Mastering Ethereum: 2nd Edition
This is the second edition of the book "Mastering Ethereum". You can access the book in the following ways:
Authors
License
This work is licensed under Creative Commons. For the first 12 months after publication, it is available under the CC BY-NC-ND 4.0 license (Attribution-NonCommercial-NoDerivatives). After that period, it becomes available under the CC BY-SA 4.0 license (Attribution-ShareAlike).
Preface
This book is a collaboration between me (Carlo Parisi, aka Blackie), Alessandro Mazza, and Niccolò Pozzolini. The first edition, which of course heavily influenced our work, was written between 2016 and 2019 by Andreas M. Antonopoulos and Dr. Gavin Wood.
In November 2023, a series of very fortunate coincidences brought Andreas and me together in Glasgow. There, after a few beers and a few autographs, I asked him if he had any intention of writing a second edition of Mastering Ethereum. This was because, even though the first edition is a masterpiece, it hasn't aged well; it was published in 2019, back when Ethereum was still using proof of work and had a very different roadmap.
Andreas's response was that he wasn't planning to write a second edition, but our conversation ended up sparking the idea that led me to take on this project. Less than a day after our meeting in Glasgow, I was talking with O'Reilly about the possibility of writing a second edition.
I immediately knew this would be a big and important task. While I was honored by the opportunity, I was also afraid I might not be able to do a good enough job. I've been a fan of Andreas's work for years; he's the reason I was able to understand Bitcoin as deeply as I did back in 2014–2015, so I knew I needed help.
The first person who came to mind was Alessandro. He was involved in the project within the first few hours. As soon as the opportunity became real, I texted and asked if he wanted to join me. He instantly and happily said yes (without knowing any of the conditions or even whether it was a paid job).
Niccolò was a bit harder to convince. It took a full month of rejections to get him on board. Luckily, I'm very stubborn and wasn't willing to take no for an answer. After one month, he finally agreed. With that, our full team was ready, and the Mastering Ethereum: Second Edition project was officially launched.
I hope that every reader of this book gains at least a bit of knowledge from it. Mastering Ethereum was a book that taught me—and thousands of others—so much, and we worked hard to maintain that same level of quality. It took two years of research and writing to complete, and I'd be lying if I said it was easy.
We're also very proud to be an all-Italian team on this project. Hopefully, that brings some pride to the Italian crypto community as well.
How to Use This Book
The book is intended to serve both as a reference manual and as a cover-to-cover exploration of Ethereum. The first two chapters offer a gentle introduction, suitable for novice users, and the examples in those chapters can be completed by anyone with a bit of technical skill. Those two chapters will give you a good grasp of the basics and allow you to use the fundamental tools of Ethereum. Parts of Chapter 3 and beyond are intended for programmers and include many technical topics and programming examples, but they still should be understandable by anyone, for the most part.
To serve as both a reference manual and a cover-to-cover narrative about Ethereum, the book inevitably contains some duplication. Some topics, such as gas, have to be introduced early enough for the rest of the topics to make sense but are also examined in depth in their own sections.
Finally, the book's index allows readers to find very specific topics and the relevant sections with ease, by keyword.
Intended Audience
This book is mostly intended for everyone. This book will teach you how smart contract blockchains work, how to use them, and how to develop smart contracts and decentralized applications with them. The first few chapters are also suitable as an in-depth introduction to Ethereum for beginners.
Code Examples
The examples are illustrated in Solidity, Vyper, and JavaScript, using the command line of a Unix-like operating system. All the code snippets can be replicated on most operating systems with a minimal installation of compilers, interpreters, and libraries for the corresponding languages. Where necessary, we provide basic installation instructions and step-by-step examples of the output of those instructions.
All the code snippets use real values and calculations where possible, so you can build from example to example and see the same results in any code you write to calculate the same values. For example, the private keys and corresponding public keys and addresses are all real. The sample transactions, contracts, blocks, and blockchain references have all been introduced to the actual Ethereum blockchain and are part of the public ledger, so you can review them.
Ethereum Addresses and Transactions in this Book
The Ethereum addresses, transactions, keys, QR codes, and blockchain data used in this book are, for the most part, real. That means you can browse the blockchain, look at the transactions offered as examples, retrieve them with your own scripts or programs, and so forth.
However, note that the private keys used to construct the addresses printed in this book have been "burned." This means that if you send money to any of these addresses, the money will be either lost forever or (more likely) appropriated, since anyone who reads the book can take it using the private keys printed herein.
Warning
Do not send money to any of the addresses in this book. Your money will be taken by another reader or lost forever.
Conventions Used in This Book
The following typographical conventions are used in this book:
Italic
Indicates new terms, URLs, email addresses, filenames, and file extensions.
Constant width
Used for program listings, as well as within paragraphs to refer to program elements such as variable or function names, databases, data types, environment variables, statements, and keywords.
Constant width bold
Shows commands or other text that should be typed literally by the user.
Constant width italic
Shows text that should be replaced with user-supplied values or by values determined by context.
Tip
This element signifies a tip or suggestion.
Note
This element signifies a general note.
Warning
This element indicates a warning or caution.
Using Code Examples
In our commitment to collaboration, we worked with O'Reilly Media to make this book available under a Creative Commons license.
If you have a technical question or a problem using the code examples, please send an email to support@oreilly.com.
This book is here to help you get your job done. In general, if example code is offered with this book, you may use it in your programs and documentation. You do not need to contact us for permission unless you're reproducing a significant portion of the code. For example, writing a program that uses several chunks of code from this book does not require permission. Selling or distributing examples from O'Reilly books does require permission. Answering a question by citing this book and quoting example code does not require permission. Incorporating a significant amount of example code from this book into your product's documentation does require permission.
We appreciate, but generally do not require, attribution. An attribution usually includes the title, author, publisher, and ISBN. For example: "Mastering Ethereum, 2nd ed., by Andreas M. Antonopoulos, Gavin Wood, Carlo Parisi, Alessandro Mazza, and Niccolò Pozzolini (O'Reilly). Copyright 2026 Carlo Parisi, Alessandro Mazza, and Niccolò Pozzolini, 978-1-098-16842-1."
If you feel your use of code examples falls outside fair use or the permission given above, feel free to contact us at permissions@oreilly.com.
O'Reilly Online Learning
Note
For more than 40 years, O'Reilly Media has provided technology and business training, knowledge, and insight to help companies succeed.
Our unique network of experts and innovators share their knowledge and expertise through books, articles, and our online learning platform. O'Reilly's online learning platform gives you on-demand access to live training courses, in-depth learning paths, interactive coding environments, and a vast collection of text and video from O'Reilly and 200+ other publishers. For more information, visit oreilly.com.
How to Contact Us
Please address comments and questions concerning this book to the publisher:
O'Reilly Media, Inc.
141 Stony Circle, Suite 195
Santa Rosa, CA 95401
800-889-8969 (in the United States or Canada)
707-827-7019 (international or local)
707-829-0104 (fax)
oreilly.com/about/contact.html
We have a web page for this book, where we list errata and any additional information. You can access this page at https://oreil.ly/MasteringEthereum2e.
For news and information about our books and courses, visit https://oreilly.com.
Find us on LinkedIn
Watch us on YouTube
Contacting Carlo
Subscribe to Carlo's channel on YouTube
Follow Carlo on Twitter/X
Connect with Carlo on LinkedIn
Email: carlo.parisi01234@gmail.com
Contacting Alessandro
Follow Alessandro on GitHub
Connect with Alessandro on LinkedIn
Follow Alessandro on Twitter/X (Italian profile)
Follow Alessandro on Twitter/X (English profile)
Subscribe to Alessandro's YouTube channel
Contacting Niccolò
Follow Niccolò on Twitter/X
Connect with Niccolò on LinkedIn
Acknowledgments by Carlo
I owe a lot of what has happened in my career and personal life to Andreas's work. Thanks to the first edition of Mastering Bitcoin, I was able, back in 2014 and 2015, to truly understand the potential of Bitcoin. Because of that, I decided to pursue a career in crypto. At the time, there weren't many complete resources available, so Mastering Bitcoin was an incredible gift to the entire community. I wouldn't have the career I have today and probably my life would be very different if it weren't for that incredible work. The same goes for Mastering Ethereum. For this reason, Andreas, thank you so much.
Thank you to Nicola Luigi Guglielmo Di Nanna, my high school computer science professor. Without you, I probably would not have discovered my passion for programming and, subsequently, for blockchains. They say a good professor can change a student's life; you certainly did. Thank you for sharing your passion for computer science and for being such an inspiring role model.
Thank you also to Alessandro and Niccolò, who helped so much in writing this book, and to all of our incredible tech reviewers.
Thank you to Michelle Smith and Shira Evans from O'Reilly, who supported us every step of the way.
Thank you to the Italian community, particularly my own community on Discord, YouTube, and Twitter, which gave me the confidence to take on this and many other projects.
Thank you to the amazing Ethereum community. We wouldn't have been able to do as much research—or write as deeply—without your ongoing support and contributions.
And last but not least, thank you to my wonderful family, who supported me in everything I did and allowed me to freely explore my passions and interests.
Acknowledgments by Alessandro
There are so many things I'm grateful for. First of all, I'd like to thank Carlo for reaching out to me and giving me the amazing opportunity to write this book. I still remember the first time we met in person, in Catanzaro, Italy.
Thank you to my university professor, Dr. Luca Giuzzi, for allowing me to dedicate my thesis to Bitcoin and the Schnorr digital signature algorithm. That was the beginning of my career in the cryptocurrency space.
A heartfelt thank you to my Italian community, who gave me confidence and indirectly brought me to where I am today. I probably wouldn't have met Carlo if it weren't for their support.
Thank you to O'Reilly, and in particular to Shira Evans and Michelle Smith, who guided us throughout this journey. Their meticulous coordination and support, along with the help of all the reviewers, made this book possible.
Finally, I want to thank my family and my girlfriend, Alessandra, for always supporting and loving me.
Acknowledgments by Niccolò
I want to thank Carlo for giving me the chance to write this book with him. Over the past two years, we've worked on many projects together and shared plenty of laughs, trips abroad, and now this book. Working with you has made this journey both fun and rewarding.
I'm grateful to Andreas and Gavin for creating the first version of Mastering Ethereum. Their book opened my eyes to the world of blockchain and has done the same for so many others. Their work helped build and grow this amazing blockchain community that we're all part of today.
A big thank you to Michelle Smith and Shira Evans from O'Reilly for supporting us from start to finish. You helped us with all the paperwork, kept us on schedule, and guided us through the whole process of making this book a reality.
To my family, my friends, and my girlfriend, Giuditta, I can't thank you enough for always being there for me. During the many months of writing, you put up with my busy schedule and stress. You listened when I needed to talk through ideas, you understood when I couldn't make it to gatherings because of deadlines, and you kept encouraging me when things got tough. Your constant support gave me the strength and focus to keep going. The book you're holding isn't just my work; it exists because of the love and support you've always shown me.
Contributions
We'd all like to thank our tech reviewers:
- Ben Edgington
- Caleb Lent
- Brian Wu
- Gonçalo Magalhães
They have helped us immensely in improving the quality of the book. Thank you so much to our wonderful tech reviewers.
Chapter 1. What Is Ethereum?
Ethereum is often described as the “world computer.” But what does that mean? Let’s start with a computer science–focused description and then try to decipher that with a more practical analysis of Ethereum’s capabilities and characteristics while comparing it to Bitcoin and other decentralized information exchange platforms (or blockchains, to be precise).
From a computer science perspective, Ethereum is a deterministic but practically unbounded state machine, consisting of a globally accessible singleton state and a virtual machine that applies changes to that state.
From a more practical perspective, Ethereum is an open source, globally decentralized computing infrastructure that executes programs called smart contracts. It uses a blockchain to synchronize and store the system’s state changes, along with a cryptocurrency called ether to meter and constrain execution resource costs.
The Ethereum platform enables developers to build powerful decentralized applications with built-in economic functions. It provides high availability, auditability, transparency, and neutrality while reducing or eliminating censorship and reducing certain counterparty risks.
Ethereum Compared to Bitcoin
Many people approach Ethereum with some prior experience of cryptocurrencies, specifically Bitcoin. Ethereum shares many elements with other open blockchains: a peer-to-peer (P2P) network connecting participants; a Byzantine, fault-tolerant consensus algorithm for synchronization of state updates; the use of cryptographic primitives, such as digital signatures and hashes; and a digital currency (ether). Yet in many ways, both the purpose and construction of Ethereum are strikingly different from those of the open blockchains that preceded it, including Bitcoin.
Ethereum’s purpose is not primarily to be a digital currency payment network. While the digital currency ether is both integral to and necessary for the operation of Ethereum, ether is intended as a utility currency to pay for use of the Ethereum platform as the world computer.
Unlike Bitcoin, which has a very limited scripting language, Ethereum is designed to be a general-purpose, programmable blockchain that runs a virtual machine capable of executing code of arbitrary and unbounded complexity. Where Bitcoin’s Script language is intentionally constrained to simple true/false evaluation of spending conditions, Ethereum’s language is Turing complete, meaning that Ethereum can function as a general-purpose computer.
In September 2022, Ethereum further distinguished itself from Bitcoin with The Merge upgrade, transitioning its consensus model from proof of work (PoW) to proof of stake (PoS). This important change not only underlines Ethereum’s commitment to reducing its environmental impact—aligning with its innovative vision—but also enhances its scalability and security features.
Components of a Blockchain
The components of an open, public blockchain are (usually) as follows:
- A P2P network connecting participants and propagating transactions and blocks of verified transactions, based on a standardized “gossip” protocol
- Messages, in the form of transactions, representing state transitions
- A set of consensus rules governing what constitutes a transaction and what makes for a valid state transition
- A state machine that processes transactions according to the consensus rules
- A chain of cryptographically secured blocks that acts as a journal of all the verified and accepted state transitions
- A consensus algorithm that decentralizes control over the blockchain by forcing participants to cooperate in the enforcement of the consensus rules
- A game-theory-sound incentivization scheme (e.g., PoW costs plus block rewards) to economically secure the state machine in an open environment
- One or more open source software implementations of these components (“clients”)
All or most of these components are usually combined in a single software client. For example, in Bitcoin, the reference implementation is developed by the Bitcoin Core open source project and implemented as the Bitcoin client. Initially, Ethereum also required a single client before its transition to PoS. However, Ethereum now utilizes two distinct clients: one for consensus and another for execution. Instead of a reference implementation, Ethereum relies on a reference specification: a mathematical description detailed in the “Yellow Paper”, which has been consistently updated throughout Ethereum’s development. The Ethereum community is currently transitioning toward a reference specification written in Python for both the consensus and the execution clients. A number of clients have been built according to the reference specification. We will dive deeper into this topic in Chapter 3.
Figure 1-1 shows a graphical representation of the blockchain components.
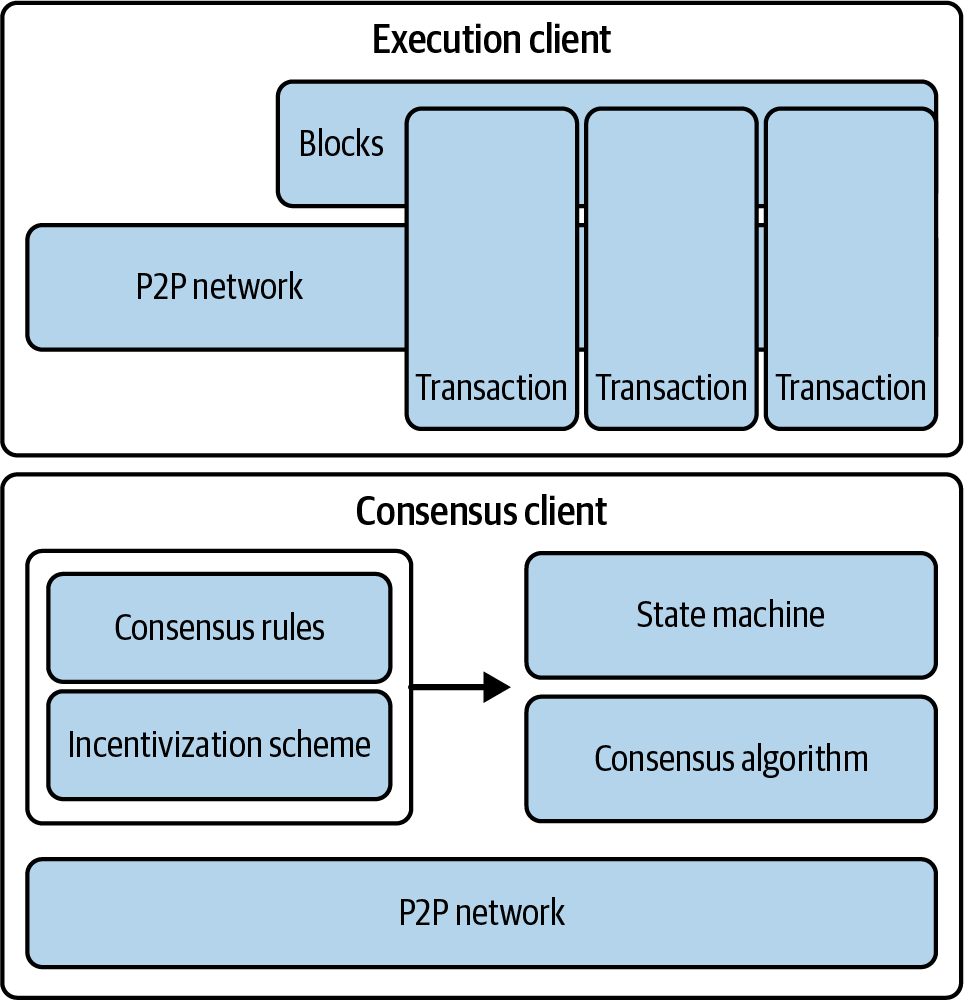
Figure 1-1. Components of a blockchain
In the past, we used the term blockchain to represent all the components listed as a shorthand reference to the combination of technologies that encompass all the characteristics described. Today, however, there are a huge variety of blockchains with different properties. We need qualifiers to help us understand the characteristics of the blockchain in question, such as *open,*public, global, decentralized, neutral, and censorship resistant, to identify the important emergent characteristics of a “blockchain” system that these components allow.
Not all blockchains are created equal. Despite the huge amount of property they show, we can broadly categorize blockchains into permissioned versus permissionless and public versus private:
Permissionless
Permissionless blockchains, like Bitcoin and Ethereum, are accessible to anyone. These decentralized networks allow anyone to join, participate in the consensus process, and read and write data, promoting trust through transparency.
Permissioned
Permissioned blockchains restrict access, allowing only authorized participants to join the network and perform certain actions.
Public
Public blockchains are decentralized and open to everyone, allowing broad participation in network activities and ensuring transparency through widespread distribution and consensus mechanisms.
Private
Private blockchains limit access to a specific group of participants, often within organizations or among trusted partners.
The Birth of Ethereum
All great innovations solve real problems, and Ethereum is no exception. Ethereum was conceived at a time when people recognized the power of the Bitcoin model and were trying to move beyond cryptocurrency applications. But developers faced a conundrum: they either needed to build on top of Bitcoin or start a new blockchain. Building on Bitcoin meant living within the intentional constraints of the network and trying to find workarounds. The limited set of transaction types, data types, and sizes of data storage seemed to restrict the kinds of applications that could run directly on Bitcoin; anything else needed additional off-chain layers, and that immediately negated many of the advantages of using a public blockchain. For projects that required more freedom and flexibility while staying on chain, a new blockchain was the only option. But that meant a lot of work: bootstrapping all the infrastructure elements, exhaustive testing, and so on.
Toward the end of 2013, Vitalik Buterin, a young programmer and Bitcoin enthusiast, started thinking about further extending the capabilities of Bitcoin and Mastercoin (an overlay protocol that extended Bitcoin to offer rudimentary smart contracts). In October of that year, Buterin proposed a more generalized approach to the Mastercoin team, one that allowed flexible and scriptable (but not Turing complete) contracts to replace the specialized contract language of Mastercoin. Although the Mastercoin team was impressed, this proposal was too radical a change to fit into their development roadmap.
In December 2013, Buterin started sharing a whitepaper that outlined the idea behind Ethereum: a Turing-complete, general-purpose blockchain. A few dozen people saw this early draft and offered feedback, helping Buterin evolve the proposal.
Both of the original authors of this book, Andreas M. Antonopoulos and Dr. Gavin Wood, received an early draft of the whitepaper and commented on it. Antonopoulos was intrigued by the idea and asked Buterin many questions about the use of a separate blockchain to enforce consensus rules on smart contract execution and the implications of a Turing-complete language. Antonopoulos continued to follow Ethereum’s progress with great interest but was in the early stages of writing his book Mastering Bitcoin and did not participate directly in Ethereum until much later. Wood, however, was one of the first people to reach out to Buterin and offer to help with his C++ programming skills. Wood became Ethereum’s cofounder, co-designer, and CTO.
Buterin recounts in his “A Prehistory of the Ethereum Protocol” post:
This was the time when the Ethereum protocol was entirely my own creation. From here on, however, new participants started to join the fold. By far the most prominent on the protocol side was Gavin Wood.
Wood can also be largely credited for the subtle change in vision from seeing Ethereum as a platform for building programmable money, with blockchain-based contracts that can hold digital assets and transfer them according to preset rules, to viewing it as a general-purpose computing platform. This started with subtle changes in emphasis and terminology, and later this influence became stronger with the increasing emphasis on the “Web3” ensemble, which saw Ethereum as one piece of a suite of decentralized technologies, with the other two being Whisper and Swarm. Starting in December 2013, Buterin and Wood refined and evolved the idea, together building the protocol layer that became Ethereum.
Ethereum’s founders were thinking about a blockchain without a specific purpose, which could support a broad variety of applications by being programmed. The idea was that by using a general-purpose blockchain like Ethereum, a developer could program their particular application without having to implement the underlying mechanisms of P2P networks, blockchains, consensus algorithms, and the like. Ethereum abstracts away those details and offers a deterministic, secure environment for writing decentralized applications. This shift in thinking didn’t just make development easier; it fundamentally expanded what blockchains could do. It laid the groundwork for entirely new sectors like decentralized finance, NFTs, and decentralized autonomous organizations (DAOs), which wouldn’t have been feasible with earlier single-purpose blockchains.
Much like Satoshi Nakamoto (the pseudonymous developer of Bitcoin), Buterin and Wood didn’t just invent a new technology; they combined new inventions with existing technologies in a novel way and delivered the prototype code to prove their ideas to the world.
The founders worked for years to build and refine their vision. And on July 30, 2015, the first Ethereum block was mined. The world’s computer started serving the world.
Note
Vitalik Buterin’s article “A Prehistory of the Ethereum Protocol” was published in September 2017 and provides a fascinating first-person view of Ethereum’s earliest moments.
Ethereum’s Stages of Development
Ethereum’s development was planned over four distinct stages, with major changes occurring at each stage. A stage may include subreleases, known as hard forks, that change functionality in a way that is not backward compatible.
The four main development stages are codenamed Frontier, Homestead, Metropolis, and Serenity. At the time of writing, we are in the last stage: Serenity. The Serenity stage has been further broken down into six substages codenamed The Merge, The Surge, The Scourge, The Verge, The Purge, and The Splurge.
Let’s now dive into the four development stages and describe their main purposes:
Frontier (July 30, 2015)
Launched at Genesis (when the first Ethereum block was mined), Frontier prepared the foundation for miners and developers by enabling the setup of mining rigs, the initiation of ETH token trading, and the testing of decentralized applications (DApps) in a minimal network setting. Initially, blocks had a gas limit of five thousand, but that was lifted in September 2015, allowing for transactions and introducing the “difficulty bomb.” Ethereum’s difficulty bomb is a mechanism designed to exponentially increase the difficulty of mining over time, ultimately making it infeasible. This incentivizes the transition from the original PoW consensus to the more energy-efficient PoS model currently in use.
Homestead (March 14, 2016)
Initiated at block 1,150,000, Homestead made Ethereum safer and more stable through key protocol updates (EIP-2, EIP-7, and EIP-8). These upgrades enhanced developer friendliness and paved the way for further protocol improvements, although the network remained in the beta phase.
Metropolis (October 16, 2017)
Starting at block 4,370,000, Metropolis aimed to increase network functionality, fostering DApp creation and overall network utility. Significant forks like Byzantium, Constantinople, and Istanbul during this phase optimized gas costs, enhanced security, and introduced layer-2 (L2) scaling solutions. Byzantium reduced mining rewards and implemented cryptographic provisions, while Constantinople further optimized gas costs and allowed interactions with uncreated addresses. Istanbul made the network more resilient against distributed denial of service (DDoS) attacks and introduced zero-knowledge cryptographic proofs (zk-SNARKs and STARKs) for improved scalability and privacy. These enhancements collectively set the stage for Ethereum 2.0, representing the final phase of Ethereum 1.0.
Serenity (September 15, 2022)
Serenity, commonly known as Ethereum 2.0, represents a major upgrade aimed at transforming Ethereum from a PoW to a PoS consensus mechanism. Serenity focuses on making Ethereum more sustainable and capable of handling a growing number of users and applications. This stage addresses critical issues like high energy consumption and network congestion, clearing the way for a more robust and efficient blockchain.
The Serenity upgrade is divided into several substages, each addressing specific aspects of the network’s evolution. While the main four development stages have been implemented sequentially, the five Serenity substages are being developed at the same time. This parallel approach is a strategic departure from the previous development method and is made possible because the foundational work laid down by the initial four stages was necessary for the simultaneous development of the Serenity substages. Each of these substages improves the Ethereum chain in a different aspect, unrelated to the others, enabling a more flexible and dynamic upgrade process:
The Merge
The Merge combines Ethereum’s mainnet with the Beacon Chain (the sidechain handling the PoS consensus), officially transitioning the network to PoS and reducing energy consumption significantly.
The Surge
The Surge introduces sharding, increasing Ethereum’s scalability by splitting the network into smaller, manageable pieces, which allows for more transactions per second.
The Scourge
The Scourge addresses issues of centralization and censorship resistance, ensuring that Ethereum remains a decentralized and open network.
The Verge
The Verge implements Verkle trees, reducing the data storage required for nodes and thus improving network efficiency and scalability.
The Purge
The Purge aims to reduce the historical data stored on Ethereum, simplifying node operation and lowering network congestion.
The Splurge
The Splurge includes various minor upgrades and optimizations to ensure that Ethereum runs smoothly and efficiently after all major changes are implemented.
Ethereum: A General-Purpose Blockchain
The original blockchain—namely, Bitcoin’s blockchain—tracks the state of units of Bitcoin and their ownership. You can think of Bitcoin as a distributed-consensus state machine, where transactions cause a global state transition, altering the ownership of coins. The state transitions are constrained by the rules of consensus, allowing all participants to (eventually) converge on a common (consensus) state of the system, after several blocks are mined.
Ethereum is also a distributed state machine. But instead of tracking only the state of currency ownership, Ethereum tracks the state transitions of a general-purpose data store—that is, a store that can hold any data expressible as a key-value tuple. A key-value data store holds arbitrary values, each referenced by some key: for example, the value “Mastering Ethereum” referenced by the key “Book Title.” In some ways, this serves the same purpose as the data-storage model of random-access memory (RAM) used by most general-purpose computers.
Ethereum has memory that stores both code and data, and it uses the Ethereum blockchain to track how this memory changes over time. Like a general-purpose, stored-program computer, Ethereum can load code into its state machine and run that code, storing the resulting state changes in its blockchain. Two of the critical differences from most general-purpose computers are that Ethereum state changes are governed by the rules of consensus and the state is distributed globally. Ethereum answers the question “What if we could track any arbitrary state and program the state machine to create a worldwide computer operating under consensus?”
Ethereum’s Components
In Ethereum, the components of a blockchain system (described in “Components of a Blockchain”) are, more specifically, as follows:
P2P network
Ethereum runs on the Ethereum main network, which is addressable on TCP port 30303, and runs a protocol called ÐΞVp2p.
Consensus rules
Ethereum’s original consensus protocol was Ethash, a PoW model defined in the reference specification: the “Yellow Paper.” It then evolved to PoS in September 2022 during The Merge upgrade (see Chapter 15).
Transactions
Ethereum transactions are network messages that include (among other things) a sender, a recipient, a value, and a data payload.
State machine
Ethereum state transitions are processed by the Ethereum Virtual Machine (EVM), a stack-based virtual machine that executes bytecode (machine-language instructions). EVM programs called smart contracts are written in high-level languages (e.g., Solidity) and compiled to bytecode for execution on the EVM.
Data structures
Ethereum’s state is stored locally on each node as a database (usually Google’s LevelDB), which contains the transactions and system state in a serialized hashed data structure called a Merkle-Patricia trie.
Consensus algorithm
Ethereum transitioned from a PoW to a PoS consensus mechanism to enhance energy efficiency and scalability. In PoS, validators stake their cryptocurrency to earn the right to validate transactions, create new blocks, and maintain network security. Ethereum’s PoS is the fusion of two distinct algorithms: Casper the Friendly Finality Gadget (FFG) and GHOST (Greedy Heaviest Observed Subtree) with latest message driven (LMD) updates (more on this in Chapter 15).
Economic security
Ethereum uses a PoS algorithm called Gasper that provides economic security to the blockchain. We’ll explore how Gasper works in detail in Chapter 15, including its role in finality and validator coordination.
Clients
Ethereum has several interoperable implementations of its execution and consensus client software, the most prominent of which are go-ethereum (Geth) and Nethermind for execution and Prysm and Lighthouse for consensus.
These references provide additional information on the technologies mentioned here:
- Ethereum “Yellow Paper”
- Consensus client Python specifications
- Execution client Python specifications
Ethereum and Turing Completeness
As soon as you start reading about Ethereum, you will encounter the term Turing complete. Ethereum, they say, is Turing complete, unlike Bitcoin. What exactly does that mean?
The term refers to English mathematician Alan Turing, who is considered the father of computer science. In 1936, he created a mathematical model of a computer consisting of a state machine that manipulates symbols by reading and writing them on sequential memory (resembling an infinite-length paper tape). With this construct, Turing went on to provide a mathematical foundation to answer (in the negative) questions about universal computability, meaning whether all problems are solvable. He proved that there are classes of problems that are uncomputable. Specifically, he proved that the halting problem (whether it is possible, given an arbitrary program and its input, to determine whether the program will eventually stop running) is not solvable.
Turing further defined a system to be Turing complete if it can be used to simulate any Turing machine. Such a system is called a universal Turing machine (UTM).
Ethereum’s ability to execute a stored program—in a state machine called the EVM—while reading and writing data to memory makes it a Turing-complete system and therefore a UTM. Ethereum can compute any algorithm that can be computed by any Turing machine, given the limitations of finite memory.
Ethereum’s groundbreaking innovation is to combine the general-purpose computing architecture of a stored-program computer with a decentralized blockchain, thereby creating a distributed single-state (singleton) world computer. Ethereum programs run “everywhere” yet produce a common state that is secured by the rules of consensus.
Turing Completeness as a “Feature”
Hearing that Ethereum is Turing complete, you might arrive at the conclusion that this is a feature that is somehow lacking in a system that is Turing incomplete. Rather, it is the opposite. Turing completeness is very easy to achieve; in fact, the simplest Turing-complete state machine known has four states and uses six symbols, with a state definition that is only 22 instructions long. Indeed, sometimes systems are found to be “accidentally Turing complete” (here’s a fun reference of such systems).
However, Turing completeness is very dangerous, particularly in open-access systems like public blockchains, because of the halting problem described in the previous section. For example, modern printers are Turing complete and can be given files to print that send them into a frozen state. The fact that Ethereum is Turing complete means that any program of any complexity can be computed by Ethereum. But that flexibility brings some thorny security and resource management problems. An unresponsive printer can be turned off and turned back on again. That is not possible with a public blockchain.
Implications of Turing Completeness
Turing proved that you cannot predict whether a program will terminate by simulating it on a computer. In simple terms, we cannot predict the path of a program without running it. Turing-complete systems can run in infinite loops, a term used (in oversimplification) to describe a program that does not terminate. It is trivial to create a program that runs a loop that never ends. But unintended never-ending loops can arise without warning due to complex interactions between the starting conditions and the code. In Ethereum, this poses a challenge: every participating node (client) must validate every transaction, running any smart contracts it calls. But as Turing proved, Ethereum can’t predict if a smart contract will terminate or how long it will run without actually running it (possibly running forever). Whether by accident or on purpose, a smart contract can be created such that it runs forever when a node attempts to validate it. This is effectively a denial-of-service (DoS) attack. And of course, between a program that takes a millisecond to validate and one that runs forever is an infinite range of nasty, resource-hogging, memory-bloating, CPU-overheating programs that simply waste resources. In a world computer, a program that abuses resources gets to abuse the world’s resources. How does Ethereum constrain the resources used by a smart contract if it cannot predict resource use in advance?
To answer this challenge, Ethereum introduced a metering mechanism called gas. As the EVM executes a smart contract, it carefully accounts for every instruction (computation, data access, etc.). Each instruction has a predetermined cost in units of gas. When a transaction triggers the execution of a smart contract, it must include an amount of gas that sets the upper limit of what can be consumed running the smart contract. The EVM will terminate execution if the amount of gas consumed by computation exceeds the gas available in the transaction. Gas is the mechanism Ethereum uses to allow Turing-complete computation while limiting the resources that any program can consume.
The next question is: how does one get gas to pay for computation on the Ethereum world computer? You won’t find gas on any exchanges. It can only be purchased as part of a transaction and can only be bought with ether. Ether needs to be sent along with a transaction, and it needs to be explicitly earmarked for the purchase of gas, along with an acceptable gas price. Just like at the pump, the price of gas is not fixed. Gas is purchased for the transaction, the computation is executed, and any unused gas is refunded back to the sender of the transaction.
From General-Purpose Blockchains to DApps
Ethereum started as a way to make a general-purpose blockchain that could be programmed for a variety of uses. But very quickly, Ethereum’s vision expanded to become a platform for programming DApps. DApps represent a broader perspective than smart contracts. A DApp is, at the very least, a smart contract and a web user interface. More broadly, a DApp is a web application that is built on top of open, decentralized, P2P infrastructure services.
A DApp is composed of at least:
- Smart contracts on a blockchain
- A web frontend user interface
In addition, many DApps include other decentralized components, such as:
- A decentralized (P2P) storage protocol and platform
- A decentralized (P2P) messaging protocol and platform
From a practical perspective, the Ethereum web3.js JavaScript library bridges JavaScript applications that run in your browser with the Ethereum blockchain. It originally included a P2P storage network called Swarm and a P2P messaging service called Whisper—tools that made it possible to develop fully decentralized Web3 DApps. Despite the appeal of this fully decentralized DApp design, it did not gain much traction in the years following. Compromises had to be accepted to improve the user experience and boost user adoption, and a centralized Web2 website interacting with smart contracts is nowadays the standard for a DApp.
The Third Age of the Internet
In 2004, the term Web 2.0 came to prominence as a label of the evolution of the web toward user-generated content, responsive interfaces, and interactivity. Web 2.0 is not a technical specification but rather a term describing the new focus of web applications.
The concept of DApps is meant to take the Web to its next natural evolutionary stage, introducing decentralization with P2P protocols into every aspect of a web application. The term used to describe this evolution is Web3, meaning the third “version” of the web. First proposed by Gavin Wood, Web3 represents a new vision and focus for web applications: from centrally owned and managed applications to applications built on decentralized protocols.
Ethereum’s Development Culture
So far, we’ve talked about how Ethereum’s goals and technology differ from those of other blockchains that preceded it, like Bitcoin. Ethereum also has a very different development culture.
In Bitcoin, development is guided by conservative principles: all changes are carefully studied to ensure that none of the existing systems are disrupted. For the most part, changes are only implemented if they are backward compatible. Existing clients are allowed to opt in but will continue to operate if they decide not to upgrade. This cautious approach aligns with Bitcoin’s governance model, where changes go through the Bitcoin Improvement Proposal (BIP) process, an intentionally slow and consensus-driven pipeline designed to preserve stability.
In Ethereum, by comparison, the community’s development culture is focused on the future rather than the past. The (not entirely serious) mantra is “move fast and break things.” If a change is needed, it is implemented, even if that means invalidating prior assumptions, breaking compatibility, or forcing clients to update. Ethereum’s governance reflects this more hands-on style, with coordination happening publicly through frequent AllCoreDevs calls where researchers, client teams, and ecosystem stakeholders discuss and align on upcoming changes. It’s a more agile and iterative process that trades some stability for a faster pace of innovation.
What this means to you as a developer is that you must remain flexible and be prepared to rebuild your infrastructure as some of the underlying assumptions change. One of the big challenges facing developers in Ethereum is the inherent contradiction between deploying code to an immutable system and a development platform that is still evolving. You can’t simply “upgrade” your smart contracts. You must be prepared to deploy new ones; migrate users, apps, and funds; and start over.
Ironically, this also means that the goal of building systems with more autonomy and less centralized control is still not fully realized. Autonomy and decentralization require a bit more stability in the platform than you’re likely to get in Ethereum in the next few years. To “evolve” the platform, you have to be ready to scrap and restart your smart contracts, which means you have to retain a certain degree of control over them.
But on the positive side, Ethereum is moving forward very quickly. There is little opportunity for bike-shedding: an expression that means holding up development by arguing over minor details, such as how to build the bicycle shed at the back of a nuclear power station. If you start bike-shedding, you might suddenly discover that while you were distracted, the rest of the development team changed the plan and ditched bicycles in favor of autonomous hovercraft.
Eventually, the development of the Ethereum platform will slow, and its interfaces will become fixed. But in the meantime, innovation is the driving principle. You’d better keep up because no one will slow down for you.
Why Learn Ethereum?
Blockchains have a very steep learning curve because they combine multiple disciplines into one domain: programming, information security, cryptography, economics, distributed systems, P2P networks, and so on. Ethereum makes this learning curve a lot less steep, so you can get started quickly. But just below the surface of a deceptively simple environment lies a lot more. As you learn and start looking deeper, there’s always another layer of complexity and wonder.
Ethereum is a great platform for learning about blockchains, and it’s building a massive community of developers, faster than any other blockchain platform. More than any other, Ethereum is a developer’s blockchain: built by developers for developers. A developer familiar with JavaScript applications can drop into Ethereum and start producing working code very quickly. For the first few years of Ethereum’s life, it was common to see T-shirts announcing that you can create a token in just five lines of code. Of course, this is a double-edged sword. It’s easy to write code, but it’s very hard to write good and secure code.
Many blockchain projects, like L2s, are based on Ethereum. Learning Ethereum helps you understand these projects better and gives you the tools to explore further developments in the blockchain world. This knowledge is key for anyone looking to get involved with the latest in blockchain technology.
Conclusion
Ethereum stands out as a groundbreaking platform in the blockchain landscape. Its design as a Turing-complete system allows for the creation of decentralized applications with sophisticated, programmable logic, going beyond the simpler functionality of Bitcoin.
For developers and technologists, understanding Ethereum opens doors to a deeper comprehension of blockchain technology and its potential applications. By mastering Ethereum, you gain the tools to participate in and contribute to the ongoing evolution of the internet, putting yourself at the cutting edge of this exciting field.
Chapter 2. Ethereum Basics
In this chapter, we will start exploring Ethereum. We'll discuss how to use wallets, create transactions, and run a basic smart contract.
Ether Currency Units
Ethereum's currency unit is called ether, identified also as ETH or with the symbols Ξ (from the Greek letter Xi that looks like a stylized capital E) or, less often, ♦: for example, 1 ether, 1 ETH, Ξ1, or ♦1.
Tip
Use Unicode characters U+039E for Ξ and U+2666 for ♦.
Ether is subdivided into smaller units, down to the smallest unit possible, which is named wei. One ether is 1 quintillion wei (1 × 10^18^, or 1,000,000,000,000,000,000). You may hear people refer to the currency as "Ethereum," too, but this is a common beginner's mistake. Ethereum is the system; ether is the currency.
The value of ether is always represented internally in Ethereum as an unsigned integer value denominated in wei. When you transact 1 ether, the transaction encodes 1,000,000,000,000,000,000 wei as the value.
Ether's various denominations have both a scientific name using the International System of Units (SI) and a colloquial name that pays homage to many of the great minds of computing and cryptography. Table 2-1 lists the various units, their colloquial (common) names, and their SI names. In keeping with the internal representation of value, the table shows all denominations in wei (first row), with ether shown as 10^18^ wei in the seventh row.
Table 2-1. Ether denominations and unit names
| Value (in wei) | Exponent | Common name | SI name |
|---|---|---|---|
| 1 | 1 | Wei | Wei |
| 1,000 | 10^3^ | Babbage | Kilowei or femtoether |
| 1,000,000 | 10^6^ | Lovelace | Megawei or picoether |
| 1,000,000,000 | 10^9^ | Shannon | Gigawei or nanoether |
| 1,000,000,000,000 | 10^12^ | Szabo | Microether or micro |
| 1,000,000,000,000,000 | 10^15^ | Finney | Milliether or milli |
| 1,000,000,000,000,000,000 | 10^18^ | Ether | Ether |
| 1,000,000,000,000,000,000,000 | 10^21^ | Grand | Kiloether |
| 1,000,000,000,000,000,000,000,000 | 10^24^ | Megaether |
Choosing an Ethereum Wallet
The term wallet has come to mean many things, although the definitions are all related, and on a day-to-day basis, they all boil down to pretty much the same thing. We will use the term wallet to refer to a software application that helps you manage your Ethereum account. In short, an Ethereum wallet is your gateway to the Ethereum system. It holds your keys and can create and broadcast transactions on your behalf. Choosing an Ethereum wallet can be difficult because there are many options with different features and designs. Some are more suitable for beginners, and some are more suitable for experts. The Ethereum platform itself is still being improved, and the "best" wallets are often the ones that adapt to the changes that come with the platform upgrades.
But don't worry! If you choose a wallet and don't like how it works—or if you like it at first but later want to try something else—you can change wallets quite easily. All you have to do is make a transaction that sends your funds from the old wallet to the new wallet or export your private keys and import them into the new one.
Remember that for a wallet application to work, it must have access to your private keys, so it is vital that you only download and use wallet applications from sources you trust. Fortunately, in general, the more popular a wallet application is, the more trustworthy it is likely to be. Nevertheless, it is good practice to avoid "putting all your eggs in one basket" and have your Ethereum accounts spread across a couple of wallets and seed phrases.
The following are some good starter wallets; the selection of these wallets is not an endorsement of their quality or security. They are simply a good starting place for demonstrations and testing. All of the following wallets are both browser-extension wallets and mobile wallets:
MetaMask
MetaMask is easy to use and convenient for testing as it is able to connect to a variety of Ethereum nodes and test blockchains.
Rabby Wallet
Rabby is often a good choice for new users as it is designed for simplicity and ease of use. It has a lot of security features built in.
Phantom
Phantom is a wallet that can connect only to Ethereum, among other non-EVM chains.
Control and Responsibility
Open blockchains like Ethereum are important because they operate as a decentralized system. That means lots of things, but one crucial aspect is that each user of Ethereum can—and should—control their own private keys, which control access to funds and smart contracts. We sometimes call the combination of access to funds and smart contracts an account or wallet. These terms can get quite complex in their functionality, so we will go into this in more detail later. As a fundamental principle, however, it is as easy as one private key equals one "account." Some users choose to give up control over their private keys by using a third-party custodian, such as an online centralized exchange. In this book, we will teach you how to take control and manage your own private keys.
With control comes a big responsibility. If you lose your private keys, you lose access to your funds and contracts. No one can help you regain access—your funds will be locked forever. Here are a few tips to help you manage this responsibility:
-
Do not improvise security. Use tried-and-tested standard approaches.
-
The more important the account (e.g., the higher the value of the funds controlled compared to your total net worth), the higher the security measures that should be taken.
-
One of the highest security levels is gained from a hardware wallet device, but this level is not required for every account.
-
Never store your private key in plain form, especially digitally. Fortunately, most user interfaces today won't even let you see the raw private key without throwing multiple warnings.
-
When you are prompted to back up a key as a mnemonic word sequence, use pen and paper to make a physical backup. Do not leave that task "for later"; you will forget. These backups can be used to rebuild your private key in case you lose all the data saved on your system or if you forget or lose your password. However, they can also be used by attackers to get your private keys, so never store them digitally and keep at least one physical copy stored securely.
-
Before transferring any large amounts (especially to new addresses), first do a small test transaction (e.g., less than $1 value) and wait for confirmation of receipt.
-
When you create a new account, start by sending only a small test transaction to the new address. Once you receive the test transaction, try sending it back again from that account. There are lots of reasons account creation can go wrong, and if it has gone wrong, it is better to find out with a small loss. If the tests work, all is well (also a testnet could be used to avoid any kind of loss).
-
Public block explorers are an easy way to independently see whether a transaction has been accepted by the network; while this information is already public on the blockchain, block explorers make it incredibly easy to access. However, this convenience has a negative impact on your privacy because you reveal your addresses to block explorers, which can track you.
-
Public block explorers are usually reliable, but not all the time—do not trust them blindly.
-
Do not send money to any of the addresses shown in this book. The private keys are listed in the book, and someone could immediately take that money.
Now that we've covered some basic best practices for key management and security, let's get to work using MetaMask!
Getting Started with MetaMask
Open the Google Chrome browser and navigate to Extensions. Search for "MetaMask" and click on the logo of a fox. You should see something similar to Figure 2-1.
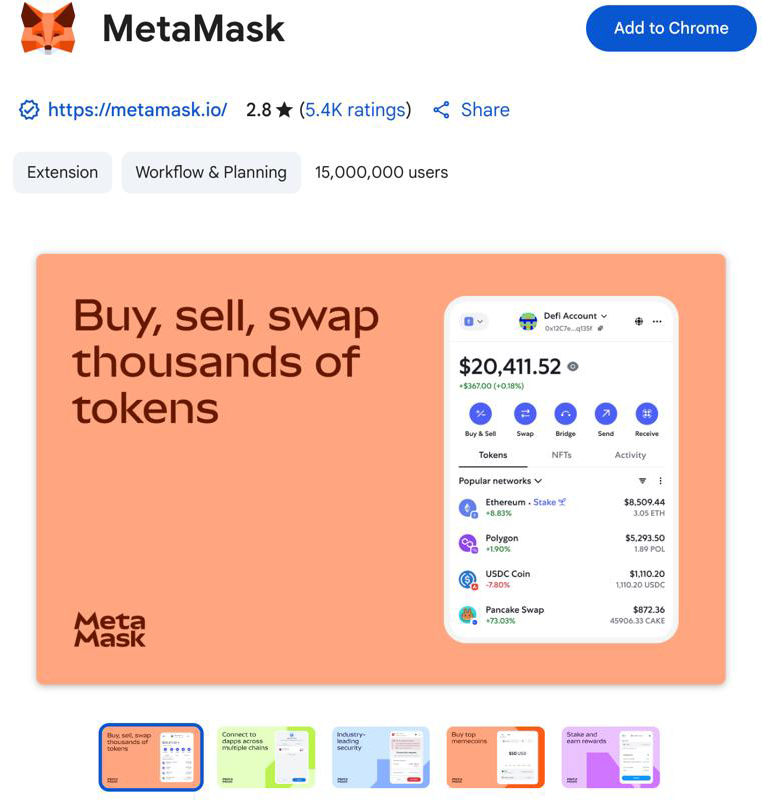
Figure 2-1. The detail page of the MetaMask Chrome extension
It's important to verify that you are downloading the real MetaMask extension because sometimes people are able to sneak malicious extensions past Google's filters. The real one does the following:
-
Shows the ID
nkbihfbeogaeaoehlefnkodbefgpgknnin the address bar -
Is offered by https://metamask.io
-
Has more than 5,400 reviews
-
Has more than 15 million users
Once you confirm that you are looking at the correct extension, click "Add to Chrome" to install it.
Creating a Wallet
Once MetaMask is installed, you should see a new icon (the head of a fox) in your browser's toolbar. Click it to get started. You will be asked to accept the terms and conditions and then to create your new Ethereum wallet by entering a password (see Figure 2-2).
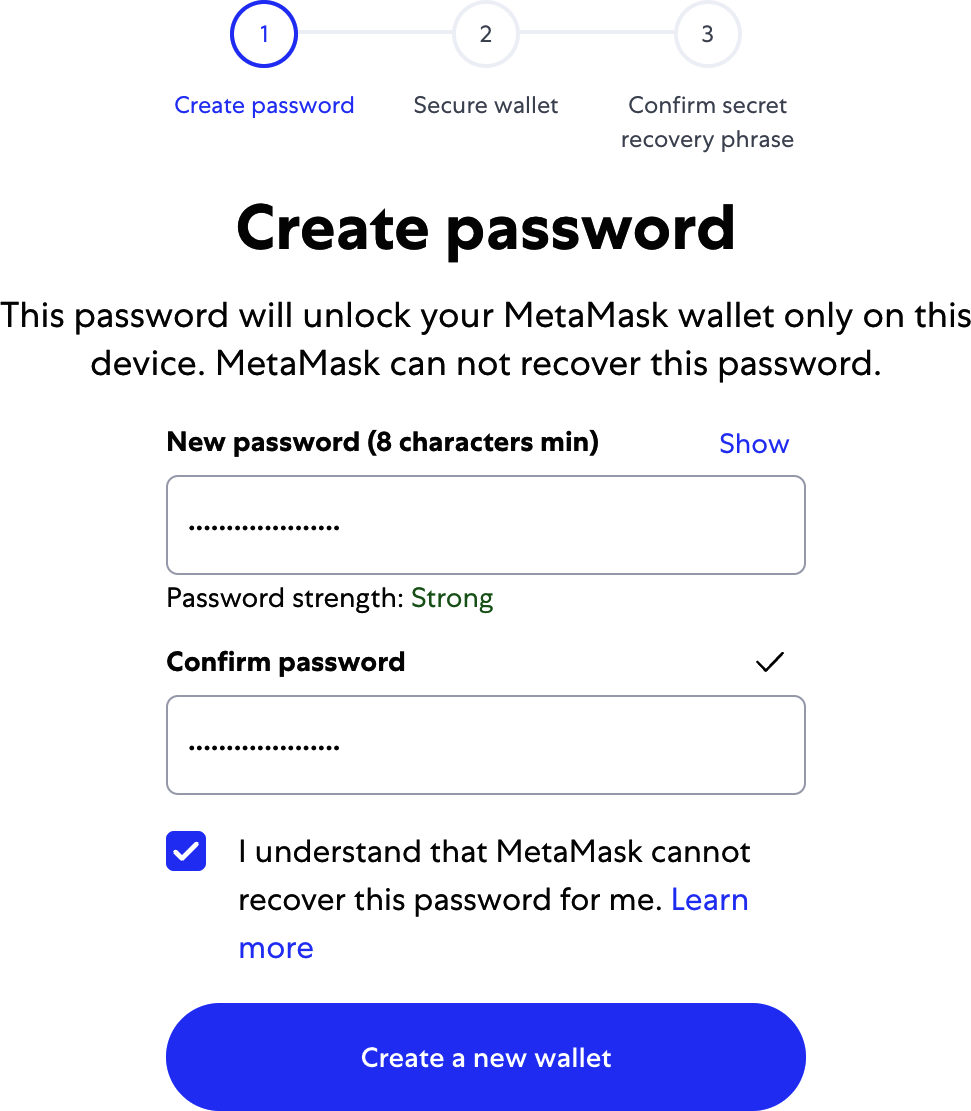
Figure 2-2. The password page of the MetaMask Chrome extension
Tip
The password controls access to MetaMask so that it can't be used by anyone with access to your browser. This password is only for your local device; if an attacker gains access to the private key or seed phrase, they will be able to access the funds in your addresses. The password is not needed if the attacker has the private key or seed phrase.
Once you've set a password, MetaMask will generate a wallet for you and show you a mnemonic backup consisting of 12 English words (see Figure 2-3). These words can be used in any compatible wallet to recover access to your funds should something happen to MetaMask or your computer. You do not need the password for this recovery; the 12 words are sufficient.
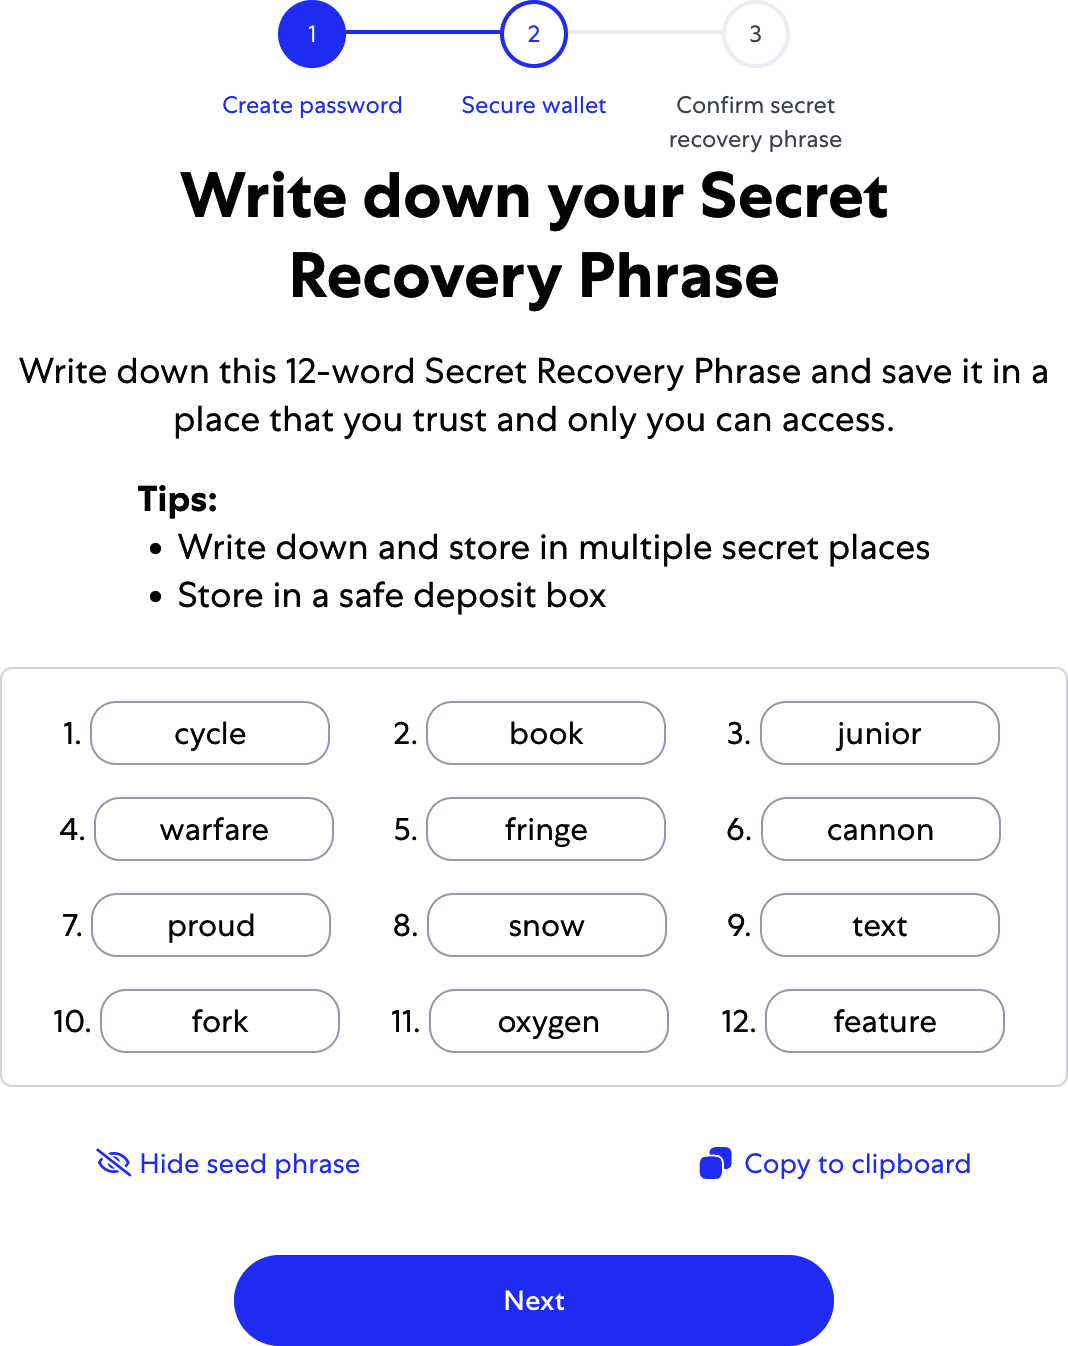
Figure 2-3. The mnemonic backup of your wallet created by MetaMask
Tip
Back up your mnemonic (12 words) on paper, twice. Store the two paper backups in two separate secure locations, such as a fire-resistant safe, a locked drawer, or a safe deposit box. Treat the paper backups like cash of equivalent value to what you store in your Ethereum wallet. Anyone with access to these words can gain access to and steal your money. We will go into much more detail on how to keep your seed phrase safe in Chapter 5.
Once you have confirmed that you have stored the mnemonic securely, you'll be able to see the details of your Ethereum account, as shown in Figure 2-4.
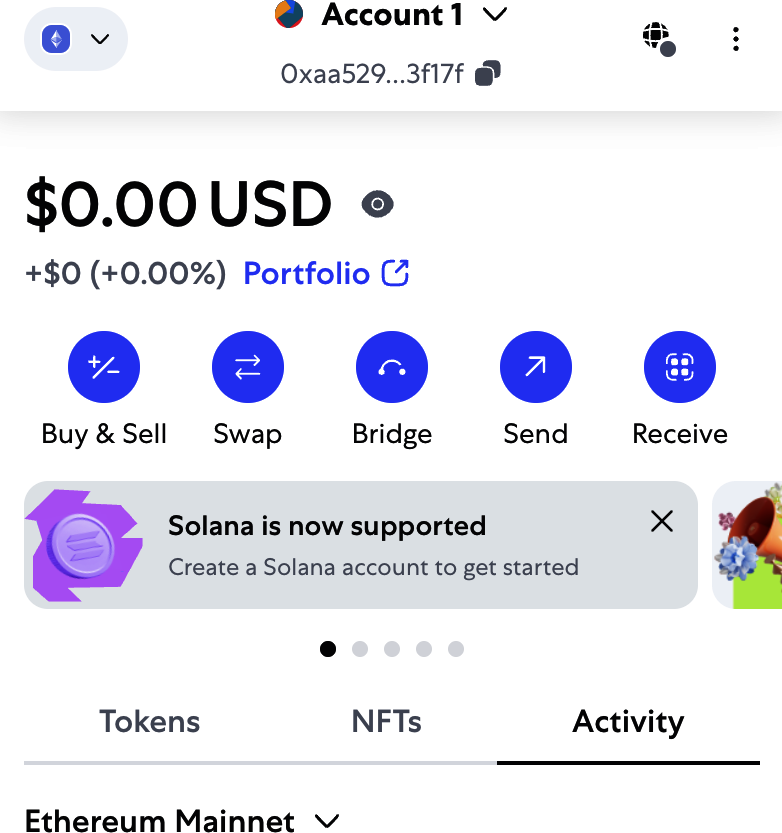
Figure 2-4. Your Ethereum account in MetaMask
Note
Do not send any assets to the addresses shown in this book. The seed phrase is public for educational purposes, and every asset sent to these addresses will probably be lost.
Your account page shows the name of your account ("Account 1" by default), an Ethereum address (0xaa529…f17f in the example), and a colorful icon to help you visually distinguish this account from other accounts. At the top of the account page, you can see which Ethereum network you are currently working on ("Main Network" in the example).
Congratulations! You have set up your first Ethereum wallet.
Switching Networks
As you can see on the MetaMask account page, you can choose among multiple Ethereum networks. By default, MetaMask will try to connect to the main network. The other choices are public testnets, any Ethereum node of your choice, or nodes running private blockchains on your own computer (localhost):
Main Ethereum Network
The main public Ethereum blockchain. Real ETH, real value, and real consequences.
Sepolia Test Network
Launched in October 2021 as a proof-of-authority network by Ethereum's core developers, Sepolia has since transitioned to a PoS consensus, mirroring Ethereum's mainnet environment.
Holesky Test Network
The Holesky Testnet is Ethereum's advanced testing ground for staking, infrastructure, and protocol development.
Localhost 8545
Connects to a node running on the same computer as the browser. The node can be part of any public blockchain (main or testnet) or a private testnet.
Custom RPC
Allows you to connect MetaMask to any node with a Geth-compatible remote procedure call (RPC) interface. The node can be part of any public or private blockchain.
Note
Your MetaMask wallet uses the same private key and Ethereum address on all the networks it connects to. However, your Ethereum address balance on each Ethereum network will be different. For instance, if you use your keys to send ether on the Sepolia testnet, your balances on other networks will remain unaffected.
Getting Some Test Ether
Your first task is to get your wallet funded. You won't be doing that on the main network because real ether costs money and handling it requires a bit more experience. For now, you'll load your wallet with some testnet ether.
Switch MetaMask to the Sepolia Test Network by clicking the Ethereum icon on the top left; toggle the option "Show test networks" and click Sepolia, as shown in Figure 2-5.
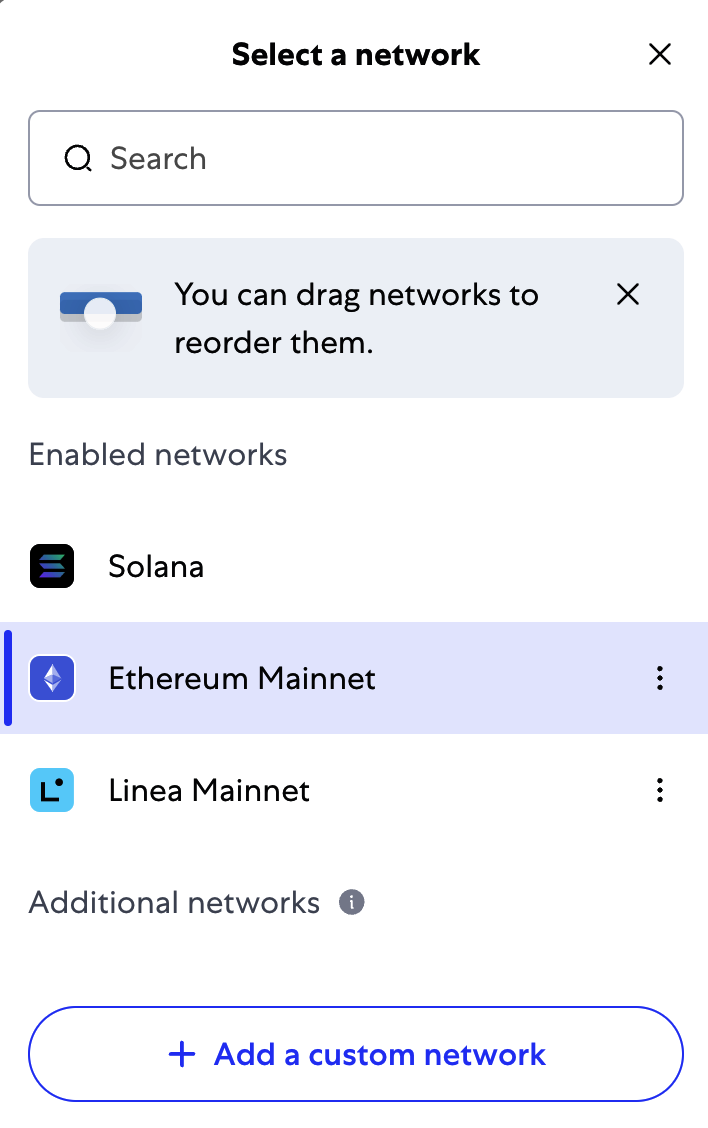
Figure 2-5. MetaMask networks
Click Buy, then navigate to one of the faucets in this list. Once you have decided which faucet you want to use—they are all pretty much equivalent—you can request ethers on the test network, as shown in Figure 2-6.
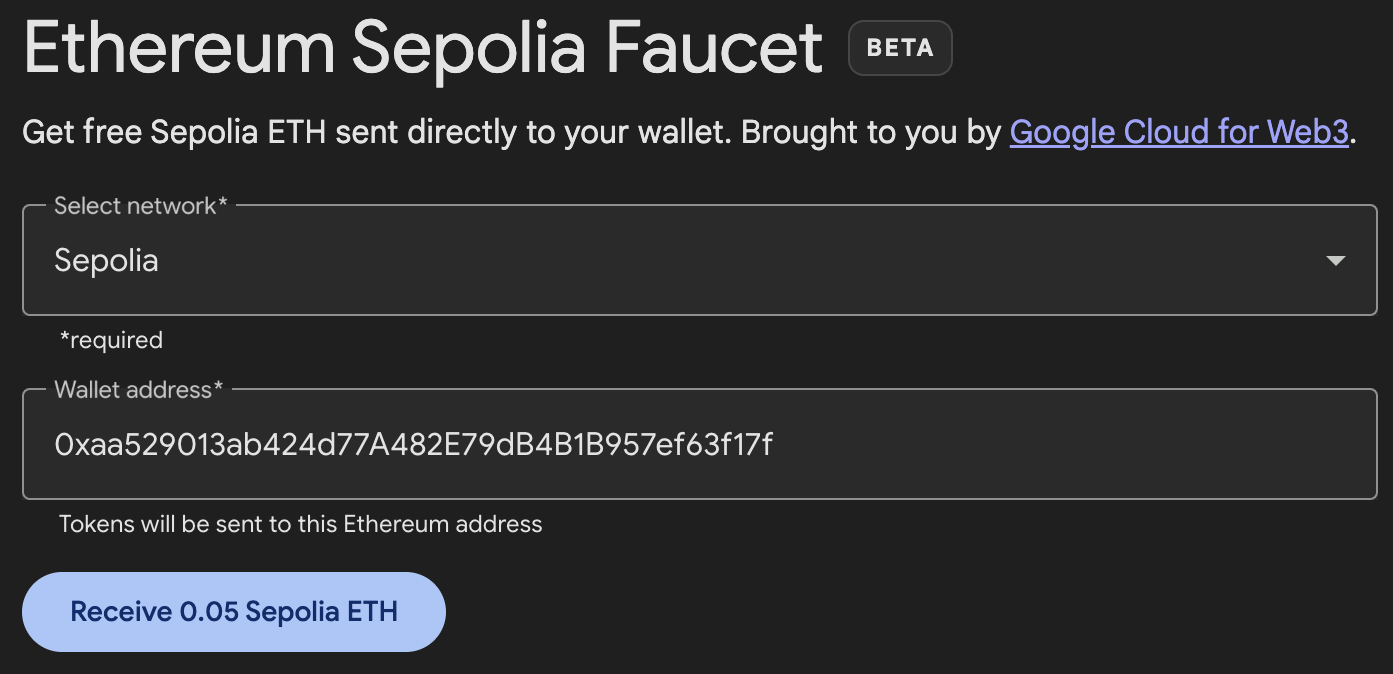
Figure 2-6. MetaMask Sepolia test faucet
The transaction ID for the request of testnet ether looks like this:
0x471273d9417e98e7f1adaae61e53a353b2d2313de2e71fc4b6184bf5a63fa0ae
In a few seconds, the new transaction will be processed by the Sepolia network, and your MetaMask wallet will show a balance of 0.05 ETH (this depends on how much ether the faucet is willing to send). Now, click to the first transaction in your browser extension and click "View on block explorer," as shown in Figure 2-7. This will navigate to a block explorer, which is a website that allows you to visualize and explore blocks, addresses, and transactions.
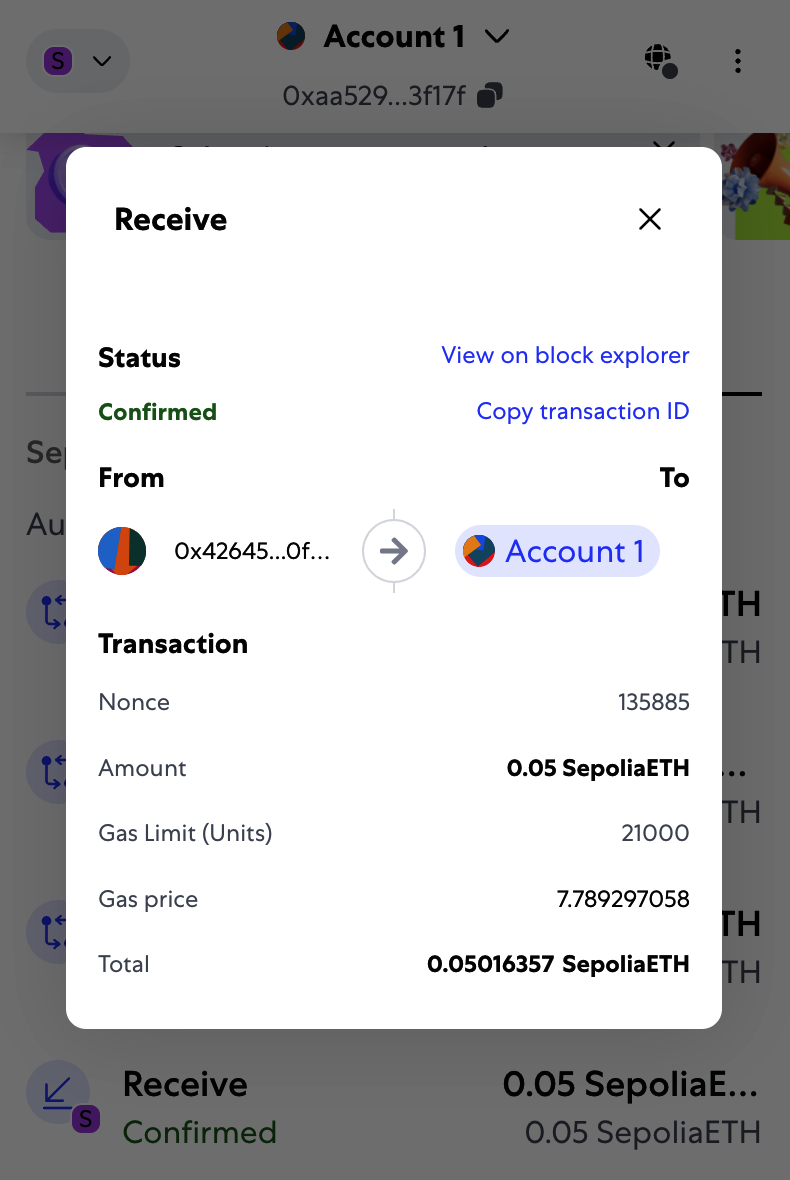
Figure 2-7. Transaction viewed from MetaMask
MetaMask uses the Etherscan block explorer, one of the more popular Ethereum block explorers. The transaction containing the payment from the Sepolia test faucet is shown in Figure 2-8.
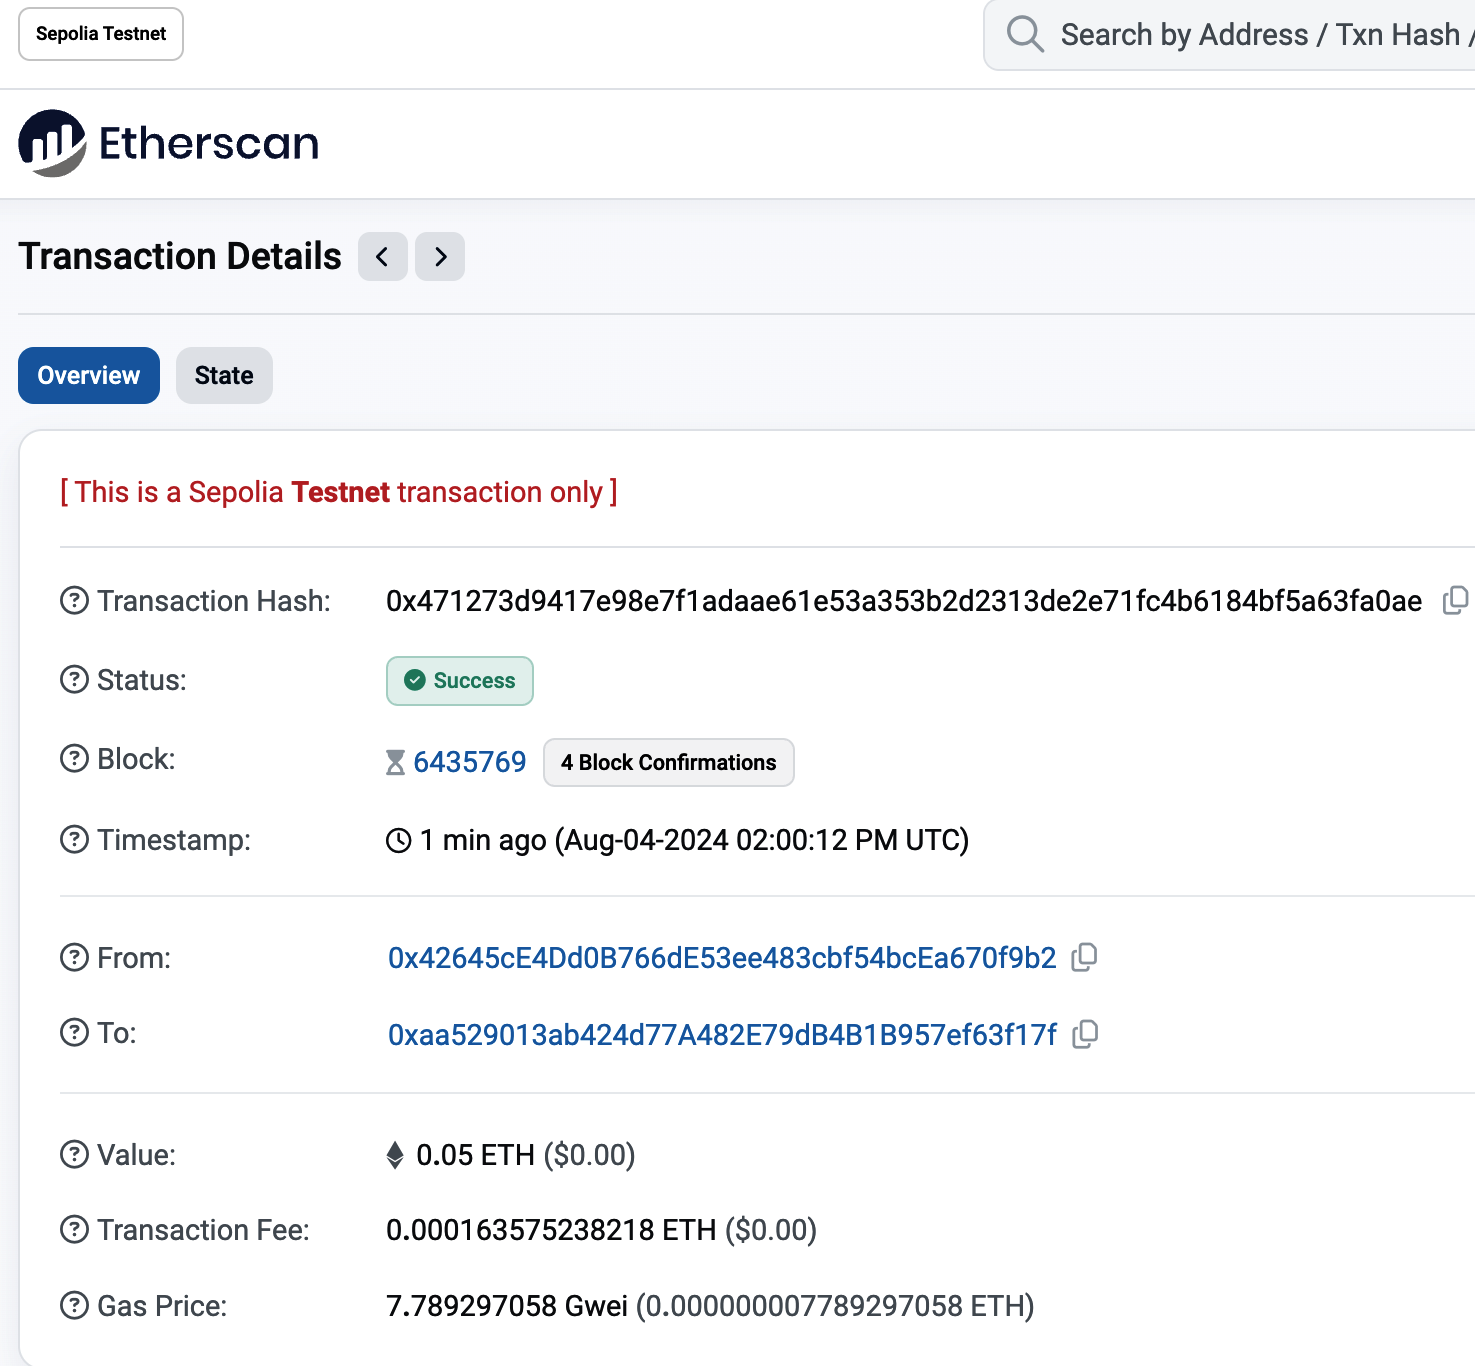
Figure 2-8. Etherscan Sepolia block explorer
The transaction has been recorded on the Sepolia blockchain and can be viewed at any time by anyone, simply by searching for the transaction ID. Try entering the transaction hash into the sepolia.etherscan.io website to see it for yourself:
0x471273d9417e98e7f1adaae61e53a353b2d2313de2e71fc4b6184bf5a63fa0ae
Sending Ether from MetaMask
Once you've received your first test ether from the Sepolia test faucet, you can experiment with sending ether by trying to send some back to the faucet or to any other address. In this example, we will be trying to send some testnet ether to Vitalik Buterin, as shown in Figure 2-9.
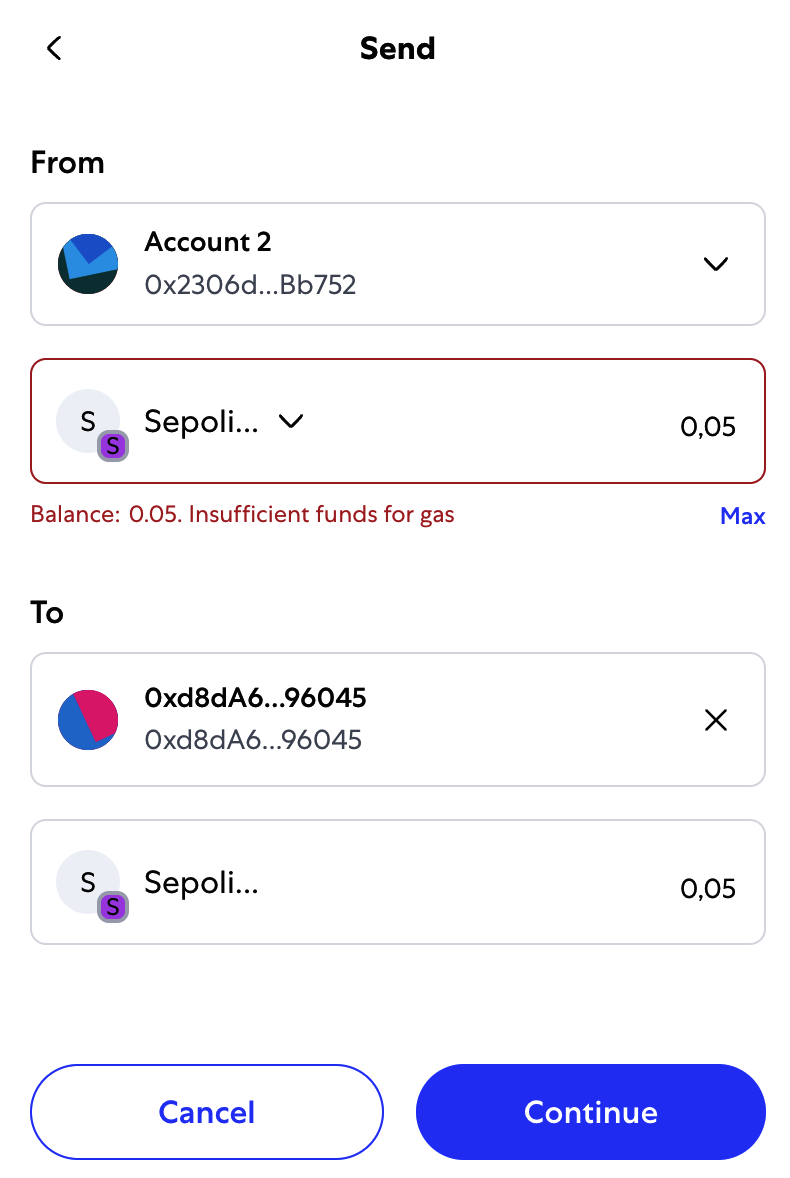
Figure 2-9. Sending 0.05 ether to an address
Oops! You probably noticed that you can't complete the transaction—MetaMask says you have an insufficient balance. At first glance, this may seem confusing: you have 0.05 ETH, you want to send 0.05 ETH, so why is MetaMask saying you have insufficient funds?
The answer is because of the cost of gas. Every Ethereum transaction requires payment of a fee, which is collected by the network to validate the transaction. The fees in Ethereum are charged in a virtual currency called gas. You pay for the gas with ether, as part of the transaction.
Note
Fees are required on the test networks, too. Without fees, a test network would behave differently from the main network, making it an inadequate testing platform. Fees also protect the test networks from DoS attacks and poorly constructed contracts (e.g., infinite loops), much like they protect the main network.
When you send the transaction, MetaMask will calculate the average gas price of recent successful transactions—for example, at 3 gwei, which stands for gigawei. Wei is the smallest subdivision of the ether currency, as we discussed in "Ether Currency Units". The gas limit is set at the cost of sending a basic transaction: 21,000 gas units, which is the smallest amount of gas that can be used to send a transaction. Therefore, the maximum amount of ETH you will spend is 3 × 21,000 gwei = 63,000 gwei = 0.000063 ETH. (Be advised that average gas prices can fluctuate. We will see in a later chapter how you can increase or decrease your gas limit to ensure that your transaction takes precedence if need be.)
All this is to say that making a 0.05 ETH transaction costs 0.050063 ETH. Click Reject to cancel this transaction. Let's try again, this time by sending 0.01 ETH.
Exploring the Transaction History of an Address
By now, you have become an expert in using MetaMask to send and receive test ether. Your wallet has received and sent payments. You can view all these transactions using the sepolia.etherscan.io block explorer. You can either copy your wallet address and paste it into the block explorer's search box or have MetaMask open the page for you. Next to your account icon in MetaMask, you will see a button showing three dots. Click it to show a menu of account-related options (see Figure 2-10).
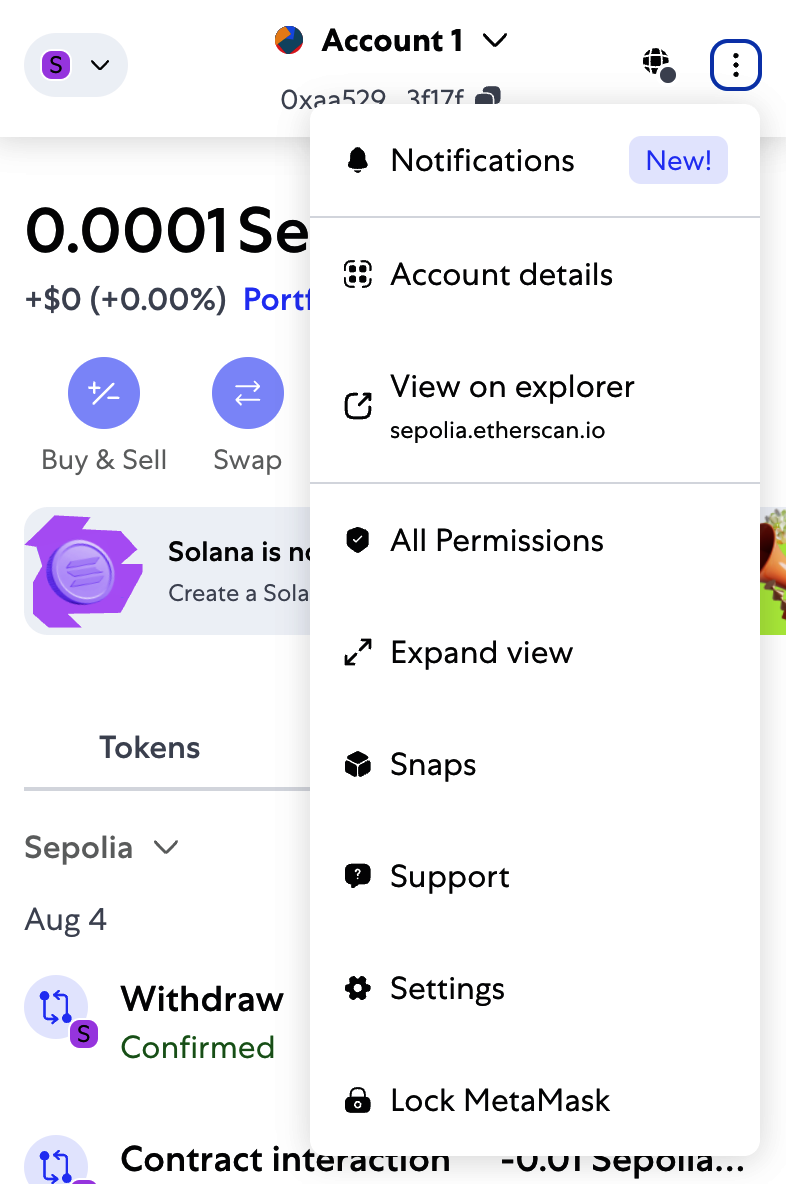
Figure 2-10. MetaMask account context menu
Tip
The default settings of MetaMask are not very privacy centric. It is advisable to carefully analyze the settings found in Settings → Security and Privacy. Once you are familiar with how MetaMask works, it is also advisable to change the Ethereum mainnet network from the default one to one that uses an RPC with privacy settings that suit your needs. The most private solution would be to have your own node with an RPC to which you can connect; we will see how to do that in Chapter 3.
Select "View account on Etherscan" to open a web page in the block explorer showing your account's transaction history, as shown in Figure 2-11.
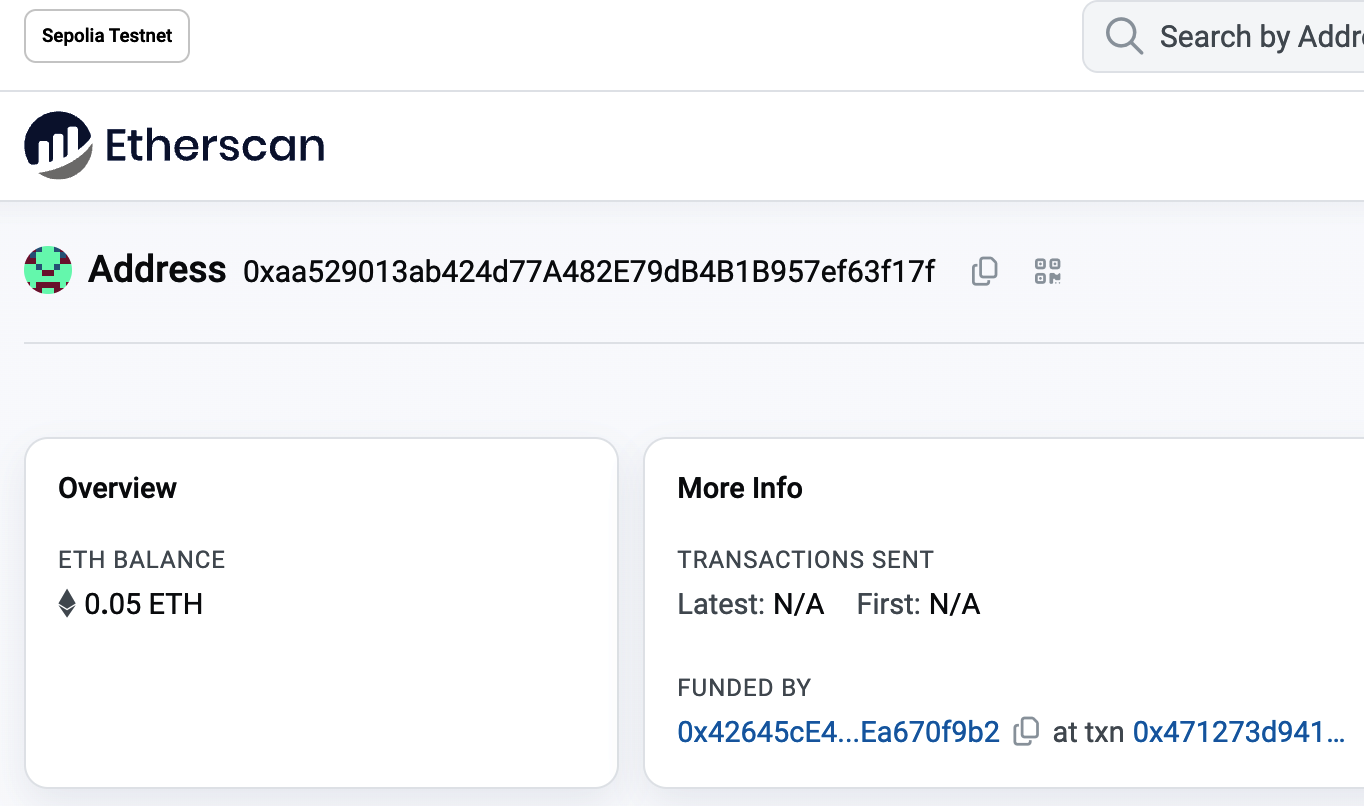
Figure 2-11. Address transaction history on Etherscan
Here you can see the entire transaction history of your Ethereum address. It shows all the transactions recorded on the Sepolia blockchain where your address is the sender or recipient. Click on a few of these transactions to see more details.
Warning
Beware, there is a known attack, called address poisoning, that can display transactions with spoofed addresses on the block explorer. The block explorer should be used for a quick check, but the information shown might not be accurate.
You can explore the transaction history of any address. Take a look at the transaction history of the Sepolia test faucet address (hint: it is the "sender" address listed in the oldest payment to your address). You can see all the test ether sent from the faucet to you and to other addresses. Every transaction you see can lead you to more addresses and more transactions. Before long, you will be lost in the maze of interconnected data. Public blockchains contain an enormous wealth of information, all of which can be explored programmatically, as we will see in future examples.
Introducing the World Computer
You've now created a wallet and sent and received ether. So far, we've treated Ethereum as a cryptocurrency. But Ethereum is much, much more. In fact, the cryptocurrency function is subservient to Ethereum's function as a decentralized world computer. Ether is meant to be used to pay for running smart contracts, which are computer programs that run on an emulated computer called the EVM.
The EVM is a global singleton, meaning that it operates as if it were a global single-instance computer, running everywhere. Each node on the Ethereum network runs a local copy of the EVM to validate contract execution, while the Ethereum blockchain records the changing state of this world computer as it processes transactions and smart contracts. We'll discuss this in much greater detail in Chapter 14.
Externally Owned Accounts and Contracts
The type of account you created in the MetaMask wallet is called an externally owned account (EOA). EOAs are those that have a private key; having the private key means control over access to funds or contracts.
You're probably guessing that there is another type of account. That other type of account is a contract account. A contract account has smart contract code, which a simple EOA can't have. Furthermore, a contract account does not have a private key. Instead, it is owned (and controlled) by the logic of its smart contract code: the software program recorded on the Ethereum blockchain at the contract account's creation and executed by the EVM.
Contracts have addresses, just like EOAs. Contracts can also send and receive ether, just like EOAs. However, when a transaction destination is a contract address, it causes that contract to run in the EVM, using the transaction—and the transaction's data—as its input. In addition to ether, transactions can contain data indicating which specific function in the contract to run and what parameters to pass to that function. In this way, transactions can call functions within contracts.
Note that because a contract account does not have a private key, it cannot initiate a transaction. Only EOAs can initiate transactions, but contracts can react to transactions by calling other contracts, building complex execution paths.
In the next few sections, we will write our first contract. You will then learn how to create, fund, and use that contract with your MetaMask wallet and test ether on the Sepolia test network.
A Simple Contract: A Test Ether Faucet
Ethereum has a few different high-level languages, all of which can be used to write a contract and produce EVM bytecode. You can read about the most prominent and interesting ones in Chapter 7. One high-level language is by far the dominant choice for smart contract programming: Solidity. Solidity was created by Gavin Wood and has become the most widely used language in Ethereum (and beyond). We'll use Solidity to write our first contract.
For our first example (Example 2-1), we will write a contract that controls a faucet. You've already used a faucet to get test ether on the Sepolia test network. A faucet is a relatively simple thing: it gives out ether to any address that asks and can be refilled.
Example 2-1. Faucet.sol: a Solidity contract implementing a faucet
pragma solidity 0.8.26;
// SPDX-License-Identifier: GPL-3.0

// Our first contract is a faucet!
contract Faucet {

    // Give out ether to anyone who asks
    function withdraw(uint256 _withdrawAmount, address payable _to) public {

        // Limit withdrawal amount
        require(_withdrawAmount <= 1000000000000);

        // Send the amount to the address that requested it
        _to.transfer(_withdrawAmount);
    }

    // Function to receive Ether. msg.data must be empty
    receive() external payable {}

    // Fallback function is called when msg.data is not empty
    fallback() external payable {}
}
This is a very simple contract, about as simple as we can make it. It is also a flawed contract, demonstrating a number of bad practices and security vulnerabilities. We will learn by examining many of its flaws in later sections. But for now, let's look at what this contract does and how it works, line by line. You will quickly notice that many elements of Solidity are similar to existing programming languages, such as JavaScript, Java, or C++.
The first line is the pragma statement:
pragma solidity 0.8.26;
By including this line at the top of a Solidity source file, you ensure that the code is compiled with version 0.8.26 of the Solidity compiler, ensuring compatibility and avoiding potential issues that might arise from using a different compiler version.
Next is a comment indicating that the smart contract is licensed under the GPL-3.0 license:
// SPDX-License-Identifier: GPL-3.0
This is important for legal and compliance reasons because it informs users and developers about their rights and obligations concerning the use and distribution of the code.
Comments are for humans to read and are not included in the executable EVM bytecode. We usually put them on the line before the code we are trying to explain, or sometimes on the same line. Comments start with two forward slashes: //. Everything from the first slash until the end of that line is treated the same as a blank line and ignored.
This is also a comment:
// Our first contract is a faucet!
The next line is where our actual contract starts:
contract Faucet {
This line declares a contract object, similar to a class declaration in other object-oriented languages. The contract definition includes all the lines between the curly braces ({}), which define a scope, much like how curly braces are used in many other programming languages.
Next, we declare the first function of the Faucet contract:
function withdraw(uint256 _withdrawAmount, address payable _to) public {
The function is named withdraw, and it takes one unsigned integer (uint256) named _withdrawAmount and an address payable named _to. It is declared as a public function, meaning it can be called by other contracts. The function definition follows, between curly braces. The first part of the withdraw function sets a limit on withdrawals:
require(_withdrawAmount <= 1000000000000);
It uses the built-in Solidity function require to test a precondition: that the _withdrawAmount is less than or equal to 1,000,000,000,000 wei, which is the base unit of ether (see Table 2-1) and equivalent to 0.000001 ether. If the withdraw function is called with a withdraw_amount greater than that amount, the require function here will cause contract execution to stop and fail with an exception. Note that statements need to be terminated with a semicolon in Solidity.
This part of the contract is the main logic of our faucet. It controls the flow of funds out of the contract by placing a limit on withdrawals. It's a very simple control but can give you a glimpse of the power of a programmable blockchain: decentralized software controlling money.
Here we have the first design flaw of the contract. It is not a security flaw, but it would be better to always add an error message to the require statement. This way, when a user's transaction fails due to a require statement, the reason is clear.
The corrected require statement is:
require(_withdrawAmount <= 1000000000000, "The requested amount is too much, try a smaller amount!");
Next comes the actual withdrawal:
_to.transfer(_withdrawAmount);
A couple of interesting things are happening here. The function transfer is a built-in function that transfers ether from the current contract to another specified address—in this case, the _to address. The transfer function takes an amount as its only argument. We pass the _withdrawAmount value that was the parameter to the withdraw function declared a few lines earlier.
This is possible because the _to address was defined as payable. The built-in functions transfer and send can be called only on payable addresses. Here is the second flaw in the code: while transfer is perfectly fine if an EOA calls the withdraw function, it becomes problematic if another contract triggers this function. In that case, the transaction might fail because the transfer function can utilize only up to 2,300 gas, and multiple contract calls will likely exceed this limit. To fix this issue, you can use the built-in call function instead of transfer and send. However, this built-in function needs to be handled properly to avoid security flaws. For now, we will leave the built-in transfer function as is.
The very next line is the closing curly brace, indicating the end of the definition of our withdraw function.
Next, we declare two more functions:
receive() external payable {}
fallback() external payable {}
These functions are the fallback and receive functions, which are called if the transaction that triggered the contract didn't name any of the declared functions in the contract, or any function at all, or didn't contain data. Contracts can have these functions and are usually the ones that receive ether. When msg.data is empty, the receive function will be triggered; when msg.data is not empty, the fallback function will be triggered.
Right below our fallback function is the final closing curly brace, which closes the definition of the contract Faucet. That's it!
Compiling the Faucet Contract
Now that we have our first example contract, we need to use a Solidity compiler to convert the Solidity code into EVM bytecode so that it can be executed by the EVM on the blockchain itself.
The Solidity compiler comes as a standalone executable, as part of various frameworks, and bundled in IDEs. To keep things simple, we will use one of the more popular IDEs: Remix.
Use your Chrome browser (with the MetaMask wallet you installed earlier) to navigate to the Remix IDE.
When you first load Remix, it will start with a sample contract called Storage.sol. We don't need that, so close it by clicking the x on the corner of the tab, as seen in Figure 2-12.
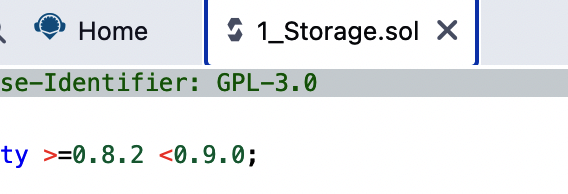
Figure 2-12. Closing the default example tab
Now, create a new file, as shown in Figure 2-13. Name the new file Faucet.sol.
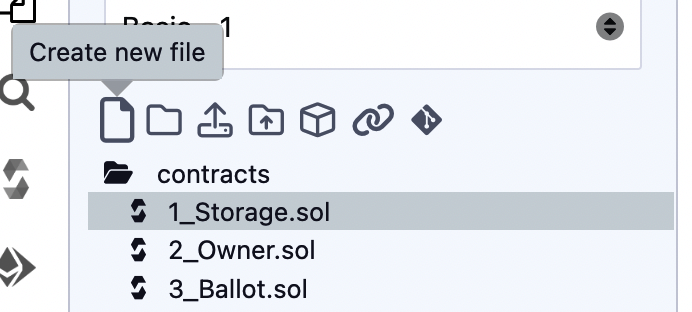
Figure 2-13. Creating a new contract
Once you have the new tab open, copy and paste the code from our example Faucet.sol, as shown in Figure 2-14.
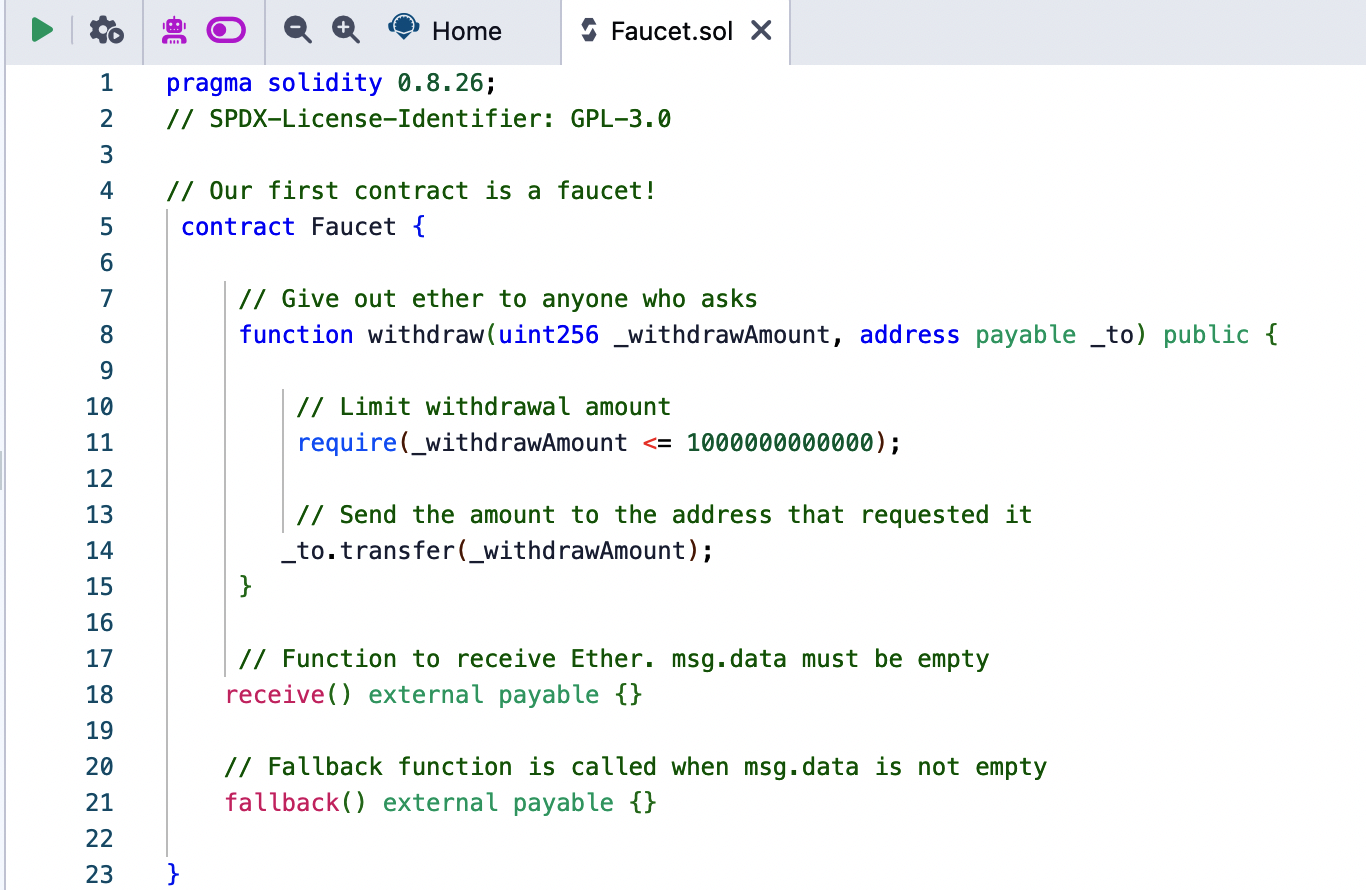
Figure 2-14. Copying the Faucet example code into the new contract
Once you have loaded the Faucet.sol contract into the Remix IDE, navigate to the compile section of Remix and click Compile Faucet.sol. If all goes well, you will see a green box (see Figure 2-15).
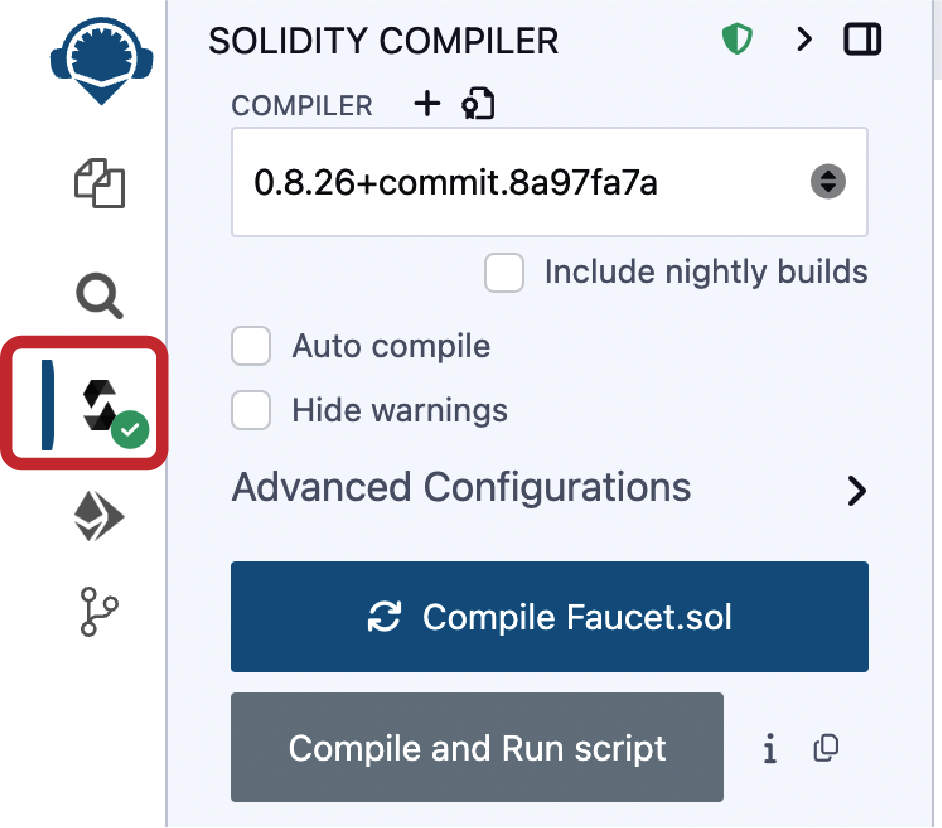
Figure 2-15. Remix successfully compiles the Faucet.sol contract
If something goes wrong, the most likely problem is that the Remix IDE is using a version of the Solidity compiler that is different from 0.8.26. In that case, our pragma directive will prevent Faucet.sol from compiling. To change the compiler version, go to the Compiler tab, set the version to 0.8.26, and try again.
The Solidity compiler has now compiled our Faucet.sol into EVM bytecode. If you are curious, the bytecode looks like this:
6080604052348015600e575f80fd5b506101af8061001c5f395ff3fe608060405260043610610020575f3560
e01c8062f714ce1461002957610027565b3661002757005b005b348015610034575f80fd5b5061004f600480
360381019061004a919061013b565b610051565b005b64e8d4a51000821115610062575f80fd5b8073ffffff
ffffffffffffffffffffffffffffffffff166108fc8390811502906040515f60405180830381858888f19350
5050501580156100a5573d5f803e3d5ffd5b505050565b5f80fd5b5f819050919050565b6100c0816100ae56
5b81146100ca575f80fd5b50565b5f813590506100db816100b7565b92915050565b5f73ffffffffffffffff
ffffffffffffffffffffffff82169050919050565b5f61010a826100e1565b9050919050565b61011a816101
00565b8114610124575f80fd5b50565b5f8135905061013581610111565b92915050565b5f80604083850312
15610151576101506100aa565b5b5f61015e858286016100cd565b925050602061016f85828601610127565b
915050925092905056fea26469706673582212207de2f4d88c747c9332dceef5dcd739f3380ec8a8c2167a29
2ba64ee24fa32a8a64736f6c634300081a0033
Aren't you glad you are using a high-level language like Solidity instead of programming directly in EVM bytecode? Us too!
Creating the Contract on the Blockchain
So, we have a contract. We've compiled it into bytecode. Now, we need to "register" the contract on the Ethereum blockchain. We will be using the Sepolia testnet to test our contract, so that's the blockchain we want to submit it to.
Registering a contract on the blockchain involves creating a special transaction whose to field is left empty (null). This empty destination signals to the Ethereum blockchain that you want to deploy a new contract rather than send a transaction to an existing address. The transaction's data field contains the compiled contract bytecode. Fortunately, the Remix IDE will handle all of that for you and send the transaction to MetaMask.
First, switch to the Run tab and select Injected Web3 in the Environment drop-down selection box. This connects the Remix IDE to the MetaMask wallet and, through MetaMask, to the Sepolia test network. Once you do that, you can see Sepolia under Environment. Also, the Account selection box shows the address of your wallet (see Figure 2-16).
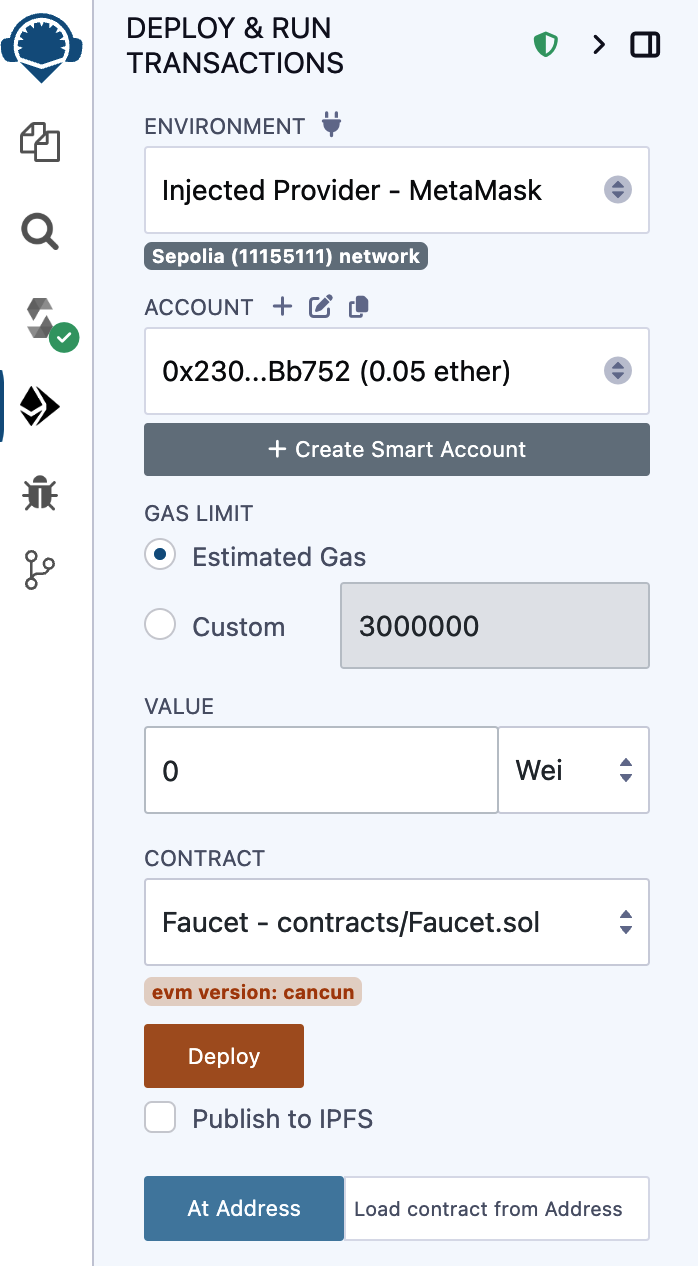
Figure 2-16. Remix IDE Run tab with Injected Web3 environment selected
Right below the Run settings you just confirmed is the Faucet contract, ready to be created. Click the Deploy button shown in Figure 2-16.
Remix will construct the special "creation" transaction, and MetaMask will ask you to approve it, as shown in Figure 2-17. You'll notice that the contract-creation transaction has no ether in it, but it has some bytes of data (the compiled contract) and will consume some gwei in gas. Click Submit to approve it.
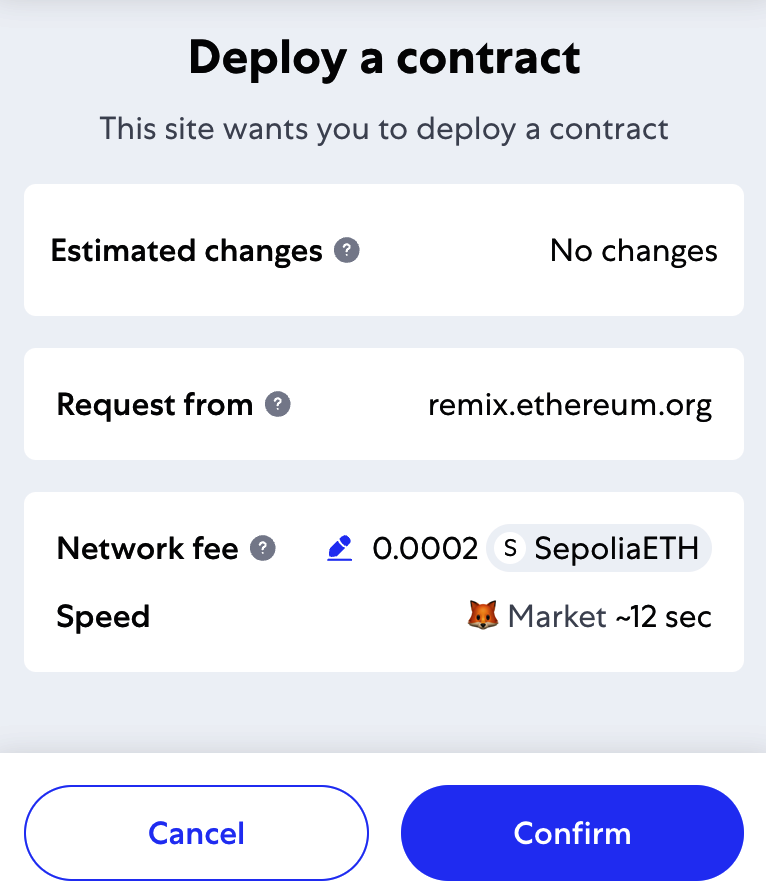
Figure 2-17. MetaMask showing the contract creation transaction
Now you have to wait. It will take about 15–30 seconds for the contract to be processed on Sepolia. Remix won't appear to be doing much, but be patient.
Once the contract is created, it appears at the bottom of the Run tab (see Figure 2-18).

Figure 2-18. The Faucet contract is alive!
Notice that the Faucet contract now has an address of its own: Remix shows it as "Faucet at 0x4E7…6EA46" (although your address—the random letters and numbers—will be different).
Interacting with the Contract
Let's recap what we've learned so far. Ethereum contracts are programs that control money, which run inside a virtual machine called the EVM. They are created by a special transaction that submits their bytecodes to be recorded on the blockchain. Once they are created on the blockchain, they have an Ethereum address, just like wallets. Anytime someone sends a transaction to a contract address, it causes the contract to run in the EVM, with the transaction as its input. Transactions sent to contract addresses may have ether or data or both. If they contain ether, it is "deposited" to the contract balance. If they contain data, the data can specify a named function in the contract and call it, passing arguments to the function.
Viewing the Contract Address in a Block Explorer
We now have a contract recorded on the blockchain, and we can see it has an Ethereum address. Let's check it out in the sepolia.etherscan.io block explorer and see what a contract looks like. In the Remix IDE, copy the address of the contract by clicking the icon next to its name (see Figure 2-19).
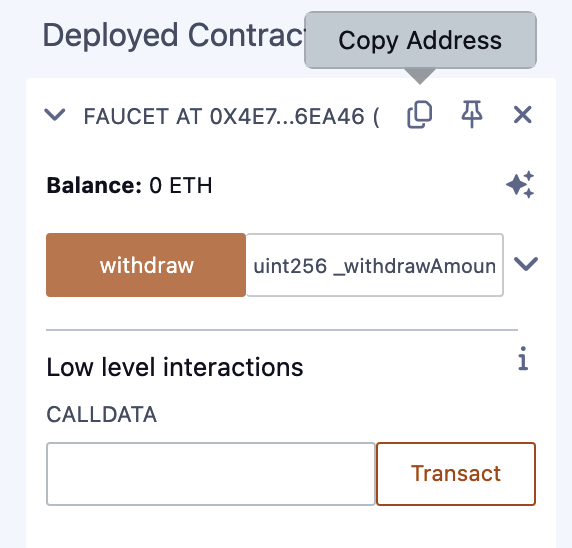
Figure 2-19. Copying the contract address from Remix
Keep Remix open; we'll come back to it later. Now, navigate your browser to sepolia.etherscan.io and paste the address into the search box. You should see the contract's Ethereum address history, as shown in Figure 2-20.
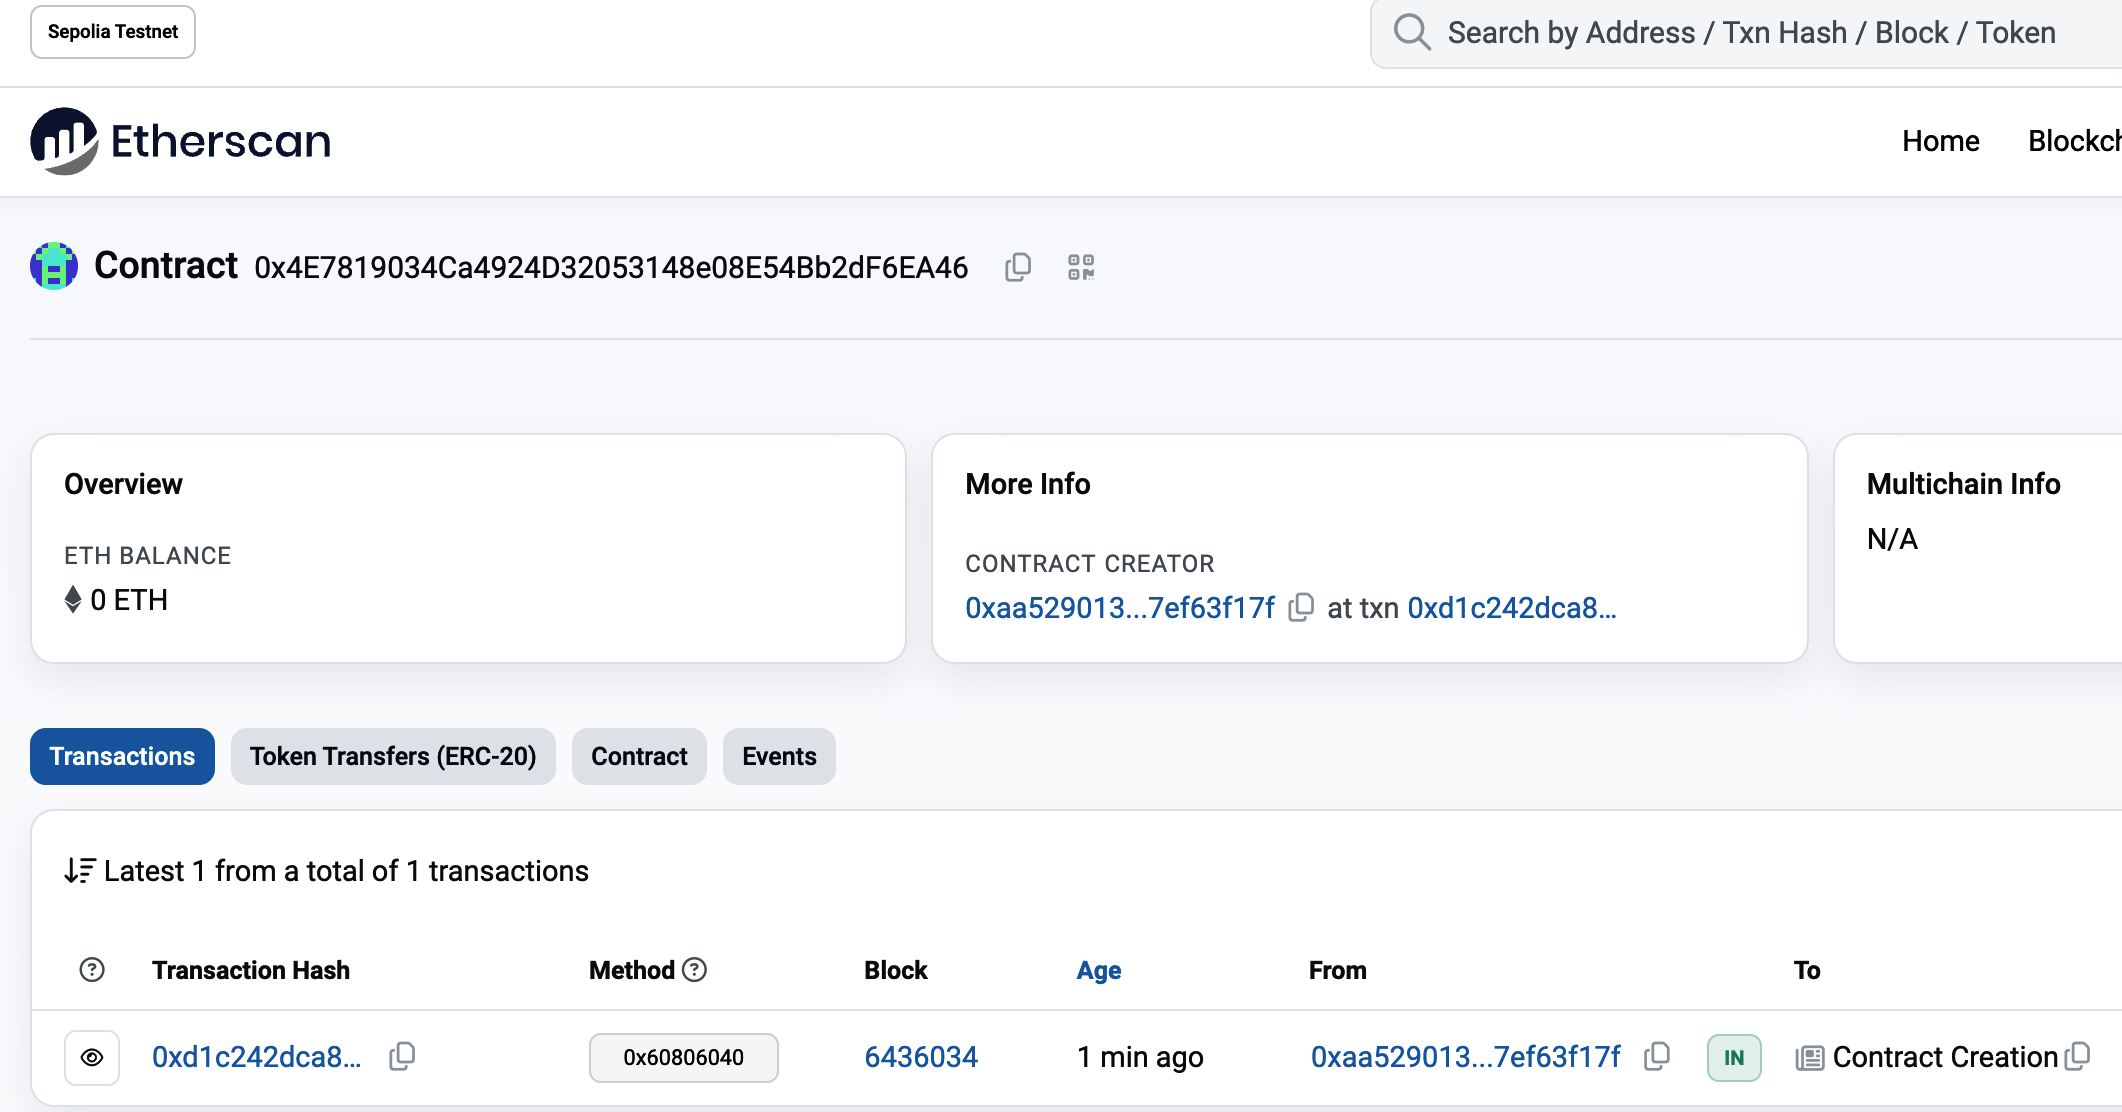
Figure 2-20. Viewing the Faucet contract address in the Etherscan block explorer
Funding the Contract
For now, the contract has only one transaction in its history: the contract-creation transaction. As you can see, the contract also has no ether (zero balance). That's because we didn't send any ether to the contract in the creation transaction, even though we could have.
Our faucet needs funds! Our first project will be to use MetaMask to send ether to the contract. You should still have the address of the contract in your clipboard (if not, copy it again from Remix). Open MetaMask and send 0.01 ether to it, exactly as you would to any other Ethereum address (see Figure 2-21).
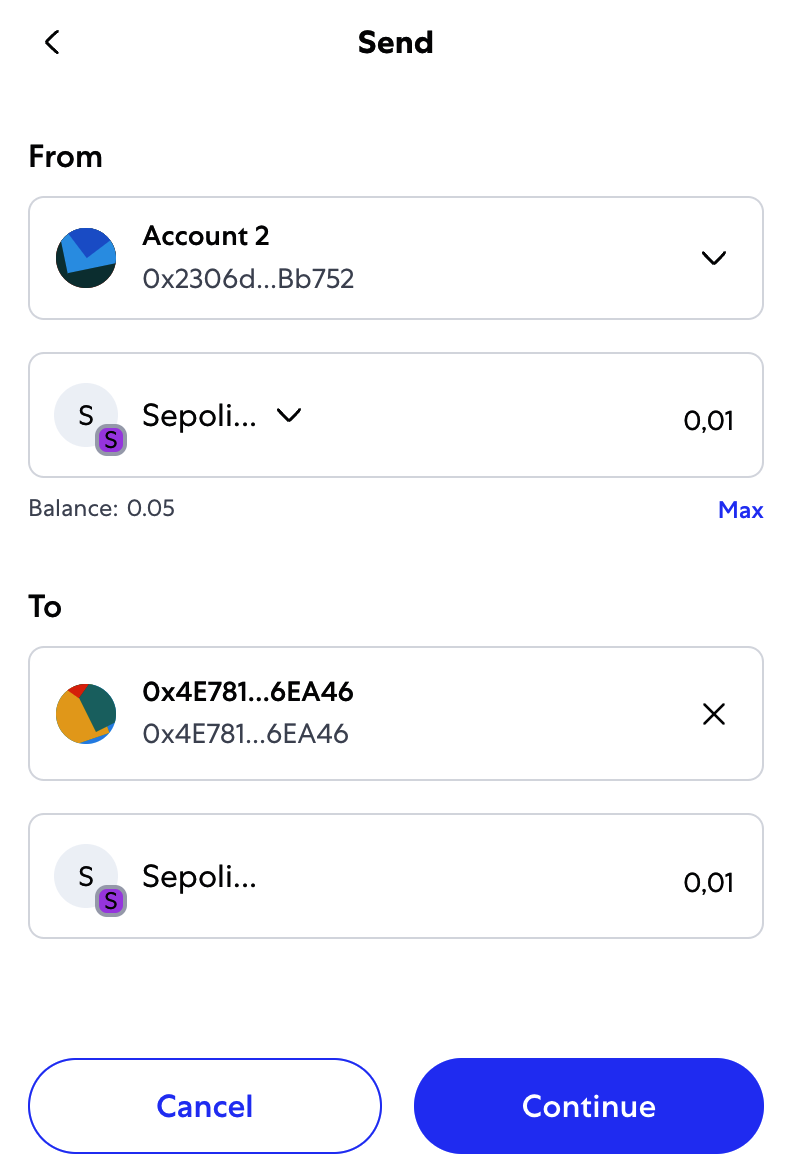
Figure 2-21. Sending 0.01 ether to the contract address
In a minute, if you reload the Etherscan block explorer, it will show another transaction to the contract address and an updated balance of 0.01 ether.
Remember the receive function in our Faucet.sol code? It looked like this:
receive() external payable {}
When you send the transaction to the contract address, with no data specifying which function to call, it calls this receive function. Your transaction caused the contract to run in the EVM, updating its balance. You have funded your faucet!
Withdrawing from Our Contract
Next, let's withdraw some funds from the faucet. To withdraw, we have to construct a transaction that calls the withdraw function and passes a _withdrawAmount and a _to argument to it. To keep things simple for now, Remix will construct that transaction for us, and MetaMask will present it for our approval.
Return to the Remix tab and look at the contract on the Run tab. You should see a red box labeled "withdraw" with a field entry labeled "uint256 _withdrawAmount, address _to" (see Figure 2-22).
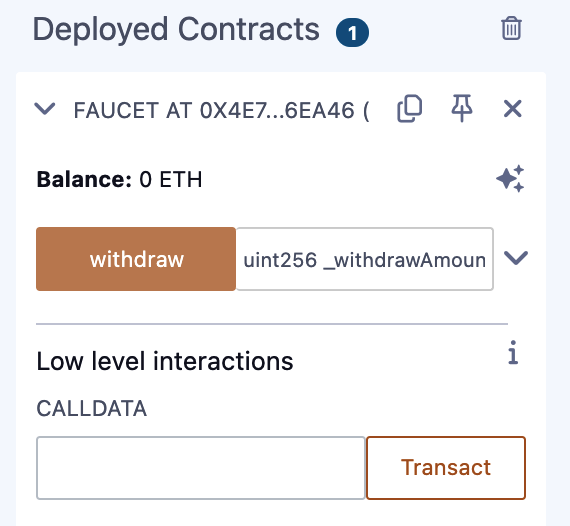
Figure 2-22. The withdraw function of Faucet.sol in Remix
This is the Remix interface to the contract. It allows us to construct transactions that call the functions defined in the contract. We will enter a _withdrawAmount and a _to address and click the withdraw button to generate the transaction.
First, let's figure out the _withdrawAmount. We want to try to withdraw 0.000001 ether, which is the maximum amount allowed by our contract. Remember that all currency values in Ethereum are denominated in wei internally, and our withdraw function expects the _withdrawAmount to be denominated in wei, too. The amount we want is 0.000001 ether, which is 1,000,000,000,000 wei (a 1 followed by 12 zeros).
For the _to address we will just use our Account 1 in MetaMask.
Tip
Due to a limitation in JavaScript, a number as large as 10^17^ cannot be processed by Remix. Instead, we enclose it in quotation marks to allow Remix to receive it as a string and manipulate it as a
BigNumber. If we don't enclose it in quotes, the Remix IDE will fail to process it and display "Error encoding arguments: Error: Assertion failed."
Type "1000000000000" (with the quotes) into the _withdrawAmount box, copy-paste your Account 1 address from MetaMask, and click the transact button. (You might see it as the withdraw button. Figure 2-23 shows an expanded view of the function; if your view is not expanded, then the button will be called "withdraw.")
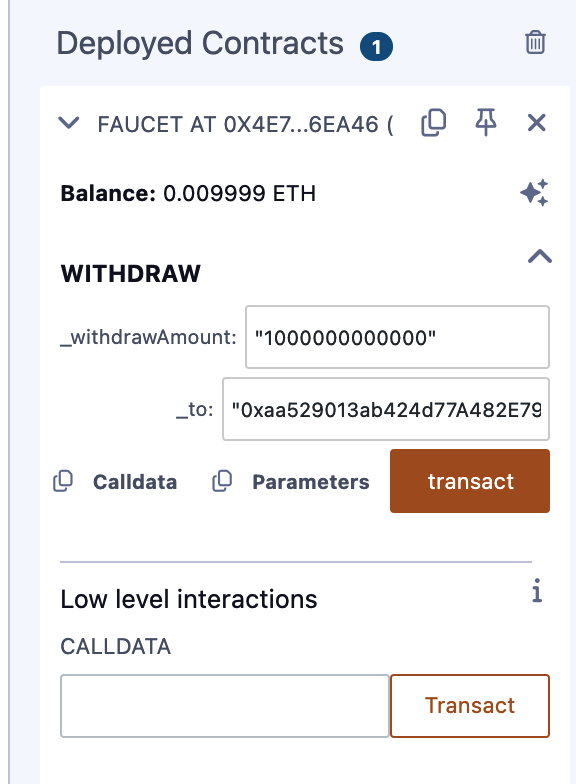
Figure 2-23. Click transact in Remix to create a withdrawal transaction
MetaMask will pop up a transaction window for you to approve. Click Submit to send your withdrawal call to the contract (see Figure 2-24).
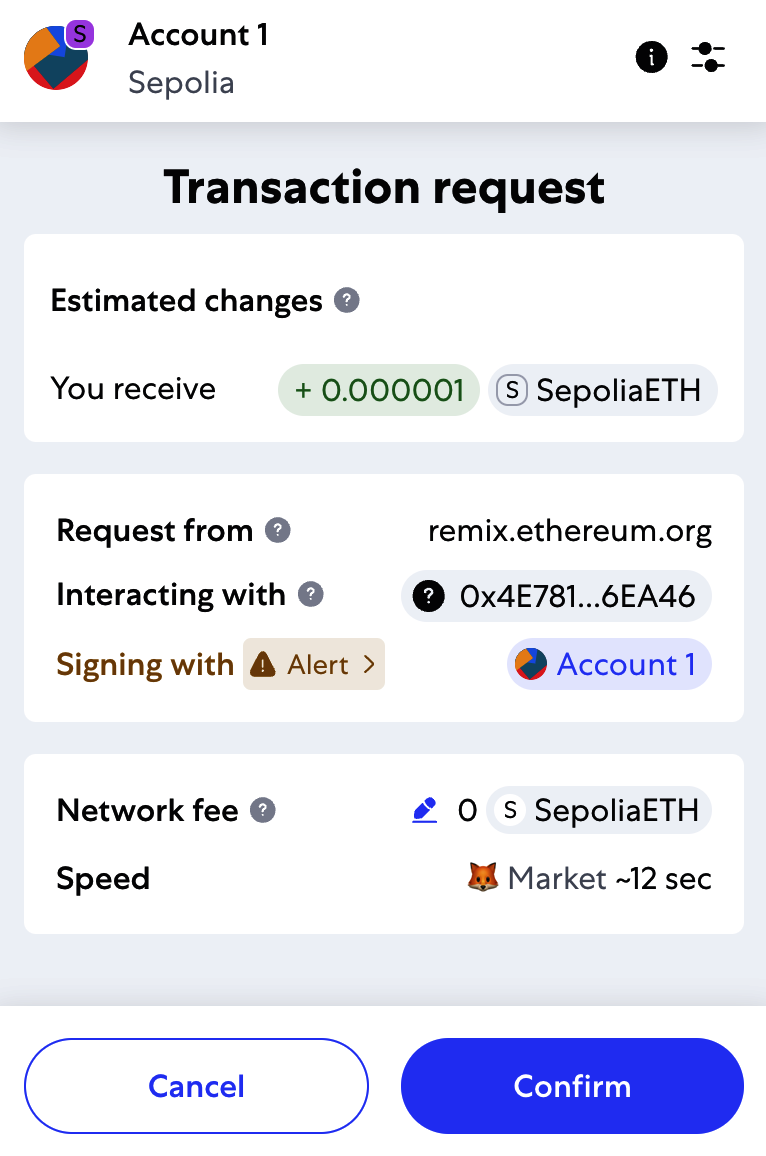
Figure 2-24. MetaMask transaction to call the withdraw function
Wait a minute and then reload the Etherscan block explorer to see the transaction reflected in the Faucet contract address history (see Figure 2-25).
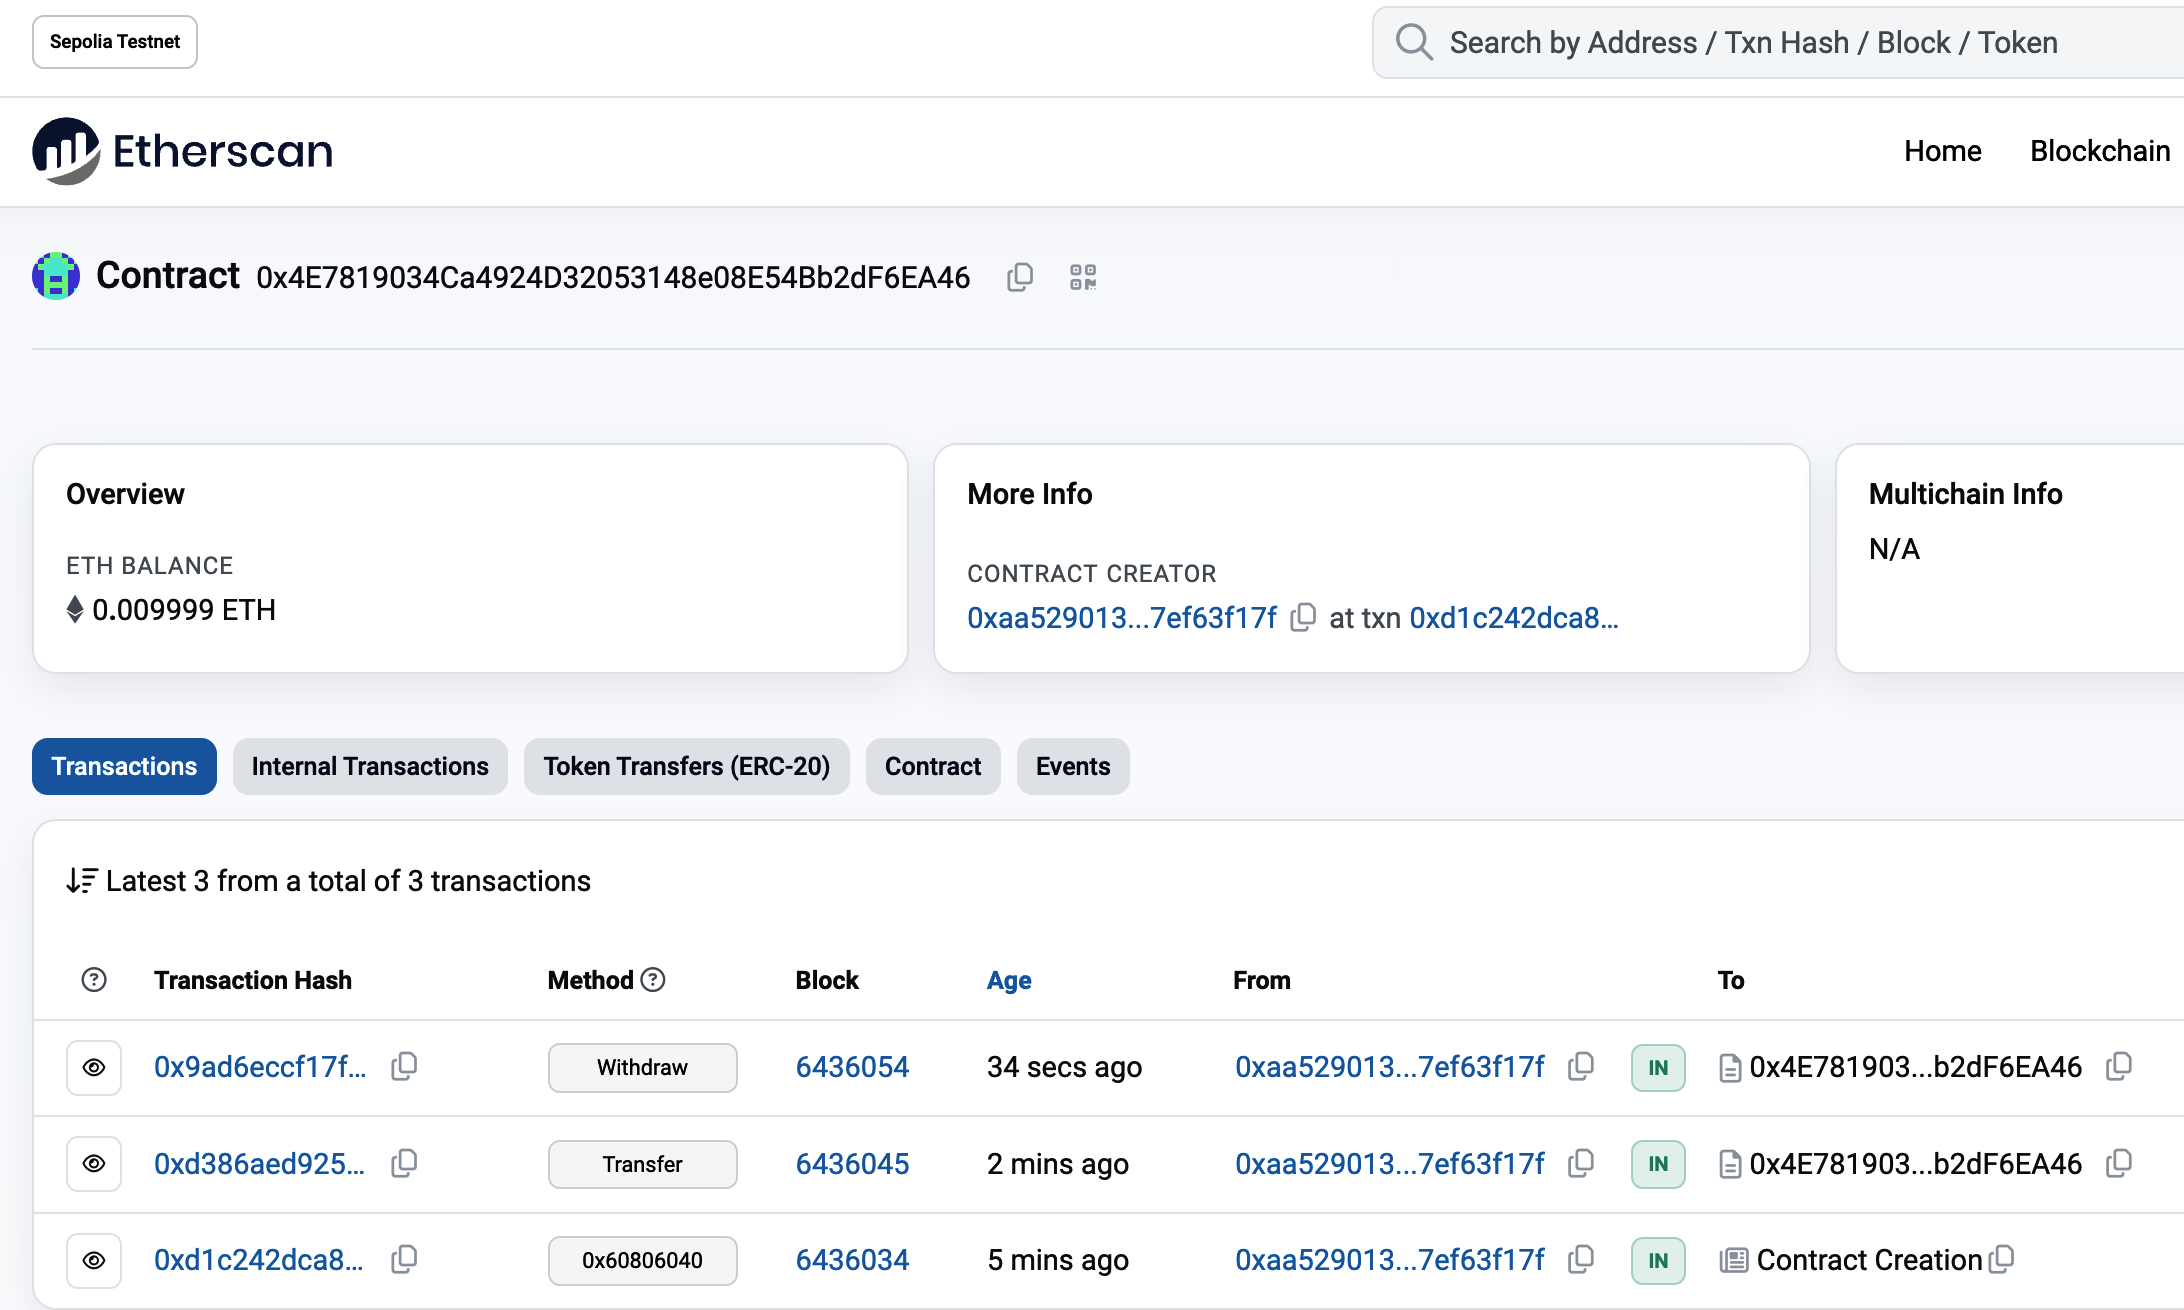
Figure 2-25. Etherscan shows the transaction calling the withdraw function
We now see a new transaction with the contract address as the destination and a value of 0 ether. The contract balance has changed and is now 0.009999 ether because it sent us 0.000001 ether as requested.
But we don't see an "OUT" transaction in the contract address history. Where's the outgoing withdrawal? A new tab named Internal Transactions has appeared on the contract's address history page. Because the 0.000001 ether transfer originated from the contract code, it is an internal transaction (also called a message). Click that tab to see it (see Figure 2-26).
This "internal transaction" was sent by the contract in this line of code (from the withdraw function in Faucet.sol):
_to.transfer(_withdrawAmount);
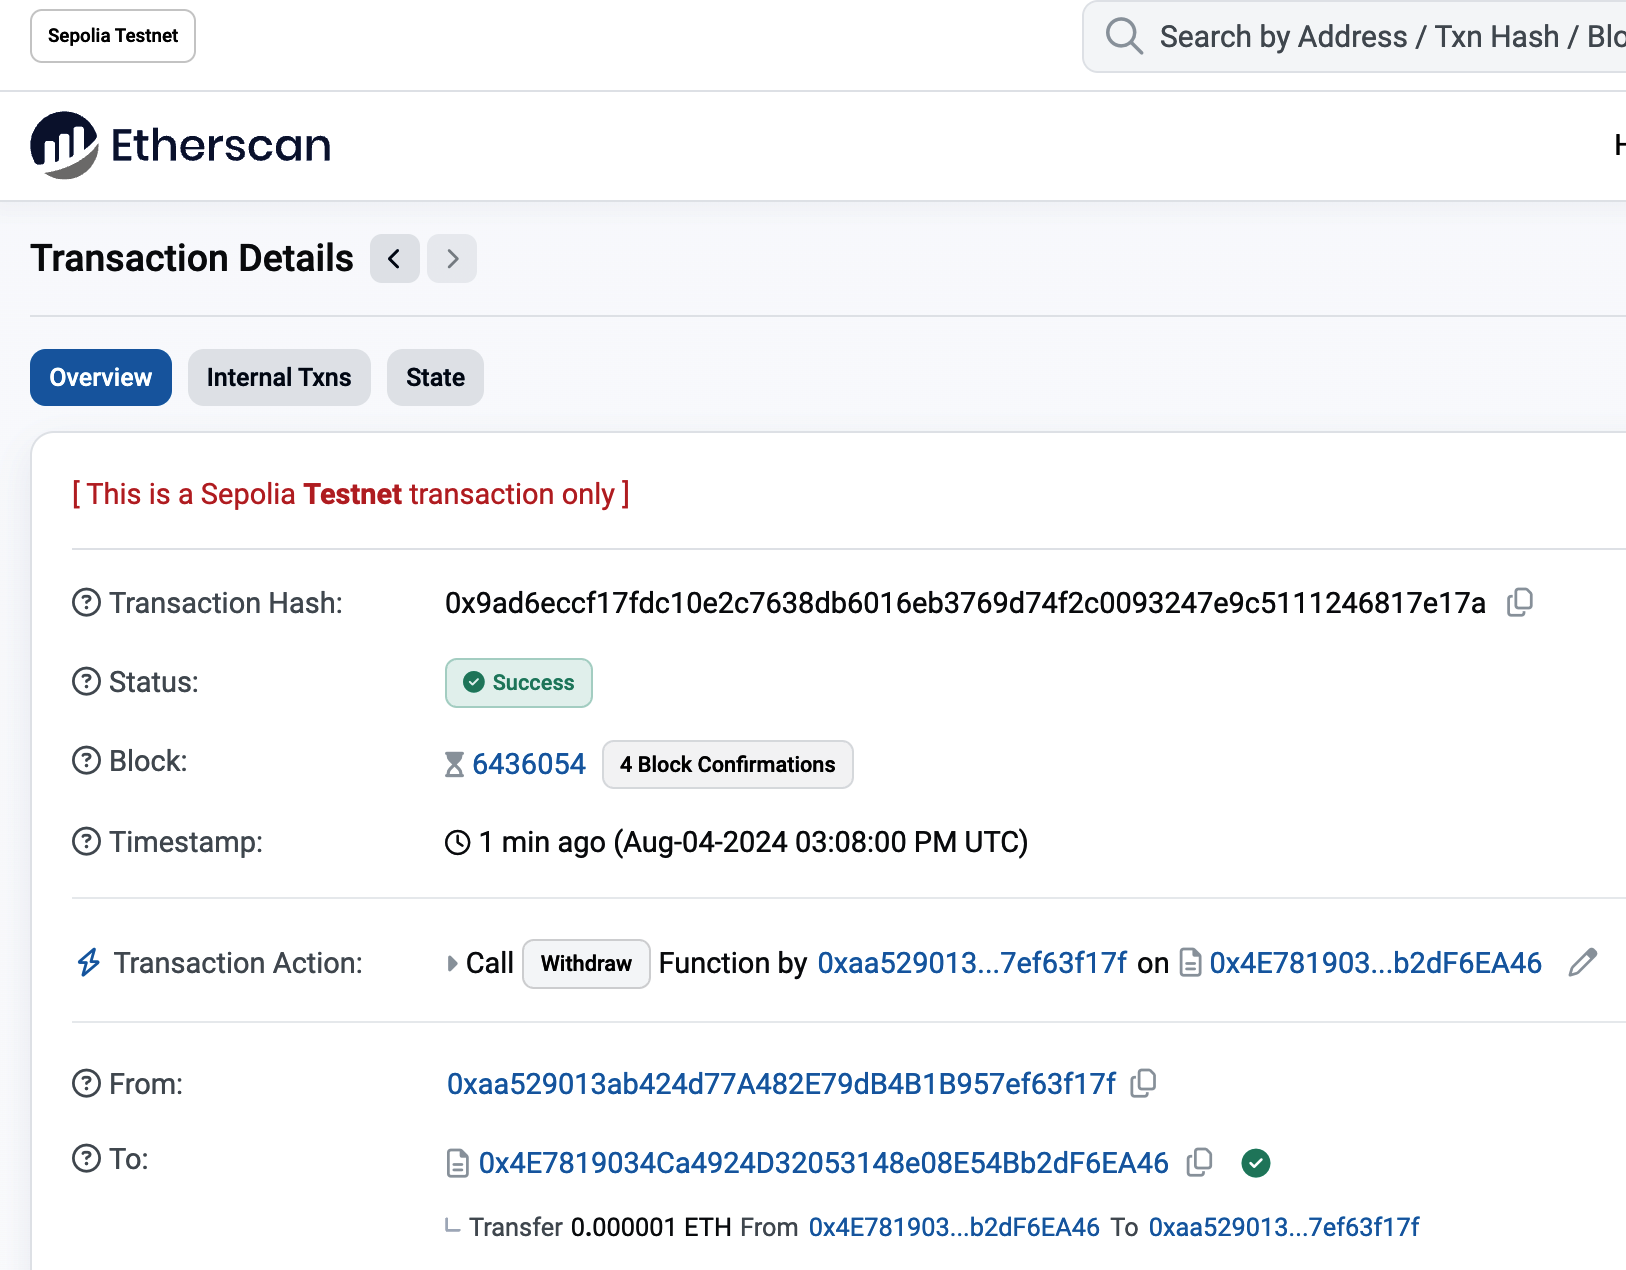
Figure 2-26. Etherscan shows the internal transaction transferring ether out from the contract
To recap: you sent a transaction from your MetaMask wallet that contained data instructions to call the withdraw function with a _withdrawAmount argument of 0.000001 ether and an address. That transaction caused the contract to run inside the EVM. As the EVM ran the Faucet contract's withdraw function, it first called the require function and validated that the requested amount was less than or equal to the maximum allowed withdrawal of 0.000001 ether. Then, it called the transfer function to send you the ether. Running the transfer function generated an internal transaction that deposited 0.000001 ether into your wallet address from the contract's balance. That's the one shown on the Internal Transactions tab in Etherscan.
Conclusion
In this chapter, you set up a wallet using MetaMask and funded it using a faucet on the Sepolia test network. You received ether into your wallet's Ethereum address, and then you sent ether to another address.
Next, you wrote a Faucet contract in Solidity. You used the Remix IDE to compile the contract into EVM bytecode, then used Remix to form a transaction and created the Faucet contract on the Sepolia blockchain. Once created, the Faucet contract had an Ethereum address, and you sent it some ether. Finally, you constructed a transaction to call the withdraw function and successfully asked for 0.000001 ether. The contract checked the request and sent you 0.000001 ether with an internal transaction.
It may not seem like much, but you've just successfully interacted with software that controls money on a decentralized world computer.
We will do a lot more Solidity smart contract programming in Chapter 7 and learn about best practices and security considerations in Chapter 9.
Chapter 3. Ethereum Nodes
An Ethereum node is a software application that implements the Ethereum specification and communicates over the P2P network with other Ethereum nodes.
Initially, a node only had to run a single client to completely implement all the requirements to be part of the Ethereum ecosystem. On September 15, 2022, The Merge hard fork happened, changing the consensus protocol from a PoW-based scheme to Gasper, the new PoS-based consensus protocol. This also led to the separation of concerns—consensus and execution—and the creation of a new type of Ethereum client: a consensus client.
And so, at the time of writing, an Ethereum node must run two pieces of software at the same time to be compatible with the latest spec, as shown in Figure 3-1, with the definitions as follows:
Consensus client
This new software is now in charge of the consensus protocol that lets all nodes agree on a single history of the blockchain.
Execution client
This software focuses on receiving all the blocks and transactions happening on the network, executing them inside the EVM, and verifying their correctness.
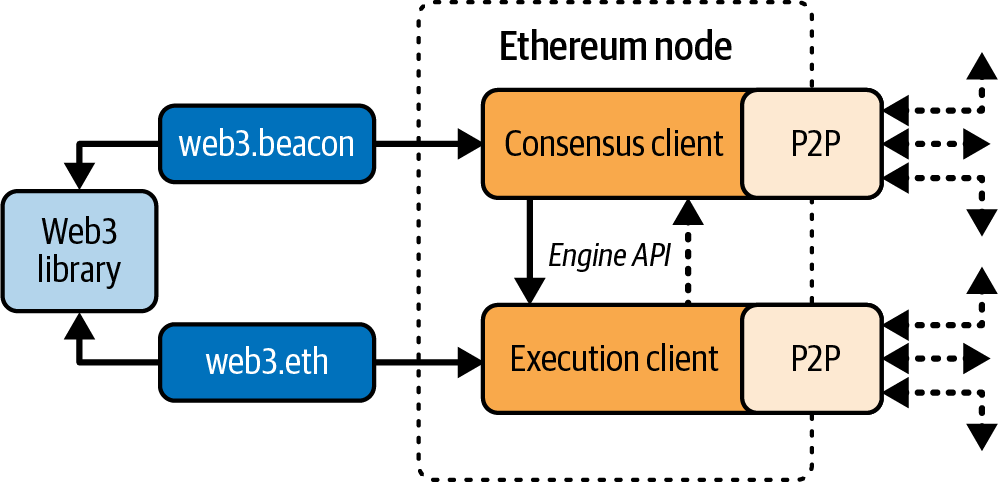
Different Ethereum clients—both execution and consensus clients—interoperate if they comply with the reference specification and the standardized communication protocols. While these different clients are implemented by different teams and in different programming languages, they all “speak” the same protocol and follow the same rules. As such, they can all be used to operate and interact with the same Ethereum network.
Ethereum is an open source project, and the source code for all major clients is available under open source licenses (e.g., LGPL v3.0), free to download and use for any purpose. Open source means more than simply free to use, though. It also means that Ethereum is developed by an open community of volunteers and can be modified by anyone. More eyes mean more trustworthy code.
Ethereum was originally defined by a single formal specification called the “Yellow Paper,” which was written by one of the original coauthors of this book, Gavin Wood. Even though this specification is periodically updated as major changes are made to Ethereum, there is a clear path toward two different reference implementations, one for execution clients and one for consensus clients. These reference implementations are written in Python and prioritize readability and simplicity.
Note
These specs are not intended to be full-node implementations. They serve as executable pseudocode specifications.
This is in contrast to Bitcoin, for example, which is not defined in any formal way. Where Bitcoin’s “specification” is the reference implementation Bitcoin Core, Ethereum’s execution specification is documented in a paper that combines an English and a mathematical (formal) specification. This formal specification, in addition to various Ethereum Improvement Proposals (EIPs) and the new consensus specification written in Python, defines the standard behavior of an Ethereum node.
As a result of Ethereum’s clear formal specification, there are a number of independently developed yet interoperable software implementations of an Ethereum client. Ethereum has a greater diversity of implementations running on the network than any other blockchain, which is generally regarded as a good thing. Indeed, this has, for example, proven to be an excellent way of defending against attacks on the network because exploitation of a particular client’s implementation strategy simply hassles the developers while they patch the exploit, while other clients keep the network running almost unaffected.
Ethereum Networks
A variety of Ethereum-based networks exist that largely conform to the formal specification defined in the original Ethereum “Yellow Paper” but that may or may not interoperate with one another.
Several EVM-compatible chains, such as Ethereum Classic, BNB Chain, and Polygon, share large portions of the execution spec, though many deviate in consensus and parameters. While they are mostly compatible at the protocol level, these networks often have features or attributes that require maintainers of Ethereum client software to make small changes to support each network. Because of this, not every version of Ethereum client software runs every Ethereum-based blockchain.
As of June 2025, there are five main implementations of the Ethereum execution protocol, written in four different languages, and five implementations of the Ethereum consensus protocol, written in five different languages:
The execution clients are:
- Geth, written in Go
- Nethermind, written in C#
- Besu, written in Java
- Erigon, written in Go
- Reth, written in Rust
The consensus clients are:
- Lighthouse, written in Rust
- Lodestar, written in TypeScript
- Nimbus, written in Nim
- Prysm, written in Go
- Teku, written in Java
In this section, we will look at the following two execution clients:
Geth
The oldest and most widely used execution client, maintained by the Ethereum Foundation
Reth
A new Rust-based execution client created by Paradigm after Parity/OpenEthereum was discontinued
And we will look at the following two consensus clients:
Prysm
The first consensus client, now maintained by Offchain Labs
Lighthouse
The most used consensus client, maintained by Sigma Prime
We’ll show how to set up a node using each client. Specifically, we’ll use the Geth-Prysm and Reth-Lighthouse combinations, and we’ll explore some of their command-line options and APIs.
Note
These pairs are just examples; you can choose to combine whatever execution and consensus clients you like the most to run an Ethereum node.
Should I Run a Full Node?
The health, resilience, and censorship resistance of blockchains depend on them having many independently operated and geographically dispersed full nodes—that is, nodes that download the entirety of the blockchain and keep data indefinitely. Each full node can help other new nodes obtain the block data to bootstrap their operations as well as offer the operator an authoritative and independent verification of all transactions and contracts.
Note
To be really precise, there is a distinction between these nodes:
Archive nodes
Ethereum nodes that keep all data indefinitelyFull nodes
Ethereum nodes that discard historical state and receipts—usually the default option when you spin up a node
However, running a full node will incur a cost in hardware resources and bandwidth. A full node must download at least 2 TB of data (as of June 2025, depending on the client configuration) and store it on a local hard drive. This data burden increases quite rapidly every day as new transactions and blocks are added. We discuss this topic in greater detail in the later section “Hardware Requirements for a Full Node”.
A full node running on a live mainnet network is not necessary for Ethereum development. You can do almost everything you need to do with a testnet node (which connects you to one of the smaller public test blockchains), with a local private blockchain like Anvil, or with a hosted node API offered by a service provider like Infura or Alchemy.
You also have the option of running a remote client, which does not store a local copy of the blockchain or validate blocks and transactions. These clients offer the functionality of a wallet and can create and broadcast transactions. Remote clients can be used to connect to existing networks, such as your own full node, a public blockchain, a public or permissioned (proof-of-authority) testnet, or a private local blockchain. In practice, you will likely use a remote client, such as MetaMask, Rabby Wallet, or Coinbase Wallet, as a convenient way to switch between all the different node options.
The terms remote client and wallet are used interchangeably, although there are some differences. Usually, a remote client offers an API (such as the web3.js API) in addition to the transaction functionality of a wallet.
Do not confuse the concept of a remote client in Ethereum with that of a light client (which is analogous to a Simplified Payment Verification [SPV] client in Bitcoin). Light clients validate block headers and use Merkle proofs to validate the inclusion of transactions in the blockchain and determine their effects, giving them a similar level of security as a full node. Conversely, Ethereum remote clients do not validate block headers or transactions. They entirely trust a full node to give them access to the blockchain and hence lose significant security and anonymity guarantees. You can mitigate these problems by using a full node you run yourself.
Full Node Advantages and Disadvantages
Choosing to run a full node helps with the operation of the networks you connect it to but also incurs some mild to moderate costs for you. Let’s look at some of the advantages and disadvantages.
Advantages:
- Supports the resilience and censorship resistance of Ethereum-based networks
- Authoritatively validates all transactions
- Can interact with any contract on the public blockchain without an intermediary
- Can directly deploy contracts into the public blockchain without an intermediary
- Can query (read only) the blockchain status (accounts, contracts, etc.) offline
- Can query the blockchain without letting a third party know the information you’re reading
Disadvantages:
- Requires significant and growing hardware and bandwidth resources
- May require several days to fully sync when first started
- Must be maintained, upgraded, and kept online to remain synced
Public Testnet Advantages and Disadvantages
Whether or not you choose to run a full node, you will probably want to run a public testnet node. Let’s look at some of the advantages and disadvantages of using a public testnet.
Advantages:
- A testnet node needs to sync and store much less data—about 100–300 GB depending on the network (as of June 2025).
- A testnet node can fully sync in a few hours.
- Deploying contracts or making transactions requires test ether, which has no value and can be acquired for free from several “faucets.”
- Testnets are public blockchains with many other users and contracts, running “live.”
Disadvantages:
- You can’t use “real” money on a testnet; it runs on test ether. Consequently, you can’t test security against real adversaries, as there is nothing at stake.
- There are some aspects of a public blockchain that you cannot test realistically on a testnet. For example, transaction fees, although necessary to send transactions, are not a consideration on a testnet, since gas is free (meaning that testnet ETH doesn’t have any real economic value). Further, the testnets do not experience network congestion like the public mainnet sometimes does.
- Some testnets are designed for specific purposes, and they could be slightly different than Ethereum mainnet.
Local Blockchain Simulation Advantages and Disadvantages
For many testing purposes, the best option is to launch a single-instance private blockchain. Anvil is one of the most popular local blockchain simulations that you can run and interact with without any other participants.
Advantages:
- No syncing and almost no data on disk; you produce the first block yourself.
- No need to obtain test ether; you “award” yourself block rewards that you can use for testing.
- No other users, just you.
- No other contracts, just the ones you deploy after you launch it.
Disadvantages:
- Having no other users means that your local chain doesn’t behave the same as a public blockchain. There’s no competition for transaction space or sequencing of transactions.
- No block producers other than you means that block production is more predictable; therefore, you can’t test some scenarios that occur on a public blockchain. It’s worth mentioning that Anvil (and other tools like Hardhat) let you configure the block production modes to try to reproduce mainnet-like behavior, but still, it’s not the same as being on Ethereum mainnet.
- Having no other contracts means you have to deploy everything you want to test, including dependencies and contract libraries. Luckily for you, tools like Anvil let you fork the Ethereum mainnet chain at arbitrary blocks and experiment with your smart contracts in a mainnet-like state.
Running an Ethereum Node
If you have the time and resources, you should attempt to run a full node, even if only to learn more about the process. In this section, we cover how to download, compile, and run the Ethereum clients Geth-Prysm and Reth-Lighthouse. This requires some familiarity with using the command-line interface (CLI) on your operating system. It’s worth installing these clients, whether you choose to run them as full nodes, as testnet nodes, or as clients to a local private blockchain.
Hardware Requirements for a Full Node
Before we get started, you should ensure that you have a computer with sufficient resources to run an Ethereum full node. You will need at least 2 TB of disk space to store a full copy of the Ethereum blockchain. If you also want to run a full node on the Ethereum testnet, you will need at least an additional 100–400 GB. Downloading 2 TB of blockchain data can take a long time, so it’s recommended that you work on a fast internet connection.
Syncing the Ethereum blockchain is very input/output (I/O) intensive. It is best to have a solid-state drive (SSD). If you have a mechanical hard-disk drive (HDD), you will need at least 8 GB of RAM to use as cache. Otherwise, you may discover that your system is too slow to keep up and fully sync.
Here is a summary of the minimum requirements to sync a full copy of an Ethereum-based blockchain:
- CPU with 2 or more cores
- At least 2 TB free storage space
- 8 GB RAM minimum with an SSD, or 8+ GB if you have an HDD (SSD is highly preferable)
- 7+ Mbps download internet service
If you want to sync in a reasonable amount of time and store all the development tools, libraries, clients, and blockchains we discuss in this book, you will want a more capable computer. Here are our recommended specifications:
- Fast CPU with 4+ cores—a higher clock speed is more important than core count
- 16+ GB RAM
- Fast NVMe SSD with at least 2 TB free space
- 24+ Mbps download internet service
It’s difficult to predict how fast a blockchain’s size will increase and when more disk space will be required, so it’s recommended to check the blockchain’s latest size before you start syncing.
Note
The disk-size requirements listed here assume you will be running a node with default settings, where the blockchain is “pruned” of old state data. If you instead run a full “archival” node, where all state is kept on disk, it will likely require more than 2 TB (up to 12–15 TB) of disk space, depending on the client. Always consult the latest hardware requirements on the official client website before running a node.
Software Requirements for Building and Running a Client
This section covers Geth-Prysm and Reth-Lighthouse client software. It also assumes you are using a Unix-like command-line environment. The examples show the commands and output as they appear on macOS running the Bash shell (command-line execution environment). Instructions work unchanged on most Linux distros. Windows users can use Windows Subsystem for Linux (WSL2).
Tip
In many of the examples in this chapter, we will be using the operating system’s CLI (also known as a shell), accessed via a terminal application. The shell will display a prompt; you type a command, and the shell responds with some text and a new prompt for your next command. The prompt may look different on your system, but in the following examples, it is denoted by a $ symbol. In the examples, when you see text after a $ symbol, don’t type the $ symbol but type the command immediately following it (shown in bold), then press Enter to execute the command. In the examples, the lines below each command are the operating system’s responses to that command. When you see the next $ prefix, you’ll know it’s a new command and you should repeat the process.
Before we get started, you may need to install some software. If you’ve never done any software development on the computer you are currently using, you will probably need to install some basic tools. For the examples that follow, you will need to install git, the source-code management system; golang, the Go programming language and standard libraries; and Rust, a systems programming language.
Here are the documentation pages for the four clients we’ll use in this example:
Feel free to consult these websites to understand more details about each client’s architecture and for troubleshooting during installation.
Preparation Phase
Starting from your home directory, create a folder in your computer called ethereum-node1 and then two subfolders within it called execution and consensus:
$ mkdir ethereum-node1
$ cd ethereum-node1
$ mkdir execution
$ mkdir consensus
Now you should have a folder structure like this:
ethereum-node1
├── consensus
└── execution
Repeat the previous step with a new folder called ethereum-node2:
$ cd .. # this command is used to go back to your home directory
$ mkdir ethereum-node2
$ cd ethereum-node2
$ mkdir execution
$ mkdir consensus
In the end you should have two root folders — ethereum-node1 and ethereum-node2 — with two subfolders within each root folder: execution and consensus.
You will also need to install Go and Rust. You can have a look at their official websites for a guide on how to install them.
Geth-Prysm
Go into the newly created folder ethereum-node1:
$ cd ethereum-node1
Geth
First we’re going to install Geth by building it from the source code. Geth is a Go language implementation of the execution specs that is actively developed by the Ethereum Foundation, so it is considered the “official” implementation of the Ethereum client. Typically, every Ethereum-based blockchain will have its own Geth implementation. If you’re running Geth, then you’ll want to make sure you grab the correct version for your blockchain using one of the following repository links:
Note
You can skip these instructions and install a precompiled binary for your platform of choice. The precompiled releases are much easier to install and can be found in the “releases” section of any of the repositories listed here. However, you may learn more by downloading and compiling the software yourself.
Cloning the repository. The first step is to clone the Git repository to get a copy of the source code. To make a local clone of your chosen repository, use the git command as follows in the execution subfolder:
$ cd execution
$ git clone https://github.com/ethereum/go-ethereum.git
You should see a progress report as the repository is copied to your local system:
Cloning into 'go-ethereum'...
remote: Enumerating objects: 130745, done.
remote: Counting objects: 100% (11/11), done.
remote: Compressing objects: 100% (11/11), done.
remote: Total 130745 (delta 1), reused 6 (delta 0), pack-reused 130734
Receiving objects: 100% (130745/130745), 204.15 MiB | 6.13 MiB/s, done.
Resolving deltas: 100% (80729/80729), done.
Great! Now that you have a local copy of Geth, you can compile an executable for your platform.
Building Geth from source code. To build Geth, change to the directory where the source code was downloaded and use the make command after selecting the latest release—right now, it’s v1.14.3, but you can always check for the latest one:
$ cd go-ethereum
$ git checkout v1.14.3
$ make geth
If all goes well, you will see the Go compiler building each component until it produces the Geth executable:
go run build/ci.go install ./cmd/geth
go: downloading golang.org/x/crypto v0.22.0
go: downloading golang.org/x/net v0.24.0
[...]
github.com/ethereum/go-ethereum/cmd/utils
github.com/ethereum/go-ethereum/beacon/blsync
github.com/ethereum/go-ethereum/cmd/geth
Done building.
Run "./build/bin/geth" to launch geth.
Let’s make sure Geth works without actually starting it:
$ ./build/bin/geth version

GethVersion: 1.14.3-stable
Git Commit: ab48ba42f4f34873d65fd1737fabac5c680baff6
Architecture: arm64
Go Version: go1.22.2
Operating System: darwin
[...]
Your geth version command may show slightly different information, but you should see a version report much like the one shown here.
Don’t run Geth yet because we still need to install a consensus client to let the Ethereum node sync up to the tip of the chain.
Prysm
Now it’s the consensus client’s turn. Prysm is a Go language implementation of the consensus specs that is actively developed by Offchain Labs. Initially, it was by far the most used consensus client after The Merge. Now, thanks to a great community effort to boost client diversity, its share of the market is greatly reduced, standing at 37%.
Installing the binary. Prysm can be built from source code as we did for Geth, but it’s a bit more complicated. The suggested way to install it is the following method. First, go to the consensus folder:
$ cd ../.. # this command is used to go back in the ethereum-node1 folder
$ cd consensus
Now, run the following command:
$ curl https://raw.githubusercontent.com/prysmaticlabs/prysm/master/prysm.sh --output prysm.sh && chmod +x prysm.sh
Generating a JWT Secret. The execution and consensus clients that made up an Ethereum node are two distinct pieces of software, but they always have to interact with each other. To achieve that, there is a sort of password that is used by both the execution and the consensus client to authenticate their connection. Now we need to generate it:
$ ./prysm.sh beacon-chain generate-auth-secret
A jwt.hex file should appear. Let’s move it to the parent folder:
$ mv jwt.hex ../jwt.hex
Run the node
Now that you have both the execution and the consensus clients and you have correctly generated the JWT secret, you can spin up the clients and have an Ethereum full node running.
Running the execution client. First, you need to run the execution client, Geth. Navigate back to the execution folder and run this command:
$ cd .. # this command is used to go back in the ethereum-node1 folder
$ cd execution
$ ./go-ethereum/build/bin/geth --mainnet \
	--http \
	--http.api eth,net,engine,admin,web3 \
	--authrpc.jwtsecret=../jwt.hex
If you see something like this, everything is running fine:
INFO [06-08|17:56:38.738] Starting Geth on Ethereum mainnet...
INFO [06-08|17:56:38.738] Bumping default cache on mainnet         provided=1024 updated=4096
INFO [06-08|17:56:38.740] Maximum peer count                       ETH=50 total=50
INFO [06-08|17:56:38.745] Set global gas cap                       cap=50,000,000
INFO [06-08|17:56:38.752] Initializing the KZG library             backend=gokzg
INFO [06-08|17:56:38.771] Allocated trie memory caches             clean=614.00MiB dirty=1024.00MiB
INFO [06-08|17:56:38.772] Using pebble as the backing database…
Running the consensus client. Now you should run the consensus client, Prysm. Don’t close the terminal tab in which the execution client lives. Just open a new terminal window or tab and navigate to the consensus folder:
$ cd ethereum-node1
$ cd consensus
$ ./prysm.sh beacon-chain \
	--execution-endpoint=http://localhost:8551 \
	--mainnet \
	--jwt-secret=../jwt.hex \
	--checkpoint-sync-url=https://beaconstate.info \
	--genesis-beacon-api-url=https://beaconstate.info
You could be asked to accept Prysm terms and conditions. If that’s the case, type accept, and you should be done:
Prysm Terms of Use
By downloading, accessing or using the Prysm implementation (“Prysm”), you (referenced
herein as “you” or the “user”) certify that you have read and agreed to the terms and
conditions below.
TERMS AND CONDITIONS: https://github.com/prysmaticlabs/prysm/blob/develop/TERMS_OF_SERVICE.md
Type “accept” to accept this terms and conditions [accept/decline]: (default: decline):
And you’re done! You should see both the execution and consensus client start logging lots of data on the terminal.
Execution client:
INFO [06-08|18:08:49.039] Forkchoice requested sync to new head    number=20,048,206 hash=8df21a..4afb49 finalized=unknown
INFO [06-08|18:08:52.507] Syncing beacon headers                   downloaded=322,560 left=19,725,577 eta=42m4.183s
INFO [06-08|18:08:57.515] Looking for peers                        peercount=1 tried=42 static=0
INFO [06-08|18:09:00.508] Syncing beacon headers                   downloaded=370,688 left=19,677,449 eta=43m35.827s
INFO [06-08|18:09:01.637] Forkchoice requested sync to new head    number=20,048,207 hash=d99dab..0293c9 finalized=unknown
Consensus client:
[2024-06-08 18:09:24]  INFO blockchain: Called new payload with optimistic block payloadBlockHash=0xd44520a09a7a slot=9253245
[2024-06-08 18:09:24]  INFO blockchain: Called fork choice updated with optimistic block finalizedPayloadBlockHash=0x38916be8a559 headPayloadBlockHash=0xd44520a09a7a headSlot=9253245
[2024-06-08 18:09:24]  INFO blockchain: Synced new block block=0xec930e7c... epoch=289163finalizedEpoch=289161 finalizedRoot=0xb8065a78... slot=9253245
[2024-06-08 18:09:24]  INFO blockchain: Finished applying state transition attestations=123 payloadHash=0xd44520a09a7a slot=9253245 syncBitsCount=510 txCount=212
[2024-06-08 18:09:24]  INFO p2p: Peer summary activePeers=64 inbound=0 outbound=63
[2024-06-08 18:09:28]  INFO sync: Subscribed to topic=/eth2/6a95a1a9/beacon_attestation_35/ssz_snappy[2024-06-08 18:09:36]  INFO blockchain: Called new payload with optimistic block payloadBlockHash=0xff879102f29e slot=9253246
Now you have an Ethereum full node that is syncing up to the tip of the chain. Note that the synchronization can take a lot of time (hours or days depending on your hardware and internet connectivity).
Note
If you want to learn more about the specific commands and CLI flags we’ve used in this example, the official docs for Geth and Prysm are the best places to look.
Reth-Lighthouse
Let’s do the same thing but using two different clients: Reth as the execution client and Lighthouse as the consensus client.
Reth
First, you need to install Reth. Go into the ethereum-node2 folder and then into the execution folder.
Cloning the repository. The first step is to clone the Git repository to get a copy of the source code. Go back to your home directory and type the following commands:
$ cd ethereum-node2
$ cd execution
$ git clone https://github.com/paradigmxyz/reth
Great! Now that you have a local copy of Reth, you can compile an executable for your platform.
Building Reth from source code. To build Reth, you need to run the following command:
$ cd reth
$ cargo install --locked --path bin/reth --bin reth
It could take more than 10 minutes to complete the installation. When it’s done, you can check if Reth is correctly installed by running:
$ reth --version
You should see something like (the version can change):
reth Version: 0.2.0-beta.6-dev
Commit SHA: ac29b4b73
Build Timestamp: 2024-04-22T17:29:01.000000000Z
Build Features: jemallocBuild Profile: maxperf+
Lighthouse
Now you need to install Lighthouse, the consensus client. Go back to the ethereum-node2 folder and dive into the consensus folder:
$ cd .. # this command is used to go back in the ethereum-node2 folder
$ cd consensus
You have to install some dependencies first. If you are on a macOS, you need to run:
$ brew install cmake
If you’re using a different operating system, you can refer to the Lighthouse official documentation.
Cloning the repository. The first step is to clone the Git repository to get a copy of the source code:
$ git clone https://github.com/sigp/lighthouse.git
Great! Now that you have a local copy of Lighthouse, you can compile an executable for your platform.
Building Lighthouse from source code. To build Lighthouse, you need to run the following command:
$ cd lighthouse
$ git checkout stable
$ make
This could take more than 10 minutes to complete.
Run the node
Again, you need to run the execution client, Reth, first.
Running the execution client. Navigate back to the execution folder and run this command:
$ cd ../.. # this command is used to go back to the ethereum-node2 folder
$ cp ../ethereum-node1/jwt.hex ./jwt.hex # we use the same jwt.hex file we generated before
$ cd execution
$ reth node --full --http --http.api all --authrpc.jwtsecret=../jwt.hex
If you see something like this, everything is running fine:
2024-06-08T16:58:43.498297Z  INFO Starting reth version="0.2.0-beta.6-dev (ac29b4b73)"
2024-06-08T16:58:43.498434Z  INFO Opening database path="/Users/alessandromazza/Library/Application Support/reth/mainnet/db"
2024-06-08T16:58:43.514141Z  INFO Configuration loaded path="/Users/alessandromazza/Library/Application Support/reth/mainnet/reth.toml"
2024-06-08T16:58:43.514778Z  INFO Database opened
2024-06-08T16:58:43.514917Z  INFO Pre-merge hard forks (block based):…
Running the consensus client. Now you should run the consensus client, Lighthouse. Don’t close the terminal tab in which the execution client lives. Just open a new terminal window or tab and navigate into the consensus folder:
$ cd ethereum-node2
$ cd consensus
$ lighthouse bn \
    --network mainnet \
	--checkpoint-sync-url https://mainnet.checkpoint.sigp.io \
	--execution-endpoint http://localhost:8551 \
	--execution-jwt ../jwt.hex \
	--http
And you’re done! You should see both the execution and consensus client start logging lots of data on the terminal.
Execution client:
2024-06-08T17:03:03.355648Z  INFO Received headers total=10000 from_block=18458372 to_block=18448373
2024-06-08T17:03:04.792262Z  INFO Received headers total=10000 from_block=18448372 to_block=18438373
2024-06-08T17:03:04.800043Z  INFO Received headers total=10000 from_block=18438372 to_block=18428373
2024-06-08T17:03:04.913377Z  INFO Received headers total=10000 from_block=18428372 to_block=18418373
Consensus client:
Jun 08 17:03:24.929 INFO New block received                      root: 0xa49c057026cea3190df38548d49963e271ebdc4d6f93d2301adc4034d6563113, slot: 9253515
Jun 08 17:03:29.001 WARN Head is optimistic                      execution_block_hash: 0x5a14bfcb9e74c5b3a5121f99ef461ae066262200c269b5d11475274eb78aa7a5, info: chain not fully verified, block and attestation production disabled untilexecution engine syncs, service: slot_notifier
Jun 08 17:03:29.001 INFO Synced                                  slot: 9253515, block: 0xa49c…3113, epoch: 289172, finalized_epoch: 289170, finalized_root: 0xca35…2b06, exec_hash: 0x5a14…a7a5 (unverified), peers: 31, service: slot_notifier
Now you have an Ethereum full node that is syncing up to the tip of the chain. Note that the synchronization can take a lot of time (hours or days depending on your hardware and internet connectivity).
Note
If you want to learn more about the specific commands and CLI flags we’ve used in this example, the official docs for Reth and Lighthouse are the best places to look.
The next section explains the challenges with the initial synchronization of Ethereum’s blockchain.
Tip
Do all these steps look complicated and confusing to you? But you would still like to contribute to the network and really don’t depend on any trusted third party running your own Ethereum full node?
There is a perfect solution for you: it’s the BuidlGuidl Client, a project that created a one-line command that lets you run an Ethereum node. You don’t believe it? See it yourself.
Another option is to use Dappnode. You can choose two different solutions:
Buy a plug-n-play device that comes with an Ethereum full node built in.
Install Dappnode Core software that makes it really easy to launch an Ethereum full node.
The First Synchronization of Ethereum-Based Blockchains
Normally when syncing an Ethereum blockchain, your client will download and validate every block and every transaction since the very start—that is, from the genesis block. While it is possible to fully sync the blockchain this way, the sync will take a very long time and has high resource requirements (it will need much more RAM and will take a very long time indeed if you don’t have fast storage).
Many Ethereum-based blockchains were the victims of DoS attacks at the end of 2016. Affected blockchains will tend to sync slowly when doing a full sync. For example, on Ethereum, a new client will make rapid progress until it reaches block 2,283,397. This block was mined on September 18, 2016, and marks the beginning of the DoS attacks. From this block to block 2,700,031 (November 26, 2016), the validation of transactions becomes extremely slow, memory intensive, and I/O intensive. This results in validation times exceeding one minute per block on contemporary 2016 hardware. Ethereum implemented a series of upgrades, using hard forks, to address the underlying vulnerabilities that were exploited in the DoS attacks. These upgrades also cleaned up the blockchain by removing some 20 million empty accounts created by spam transactions.
If you are syncing with full validation, your client will slow, and it may take several days, or perhaps even longer, to validate the blocks affected by the DoS attacks. Fortunately, most Ethereum clients include an option to perform a “fast” synchronization that skips the full validation of transactions until it has synced to the tip of the blockchain, then resumes full validation starting from the new tip of the chain. For execution clients, the option to enable fast synchronization is typically snap sync. For consensus clients, the option for fast synchronization is checkpoint sync.
In this tutorial, we’ve been using by default fast synchronization both with snap sync on the execution client and checkpoint sync on the consensus client, with the exception of Reth, which doesn’t support snap sync yet (as of June 2025).
The JSON-RPC Interface
Ethereum clients offer an API and a set of RPC commands, which are encoded as JSON. You will see this referred to as the JSON-RPC API. Essentially, the JSON-RPC API is an interface that allows us to write programs that use an Ethereum client as a gateway to an Ethereum network and blockchain.
Usually, the RPC interface is offered as an HTTP service on port 8545. For security reasons, it is restricted by default to accept connections only from localhost (the IP address of your own computer, which is 127.0.0.1).
To access the JSON-RPC API, you can use a specialized library (written in the programming language of your choice) that provides “stub” function calls corresponding to each available RPC command, or you can manually construct HTTP requests and send/receive JSON-encoded requests. You can even use a generic command-line HTTP client like curl to call the RPC interface. Let’s try that. First, ensure that you have the execution client configured and running. Then, switch to a new terminal window and type the following command:
$ curl -X POST -H "Content-Type: application/json" --data \
	'{"jsonrpc":"2.0","method":"web3_clientVersion","params":[],"id":1}' \
	http://localhost:8545

{"jsonrpc":"2.0","id":1,"result":"Geth/1.14.3-stable/darwin-arm64/go1.22.2"}
In this example, we use curl to make an HTTP connection to the address http://localhost:8545. We are already running the execution client, which offers the JSON-RPC API as an HTTP service on port 8545. We instruct curl to use the HTTP POST method and to identify the content as type application/json. Finally, we pass a JSON-encoded request as the data component of our HTTP request. Most of our command line is just setting up curl to make the HTTP connection correctly. The interesting part is the actual JSON-RPC command we issue:
{"jsonrpc":"2.0","method":"web3_clientVersion","params":[],"id":1}
The JSON-RPC request is formatted according to the JSON-RPC 2.0 specification. Each request contains four elements:
jsonrpc
Version of the JSON-RPC protocol. This must be exactly "2.0".
method
The name of the method to be invoked.
params
A structured value that holds the parameter values to be used during the invocation of the method. This member may be omitted.
id
An identifier established by the client that must contain a string, number, or NULL value if included. The server must reply with the same value in the response object if included. This member is used to correlate the context between the two objects.
Tip
The id parameter is used primarily when you are making multiple requests in a single JSON-RPC call, a practice called batching. Batching is used to avoid the overhead of a new HTTP and TCP connection for every request. In the Ethereum context, for example, we would use batching if we wanted to retrieve thousands of transactions over one HTTP connection. When batching, you set a different id for each request and then match it to the id in each response from the JSON-RPC server. The easiest way to implement this is to maintain a counter and increment the value for each request.
The response we receive is:
{"jsonrpc":"2.0","id":1,"result":"Geth/1.14.3-stable/darwin-arm64/go1.22.2"}
This tells us that the JSON-RPC API is being served by Geth client version 1.14.3-stable.
Let’s try something a bit more interesting. In the next example, we ask the JSON-RPC API for the current price of gas in wei:
$ curl -X POST -H "Content-Type: application/json" --data \
	'{"jsonrpc":"2.0","method":"eth_gasPrice","params":[],"id":4213}' \
	http://localhost:8545

{"jsonrpc":"2.0","id":4213,"result":"0x1B1717FC7"}
The response, 0x1B1717FC7, tells us that the current gas price is 7.27 gwei (gigawei or billion wei). If, like us, you don’t think in hexadecimal, you can convert it to decimal on the command line with a little Bash-fu:
$ echo $((0x1B1717FC7))
7271972807
The full JSON-RPC API can be investigated on the Ethereum wiki.
Tip
In this section, we used raw curl requests to show the Ethereum JSON-RPC interface. In real life, you probably want to access it through a better, more programmatic way. Here is where libraries come into play. Feel free to explore the three most famous and used ones:
Remote Ethereum Clients
Remote clients offer a subset of the functionality of a full client. They do not store the full Ethereum blockchain, so they are faster to set up and require far less data storage.
These clients typically provide the ability to do one or more of the following:
- Manage private keys and Ethereum addresses in a wallet
- Create, sign, and broadcast transactions
- Interact with smart contracts using the data payload
- Browse and interact with DApps
- Offer links to external services, such as block explorers
- Convert ether units and retrieve exchange rates from external sources
- Inject a Web3 instance into the web browser as a JavaScript object
- Use a Web3 instance provided or injected into the browser by another client
- Access RPC services on a local or remote Ethereum node
Remote clients commonly offer some of the functions of a full-node Ethereum client without synchronizing a local copy of the Ethereum blockchain by connecting to a full node being run elsewhere—for example, by you locally on your machine or on a web server or by a third party on its server.
Let’s look at some of the most popular remote clients and the functions they offer.
Mobile (Smartphone) Wallets
Most production mobile wallets operate as remote clients because smartphones do not have adequate resources to run a full Ethereum client. Light clients are in development and are not in general use for Ethereum. The most famous one is Helios, which is still experimental software.
Popular mobile wallets include the following (we list these merely as examples; this is not an endorsement or an indication of the security or functionality of these wallets):
Coinbase Wallet
A mobile wallet that supports a bunch of different chains, such as Ethereum (and all L2s), EVM-compatible L1s, Bitcoin, Solana, Litecoin, and Dogecoin. It can also connect to a Coinbase account.
Phantom
Phantom is another multichain wallet that is compatible with Ethereum, Solana, Bitcoin, and Polygon.
Trust Wallet
A mobile multichain wallet that supports more than one hundred blockchains. Trust Wallet is available for iOS and Android.
Uniswap Wallet
A mobile wallet that supports only Ethereum and EVM-compatible L2s and L1s. It’s made by the Uniswap team. It’s quite new, available both for iOS and Android.
Browser Wallets
A variety of wallets and DApp browsers are available as plug-ins or extensions of web browsers like Chrome and Firefox. These are remote clients that run inside your browser. Some of the more popular ones include:
MetaMask
MetaMask, introduced in Chapter 2, is a versatile browser-based wallet, RPC client, and basic contract explorer. It is available on Chrome, Firefox, Opera, and Brave Browser.
Phantom
Phantom also has a web browser wallet that has a very nice and clean UI.
Rabby Wallet
Rabby is a new multichain web browser wallet that supports more than one hundred different blockchains (EVM-compatible chains).
Coinbase Wallet
Coinbase Wallet also has the web browser wallet. It has the same features as the mobile version.
Hardware Wallets
The majority of mobile and browser wallets can be coupled with the higher security of hardware wallets: offline devices designed to never connect to the internet and built to resist tampering and other forms of physical attacks, providing a higher level of security. Several companies are building these kinds of devices, but two of the most widely used are Ledger and Trezor.
Conclusion
In this chapter, we explored Ethereum clients. You downloaded, installed, and synchronized a client, becoming a participant in the Ethereum network and contributing to the health and stability of the system by replicating the blockchain on your own computer.
In the future, new types of Ethereum clients will be available since the research and development around Ethereum is huge. Interesting areas include:
History pruning
Prune historical data to lower the storage requirement for a full node
Verkle trees and statelessness
Be able to verify a block without having the full Ethereum state
zk-EVM
Verify the correctness of a block by verifying a zero-knowledge proof without having to reexecute all the transactions in the block
We’ll explore each of these concepts in the following chapters, but first, we need to uncover the true magic that makes all this possible: cryptography.
Chapter 4. Cryptography
One of Ethereum's foundational technologies is cryptography, which is a branch of mathematics used extensively in computer security. Cryptography means "secret writing" in Greek, but the study of cryptography encompasses more than just secret writing, which is referred to as encryption. Cryptography can, for example, also be used to prove knowledge of a secret without revealing that secret (e.g., with a digital signature) or to prove the authenticity of data (e.g., with digital fingerprints, also known as hashes). These types of cryptographic proofs are mathematical tools critical to the operation of the Ethereum platform (and, indeed, all blockchain systems) and are also extensively used in Ethereum applications.
Note that, at the time of publication, no part of the Ethereum protocol involves encryption; that is to say all communications with the Ethereum platform and between nodes (including transaction data) are unencrypted and can (necessarily) be read by anyone. This is so everyone can verify the correctness of state updates and consensus can be reached. In the future, advanced cryptographic tools, such as zero-knowledge proofs and homomorphic encryption, will be available that will allow for some encrypted calculations to be recorded on the blockchain while still enabling consensus; however, while provision has been made for them, they have yet to be fully deployed.
In this chapter, we will introduce some of the cryptography used in Ethereum—namely, public key cryptography (PKC), which is used to control ownership of funds, in the form of private keys and addresses.
Keys and Addresses
As we learned earlier in this book, Ethereum has two different types of accounts: EOAs and contracts. Ownership of ether by EOAs is established through digital private keys, Ethereum addresses, and digital signatures. The private keys are at the heart of all user interactions with Ethereum. In fact, account addresses are derived directly from private keys: a private key uniquely determines a single Ethereum address, also known as an account.
Private keys are not used directly in the Ethereum system in any way; they are never transmitted or stored on Ethereum. That is to say that private keys should remain private and should never appear in messages passed to the network, nor should they be stored on chain; only account addresses and digital signatures are ever transmitted and stored on the Ethereum system. For more information on how to keep private keys safe and secure, see "Wallet Best Practices".
Access to and control of funds are achieved with digital signatures, which are also created using the private key. Ethereum transactions require a valid digital signature to be included in the blockchain. Anyone with a copy of a private key has control of the corresponding account and any ether it holds. Assuming a user keeps their private key safe, the digital signatures in Ethereum transactions prove the true owner of the funds, because they prove ownership of the private key.
In PKC-based systems, such as that used by Ethereum, keys come in pairs consisting of a private (secret) key and a public key. Think of the public key as similar to a bank account number and the private key as similar to the secret PIN; it is the latter that provides control over the account and the former that identifies it to others. The private keys themselves are very rarely seen by Ethereum users; for the most part, they are stored (in encrypted form) in special files and managed by Ethereum wallet software.
In the payment portion of an Ethereum transaction, the intended recipient is represented by an Ethereum address, which is used in the same way as the beneficiary account details of a bank transfer. As we will see in more detail shortly, an Ethereum address for an EOA is generated from the public key portion of a key pair. However, not all Ethereum addresses represent public–private key pairs; they can also represent contracts, which, as we will see in Chapter 7, are not backed by private keys.
In the rest of this chapter, we will:
- Dive deeper into the fundamentals of cryptography and explore its mathematical underpinnings within Ethereum
- Examine the processes of key generation, storage, and management
- Review the various encoding formats used for private keys, public keys, and addresses
- Investigate the validator key cryptography and the KZG commitment scheme, which represent the most recent updates to Ethereum's cryptographic infrastructure
PKC and Cryptocurrency
PKC (also called asymmetric cryptography) is a core part of modern-day information security. The key exchange protocol, first published in the 1970s by Martin Hellman, Whitfield Diffie, and Ralph Merkle, was a monumental breakthrough that incited the first big wave of public interest in the field of cryptography. Before the 1970s, strong cryptographic knowledge was kept secret by governments.
PKC uses unique keys to secure information. These keys are based on mathematical functions that have a special property: it is easy to calculate them but hard to calculate their inverse. Based on these functions, cryptography enables the creation of digital secrets and unforgeable digital signatures, which are secured by the laws of mathematics.
For example, multiplying two large prime numbers together is trivial. But given the product of two large primes, it is very difficult to find the prime factors (a problem called prime factorization). Let's say we present the number 8,018,009 and tell you it is the product of two primes. Finding those two primes is much harder for you than it was for me to multiply them to produce 8,018,009.
Some of these mathematical functions can be inverted easily if you know some secret information. In the preceding example, if I tell you that one of the prime factors is 2,003, you can trivially find the other one with simple division: 8,018,009 ÷ 2,003 = 4,003. Such functions are often called trapdoor functions because they are very difficult to invert unless you are given a piece of secret information that can be used as a shortcut to reverse the function.
A more advanced category of mathematical functions that is useful in cryptography is based on arithmetic operations on an elliptic curve. In elliptic curve arithmetic, multiplication modulo a prime is simple, but division (the inverse) is practically impossible. This is called the discrete logarithm problem, and there are currently no known trapdoors. Elliptic curve cryptography is used extensively in modern computer systems and is the basis of Ethereum's (and other cryptocurrencies') use of private keys and digital signatures.
Note
Take a look at the following resources if you're interested in reading more about cryptography and the mathematical functions that are used in modern cryptography:
In Ethereum, we use PKC to create the public–private key pair we have been talking about in this chapter. They are considered a "pair" because the public key is derived from the private key. Together, they represent an Ethereum account by providing, respectively, a publicly accessible account handle (the address) and private control over access to any ether in the account and over any authentication the account needs when using smart contracts. The private key controls access by being the unique piece of information needed to create digital signatures, which are required to sign transactions to spend any funds in the account. Digital signatures are also used to authenticate owners or users of contracts, as we will see in Chapter 7.
Tip
In most wallet implementations, the private and public keys are stored together as a key pair for convenience. However, the public key can be trivially calculated from the private key, so storing only the private key is also possible.
A digital signature can be created to sign any message. For Ethereum transactions, the details of the transaction itself are used as the message. The mathematics of cryptography—in this case, elliptic curve cryptography—provides a way for the message (i.e., the transaction details) to be combined with the private key to create a code that can be produced only with knowledge of the private key. That code is called the digital signature.
Note that an Ethereum transaction is basically a request to access a particular account with a particular Ethereum address. When a transaction is sent to the Ethereum network in order to move funds or interact with smart contracts, it needs to be sent with a digital signature created with the private key corresponding to the Ethereum address in question. Elliptic curve mathematics means that anyone can verify that a transaction is valid, by checking that the digital signature matches the transaction details and the Ethereum address to which access is being requested. The verification doesn't involve the private key at all; that remains private. However, the verification process determines beyond doubt that the transaction could have come only from someone with the private key that corresponds to the public key behind the Ethereum address. This is the "magic" of PKC.
Tip
There is no encryption as part of the Ethereum protocol—all messages that are sent as part of the operation of the Ethereum network can (necessarily) be read by everyone. As such, private keys are used only to create digital signatures for transaction authentication.
Private Keys
A private key is simply a number, picked at random. Ownership and control of the private key is the root of user control over all funds associated with the corresponding Ethereum address as well as access to contracts that authorize that address. The private key is used to create signatures required to spend ether by proving ownership of funds used in a transaction. The private key must remain secret at all times because revealing it to third parties is equivalent to giving them control over the ether and contracts secured by that private key. The private key must also be backed up and protected from accidental loss. If it's lost, it cannot be recovered, and the funds secured by it are lost forever, too.
Tip
The Ethereum private key is just a number. One way to pick your private keys randomly is to simply use a coin, pencil, and paper: toss a coin 256 times and you have the binary digits of a random private key you can use in an Ethereum wallet (probably—see the following paragraphs). The public key and address can then be generated from the private key.
The first and most important step in generating keys is to find a secure source of entropy, or randomness. Creating an Ethereum private key essentially involves picking a number between 1 and 2^256. The exact method you use to pick that number does not matter as long as it is not predictable or deterministic. Ethereum software uses the underlying operating system's random number generator (RNG) to produce 256 random bits. Usually, the OS RNG is initialized by a human source of randomness, which is why you may be asked to wiggle your mouse around for a few seconds or to press random keys on your keyboard. An alternative could be cosmic radiation noise on the computer's microphone channel.
More precisely, a private key can be any nonzero number up to a very large number slightly less than 2^256—a huge 78-digit number, roughly 1.158 × 10^77. The exact number shares the first 38 digits with 2^256 and is defined as the order of the elliptic curve used in Ethereum. To create a private key, we randomly pick a 256-bit number and check that it is within the valid range. In programming terms, this is usually achieved by feeding an even larger string of random bits (collected from a cryptographically secure source of randomness) into a 256-bit hash algorithm such as Keccak-256 or SHA-256, both of which will conveniently produce a 256-bit number. If the result is within the valid range, we have a suitable private key. Otherwise, we simply try again with another random number.
Note
The size of Ethereum's private-key space—2^256—is an unfathomably large number. It is approximately 10^77 in decimal—that is, a number with 78 digits. For comparison, the visible universe is estimated to contain 10^80 atoms. Thus, there are almost enough private keys to give every atom in the universe an Ethereum account. If you pick a private key randomly, there is no conceivable way anyone will ever guess it or pick it themselves.
Note that the process of generating private keys is an offline one; it does not require any communication with the Ethereum network—or indeed, any communication with anyone at all. As such, to pick a number that no one else will ever pick, it needs to be truly random. If you choose the number yourself, the chance that someone else will try it (and then run off with your ether) is too high. Using a bad RNG (like the pseudorandom rand function in most programming languages) is even worse because it is even more obvious and even easier to replicate. Just like with passwords for online accounts, the private key needs to be unguessable. Fortunately, you never need to remember your private key, so you can take the best possible approach for picking it: true randomness.
Warning
Do not write your own code to create a random number or use a "simple" RNG offered by your programming language. Note that JavaScript-based RNGs in browser wallets can be insecure unless backed by OS entropy. It is vital that you use a cryptographically secure pseudorandom number generator (such as CSPRNG) with a seed from a source of sufficient entropy. Study the documentation of the RNG library you choose to make sure it is cryptographically secure. Correct implementation of the CSPRNG library is critical to the security of the keys.
The following is a randomly generated private key shown in hexadecimal format (256 bits shown as 64 hexadecimal digits, each 4 bits):
f8f8a2f43c8376ccb0871305060d7b27b0554d2cc72bccf41b2705608452f315
Public Keys
An Ethereum public key is a point on an elliptic curve, meaning it is a set of x and y coordinates that satisfy the elliptic curve equation.
In simpler terms, an Ethereum public key is two numbers, joined together. These numbers are produced from the private key by a calculation that can only go one way. That means that it is trivial to calculate a public key if you have the private key, but you cannot calculate the private key from the public key.
Warning
MATH is about to happen! Don't panic. If you start to get lost at any point in the following paragraphs, you can skip the next few sections. There are many tools and libraries that will do the math for you.
The public key is calculated from the private key using elliptic curve multiplication, which is practically irreversible: K = k * G, where k is the private key, G is a constant point called the generator point, K is the resulting public key, and * is the special elliptic curve "multiplication" operator. Note that elliptic curve multiplication is not like normal multiplication. It shares functional attributes with normal multiplication, but that is about it. For example, the reverse operation (which would be division for normal numbers), known as "finding the discrete logarithm"—that is, calculating k if you know K—is as difficult as trying all possible values of k (a brute-force search that will likely take more time than this universe will allow for).
In simpler terms, arithmetic on the elliptic curve is different from "regular" integer arithmetic. A point (G) can be multiplied by an integer (k) to produce another point (K). But there is no such thing as division, so it is not possible to simply "divide" the public key K by the point G to calculate the private key k. This is the one-way mathematical function described in the previous section "PKC and Cryptocurrency".
Note
Elliptic curve multiplication is a type of function that cryptographers call a "one-way" function: it is easy to do in one direction (multiplication) and impossible to do in the reverse direction (division). The owner of the private key can easily create the public key and then share it with the world, knowing that no one can reverse the function and calculate the private key from the public key. This mathematical trick becomes the basis for unforgeable and secure digital signatures that prove ownership of Ethereum funds and control of contracts.
Before we demonstrate how to generate a public key from a private key, let's look at elliptic curve cryptography in a bit more detail.
Elliptic Curve Cryptography Explained
Elliptic curve cryptography is a type of asymmetric or public key cryptography based on the discrete logarithm problem as expressed by addition and multiplication on the points of an elliptic curve. Figure 4-1 is an example of an elliptic curve, similar to that used by Ethereum.
Note
Ethereum uses the exact same elliptic curve, called
secp256k1, as Bitcoin. That makes it possible to reuse many of the elliptic curve libraries and tools from Bitcoin.

Figure 4-1. An elliptic curve
Ethereum uses a specific elliptic curve and set of mathematical constants, as defined in a standard called secp256k1, established by the US National Institute of Standards and Technology (NIST). The secp256k1 curve is defined by the following function, which produces an elliptic curve:
y^2 = (x^3 + 7) over (Fp)
or:
y^2 mod p = (x^3 + 7) mod p
The mod p (modulo prime number p) indicates that this curve is over a finite field of prime order p, also written as Fp, where p = 2^256 – 2^32 – 2^9 – 2^8 – 2^7 – 2^6 – 2^4 – 1, which is a very large prime number.
Because this curve is defined over a finite field of prime order instead of over the real numbers, it looks like a pattern of dots scattered in two dimensions, which makes it difficult to visualize. However, the math is identical to that of an elliptic curve over real numbers. As an example, Figure 4-2 shows the same elliptic curve over a much smaller finite field of prime order 17, showing a pattern of dots on a grid. The secp256k1 Ethereum elliptic curve can be thought of as a much more complex pattern of dots on an unfathomably large grid.
Figure 4-2. Elliptic curve cryptography: visualizing an elliptic curve over F(p), with p=17
So for example, the following is a point Q with coordinates (x, y) that is a point on the secp256k1 curve:
Q = (49790390825249384486033144355916864607616083520101638681403973749255924539515, 59574132161899900045862086493921015780032175291755807399284007721050341297360)
Example 4-1 shows how you can check this yourself using Python. The variables x and y are the coordinates of the point Q, as in the preceding example. The variable p is the prime order of the elliptic curve (the prime that is used for all the modulo operations). The last line of Python is the elliptic curve equation (the % operator in Python is the modulo operator). If x and y are indeed the coordinates of a point on the elliptic curve, then they satisfy the equation and the result is zero. Try it yourself, by typing python (or python3) on a command line and copying each line (after the prompt >>>) from the listing.
Example 4-1. Using Python to confirm that this point is on the elliptic curve
Python 3.12.4 (main, Jun  6 2024, 18:26:44) [Clang 15.0.0 (clang-1500.3.9.4)] on darwin
Type "help", "copyright", "credits" or "license" for more information.
>>> p = 115792089237316195423570985008687907853269984665640564039457584007908834671663
>>> x = 49790390825249384486033144355916864607616083520101638681403973749255924539515
>>> y = 59574132161899900045862086493921015780032175291755807399284007721050341297360
>>> (x ** 3 + 7 - y**2) % p
0
Elliptic Curve Arithmetic Operations
A lot of elliptic curve math looks and works very much like the integer arithmetic we learned at school. Specifically, we can define an addition operator, which instead of jumping along the number line is jumping to other points on the curve. Once we have the addition operator, we can also define multiplication of a point and a whole number, which is equivalent to repeated addition.
Elliptic curve addition is defined such that given two points P1 and P2 on the elliptic curve, there is a third point P3 = P1 + P2, also on the elliptic curve.
Geometrically, this third point P3 is calculated by drawing a line between P1 and P2. This line will intersect the elliptic curve in exactly one additional place (amazingly). Call this point P3′ = (x, y). Then reflect in the x-axis to get P3 = (x, –y), as you can see in Figure 4-3.
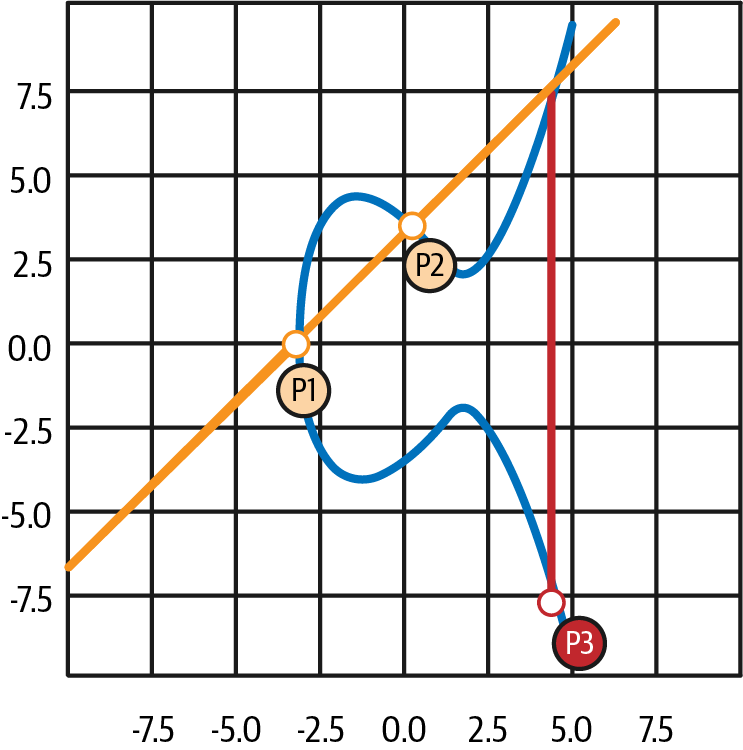
Figure 4-3. Elliptic curve addition: adding two points on an elliptic curve
If P1 and P2 are the same point, the line "between" P1 and P2 should extend to be the tangent to the curve at this point P1. This tangent will intersect the curve at exactly one new point, as shown in Figure 4-4. You can use techniques from calculus to determine the slope of the tangent line. Curiously, these techniques work, even though we are restricting our interest to points on the curve with two integer coordinates!
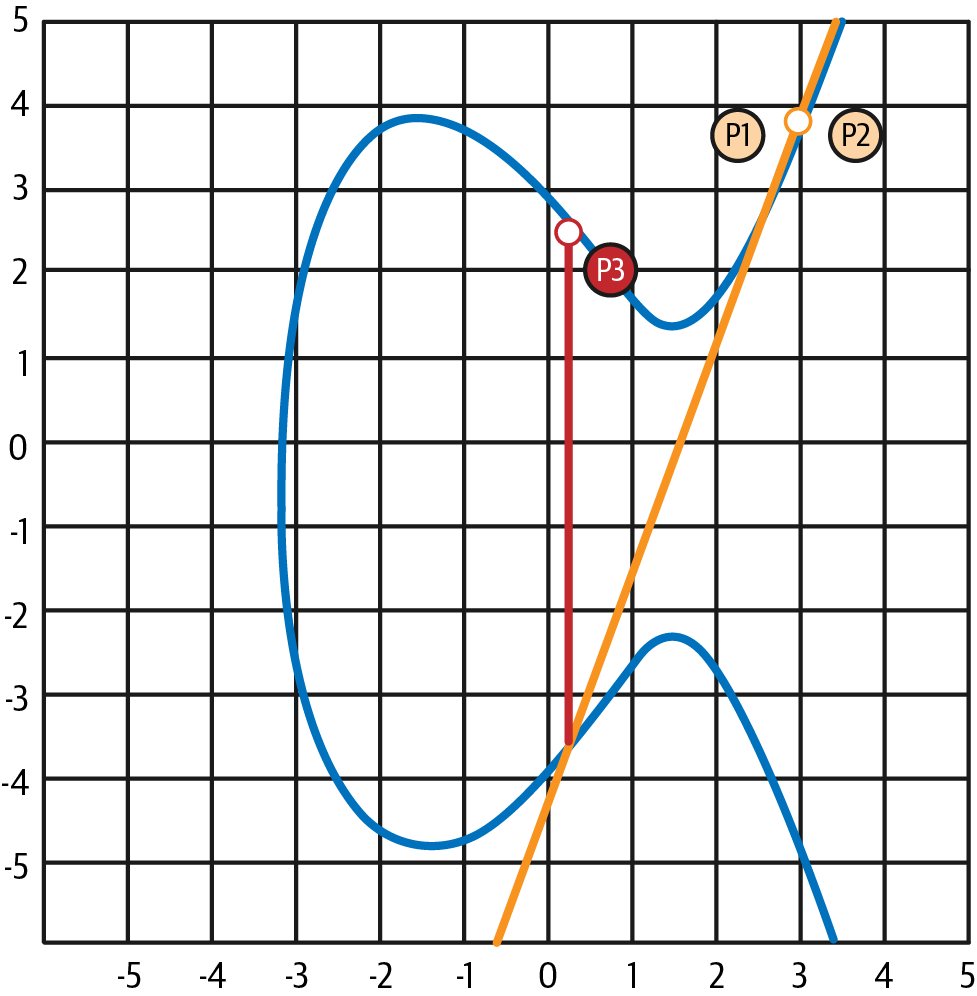
Figure 4-4. Elliptic curve addition: adding a point to itself
In elliptic curve math, there is also a point called the point at infinity, which roughly corresponds to the role of the number zero in addition. On computers, it's sometimes represented by x = y = 0 (which doesn't satisfy the elliptic curve equation, but it's an easy separate case that can be checked). There are a couple of special cases that explain the need for the point at infinity.
In some cases (e.g., if P1 and P2 have the same x values but different y values, as shown in Figure 4-5), the line will be exactly vertical, in which case P3 = the point at infinity.
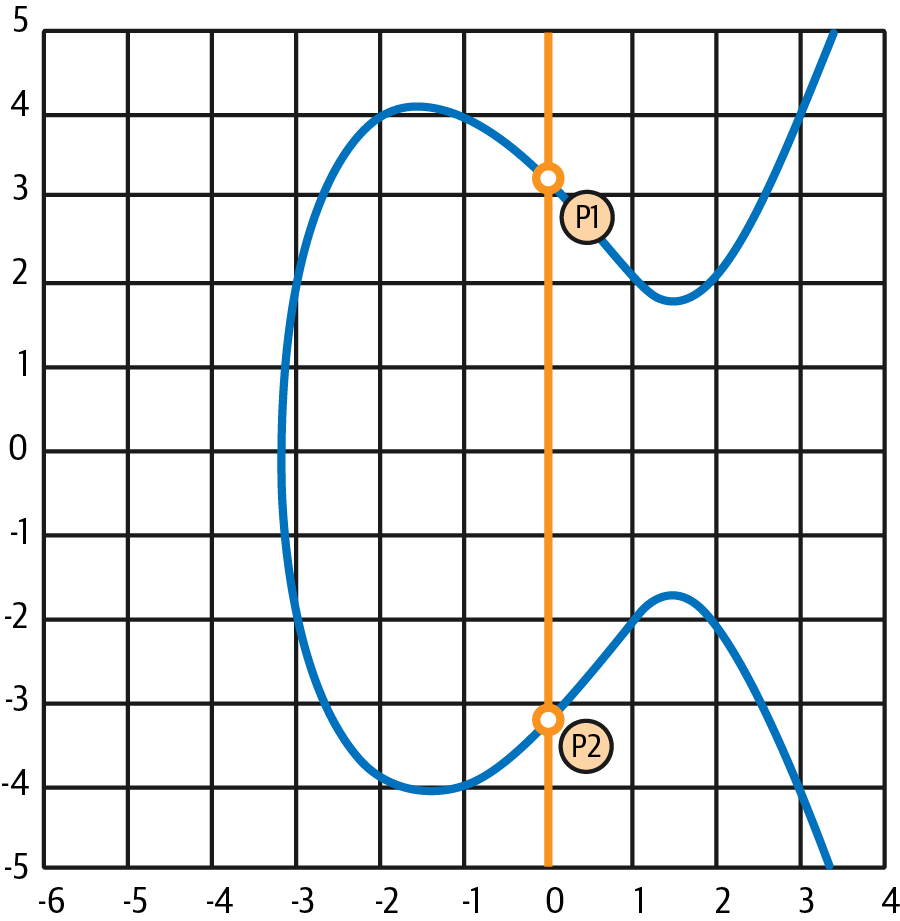
Figure 4-5. Elliptic curve addition: a special case results in the point at infinity
If P1 is the point at infinity, then P1 + P2 = P2. Similarly, if P2 is the point at infinity, then P1 + P2 = P1. This shows how the point at infinity plays the role that zero plays in "normal" arithmetic.
It turns out that + is associative, which means that (A + B) + C = A + (B + C). That means we can write A + B + C (without parentheses) without ambiguity.
Now that we have defined addition, we can define multiplication in the standard way that extends addition. For a point P on the elliptic curve, if k is a whole number, then k * P = P + P + P + … + P (k times). Note that k is sometimes (perhaps confusingly) called an exponent in this case.
Generating a Public Key
Starting with a private key in the form of a randomly generated number k, we multiply it by a predetermined point on the curve called the generator point G to produce another point somewhere else on the curve, which is the corresponding public key K:
K = k * G
The generator point is specified as part of the secp256k1 standard; it is the same for all implementations of secp256k1, and all keys derived from that curve use the same point G. Because the generator point is always the same for all Ethereum users, a private key k multiplied with G will always result in the same public key K. The relationship between k and K is fixed but can only be calculated in one direction, from k to K. That's why an Ethereum address (derived from K) can be shared with anyone and does not reveal the user's private key (k).
As we described in the previous section, the multiplication of k * G is equivalent to repeated addition, so G + G + G + … + G, repeated k times. In summary, to produce a public key K from a private key k, we add the generator point G to itself, k times.
Tip
A private key can be converted into a public key, but a public key cannot be converted back into a private key, because the math only works one way.
Let's apply this calculation to find the public key for the specific private key we showed you in the section "Private Keys":
K = f8f8a2f43c8376ccb0871305060d7b27b0554d2cc72bccf41b2705608452f315 * G
A cryptographic library can help us calculate K, using elliptic curve multiplication. The resulting public key K is defined as the point:
K = (x, y)
where:
x = 6e145ccef1033dea239875dd00dfb4fee6e3348b84985c92f103444683bae07b
y = 83b5c38e5e2b0c8529d7fa3f64d46daa1ece2d9ac14cab9477d042c84c32ccd0
In Ethereum you may see public keys represented as a serialization of 130 hexadecimal characters (65 bytes). This is adopted from a standard serialization format proposed by the industry consortium Standards for Efficient Cryptography Group (SECG), documented in Standards for Efficient Cryptography (SEC1). The standard defines four possible prefixes that can be used to identify points on an elliptic curve, listed in Table 4-1.
Table 4-1. Serialized elliptic curve public key prefixes
| Prefix | Meaning | Length (bytes, including prefix) |
|---|---|---|
| 0x00 | Point at infinity | 1 |
| 0x04 | Uncompressed point | 65 |
| 0x02 | Compressed point with even y | 33 |
| 0x03 | Compressed point with odd y | 33 |
Ethereum only uses uncompressed public keys, so the only prefix that is relevant is (hex) 04. The serialization concatenates the x and y coordinates of the public key:
04 + x-coordinate (32 bytes / 64 hex) + y-coordinate (32 bytes / 64 hex)
Therefore, the public key we calculated earlier is serialized as:
046e145ccef1033dea239875dd00dfb4fee6e3348b84985c92f103444683bae07b83b5c38e5e2b0c8529d7fa3f64d46daa1ece2d9ac14cab9477d042c84c32ccd0
Elliptic Curve Libraries
There are a couple of implementations of the secp256k1 elliptic curve that are used in cryptocurrency-related projects:
The OpenSSL library offers a comprehensive set of cryptographic primitives, including a full implementation of secp256k1. For example, to derive the public key, the function EC_POINT_mul can be used.
Bitcoin Core's libsecp256k1 is a C-language implementation of the secp256k1 elliptic curve and other cryptographic primitives. It was written from scratch to replace OpenSSL in Bitcoin Core software and is considered superior in both performance and security.
Cryptographic Hash Functions
Cryptographic hash functions are used throughout Ethereum. In fact, hash functions are used extensively in almost all cryptographic systems—a fact captured by cryptographer Bruce Schneier, who said, "Much more than encryption algorithms, one-way hash functions are the workhorses of modern cryptography."
In this section, we will discuss hash functions, explore their basic properties, and see how those properties make them so useful in so many areas of modern cryptography. We address hash functions here because they are part of the transformation of Ethereum public keys into addresses. They can also be used to create digital fingerprints, which aid in the verification of data.
In simple terms, a hash function is any function that can be used to map data of arbitrary size to data of fixed size. The input to a hash function is called a preimage, the message, or simply the input data. The output is called the hash. Cryptographic hash functions are a special subcategory that have specific properties that are useful to secure platforms, such as Ethereum.
A cryptographic hash function is a one-way hash function that maps data of arbitrary size to a fixed-size string of bits. The "one-way" nature means that it is computationally infeasible to re-create the input data if one only knows the output hash. The only way to determine a possible input is to conduct a brute-force search, checking each candidate for a matching output; given that the search space is virtually infinite, it is easy to understand the practical impossibility of the task. Even if you find some input data that creates a matching hash, it may not be the original input data: hash functions are "many-to-one" functions. Finding two sets of input data that hash to the same output is called finding a hash collision. Roughly speaking, the better the hash function, the rarer hash collisions are. For Ethereum, they are effectively impossible.
Let's take a closer look at the main properties of cryptographic hash functions:
Determinism
A given input message always produces the same hash output.
Verifiability
Computing the hash of a message is efficient (linear complexity).
Noncorrelation
A small change to the message (e.g., a 1-bit change) should change the hash output so extensively that it cannot be correlated to the hash of the original message.
Irreversibility
Computing the message from its hash is infeasible, equivalent to a brute-force search through all possible messages.
Collision protection
It should be infeasible to calculate two different messages that produce the same hash output.
Resistance to hash collisions is particularly important for avoiding digital signature forgery in Ethereum.
The combination of these properties makes cryptographic hash functions useful for a broad range of security applications, including:
- Data fingerprinting
- Message integrity (error detection)
- Proof of work
- Authentication (password hashing and key stretching)
- Pseudorandom number generators
- Message commitment (commit-reveal mechanisms)
- Unique identifiers
We will find many of these in Ethereum as we progress through the various layers of the system.
Ethereum's Cryptographic Hash Function: Keccak-256
Ethereum uses the Keccak-256 cryptographic hash function in many places. Keccak-256 was designed as a candidate for the SHA-3 Cryptographic Hash Function Competition held in 2007 by NIST. Keccak was the winning algorithm, which became standardized as Federal Information Processing Standard (FIPS) 202 in 2015.
However, during the period when Ethereum was developed, the NIST standardization was not yet finalized. NIST adjusted some of the parameters of Keccak after completion of the standards process, allegedly to improve its efficiency. At the same time, heroic whistleblower Edward Snowden revealed documents implying that NIST may have been improperly influenced by the National Security Agency to intentionally weaken the Dual_EC_DRBG RNG standard, effectively placing a backdoor in the standard RNG. The result of this controversy was a backlash against the proposed changes and a significant delay in the standardization of SHA-3. At the time, the Ethereum Foundation decided to implement the original Keccak algorithm as proposed by its inventors, rather than the SHA-3 standard as modified by NIST.
Warning
While you may see "SHA-3" mentioned throughout Ethereum documents and code, many—if not all—of those instances actually refer to Keccak-256, not the finalized FIPS-202 SHA-3 standard. The implementation differences are slight, having to do with padding parameters, but they are significant in that Keccak-256 produces different hash outputs than FIPS-202 SHA-3 for the same input.
Which Hash Function Am I Using?
How can you tell if the software library you are using implements FIPS-202 SHA-3 or Keccak-256, if both might be called "SHA-3"?
An easy way to tell is to use a test vector, an expected output for a given input. The test most used for a hash function is the empty input. If you run the hash function with an empty string as input, you should see the following results:
Keccak256("") = c5d2460186f7233c927e7db2dcc703c0e500b653ca82273b7bfad8045d85a470
SHA3("") = a7ffc6f8bf1ed76651c14756a061d662f580ff4de43b49fa82d80a4b80f8434a
Regardless of what the function is called, you can test it to see whether it is the original Keccak-256 or the final NIST standard FIPS-202 SHA-3 by running this simple test. Remember, Ethereum uses Keccak-256, even though it is often called SHA-3 in the code.
Note
Due to the confusion created by the difference between the hash function used in Ethereum (Keccak-256) and the finalized standard (FIP-202 SHA-3), all instances of
sha3in all code, opcodes, and libraries have been renamed tokeccak256. See ERC-59 for details.
Next, let's examine the first application of Keccak-256 in Ethereum, which is to produce Ethereum addresses from public keys.
Ethereum Addresses
Ethereum addresses are unique identifiers that are derived from public keys or contracts using the Keccak-256 one-way hash function.
In our previous examples, we started with a private key and used elliptic curve multiplication to derive a public key.
Private key k:
k = f8f8a2f43c8376ccb0871305060d7b27b0554d2cc72bccf41b2705608452f315
Public key K (x and y coordinates concatenated and shown as hex):
K = 6e145ccef1033dea239875dd00dfb4fee6e3348b84985c92f103444683bae07b83b5c38e5e...
Note
It is worth noting that the public key is not formatted with the prefix (hex)
04when the address is calculated.
We use Keccak-256 to calculate the hash of this public key:
Keccak256(K) = 2a5bc342ed616b5ba5732269001d3f1ef827552ae1114027bd3ecf1f086ba0f9
Then, we keep only the last 20 bytes (least significant bytes), which is our Ethereum address:
001d3f1ef827552ae1114027bd3ecf1f086ba0f9
You will most often see Ethereum addresses with the prefix 0x, which indicates they are hexadecimal encoded, like this:
0x001d3f1ef827552ae1114027bd3ecf1f086ba0f9
Ethereum Address Formats
Ethereum addresses are hexadecimal numbers, identifiers derived from the last 20 bytes of the Keccak-256 hash of the public key.
Unlike Bitcoin addresses, which are encoded in the user interface of all clients to include a built-in checksum to protect against mistyped addresses, Ethereum addresses are presented as raw hexadecimal without any checksum. The rationale behind that decision was that Ethereum addresses would eventually be hidden behind abstractions (such as name services) at higher layers of the system and that checksums should be added at higher layers if necessary.
In reality, these higher layers were developed too slowly, and this design choice led to a number of problems in the early days of the ecosystem, including the loss of funds due to mistyped addresses and input validation errors. Furthermore, because Ethereum name services were developed more slowly than initially expected, alternative encodings were adopted very slowly by wallet developers. We'll look at a few of the encoding options next.
Note
It's worth mentioning the Ethereum Name Service (ENS), introduced in 2017 by Alex Van de Sande and Nick Johnson. ENS provides an on-chain solution for converting human-readable names, such as
masteringethereum.eth, into Ethereum addresses.
Hex Encoding with Checksum in Capitalization (ERC-55)
Due to the slow deployment of name services, a standard was proposed by ERC-55. ERC-55 offers a backward-compatible checksum for Ethereum addresses by modifying the capitalization of the hexadecimal address. The idea is that Ethereum addresses are case insensitive and all wallets are supposed to accept Ethereum addresses expressed in capital or lowercase characters, without any difference in interpretation. By modifying the capitalization of the alphabetic characters in the address, we can convey a checksum that can be used to protect the integrity of the address against typing or reading mistakes. Wallets that do not support ERC-55 checksums simply ignore the fact that the address contains mixed capitalization, but those that do support it can validate it and detect errors with a 99.986% accuracy.
The mixed-capitals encoding is subtle, and you may not notice it at first. Our example address is:
0x001d3f1ef827552ae1114027bd3ecf1f086ba0f9
With an ERC-55 mixed-capitalization checksum it becomes:
0x001d3F1ef827552Ae1114027BD3ECF1f086bA0F9
Can you tell the difference? Some of the alphabetic (A–F) characters from the hexadecimal encoding alphabet are now capitals, while others are lowercase.
ERC-55 is quite simple to implement. We take the Keccak-256 hash of the lowercase hexadecimal address. This hash acts as a digital fingerprint of the address, giving us a convenient checksum. Any small change in the input (the address) should cause a big change in the resulting hash (the checksum), allowing us to detect errors effectively. The hash of our address is then encoded in the capitalization of the address itself. Let's break it down, step-by-step:
-
Hash the lowercase address, without the
0xprefix:Keccak256("001d3f1ef827552ae1114027bd3ecf1f086ba0f9") = 23a69c1653e4ebbb619b0b2cb8a9bad49892a8b9695d9a19d8f673ca991deae1 -
Capitalize each alphabetic address character if the corresponding hex digit of the hash is greater than or equal to
0x8. This is easier to show if we line up the address and the hash:Address: 001d3f1ef827552ae1114027bd3ecf1f086ba0f9 Hash : 23a69c1653e4ebbb619b0b2cb8a9bad49892a8b9...
Our address contains an alphabetic character d in the fourth position. The fourth character of the hash is 6, which is less than 8. So, we leave the d lowercase. The next alphabetic character in our address is f, in the sixth position. The sixth character of the hexadecimal hash is c, which is greater than 8. Therefore, we capitalize the F in the address, and so on. As you can see, we only use the first 20 bytes (40 hex characters) of the hash as a checksum, since we only have 20 bytes (40 hex characters) in the address to capitalize appropriately.
Check the resulting mixed-capitals address yourself and see if you can tell which characters were capitalized and which characters they correspond to in the address hash:
Address: 001d3F1ef827552Ae1114027BD3ECF1f086bA0F9
Hash   : 23a69c1653e4ebbb619b0b2cb8a9bad49892a8b9...
Detecting an Error in an ERC-55 Encoded Address
Now, let's look at how ERC-55 addresses will help us find an error. Let's assume we have printed out an Ethereum address, which is ERC-55 encoded:
0x001d3F1ef827552Ae1114027BD3ECF1f086bA0F9
Now let's make a basic mistake in reading that address. The character before the last one is a capital F. For this example, let's assume we misread that as a capital E, and we type the following (incorrect) address into our wallet:
0x001d3F1ef827552Ae1114027BD3ECF1f086bA0E9
Fortunately, our wallet is EIP-55 compliant! It notices the mixed capitalization and attempts to validate the address. It converts it to lowercase and calculates the checksum hash:
Keccak256("001d3f1ef827552ae1114027bd3ecf1f086ba0e9") = 5429b5d9460122fb4b11af9cb88b7bb76d8928862e0a57d46dd18dd8e08a6927
As you can see, even though the address has only changed by one character (in fact, only one bit, as e and f are one bit apart), the hash of the address has changed radically. That's the property of hash functions that makes them so useful for checksums!
Now, let's line up the two and check the capitalization:
001d3F1ef827552Ae1114027BD3ECF1f086bA0E9
5429b5d9460122fb4b11af9cb88b7bb76d892886...
It's all wrong! Several of the alphabetic characters are incorrectly capitalized. Remember that the capitalization is the encoding of the correct checksum.
The capitalization of the address we input doesn't match the checksum just calculated, meaning something has changed in the address, and an error has been introduced.
Validators' Cryptography
In this section, we're going to explore the cryptography used by validators in the new PoS-based consensus protocol. While the core idea is always to be able to digitally sign messages and verify them, there are interesting requirements that lead to design choices and final implementations that differ from the cryptography used in Ethereum for transactions or addresses.
Introduction
When Ethereum was using Ethash—the PoW consensus algorithm—there was no reason why block proposers—miners at that time—should have signed the blocks they were producing. In fact, PoW-based consensus algorithms don't need to know who's creating the blocks in order to correctly work. If a block proposer misbehaves, the protocol implicitly punishes them by making them waste electric energy and time, thus money. Let's take the example of a miner who tries to do a double spend by creating two blocks at the same time. To better understand the core idea behind this "exploit," imagine a miner wants to buy a car and agrees with the dealer to pay in ETH—let's say 10 ETH. The miner then creates two blocks at the same time. Let's suppose they're both valid: in the first one, the miner adds the payment transaction in which they send 10 ETH to the car dealer while in the other block, they don't. The miner is trying to split the chain in two parts.
Depending on (almost) random factors, the car dealer could receive first the block in which the miner paid them 10 ETH. So the car dealer can suppose that the payment went fine. But they don't give the car to the miner yet. In fact, the car dealer knows that in PoW systems, you usually want to wait a bunch of blocks before considering a transaction definitely settled.
After more or less 12 seconds, a different miner produces a new block on top of the block that doesn't contain the 10 ETH payment. This is completely possible as it usually depends on which block this next miner has received first. Now there is one longer blockchain and, thanks to the heaviest chain rule—also known (a bit wrongly) as the longest chain rule—that chain is considered the only one that is valid by all the nodes.
The car dealer sees that the valid blockchain doesn't contain the block they previously received in which there is the 10 ETH payment, so they consider the payment not done, and they don't give the car to the miner.
Remember that, in PoW systems, miners have to spend real energy and time to produce a valid block that passes the PoW check—that is, the block hash is lower than a dynamic threshold—so the fact that they spend energy and time to create a block and then they see one of their blocks rejected by the entire network is already an implicit punishment. They lost precious energy and time they could have better spent by creating only valid blocks, respecting all the rules and not trying to cheat.
PoS systems don't have this same implicit punishment for block producers (i.e., validators) that misbehave. Instead, they use an explicit method: slashing.
Slashing is the action of punishing a validator who didn't follow the rules by subtracting some (or all) of their staked ETH. This explains why validators have to put a minimum amount of ETH at stake to become active validators. If they don't have anything at stake, the protocol won't be able to punish them if they start to act maliciously.
Explicitly punishing validators for not following the rules requires knowing exactly what every validator is doing. To do that, every message (including blocks) that validators send must be authenticated with their digital signatures.
Let's re-create the analogous example we used previously with the miner. Now we have a validator who is proposing two blocks at the same time. While with PoW, the miner should have spent double the energy and time to produce two valid blocks at the same time, with PoS this is (almost) entirely free.
But here is where slashing enters into the scene. Double-signing — proposing two blocks at the same time — is a slashable event, so the validator is immediately punished by (in this specific example) destroying all their ETH at stake.
Now that we know why validators must authenticate all of their messages, we can deep-dive into the cryptography used for that: BLS signatures. In the next section, we'll see the requirements that led to the final decision to use BLS cryptography.
Requirements
The first solution you could think of for this problem—that is, the need to authenticate every message that validators send to one another—is to apply the same digital signature algorithm Ethereum already uses to digitally sign every transaction: the Elliptic Curve Digital Signature Algorithm (ECDSA).
But it wouldn't work with the high number of validators Ethereum has—more than one million. In fact, there is a fundamental requirement that this digital signature algorithm should adhere to: it must be possible to condense signatures in order to reduce the space needed for them in the block and lower the time nodes need to spend on validating all validators' signatures.
Right now, every validator can cast a vote—a message that needs to be authenticated—once every epoch, or 32 slots (we'll expand more on this in Chapter 15). These messages need to travel the P2P gossip layer to reach other validators and nodes, be validated by every other node to check that the signature is valid, and be inserted into a block.
It's very easy to spot a bottleneck here: the more validators that join the network, the more messages that nodes need to handle. Even blocks become bigger because they need to reserve more and more space for those validators' signatures.
Note
You can easily calculate the number of messages that nodes need to handle based on the number of active validators:
N = number of active validators
1 msg / 1 epoch × N =
= 1 msg / 32 slots × N = ← one epoch is made of 32 slots
= 1 msg / 32 × 12 seconds × N = ← every slot takes 12 seconds
= 1 msg / 384 seconds × N =
= 0.0026041667 msg / second × N
So we have about 0.0026 messages every second that we need to multiply with N, the number of active validators in the network:
N = 1,000 → ~2.6 messages per second
N = 10,000 → ~26 messages per second
N = 100,000 → 260 messages per second
N = 1,000,000 → 2,600 messages per second
Right now, the Ethereum PoS protocol is handling about 2,600 messages every second.
For these reasons, most PoS blockchains have a very small validator set, in the tens or hundreds at maximum. Even the Ethereum initial proposal (see EIP-1011) was targeting a maximum of nine hundred validators, with 1,500 ETH as the minimum deposit for being elected in the active validator set.
This would have been the final specification for the Ethereum PoS protocol if Justin Drake, an Ethereum Foundation researcher, didn't come up with the idea of BLS signature aggregation in May 2018 in a long article published on the ethresearch website.
BLS Digital Signatures
BLS signatures are named after their authors. BLS stands for Boneh–Lynn–Shacham, referring to the three cryptographers Dan Boneh, Ben Lynn, and Hovav Shacham who introduced the signature scheme in their paper titled "Short Signatures from the Weil Pairing" in 2001.
As ECDSA (which will be further explained in Chapter 6), BLS signatures are still based on elliptic curve cryptography. In particular, Ethereum uses the curve BLS12-381, designed by Sean Bowe in 2017 while he was working for the Zcash protocol. It's defined by the following function:
y^2 = x^3 + 4
over the integers modulo q, where q is a 115-decimal-digits number: 0x1a0111ea397fe69a4b1ba7b6434bacd764774b84f38512bf6730d2a0f6b0f6241eabfffeb153ffffb9feffffffffaaab.
How Does It Work?
The core idea is very similar to how ECDSA works: there is a secret key from which a public key is derived. Then, every message is signed using the secret key, and everyone else can verify its integrity by using the corresponding public key.
The secret key (sk) is an integer between 1 and r – 1, where r is this huge number: 0x73eda753299d7d483339d80809a1d80553bda402fffe5bfeffffffff00000001. It has 77 decimal digits!
The public key (pk) is obtained by doing sk * g1, a scalar multiplication of the elliptic curve point, where g1 is the generator of a group called G1. The pk is represented in a compressed and serialized format, resulting in a 48-byte string.
The message (m) that is signed is always mapped to an elliptic curve point, which is a member of a different group called G2. You can think of this mapping as a sort of hash function that takes a message m—that is, the actual validator's attestation—and outputs a point H(m) in G2, represented in its compressed serialized form as a 96-byte string.
Finally, we obtain the signature (σ) of the message m by doing sk * H(m), a new elliptic point in G2.
The key differences between ECDSA and BLS lie in the low-level details of the two protocols—that is, in the mathematical techniques they use for verifying the correctness of signatures. In fact, while ECDSA involves mathematical linear calculations, such as scalar multiplication and addition on the elliptic curve, BLS signatures rely on the more complex arithmetic of elliptic curve bilinear pairings.
In fact, a signature σ is valid if and only if the following equation holds true:
e(g1,σ) = e(pk, H(m))
where e is an elliptic curve bilinear pairing.
Inside Elliptic Curve Properties
Completely understanding the previous equation requires a deep knowledge of elliptic curves, pairings, and all that huge rabbit hole. But an easy way to understand it is to simply follow the steps here. You won't grasp all the details of why and how the pairing has that property, but it can still help you familiarize yourself with it:
e(pk, H(m)) = e(sk * g1,H(m)) = ← pk = sk * g1
= e(g1, H(m))^sk = ← thanks to a pairing property
= e(g1, sk * H(m)) = ← thanks to the same property
= e(g1,σ) ← σ = sk * H(m)
As Vitalik Buterin pointed out in a Medium article:
If you view elliptic curve points as one-way encrypted numbers—
encrypt(p) = p * G = P, where G is the generator point—then whereas traditional elliptic curve math lets you check linear constraints on the numbers (e.g., ifP = G * p,Q = G * qandR = G * r, checking5 * P + 7 * Q = 11 * Ris really checking that5 * p + 7 * q = 11 * r), pairings let you check quadratic constraints (e.g., checkinge(P, Q) * e(G, G * 5) = 1is really checking thatp * q + 1 * 5 = 0).
As you can imagine, more complex arithmetic also means more time to produce and to verify a signature. The only reason Ethereum is using BLS signatures for validators is their extremely important property of signature aggregation.
In fact, if you take two ECDSA signatures and sum them together, you don't obtain a meaningful result. If you try to use that result to prove the integrity of the initially signed message, you won't pass any test.
Instead, if you take two BLS signatures and sum them together, you are simply doing an elliptic curve addition. The result is a new elliptic curve point—in G2—that you can use against the sum of the two correspondent public keys—which is still an elliptic curve point in G1—to correctly verify the integrity of the initially signed message.
Note
Aggregate signatures and aggregate public keys are indistinguishable from a single signature and a single public key, so you can use the exact same algorithm to verify the correctness of an aggregated signature.
Aggregated signature and public key:
σagg = σ1 + σ2 + σ3 + … + σn
pkagg = pk1 + pk2 + pk3 + … + pkn
Aggregated signature verification:
e(pkagg,H(m)) =
= e(pk1 + pk2 + pk3 + ... + pkn,H(M)) =
= e((sk1 + sk2 + sk3 + ... + skn) * g1,H(m)) =
= e(g1,H(m))^(sk1 + sk2 + sk3 + ... + skn) =
= e(g1,(sk1 + sk2 + sk3 + ... + skn) * H(m)) =
= e(g1,σ1 + σ2 + σ3 + ... + σn) =
= e(g1,σagg)
In Summary
Cryptography is really hard; it requires a deep mathematical background. And this book isn't really for cryptographers, so it's fundamental to summarize what we've briefly touched on in the previous sections. We explained how BLS signatures work and why they were chosen as the digital signature algorithm that validators use in the new PoS-based consensus protocol: their aggregation property lets you condense more digital signatures into one, reducing the amount of space needed to store them and the time to validate them without losing any security.
We can now do a quick example to demonstrate how validators use BLS algorithms in "real life" and how signature aggregation comes into play. Figure 4-6 illustrates a scenario where we have three validators who want to express their votes for a block, block A. So they cast their votes, sign them, and share them with one another.
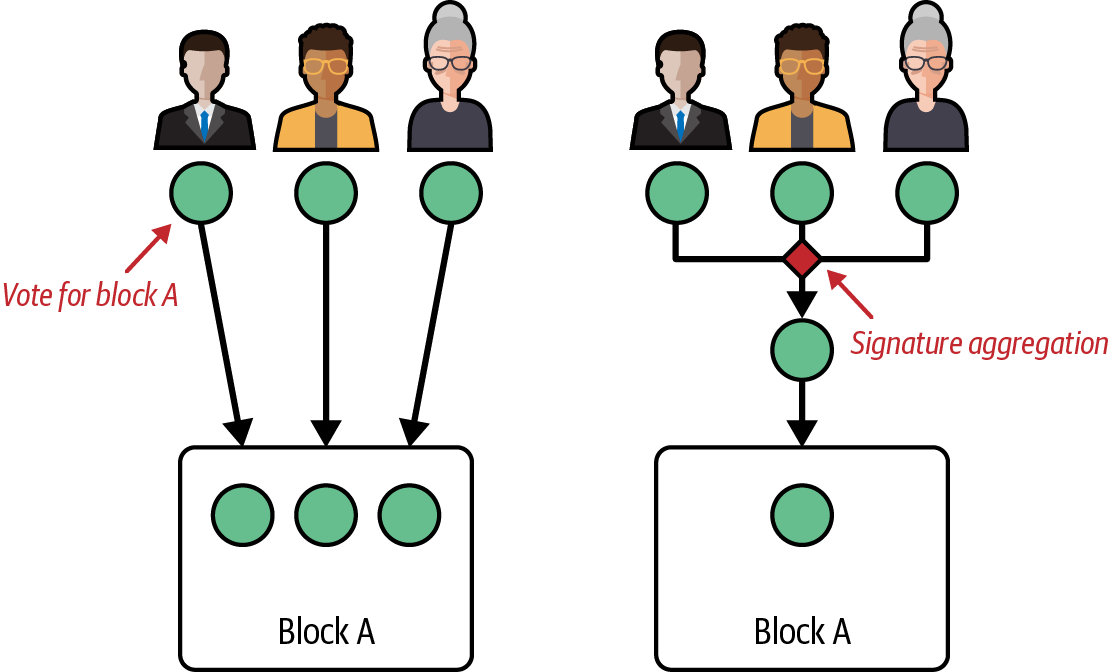
Figure 4-6. BLS signature aggregation: three validators vote and sign
Without BLS, you would need to save all three signed votes into the block to store them permanently. With BLS, you can aggregate all three signed votes into a new aggregated vote and store only that into the block.
This not only saves space but also dramatically reduces the amount of time and computation all Ethereum nodes have to do when validating all signed votes because they can directly validate aggregated ones instead of performing the validation for each single signed vote. And the magic of BLS cryptography is that the aggregated result is no different than a normal signature: that means that verifying the validity of an aggregated signature is no harder than verifying the validity of a single signature. Thus, by significantly reducing the number of signed votes that must be validated, while requiring the same amount of computation to verify each signature, the total amount of computation—and therefore time—that full nodes must perform is much lower than it would be without BLS-aggregated signatures, as shown in Figure 4-7.
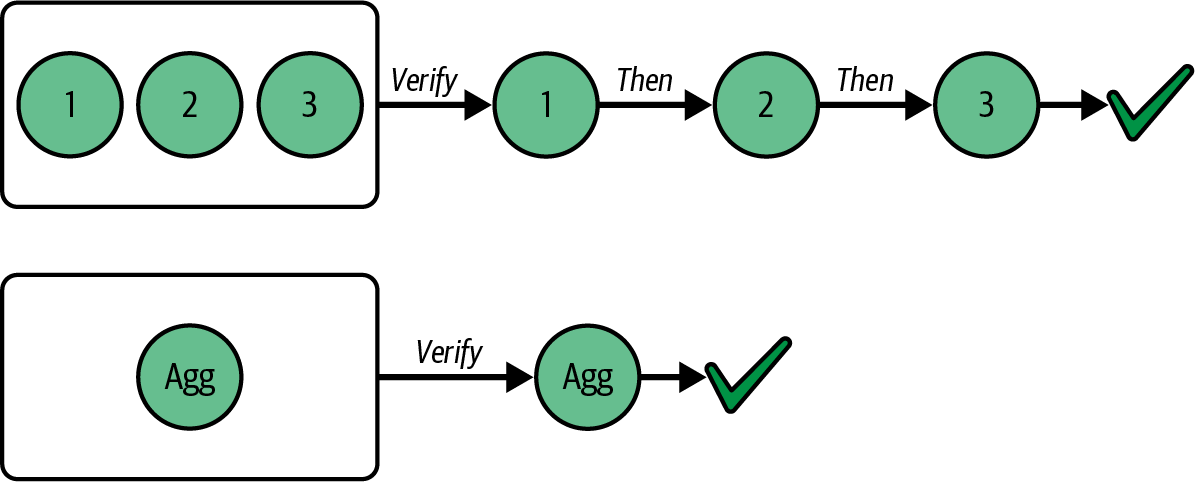
Figure 4-7. BLS signature aggregation reduces validation time
What if a validator doesn't follow the rules? If a validator behaves maliciously—for example, by double-signing, or voting for two different blocks at the same time—the protocol can detect this behavior and punish the validator accordingly, as shown in Figure 4-8.

Figure 4-8. BLS signatures enable detection of malicious validators
In fact, because all votes are digitally signed using the BLS signature scheme, it's trivial to identify validators who are responsible for misbehaviors and slash them accordingly.
KZG Cryptography
On March 13, 2024, Ethereum upgraded to the Cancun-Deneb (Dencun) hard fork. This upgrade contained a lot of changes, but the most important one was definitely the introduction of a new type of transaction: EIP-4844 blob transaction.
We're not going to deep-dive here into why blob transactions are important to Ethereum's roadmap, as we will do that in much more detail in Chapter 16. Instead, in the next sections we'll explore the cryptography underneath this new type of transaction: polynomial commitment schemes and, more specifically, the KZG commitment scheme.
Introduction
Before looking at polynomial commitment schemes, it's important to understand the problem we're facing and the final goal we want to reach.
Note
In this section, we'll briefly mention the term Layer 2s (L2s). While L2s will be properly explained and expanded on in Chapter 16, it can be useful to at least have a quick introduction to them. L2s are a new scaling solution for Ethereum: they are real blockchains, with a unique history and state, that periodically post all their updates and data to the Ethereum mainnet. The rationale is that it must be possible to derive the entire L2 blockchain by looking only at the Ethereum mainnet.
Without going into too much detail, L2s post a lot of data into the Ethereum main chain every day. All this data has to be downloaded and verified by all the nodes in the network. This situation usually leads to a spike in gas fees that, in critical scenarios, can reach $10–$20 just for a single ETH transfer.
Eventually, instead of posting all this data directly on chain, we only want to store a commitment to it—that is, a cryptographic hash—leaving the full data outside the Ethereum chain. But posting only a hash creates a new problem: all the nodes in the network must ensure that the data that the commitment points to exists somewhere; otherwise, we may have lost critical data.
The first (obvious) solution would be to obligate all the nodes to temporarily download the full data so that they can easily verify the commitment is valid—that is, it points to the full data they have. This is where we are at the time of writing this chapter (June 2025).
The long-term solution is to not require all the nodes to download the full data but just a very small part of it. Nodes can then use cryptographic proofs that ensure the data is fully available. These proofs have to be small and need to be verified quickly. The idea is that it's much faster and more lightweight to prove—and verify—that the data is available than it is to download it and directly verify it. This strategy is called data availability sampling (DAS), one of the most important areas of research in the Ethereum community.
To achieve the final goal of DAS, we want a cryptographic system that enables us—all the nodes—to:
- Create a commitment to some data (data you want to prove that exists and is available in its entirety)
- Generate small proofs for the data related to the previously created commitment
- Easily verify these proofs
This cryptographic system optionally (but ideally) shouldn't reveal much information about the data it refers to.
In the next section, we'll explore such a cryptographic system: polynomial commitment schemes and, more specifically, the KZG commitment scheme.
Note
You may wonder why we're talking about polynomial commitment schemes instead of data commitment schemes. And that's a very good question: our goal is to be able to commit to some data, not to a polynomial. But here is the trick: data can be represented as a polynomial. So if we are able to produce a polynomial commitment scheme, then we're good.
Polynomial Commitment Schemes
A polynomial commitment scheme allows a prover to compute a commitment to a polynomial, with the property that this commitment can later be "opened"—evaluated—at any position. The prover can show that the value of the polynomial at a certain position is equal to a claimed value and can generate a proof for that claim. The verifier, having both the commitment and the proof, can verify that the proof is valid if and only if the prover didn't cheat—that is, the committed polynomial actually evaluates to the claimed value at the selected position.
Introduction to Polynomials
We'll talk about polynomials a lot in this section, so it's important to make sure everyone knows what a polynomial is, since it may have been a long time since you studied them in school.
A polynomial is a mathematical expression like this:
x^3 + 3x^2 – 9
where x is the variable and all the numbers (1, 3, 0, –9) are the coefficients. Note that we put a 0 as the third coefficient because that polynomial is actually the following one:
x^3 + 3x^2 + 0x – 9
We'll refer to a polynomial as p(x) throughout this section:
p(x) = x^3 + 3x^2 + 0x – 9
We'll also need the degree n of a polynomial. It's the number of the highest power in the polynomial. The degree of our example polynomial is 3. So n = 3.
The general formula to describe a polynomial is the following:
p(x) = p₀ + p₁x + p₂x² + ... + pₙxⁿ
Or more formally:
p(x) = Σ pᵢxⁱ (for i = 0 to n)
where n is the degree of the polynomial and pi are all its coefficients.
Using Merkle Trees
Let's start looking at a polynomial commitment scheme using the classical Merkle tree data structure. If you're interested in deep-diving into Merkle trees, we'll expand on them in Chapter 14.
We can commit to a polynomial of degree n = 2^d – 1, where d is the depth of the Merkle tree, by setting all the leaf elements of the tree equal to all the coefficients pi of the polynomial we want to commit to.
Have a look at the following example:
p(x) = x^7 + 5x^5 – 2x^4 + 3
n = 7 ← degree of p(x)
d = 3 ← depth of the required Merkle tree
Figure 4-9 shows the polynomial commitment scheme applied to this example, using Merkle roots as the core cryptographic primitive.
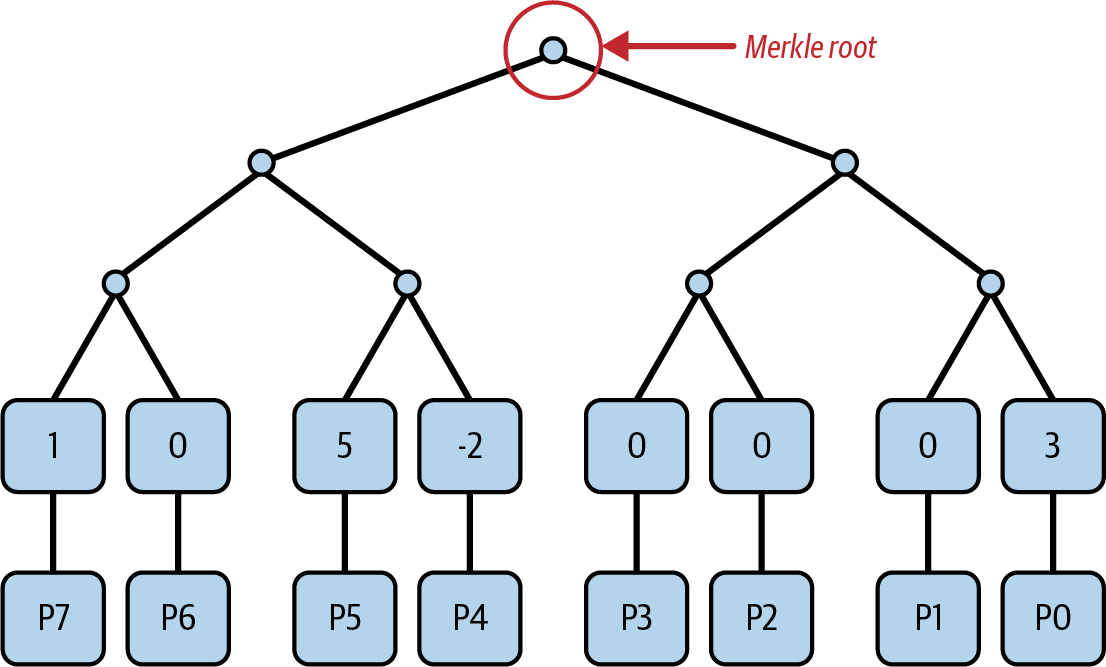
Figure 4-9. Polynomial commitment using Merkle trees
The final commitment is the Merkle root we obtain by constructing the full Merkle tree.
Now let's say we want to prove (to a verifier) that p(1) = 7. This statement is true because if you take p(x) and set x = 1, you can easily calculate that the polynomial at that position evaluates to 7.
To prove our assertion that p(1) = 7, we need to send to the verifier:
- The statement we want to prove:
p(1) = 7 - The Merkle root—that is, the commitment to the polynomial
p(x) - All the coefficients
piof the polynomial
This way, the verifier can take all the coefficients pi and calculate the value of the polynomial when x = 1. Here, the verifier verifies that our assertion is actually true. Then, the verifier takes all the coefficients pi and computes the Merkle tree, comparing their Merkle root with the one we provided to them. Here, they verify that the polynomial we committed to initially is actually the same one we sent to them.
To recap the properties of polynomial commitment using Merkle trees, we have the following:
Commitment size
The commitment is the Merkle root, which is a single hash, usually 32 bytes long.
Proof size
To prove an evaluation, we need to send all the coefficients pi of the polynomial. That means the proof size is linear in the degree n of the polynomial.
Verifier complexity
The verifier has to do linear work (in the degree of the polynomial) to completely verify our assertion. In fact, the verifier has all the coefficients pi and has to compute both the Merkle tree and the evaluation of the polynomial at the claimed point.
Scheme privacy
The scheme doesn't hide anything about the polynomial as the prover sends all its coefficients pi.
These properties are not ideal because the degree n of the polynomial could be very big in the real Ethereum protocol, and the bandwidth required to send all its coefficients on the network is too high. Also, we would like a protocol that lets the prover reveal as little information as possible regarding the committed polynomial.
Luckily, there is a scheme that satisfies all our requirements, and this is where KZG enters the scene.
KZG Commitment
KZG is an acronym that stands for Kate, Zaverucha, and Goldberg, the names of its three authors. These cryptographers introduced this commitment scheme in their 2010 paper "Constant-Size Commitments to Polynomials and Their Applications".
The trusted setup
The KZG commitment scheme requires the presence of a trusted setup. You can view it as a common knowledge base shared with all the participants of a cryptographic protocol—that is, both prover and verifier. It's called a trusted setup because, in order to produce that common knowledge base, some participants need to generate random numbers (secrets), encrypt them, and create the final data. Then, they must delete the secrets to ensure the protocol remains safe. Since these participants need to be trusted to delete their secrets, this whole ceremony is called a trusted setup.
Modern setups usually use the Powers-of-Tau setup, which has a 1-of-N trust model. That means we need only one honest actor for the entire trusted setup to be considered safe.
The Ethereum KZG trusted setup ceremony involved more than 140,000 different participants, as you can see in Figure 4-10.
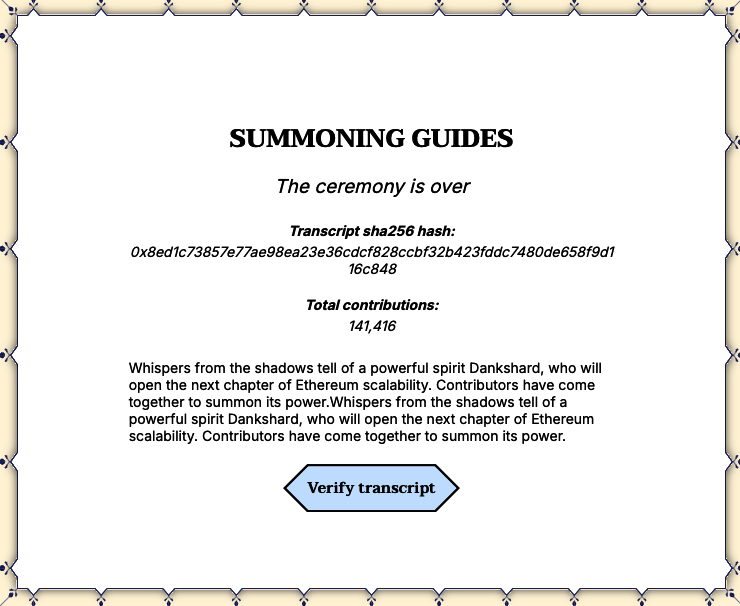
Figure 4-10. Ethereum KZG trusted setup ceremony participants
More specifically the trusted setup generates the elements [s^i]₁ and [s^i]₂ for i = 0, 1, … , n – 1, where:
sis the trusted setup secret that no one knows (made by the sum of secrets that each participant has generated)[s^i]₁and[s^i]₂are actually elliptic curve points (respectively in curves G1 and G2)nis the order of the polynomial
Tip
When you see something inside square braces, that represents an elliptic curve point.
The commitment
As you can see, the KZG commitment scheme involves (again) elliptic curves and pairings, something we have already seen for BLS digital signatures.
Remember that on elliptic curves, if you have a secret number a, you can obtain an elliptic curve point [a] with an elliptic curve multiplication:
[a]₁ = aG₁
And it's computationally impossible to go back. Thus, if you have only [a], you cannot obtain the secret a.
Even though neither the prover nor the verifier knows s, the trusted-setup secret, they can still do certain operations on it:
c[s^i]₁ = cs^iG₁ = [cs^i]₁  ← elliptic curve multiplication; c is an integer number
c[s^i]₁ + d[s^i]₁ = (cs^i + ds^i)G₁ = [cs^i + ds^i]₁  ← elliptic curve points addition
So, if p(x) = p₀ + p₁x + p₂x² + ... + pₙxⁿ is a polynomial, the prover can compute:
[p(s)]₁ = [p₀ + p₁s₁ + p₂s²₁ + ... + pₙsⁿ₁] = p₀ + p₁[s]₁ + p₂[s²]₁ + ... + pₙ[sⁿ]₁
Since [s^i]₁ is part of the trusted setup, and therefore it's common knowledge, the prover is able to evaluate the polynomial at a secret point s that no one knows. Sounds magic, right? Be careful of one important thing, though: the output of the previous operation is not an integer number; instead, it's an elliptic curve point. That [p(s)]₁ elliptic curve point is our KZG commitment to the polynomial p(x).
Soundness of KZG: Why the Prover Can't Fake the Commitment
Can the prover, without knowing the secret s, find a different polynomial q(x) != p(x) so that they have the same KZG commitment: [q(s)]₁ = [p(s)]₁? If so, the prover would be able to make the verifier think that they know a polynomial p even if that's not true.
Assume they can, so there is a polynomial r(x) = p(x) – q(x) not constant of degree n. Since q(x) != p(x), that means that r(x) has at most n zeros—that is, r(x) = 0 in at most n positions. This is a fundamental property of algebra. You can easily verify that it holds true for all the basic geometric shapes you studied in school: lines (polynomials of degree 1) have one zero, parabolas (polynomials of degree 2) have at most two, and so on.
The only way the prover can achieve q(s) = p(s) is by making r(x) = p(x) - q(x) = 0 in as many places as possible. But they can choose up to n zeros, as we said previously.
Since the prover doesn't know s, it's extremely unlikely that they will be able to guess it. In fact, n (order of the polynomial) << p (order of elliptic curves).
If n = 228 and p = 2^256, the probability that s is one of the selected zeros is 2 × 10^-69.
So we can say that, while there exist many polynomials with the same commitment C = [p(s)]₁, they are impossible to compute. This is a computational binding.
So far, we are able to commit to a polynomial p(x) by evaluating it at a secret point s, but we're still missing a way to prove that the initial prover's assertion p(z) = y is true without sending all the coefficients pi to the verifier. Here again is where elliptic curve pairings come in handy.
KZG Proof
To understand the final KZG proof, we need to recall some important properties of polynomials.
A polynomial p(x) is divisible by (x – z) if it has a zero in z. This is very easy to understand. Take the polynomial p(x) = x² – 4 that can also be represented as p(x) = (x + 2)(x – 2). Since p(2) = 4 – 4 = 0, p(x) is divisible by (x – 2).
The opposite is also true. A polynomial p(x) has a zero in z if p(x) is divisible by (x – z). Take the same example we used before and you can easily demonstrate that.
Remember that we (as the prover) want to prove that p(z) = y. At this point, we take the polynomial p(x) – y. This polynomial evaluates to zero at x = z, so we can use the properties described previously—in particular, the fact that since p(x) – y has a zero in z, then it is divisible by (x – z).
So we can compute the quotient polynomial q(x):
q(x) = [p(x) – y] / (x – z)
which we can write in the equivalent form:
q(x)(x – z) = p(x) – y
Note
It's very important to note here that the quotient polynomial
q(x)is only possible to compute becausep(x) – yis divisible byx – z. Otherwise, it would be impossible as we would always have a remainder.To understand this better, let's look at an example. Take again the polynomial
p(x) = (x + 2)(x – 2). Since this polynomial is divisible by(x + 2), we can compute the quotient polynomial:q(x) = p(x) / (x + 2) = [(x + 2)(x – 2)] / (x + 2) = x – 2If we tried to divide by
(x – 3), we wouldn't be able to obtain the quotient polynomial. You can try using the previous example if you want…
Now we're fully ready to generate our proof. In fact, a KZG proof for the assertion p(z) = y is π = [q(s)]₁. Basically, it's the (elliptic curve point) quotient polynomial evaluated at the secret point s.
The verifier checks the validity of this proof by computing the following equation:
e(π, [s – z]₂) = e(C – [y]₁, H)
where:
π = [q(s)]₁is the KZG proofC = [p(s)]₁is the commitment to the polynomialp(x)His the generator of the group G2, known to both prover and verifier
Let's prove that this cryptographic scheme is both:
Correct
If the prover follows all the rules, then they must be able to produce a valid proof that the verifier should be able to correctly verify.
Sound
The prover cannot trick the verifier by computing a fake proof—that is, the prover cannot make the verifier believe that p(z) = y′ for some y′ != y.
Correctness
If we take the verifier equation and write it to the pairing group, basically computing the pairing operation, we get:
[q(s)(s – z)]ₜ = [p(s) – y]ₜ
where T is a a multiplicative subgroup of a finite field extension.
You can just see that this equation is the exact same equation we calculated before:
q(x)(x – z) = p(x) – y
evaluated at the secret point s. The only difference is that we have elliptic curve points instead of numbers.
That equation always holds true by construction. And that's it for the correctness part.
Soundness
Can the prover fake it? That means: can the prover claim that p(z) = y′ even though that's not true and still pass the verifier check?
To try to do that, the verifier has two options:
-
The verifier can try to follow the normal procedure, just changing the claimed value
y′. So, they have to compute the quotient polynomial by dividingp(x) – y′by(x – z). But that's impossible becausep(z) – y′ != 0—polynomial division is not doable here. You may wonder: what if the prover is able to choose ay′ != yso thatp(x) – y′ = 0? Actually, we have already given an answer in a previous note, which is that the probability is near zero. The prover is not able to compute such ay′. This first solution is not a concrete option. -
The verifier can directly work on the elliptic curve when constructing the proof. In fact, if they are able to generate the proof:
π′ = [C – y′] / [s – z]₂then they can prove whatever they want:
e(π′, [s – z]₂) = e(C – [y′]₁, H) →
→ e(π′, [s – z]₂) = e(C – [y′]₁, H) →
→ (C - y`)/(s - z)*(s - z) = C - y` →
→ C - y` = C - y`  ← This is always true.
But again, computing that proof is computationally impossible for the prover as that requires knowledge of
s, which is the secret of the trusted setup and no one knows its value.
KZG Properties
To recap the properties of polynomial commitment using the KZG proof system, we have:
Commitment size
The commitment is a single group element of an elliptic curve that admits pairing—for example, with curve BLS12_381, this is 48 bytes long in its compressed form.
Proof size
The proof size is independent of the size of the polynomial p(x) we commit to. It's always one single group element of an elliptic curve.
Verifier complexity
Verification is also independent of the size of the polynomial and only requires two (elliptic curve) group multiplications and two pairings.
Scheme privacy
The scheme is able to mostly hide the polynomial p(x) that the prover commits to. In fact, while with Merkle trees the prover has to send all the coefficients, with KZG they need to only send the quotient polynomial evaluated at the secret point s, even though it's an elliptic curve point and not an integer number.
Multiproofs
We were able to prove a single evaluation of a polynomial p(x), but we can do more. We can prove the evaluation of a polynomial at any number of points and prove while still using the same proof size.
Let's see how this works. We want to prove that for every zᵢ, p(x) evaluates to yᵢ:
(z₀, y₀), (z₁, y₁), …, (zₖ₋₁, yₖ₋₁)
We can always find a polynomial of degree lower than k that passes through all these points. This is an algebraic property, and there also is a mathematical formula that generates that polynomial, which is called the interpolation polynomial I(x):
I(x) = Σ yᵢ · ∏ (x – zⱼ)/(zᵢ – zⱼ) (for i,j = 0 to k-1, j ≠ i)
Although this sounds hard, it's actually pretty easy to grasp. Let's say we have two distinct points, as shown in Figure 4-11:
A = (1, 0)
B = (2, 1)

Figure 4-11. Two distinct points A and B
It's easy to understand that there is a line—a polynomial of degree 1 (which is less than two, the number of points)—that goes through both A and B.
That line is:
I(x) = x – 1
Figure 4-12 better illustrates this.
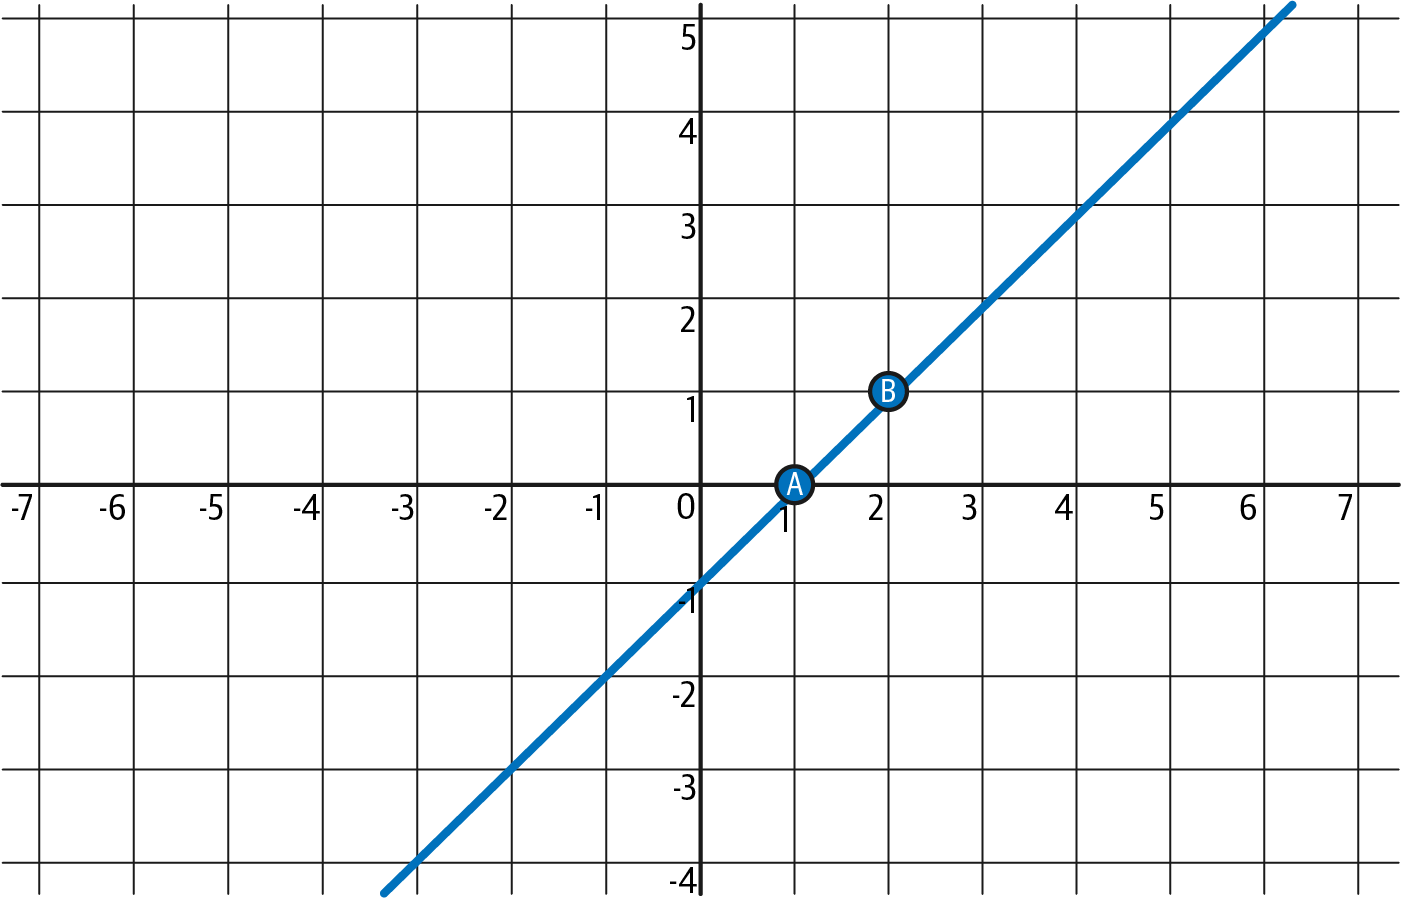
Figure 4-12. The interpolation polynomial (line) passing through points A and B
Here, we used our intuition, but we can use the formula to prove that the result is the same. Remember that we have k = 2:
I(x) = y₀ · (x – z₁)/(z₀ – z₁) + y₁ · (x – z₀)/(z₁ – z₀)
     = 0 · (x – 2)/(1 – 2) + 1 · (x – 1)/(2 – 1)
     = 0 + (x – 1) = x – 1
Since the prover wants to prove that p(x) goes through all those points mentioned at the start of this section, and we assume that's true—that is, the prover is trustworthy—p(x) – I(x) is zero at each z₀, z₁, …, zₖ₋₁ point.
That means it's divisible by (x – z₀)(x – z₁)...(x – zₖ₋₁). We call this polynomial Z(x) the zerofier.
Now, we proceed with the usual method. The prover computes the quotient polynomial q(x):
q(x) = [p(x) – I(x)] / Z(x)
and generates the proof π = [q(s)]₁. Note that this proof is the usual (single elliptic curve point) KZG proof.
To check the validity of this proof, the verifier needs to:
- Compute
I(x)by applying the formula previously described and then calculating[I(s)]₁. - Compute
Z(x)and then calculate[Z(s)]₂. Note that the verifier can computeZ(x)because they know all the claimed points (and values) that the prover wants to prove. - And then apply the usual equivalence check:
e(π, [Z(s)]₂) = e(C – [I(s)]₁, H)
by writing the equation in the pairing group:
q(s)Z(s) = p(s) – I(s)
That's the same equation we had when the prover computed the quotient polynomial before, with the only difference that here it's evaluated at the secret point s.
In Summary
Let's summarize the entire prover↔verifier flow in the KZG commitment scheme.
We start with the prover, who has knowledge of some data. They immediately encode this data into a polynomial, as shown in Figure 4-13.
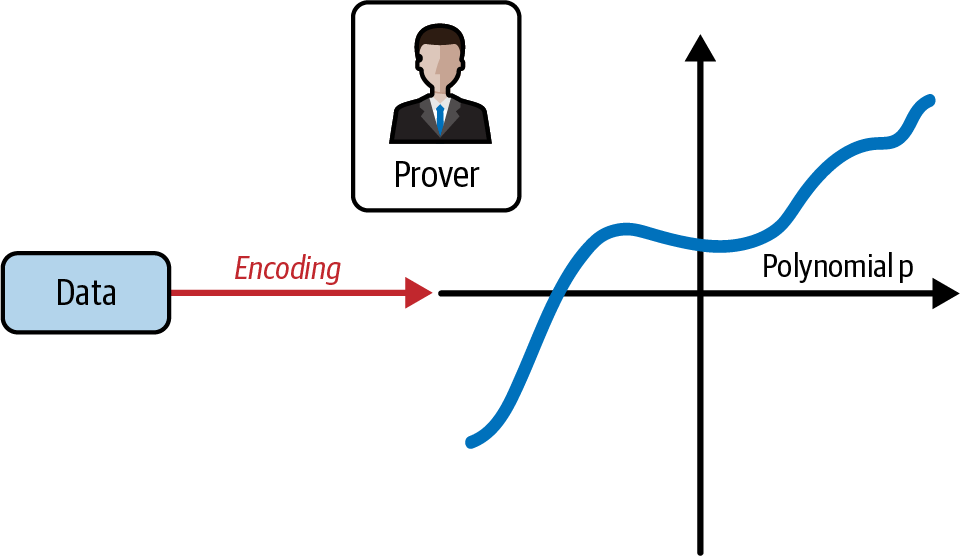
Figure 4-13. The prover encodes the data into a polynomial p
The goal of the prover is to convince the verifier that they know a certain piece of data, now encoded as a polynomial. However, the prover does not want to reveal the entire dataset. Instead, they want the verifier to be able to verify specific claims about the data. In particular, the prover wants the verifier to confirm that the polynomial evaluates to the expected values at specific points, as shown in Figure 4-14.
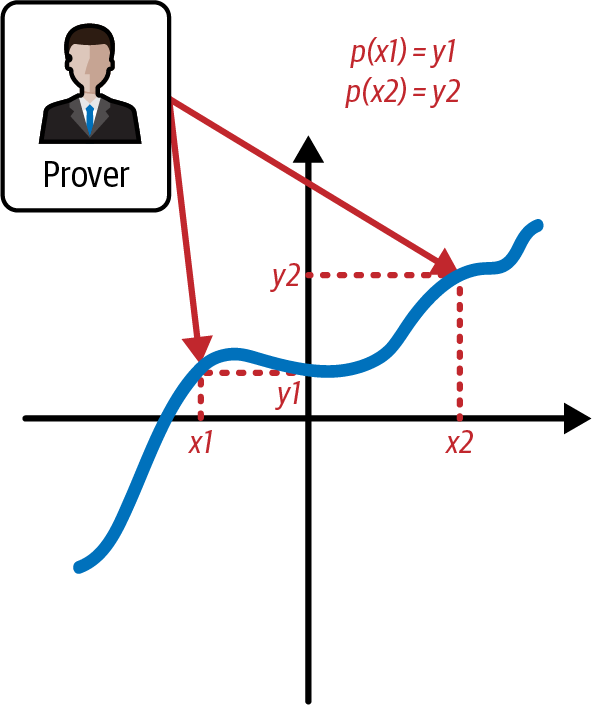
Figure 4-14. The prover wants to prove the evaluation of the polynomial at specific points
To achieve this goal, the prover computes the KZG commitment of the polynomial and sends it to the verifier, as shown in Figure 4-15.
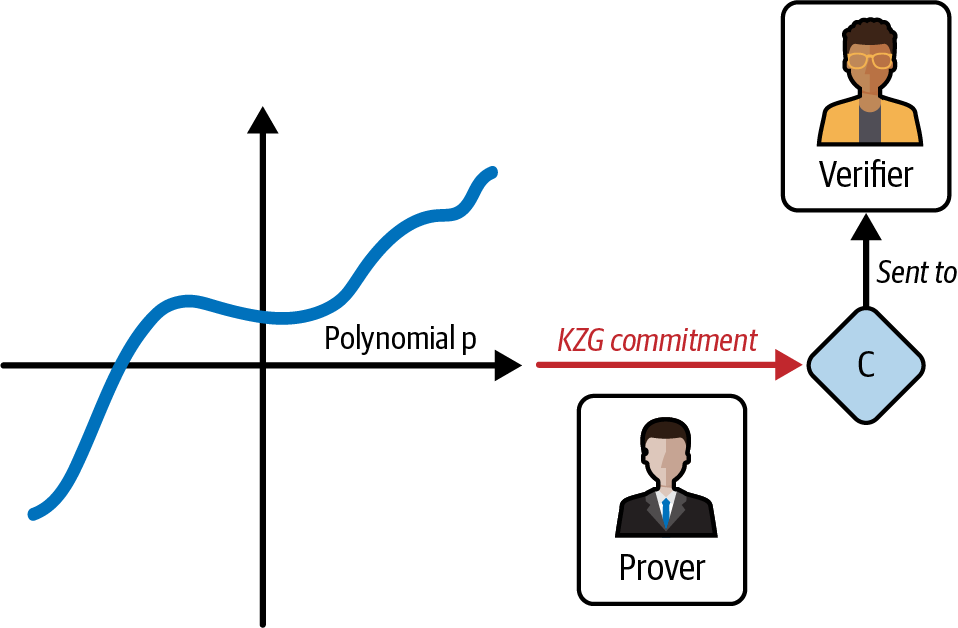
Figure 4-15. The prover computes KZG commitment C and sends it to the verifier
Then, the prover needs to compute the KZG proof for all evaluations that they want to prove to the verifier, as shown in Figure 4-16.
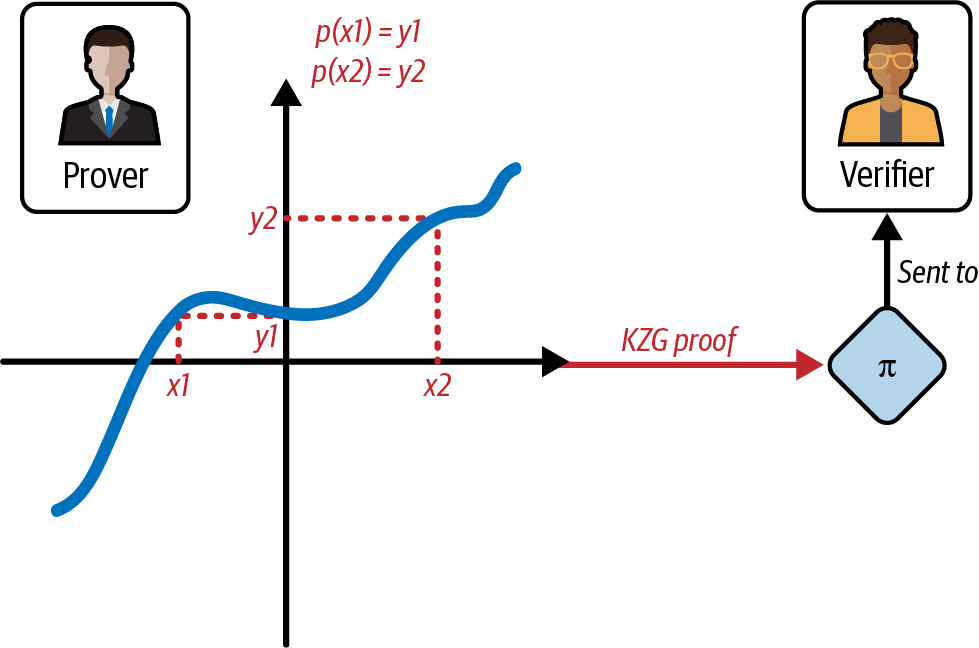
Figure 4-16. The prover computes the KZG proof of different evaluations of the polynomials and sends it to the verifier
Now, it's the verifier's turn. To make sure that the prover is honest, the verifier needs to compute the elliptic curve pairing check using the information that the prover has previously sent, along with the trusted setup, as you can see in Figure 4-17.
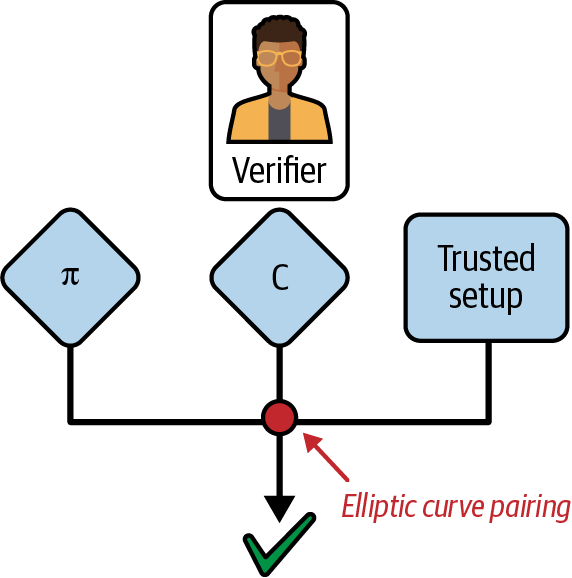
Figure 4-17. The verifier checks the validity of the evaluations through an elliptic curve pairing operation
Conclusion
We provided a survey of PKC and focused on the use of public and private keys in Ethereum and of cryptographic tools, such as hash functions, in the creation and verification of Ethereum addresses. We also looked at digital signatures and how they can show ownership of a private key without revealing that key. In Chapter 5, we’ll put these ideas together and look at how wallets can be used to manage collections of keys.
Chapter 5: Wallets
The word wallet is used to describe a few different things in Ethereum. At a high level, a wallet is a software application that serves as the primary user interface to Ethereum. The wallet controls access to a user's money, manages keys and addresses, tracks the balance, and creates and signs transactions. In addition, some Ethereum wallets can interact with contracts, such as ERC-20 tokens.
More narrowly, from a programmer's perspective, the word wallet refers to the system used to store and manage a user's keys. Every wallet has a key-management component. For some wallets, that's all there is. Other wallets are part of a much broader category, that of browsers, which are interfaces to Ethereum-based DApps, which we will examine in more detail in Chapter 12. There are no clear lines of distinction between the various categories that are conflated under the term wallet.
In this chapter, we will look at wallets as containers for private keys and as systems for managing these keys.
Overview of Wallet Technologies
In this section, we summarize the various technologies used to construct user-friendly, secure, and flexible Ethereum wallets.
One key consideration in designing wallets is balancing convenience and privacy. The most convenient Ethereum wallet is one with a single private key and address that you reuse for everything. Unfortunately, such a solution is a privacy nightmare since anyone can easily track and correlate all your transactions. Using a new key for every transaction is best for privacy but becomes very difficult to manage. The correct balance is difficult to achieve, which is why good wallet design is paramount.
A common misconception about Ethereum is that Ethereum wallets contain ether or tokens. In fact, very strictly speaking, the wallet holds only keys. The ether or other tokens are recorded on the Ethereum blockchain. Users control the tokens on the network by signing transactions with the keys in their wallets. In a sense, an Ethereum wallet is a keychain. Having said that, given that the keys held by the wallet are the only things needed to transfer ether or tokens to others, in practice this distinction is fairly irrelevant.
Where the difference does matter is in changing one's mindset from dealing with the centralized system of conventional banking (where only you and the bank can see the money in your account, and you only need to convince the bank that you want to move funds to make a transaction) to the decentralized system of blockchain platforms (where everyone can see the ether balance of an account, although they probably don't know the account's owner, and everyone needs to be convinced that the owner wants to move funds for a transaction to be enacted). In practice, this means that there is an independent way to check an account's balance without needing its wallet. Moreover, you can move your account handling from your current wallet to a different wallet, if you grow to dislike the wallet app you started out using.
Note
Ethereum wallets contain keys, not ether or tokens. Wallets are like keychains containing pairs of private and public keys. Users sign transactions with the private keys, thereby proving they own the ether. The ether is stored on the blockchain.
There are two primary types of wallets, distinguished by whether the keys they contain are related to one another or not.
The first type is a nondeterministic wallet, where each key is independently generated from a different random number. The keys are not related to one another. This type of wallet is also known as a JBOK wallet, from the phrase "just a bunch of keys."
The second type of wallet is a deterministic wallet, where all the keys are derived from a single master key, known as the seed. All the keys in this type of wallet are related to one another and can be generated again if you have the original seed. Several different key-derivation methods are used in deterministic wallets. The most common derivation method uses a treelike structure, as described in "Hierarchical Deterministic Wallets (BIP-32/BIP-44)".
To make deterministic wallets slightly more secure against data-loss accidents, such as having your phone stolen or dropping it in the toilet, the seeds are often encoded as a list of words (in English or another language) for you to write down and use in case of an accident. These are known as the wallet's mnemonic code words. Of course, if someone gets hold of your mnemonic code words, then they can also re-create your wallet and thus gain access to your ether and smart contracts. As such, be very, very careful with your recovery word list! Never store it electronically, in a file on your computer or phone. Write it down on paper and store it in a safe, secure place.
The next few sections introduce each of the wallet technologies at a high level.
Nondeterministic (Random) Wallets
In the first Ethereum wallet (produced for the Ethereum presale), each wallet file stored a single randomly generated private key. Such wallets are being replaced with deterministic wallets because these "old-style" wallets are in many ways inferior. For example, it is considered good practice to avoid reusing Ethereum addresses as part of maximizing your privacy while using Ethereum—that is, to use a new address (which needs a new private key) every time you receive funds. You can go further and use a new address for each transaction, although this can get expensive if you deal a lot with tokens. To follow this practice, a nondeterministic wallet will need to regularly increase its list of keys, which means you will need to make regular backups. If you ever lose your data (disk failure, drink accident, phone stolen) before you've managed to back up your wallet, you will lose access to your funds and smart contracts. The "type 0" nondeterministic wallets are the hardest to deal with because they create a new wallet file for every new address in a "just in time" manner.
Nevertheless, many Ethereum clients (including Geth) use a keystore file, which is a JSON-encoded file that contains a single (randomly generated) private key, encrypted by a passphrase for extra security. The JSON file's contents look like this:
{
    "address": "001d3f1ef827552ae1114027bd3ecf1f086ba0f9",
    "crypto": {
        "cipher": "aes-128-ctr",
        "ciphertext":
            "233a9f4d236ed0c13394b504b6da5df02587c8bf1ad8946f6f2b58f055507ece",
        "cipherparams": {
            "iv": "d10c6ec5bae81b6cb9144de81037fa15"
        },
        "kdf": "scrypt",
        "kdfparams": {
            "dklen": 32,
            "n": 262144,
            "p": 1,
            "r": 8,
            "salt":
                "99d37a47c7c9429c66976f643f386a61b78b97f3246adca89abe4245d2788407"
        },
        "mac": "594c8df1c8ee0ded8255a50caf07e8c12061fd859f4b7c76ab704b17c957e842"
    },
    "id": "4fcb2ba4-ccdb-424f-89d5-26cce304bf9c",
    "version": 3
}
The keystore format uses a key derivation function (KDF), also known as a password-stretching algorithm, which protects against brute-force, dictionary, and rainbow table attacks. In simple terms, the private key is not encrypted by the passphrase directly. Instead, the passphrase is "stretched" by repeatedly hashing it. The hashing function is repeated for 262,144 rounds, which can be seen in the keystore JSON as the parameter crypto.kdfparams.n. An attacker trying to brute-force the passphrase would have to apply 262,144 rounds of hashing for every attempted passphrase, which slows the attack sufficiently to make it infeasible for passphrases of appropriate complexity and length.
Tip
Using nondeterministic wallets is discouraged for anything other than simple tests. They are too cumbersome to back up and use for anything but the most basic of situations. Instead, use an industry standard–based hierarchical deterministic wallet with a mnemonic seed for backup.
Deterministic (Seeded) Wallets
Deterministic or "seeded" wallets contain private keys that are all derived from a single master key, or seed. The seed is a randomly generated number that is combined with other data, such as an index number or "chain code" (see "Extended Public and Private Keys"), to derive any number of private keys. In a deterministic wallet, the seed is sufficient to recover all the derived keys, and therefore a single backup, at creation time, is sufficient to secure all the funds and smart contracts in the wallet. The seed is also sufficient for a wallet export or import, allowing for easy migration of all the keys between different wallet implementations.
This design makes the security of the seed of utmost importance, as only the seed is needed to gain access to the entire wallet. On the other hand, being able to focus security efforts on a single piece of data can be seen as an advantage.
Hierarchical Deterministic Wallets (BIP-32/BIP-44)
Deterministic wallets were developed to make it easy to derive many keys from a single seed. Currently, one of the most advanced forms of deterministic wallet is the hierarchical deterministic (HD) wallet defined by Bitcoin's BIP-32 standard. HD wallets contain keys derived in a tree structure, such that a parent key can derive a sequence of child keys, each of which can derive a sequence of grandchild keys, and so on. This tree structure is illustrated in Figure 5-1.
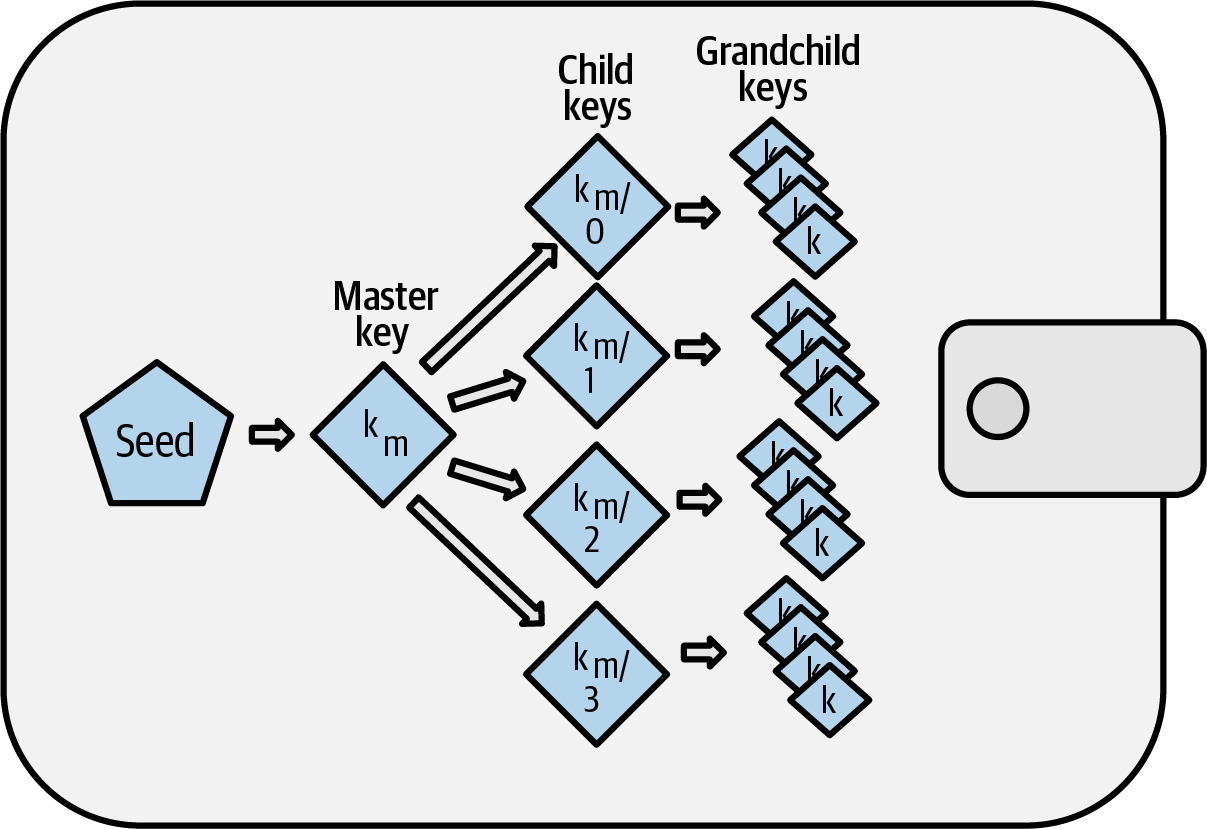
Figure 5-1. HD wallet: a tree of keys generated from a single seed
HD wallets offer a few key advantages over simpler deterministic wallets. First, the tree structure can be used to express additional organizational meaning, such as when a specific branch of subkeys is used to receive incoming payments and a different branch is used to receive change from outgoing payments. Branches of keys can also be used in corporate settings, where different branches can be allocated to departments, subsidiaries, specific functions, or accounting categories.
The second advantage of HD wallets is that users can create a sequence of public keys without having access to the corresponding private keys. This allows HD wallets to be used on an insecure server or in a watch-only or receive-only capacity, where the wallet doesn't have the private keys that can spend the funds.
Seeds and Mnemonic Codes (BIP-39)
There are many ways to encode a private key for secure backup and retrieval. The currently preferred method is to use a sequence of words that, when taken together in the correct order, can uniquely re-create the private key. This is sometimes known as a mnemonic, and the approach has been standardized by BIP-39. Today, many Ethereum wallets (as well as wallets for other cryptocurrencies) use this standard and can import and export seeds for backup and recovery using interoperable mnemonics.
To see why this approach has become popular, let's have a look at an example:
FCCF1AB3329FD5DA3DA9577511F8F137 ← seed in hexadecimal
wolf juice proud gown wool unfair
wall cliff insect more detail hub ← seed using BIP-39 representation
In practical terms, the chance of an error when writing down the hex sequence is unacceptably high. In contrast, the list of known words is quite easy to deal with, mainly because there is a high level of redundancy in the writing of words (especially English words). If inzect had been recorded by accident, it could quickly be determined, upon the need for wallet recovery, that inzect is not a valid English word and that insect should be used instead. We are talking about writing down a representation of the seed because that is good practice when managing HD wallets: the seed is needed to recover the wallet in the case of data loss (whether through accident or theft), so keeping a backup is very prudent. However, the seed must be kept extremely private, so digital backups should be carefully avoided—hence, the advice to back up with pen and paper.
In summary, using a recovery word list to encode the seed for an HD wallet is the easiest way to safely export a private key set, transcribe it, record it on paper, read it without error, and import it into another wallet.
Wallet Best Practices
As cryptocurrency wallet technology has matured, certain industry standards have emerged that make wallets broadly interoperable, easy to use, secure, and flexible. These standards also allow wallets to derive keys for multiple different cryptocurrencies, all from a single mnemonic. These standards are:
- Mnemonic code words, based on BIP-39
- HD wallets, based on BIP-32
- A multipurpose HD wallet structure, based on BIP-43
- Multicurrency and multiaccount wallets, based on BIP-44
These standards may change or be made obsolete by future developments, but for now, they form a set of interlocking technologies that have become the de facto wallet standard for most blockchain platforms and their cryptocurrencies.
A broad range of software and hardware wallets have adopted the standards, making all these wallets interoperable. A user can export a mnemonic generated in one of these wallets and import it to another wallet, recovering all keys and addresses.
Some examples of software wallets supporting these standards include Rabby Wallet, MetaMask, and Phantom. Examples of hardware wallets supporting these standards are various models of Ledger and Trezor.
The following sections examine each of these technologies in detail.
Tip
If you are implementing an Ethereum wallet, it should be built as an HD wallet, with a seed encoded as a mnemonic code for backup, following the BIP-32, BIP-39, BIP-43, and BIP-44 standards, as described in the following sections.
Mnemonic Code Words (BIP-39)
Mnemonic code words are word sequences that encode a random number used as a seed to derive a deterministic wallet. The sequence of words is sufficient to re-create the seed and, from there, to re-create the wallet and all the derived keys. A wallet application that implements deterministic wallets with mnemonic words will show the user a sequence of 12–24 words when first creating a wallet. That sequence of words is the wallet backup and can be used to recover and re-create all the keys in the same or any compatible wallet application. As we explained earlier, mnemonic word lists make it easier for users to back up wallets because they are easy to read and correctly transcribe.
Note
Mnemonic words are often confused with brainwallets. They are not the same. The primary difference is that a brainwallet consists of words chosen by the user, whereas mnemonic words are created randomly by the wallet and presented to the user. This important difference makes mnemonic words much more secure because humans are very poor sources of randomness. Perhaps more important, using the term brainwallet suggests that the words have to be memorized, which is a terrible idea and a recipe for not having your backup when you need it.
Mnemonic codes are defined in BIP-39. Note that BIP-39 is one implementation of a mnemonic code standard. There is a different standard, with a different set of words, used by the Electrum Bitcoin wallet and predating BIP-39. BIP-39 was proposed by the company behind the Trezor hardware wallet and is incompatible with Electrum's implementation. However, BIP-39 has now achieved broad industry support across dozens of interoperable implementations and should be considered the de facto industry standard. Furthermore, BIP-39 can be used to produce multicurrency wallets supporting Ethereum, whereas Electrum seeds cannot.
BIP-39 defines the creation of a mnemonic code and seed, which we describe here in nine steps. For clarity, the process is split into two parts: steps 1 through 6 are listed in "Generating mnemonic words", and steps 7 through 9 are listed in "From mnemonic to seed".
Generating mnemonic words
The wallet generates mnemonic words automatically using the standardized process defined in BIP-39. The wallet starts from a source of entropy, adds a checksum, and then maps the entropy to a word list following these steps:
-
Create a cryptographically random sequence S of 128–256 bits.
-
Create a checksum of S by taking the first length-of-S ÷ 32 bits of the SHA-256 hash of S.
-
Add the checksum to the end of the random sequence S.
-
Divide the sequence-and-checksum concatenation into sections of 11 bits.
-
Map each 11-bit value to a word from the predefined dictionary of 2,048 words.
-
Create the mnemonic code from the sequence of words, maintaining the order.
Figure 5-2 shows how entropy is used to generate mnemonic words.
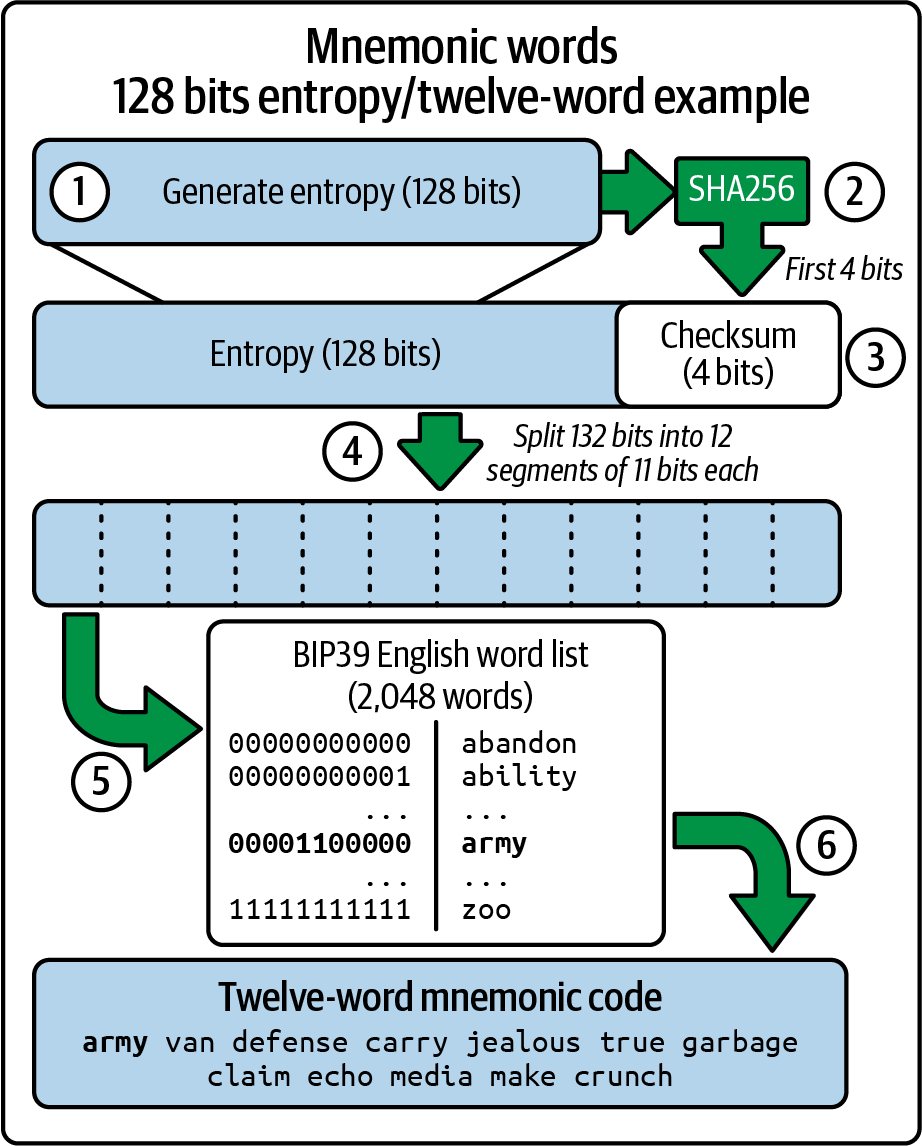
Figure 5-2. Generating mnemonic words
Table 5-1 shows the relationship between the size of the entropy data and the length of mnemonic codes in words.
Table 5-1. Mnemonic codes: Entropy and word length
| Entropy (bits) | Checksum (bits) | Entropy + checksum (bits) | Mnemonic length (words) |
|---|---|---|---|
| 128 | 4 | 132 | 12 |
| 160 | 5 | 165 | 15 |
| 192 | 6 | 198 | 18 |
| 224 | 7 | 231 | 21 |
| 256 | 8 | 264 | 24 |
From mnemonic to seed
The mnemonic words represent entropy with a length of 128–256 bits. The entropy is then used to derive a longer (512-bit) seed through the use of the key-stretching function PBKDF2. The seed produced is used to build a deterministic wallet and derive its keys.
The key-stretching function takes two parameters: the mnemonic and a salt. The purpose of a salt in a key-stretching function is to make it difficult to build a lookup table enabling a brute-force attack. In the BIP-39 standard, the salt has another purpose: it allows for the introduction of a passphrase that serves as an additional security factor protecting the seed, which we will describe in more detail in the next section.
The process continues from the previous section with the following steps:
-
The first parameter to the PBKDF2 key-stretching function is the mnemonic produced in step 6.
-
The second parameter to the PBKDF2 key-stretching function is a salt. The salt is composed of the string constant
"mnemonic"concatenated with an optional user-supplied passphrase. -
PBKDF2 stretches the mnemonic and salt parameters using 2,048 rounds of hashing with the HMAC-SHA512 algorithm, producing a 512-bit value as its final output. That 512-bit value is the seed.
Figure 5-3 shows how a mnemonic is used to generate a seed.
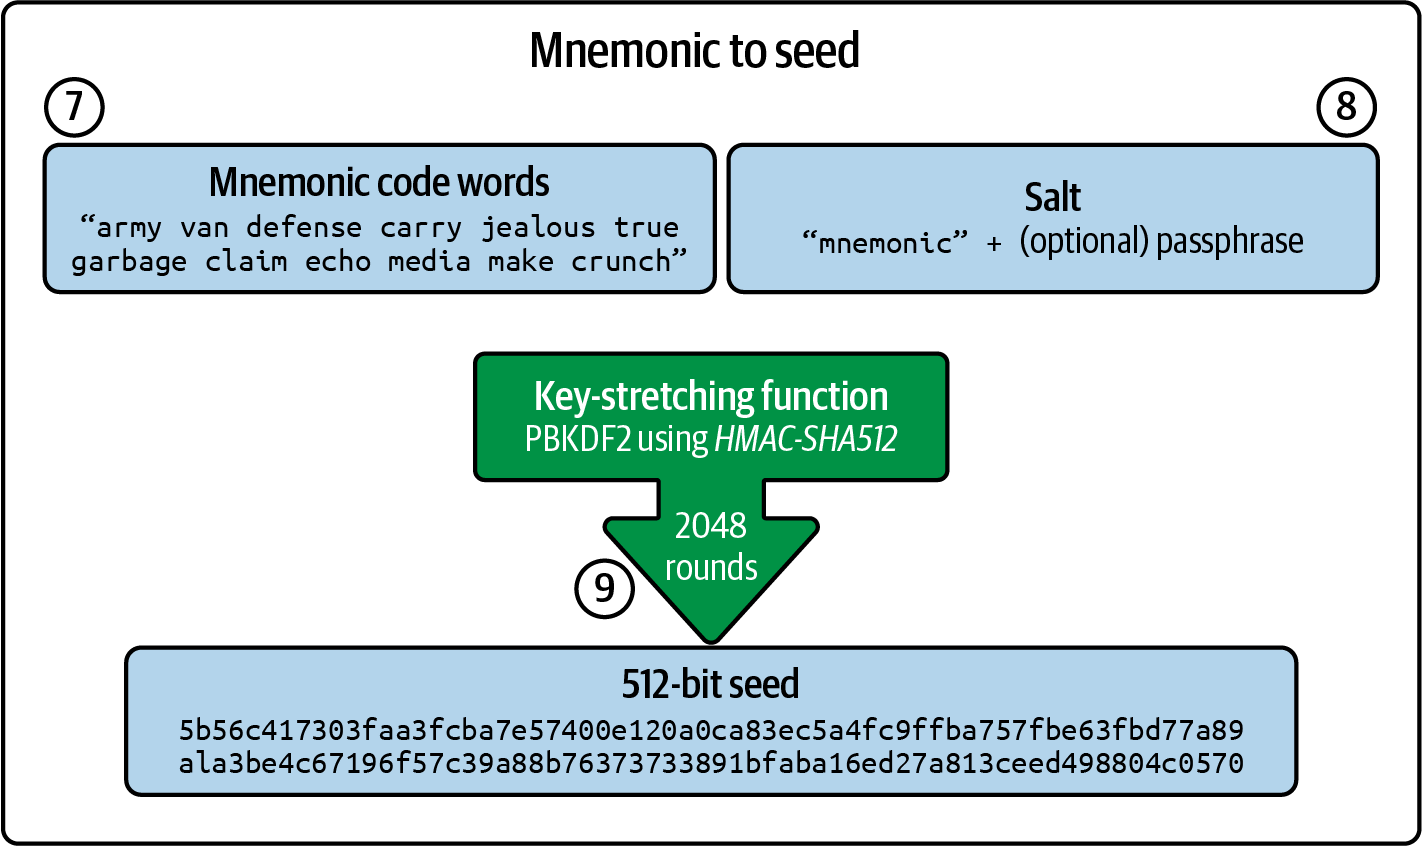
Figure 5-3. From mnemonic to seed
Note
The key-stretching function, with its 2,048 rounds of hashing, is a somewhat effective protection against brute-force attacks against the mnemonic or the passphrase. It makes it costly (in computation) to try more than a few thousand passphrase and mnemonic combinations, while the number of possible derived seeds is vast (2^512^, or about 10^154^)—far bigger than the number of atoms in the visible universe (about 10^80^).
Tables 5-2, 5-3, and 5-4 show some examples of mnemonic codes and the seeds they produce.
Table 5-2. A 128-bit entropy mnemonic code with no passphrase and the resulting seed
| Entropy | 0c1e24e5917779d297e14d45f14e1a1a |
| Mnemonic | army van defense carry jealous true garbage claim echo media make crunch |
| Passphrase | (none) |
| Seed | 5b56c417303faa3fcba7e57400e120a0ca83ec5a4fc9ffba757fbe63fbd77a89a1a3be4c67196f57c39... |
Table 5-3. A 128-bit entropy mnemonic code with a passphrase and the resulting seed
| Entropy | 0c1e24e5917779d297e14d45f14e1a1a |
| Mnemonic | army van defense carry jealous true garbage claim echo media make crunch |
| Passphrase | SuperDuperSecret |
| Seed | 3b5df16df2157104cfdd22830162a5e170c0161653e3afe6c88defeefb0818c793dbb28ab3ab091897d0... |
Table 5-4. A 256-bit entropy mnemonic code with no passphrase and the resulting seed
| Entropy | 2041546864449caff939d32d574753fe684d3c947c3346713dd8423e74abcf8c |
| Mnemonic | cake apple borrow silk endorse fitness top denial coil riot stay wolf luggage oxygen faint major edit measure invite love trap field dilemma oblige |
| Passphrase | (none) |
| Seed | 3269bce2674acbd188d4f120072b13b088a0ecf87c6e4cae41657a0bb78f5315b33b3a04356e53d062e5... |
Optional Passphrase in BIP-39
The BIP-39 standard allows for the use of an optional passphrase in the derivation of the seed. If no passphrase is used, the mnemonic is stretched with a salt consisting of the constant string "mnemonic", producing a specific 512-bit seed from any given mnemonic. If a passphrase is used, the stretching function produces a different seed from that same mnemonic. In fact, given a single mnemonic, every possible passphrase leads to a different seed. Essentially, there is no "wrong" passphrase. All passphrases are valid, and they all lead to different seeds, forming a vast set of possible uninitialized wallets. The set of possible wallets is so large (2^512^) that there is no practical possibility of brute-forcing or accidentally guessing one that is in use, as long as the passphrase has sufficient complexity and length.
Tip
There are no "wrong" passphrases in BIP-39. Every passphrase leads to some wallet, which unless previously used will be empty.
The optional passphrase creates two important features:
-
A second factor (something memorized) that makes a mnemonic useless on its own, protecting mnemonic backups from compromise by a thief
-
A form of plausible deniability or "duress wallet," where a chosen passphrase leads to a wallet with a small amount of funds, used to distract an attacker from the "real" wallet that contains the majority of funds
However, it is important to note that the use of a passphrase also introduces the risk of loss:
-
If the wallet owner is incapacitated or dead and no one else knows the passphrase, the seed is useless, and all the funds stored in the wallet are lost forever.
-
Conversely, if the owner backs up the passphrase in the same place as the seed, that defeats the purpose of a second factor.
While passphrases are very useful, they should be used only in combination with a carefully planned process for backup and recovery, considering the possibility of heirs surviving the owner being able to recover the cryptocurrency.
Working with Mnemonic Codes
BIP-39 is implemented as a library in many different programming languages, such as:
python-mnemonic
The reference implementation of the standard by the SatoshiLabs team that proposed BIP-39, in Python
ConsenSys/eth-lightwallet
A lightweight JavaScript Ethereum wallet for nodes and browser (with BIP-39)
npm/bip39
A JavaScript implementation of Bitcoin BIP-39
There is also a BIP-39 generator implemented in a standalone web page (Figure 5-4), which is extremely useful for testing and experimentation. The Mnemonic Code Converter generates mnemonics, seeds, and extended private keys. It can be used offline in a browser, or it can be accessed online.
Note
This will be emphasized repeatedly throughout the chapter because it is the most crucial rule for seed security: never, under any circumstances, save your seed phrase in digital form.
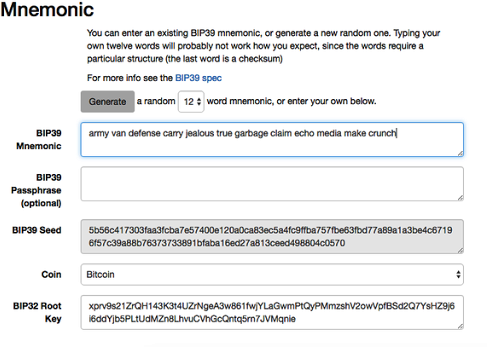
Figure 5-4. The BIP-39 generator web page
Creating an HD Wallet from the Seed
HD wallets are created from a single root seed, which is a 128-, 256-, or 512-bit random number. This seed is most commonly generated from a mnemonic, as detailed in the previous section.
Every key in the HD wallet is deterministically derived from this root seed, which makes it possible to re-create the entire HD wallet from that seed in any compatible HD wallet. This makes it easy to export, back up, restore, and import HD wallets containing thousands or even millions of keys by transferring just the mnemonic from which the root seed is derived.
HD Wallets (BIP-32)
Most HD wallets follow the BIP-32 standard, which has become a de facto industry standard for deterministic key generation. We won't be discussing all the details of BIP-32 here, only the components necessary to understand how it is used in wallets. The most important aspect is the treelike hierarchical relationships that it is possible for the derived keys to have, as you can see in Figure 5-1. It's also important to understand the ideas of extended keys and hardened keys, which are explained in the following sections.
There are dozens of interoperable implementations of BIP-32 offered in many software libraries. These are mostly designed for Bitcoin wallets, which implement addresses in a different way, but they share the same key-derivation implementation as Ethereum's BIP-32-compatible wallets. Use one designed for Ethereum or adapt one from Bitcoin by adding an Ethereum address encoding library.
There is also a BIP-32 generator implemented as a standalone web page that is very useful for testing and experimentation with BIP-32.
Warning
The standalone BIP-32 generator is not an HTTPS site. That's to remind you that using this tool is not secure. It is only for testing. You should not use the keys produced by this site with real funds.
Extended Public and Private Keys
In BIP-32 terminology, keys can be "extended." With the right mathematical operations, these extended "parent" keys can be used to derive "child" keys, thus producing the hierarchy of keys and addresses described earlier. A parent key doesn't have to be at the top of the tree. It can be picked out from anywhere in the tree hierarchy. Extending a key involves taking the key itself and appending a special chain code to it. A chain code is a 256-bit binary string that is mixed with each key to produce child keys.
If the key is a private key, it becomes an extended private key distinguished by the prefix xprv:
xprv9s21ZrQH143K2JF8RafpqtKiTbsbaxEeUaMnNHsm5o6wCW3z8ySyH4UxFVSfZ8n7ESu7fgir8i...
An extended public key is distinguished by the prefix xpub:
xpub661MyMwAqRbcEnKbXcCqD2GT1di5zQxVqoHPAgHNe8dv5JP8gWmDproS6kFHJnLZd23tWevhdn...
A very useful characteristic of HD wallets is the ability to derive child public keys from parent public keys without having the private keys. This gives us two ways to derive a child public key: either directly from the child private key or from the parent public key. An extended public key can be used, therefore, to derive all the public keys (and only the public keys) in that branch of the HD wallet structure.
This shortcut can be used to create extremely secure public-key-only deployments, where a server or application has a copy of an extended public key but no private keys whatsoever. That kind of deployment can produce an infinite number of public keys and Ethereum addresses but cannot spend any money sent to those addresses. Meanwhile, on another, more secure server, the extended private key can derive all the corresponding private keys to sign transactions and spend the money.
One common application of this method is to install an extended public key on a web server that serves an ecommerce application. The web server can use the public key derivation function to create a new Ethereum address for every transaction (e.g., for a customer shopping cart) and will not have any private keys that would be vulnerable to theft. Without HD wallets, the only way to do this is to generate thousands of Ethereum addresses on a separate secure server and then preload them on the ecommerce server. That approach is cumbersome and requires constant maintenance to ensure that the server doesn't run out of keys—hence the preference to use extended public keys from HD wallets.
Another common application of this solution is for cold-storage or hardware wallets. In that scenario, the extended private key can be stored in a hardware wallet, while the extended public key can be kept online. The user can create "receive" addresses at will while the private keys are safely stored offline. To spend the funds, the user can use the extended private key in an offline signing Ethereum client or sign transactions on the hardware wallet device.
Hardened Child Key Derivation
The ability to derive a branch of public keys from an extended public key, or xpub, is very useful, but it comes with potential risk. Access to an xpub does not give access to child private keys. However, because the xpub contains the chain code (used to derive child public keys from the parent public key), if a child private key is known or somehow leaked, it can be used with the chain code to derive all the other child private keys. A single leaked child private key, together with a parent chain code, reveals all the private keys of all the children. Worse, the child private key together with a parent chain code can be used to deduce the parent private key.
To counter this risk, HD wallets use an alternative derivation function called hardened derivation, which "breaks" the relationship between parent public key and child chain code. The hardened derivation function uses the parent private key to derive the child chain code, instead of the parent public key. This creates a "firewall" in the parent-child sequence, with a chain code that cannot be used to compromise a parent or sibling private key.
In simple terms, if you want to use the convenience of an xpub to derive branches of public keys without exposing yourself to the risk of a leaked chain code, you should derive it from a hardened parent, rather than a normal parent. Best practice is to have the level-one children of the master keys always derived by hardened derivation, to prevent compromise of the master keys.
Index Numbers for Normal and Hardened Derivation
It is clearly desirable to be able to derive more than one child key from a given parent key. To manage this, an index number is used. Each index number, when combined with a parent key using the special child derivation function, gives a different child key. The index number used in the BIP-32 parent-to-child derivation function is a 32-bit integer. To easily distinguish between keys derived through the normal (unhardened) derivation function versus keys derived through hardened derivation, this index number is split into two ranges. Index numbers between 0 and 2^31^–1 (0x0 to 0x7FFFFFFF) are used only for normal derivation. Index numbers between 2^31^ and 2^32^–1 (0x80000000 to 0xFFFFFFFF) are used only for hardened derivation. Therefore, if the index number is less than 2^31^, the child is normal, whereas if the index number is equal to or above 2^31^, the child is hardened.
To make the index numbers easier to read and display, the index numbers for hardened children are displayed starting from zero, but with a prime symbol. The first normal child key is therefore displayed as 0, whereas the first hardened child (index 0x80000000) is displayed as 0′. In sequence, then, the second hardened key would have an index of 0x80000001 and would be displayed as 1′, and so on. When you see an HD wallet index i′, that means 2^31^ + i.
HD Wallet Key Identifier (Path)
Keys in an HD wallet are identified using a "path" naming convention, with each level of the tree separated by a slash (/) character (see Table 5-5). Private keys derived from the master private key start with m. Public keys derived from the master public key start with M. Therefore, the first child private key of the master private key is m/0. The first child public key is M/0. The second grandchild of the first child is m/0/1, and so on.
The "ancestry" of a key is read from right to left, until you reach the master key from which it was derived. For example, identifier m/x/y/z describes the key that is the z-th child of key m/x/y, which is the y-th child of key m/x, which is the x-th child of m.
Table 5-5. HD wallet path examples
| HD path | Key described |
|---|---|
| m/0 | The first (0) child private key from the master private key (m) |
| m/0/0 | The first grandchild private key of the first child (m/0) |
| m/0'/0 | The first normal grandchild of the first hardened child (m/0') |
| m/1/0 | The first grandchild private key of the second child (m/1) |
| M/23/17/0/0 | The first great-great-grandchild public key of the first great-grandchild of the 18th grandchild of the 24th child |
Navigating the HD Wallet Tree Structure
The HD wallet tree structure is tremendously flexible. The flip side of this is that it also allows for unbounded complexity: each parent extended key can have four billion children—two billion normal children and two billion hardened children. Each of those children can have another four billion children, and so on. The tree can be as deep as you want, with a potentially infinite number of generations. With all that potential, it can become quite difficult to navigate these very large trees.
Two BIPs offer a way to manage this potential complexity by creating standards for the structure of HD wallet trees. BIP-43 proposes the use of the first hardened child index as a special identifier that signifies the "purpose" of the tree structure. Based on BIP-43, an HD wallet should use only one level-one branch of the tree, with the index number defining the purpose of the wallet by identifying the structure and namespace of the rest of the tree. More specifically, an HD wallet using only branch m/i′/... is intended to signify a specific purpose, and that purpose is identified by index number i.
Extending that specification, BIP-44 proposes a multicurrency, multiaccount structure signified by setting the "purpose" number to 44′. All HD wallets following the BIP-44 structure are identified by the fact that they use only one branch of the tree: m/44′/*. BIP-44 specifies the structure as consisting of five predefined tree levels:
m / purpose′ / coin_type′ / account′ / change / address_index
The first level, purpose′, is always set to 44′. The second level, coin_type′, specifies the type of cryptocurrency coin, allowing for multicurrency HD wallets where each currency has its own subtree under the second level. There are several currencies defined in the standards document SLIP-0044; for example, Ethereum is m/44′/60′, Ethereum Classic is m/44′/61′, Bitcoin is m/44′/0′, and testnet for all currencies is m/44′/1′.
The third level of the tree is account′, which allows users to subdivide their wallets into separate logical subaccounts for accounting or organizational purposes. For example, an HD wallet might contain two Ethereum accounts: m/44′/60′/0′ and m/44′/60′/1′. Each account is the root of its own subtree.
Because BIP-44 was created originally for Bitcoin, it contains a "quirk" that isn't relevant in the Ethereum world. On the fourth level of the path, change, an HD wallet has two subtrees: one for creating receiving addresses and one for creating change addresses. Only the "receive" path is used in Ethereum, as there is no necessity for a change address like there is in Bitcoin. Note that whereas the previous levels used hardened derivation, this level uses normal derivation. This is to allow the account level of the tree to export extended public keys for use in a nonsecured environment.
Usable addresses are derived by the HD wallet as children of the fourth level, making the fifth level of the tree the address_index. For example, the third receiving address for Ethereum payments in the primary account would be M/44′/60′/0′/0/2. Table 5-6 shows a few more examples.
Table 5-6. BIP-44 HD wallet structure examples
| HD path | Key described |
|---|---|
| M/44′/60′/0′/0/2 | The third receiving public key for the primary Ethereum account |
| M/44′/0′/3′/1/14 | The 15th change-address public key for the fourth Bitcoin account |
| m/44′/2′/0′/0/1 | The second private key in the Litecoin main account, for signing transactions |
Security
Let's start by introducing the concept of security versus ease of recovery. Taking these concepts to the extreme: what's the most secure seed? It's the one that no one can recover, not even you. So if the seed is created and all copies (physical or digital) are destroyed, that's the most secure seed in the world. Not great, as you wouldn't be able to recover it, but it's technically the most secure.
On the flip side, for ease of recovery, what's the easiest seed to recover? One that has the seed phrase written everywhere, like getting it tattooed on your body, in plain sight. That seed will be super easy to recover but not secure at all.
Any choice you make for your operational security (OpSec) in self-custody will likely increase either the security or the ease of recovery of your seed phrase. Increasing security typically reduces ease of recovery, and vice versa. Sometimes, you may end up reducing both, which should be avoided.
Even with a high-security system, no setup is 100% secure. You can do everything in your power to create a perfect system, but there will still be vulnerabilities. One of the most interesting is private-key collisions: essentially generating a seed that's already been used. Since seeds in hardware wallets are generated offline and there's no database of generated seeds, it's technically possible to generate the same wallet twice. The chances of this happening are astronomically small (you're more likely to win the lottery twice in a row), but it's still a possibility.
Warning
Often, there's no urgency in seed security. Either your seed has been stolen, in which case you're already in trouble, or it hasn't. This is especially true for Bitcoin wallets. For Ethereum, it is still the case, but there are situations where acting fast can save funds—for example, removing approvals to dangerous smart contracts. If you receive any urgent messages about your seed, it's probably a scam.
Complex security mechanisms for hiding your seed are not a best practice. Although they may seem foolproof at first, professionals in the field can often recover these types of seeds with the right tools. And if it's so complex that even professionals can't recover it, there's a good chance you won't be able to when needed.
Another non–best practice is relying on obscurity for security. Your system should have as few "secret" components as possible, with the seed itself being the main one. If revealing parts of your system causes it to collapse, it's not secure.
A best practice is to follow what most others do. Trying to invent new systems or, worse, creating everything from scratch is wrong. It's not secure, and the majority of people don't have the technical skills to do it. Keep things simple. Simplicity is absolutely a best practice.
Making a backup of your seed is probably the most important best practice. Whether it's a hardware wallet or a browser wallet, a backup is essential. Backup storage should (a) withstand natural disasters, (b) be geographically separate from your hardware wallet, (c) be in a secure place, and (d) have tamper-evident packaging. Dividing your seed across multiple pieces of paper is not a best practice. It gives a false sense of security.
Tip
If you don't have a secure place to store your seed, consider using a passphrase. The passphrase adds an extra layer of protection by being combined with your seed during the key-generation process. You can even store the passphrase digitally since it's useless without the seed. If someone gets your seed but not your passphrase, they won't be able to access your funds for a certain amount of time; this is because the passphrase can be brute-forced if the attacker has the seed.
Everyone's needs are different, and their security requirements will vary accordingly. But you should always follow best practices. Your needs may change over time, so stay aware and adjust your OpSec if needed.
After setting up your hardware wallet, test your ability to recover the seed. Do this at least once every 12 months, ensuring that your backup works and is accessible.
What does a secure system look like? A trusted hardware wallet (like Trezor), at least one safe backup (never saved digitally), and a plan for inheritance in case something happens to you.
Note
Inheritance is a very complicated topic. We recommend reading Cryptoasset Inheritance Planning: A Simple Guide for Owners by Pamela Morgan (Merkle Bloom).
Improving on User Experience
As we mentioned earlier, at a high level, a wallet is a software application that serves as the primary user interface to Ethereum. So for most of Ethereum's users, the wallet is most of the user experience. For years, it has not really been improved. For example, the most popular browser wallet at the time of writing is MetaMask, which has not evolved that much since its inception; a close second, Rabby, has recently emerged. We will now examine a few updates to wallets that could drastically improve the user experience.
Account Abstraction
Account abstraction (AA) on Ethereum is a way to make user accounts more flexible and easier to use. Normally, there are two types of accounts in Ethereum, as described in Chapter 2: EOAs and smart contract accounts. AA combines the benefits of both types. It allows regular accounts (EOAs) to behave more like smart contracts, meaning users can set up custom rules for how their accounts work, such as adding security features or allowing multiple people to sign transactions.
With AA, Ethereum can become more user-friendly and flexible. For example, you could recover a lost account without relying solely on a private key, or you could pay transaction fees in any token, not just ether.
There have been multiple proposals to implement AA. The main distinction is that one group of proposals tried to implement AA without changing the Ethereum protocol. Another group of proposals, which will be implemented in the Pectra upgrade, will end up changing the Ethereum protocol.
Let's look at the main EIPs and Ethereum Requests for Comments (ERCs) for AA. Keep in mind that these proposals are evolving rapidly, and by the time this book is published, the AA landscape may have changed significantly. Nevertheless, it's still useful to explore what has been implemented and what is planned for the near future.
Tip
It is important to understand the difference between an ERC, an EIP, and a Rollup Improvement Proposal (RIP). Essentially, EIPs and RIPs are improvements that center on changes in the Ethereum networks, whereas ERCs are application-related changes that do not have any impact on core network capability.
ERC-4337
ERC-4337 is an advancement in the Ethereum blockchain that aims to make user accounts more versatile, secure, and user-friendly. Unlike typical upgrades that alter the Ethereum protocol, ERC-4337 introduces new functionality through smart contracts and off-chain components. As of September 2024, the primary on-chain implementation of AA is ERC-4337.
As we said in Chapter 2, traditional Ethereum accounts are divided into two types: EOAs, controlled solely by private keys, and contract accounts, which operate through smart contracts. EOAs dominate user wallets today because they are simple and economical; however, they are also limited in functionality and prone to security risks. Losing a private key can mean permanent loss of funds, and EOAs are not customizable for security features like multisignature setups or account-recovery options. Contract accounts can incorporate these security measures and more, yet their complexity and higher transaction fees have prevented their widespread use by everyday users. ERC-4337 overcomes this by enabling EOAs to function as smart contracts, merging the simplicity of EOAs with the security and flexibility of contract accounts.
The implementation of ERC-4337 introduces UserOperations to handle transactions differently, as shown in Figure 5-5. Rather than directly broadcasting each transaction to the blockchain, users submit UserOperations to a high-level mempool, where transactions are temporarily stored. Special participants, known as bundlers, collect and process these UserOperations, packaging them into a single Ethereum transaction. This process reduces network congestion and allows multiple operations to be processed in a more efficient, bundled manner. ERC-4337 also establishes a new role called paymasters. Typically, Ethereum transactions require the payment of gas fees in ETH, but paymasters make it possible for users to cover gas fees with alternative tokens or even to have a third-party sponsor pay the fees on their behalf. This shift eliminates a significant barrier, especially for newcomers who may not hold ETH, making the Ethereum network more inclusive and accessible.
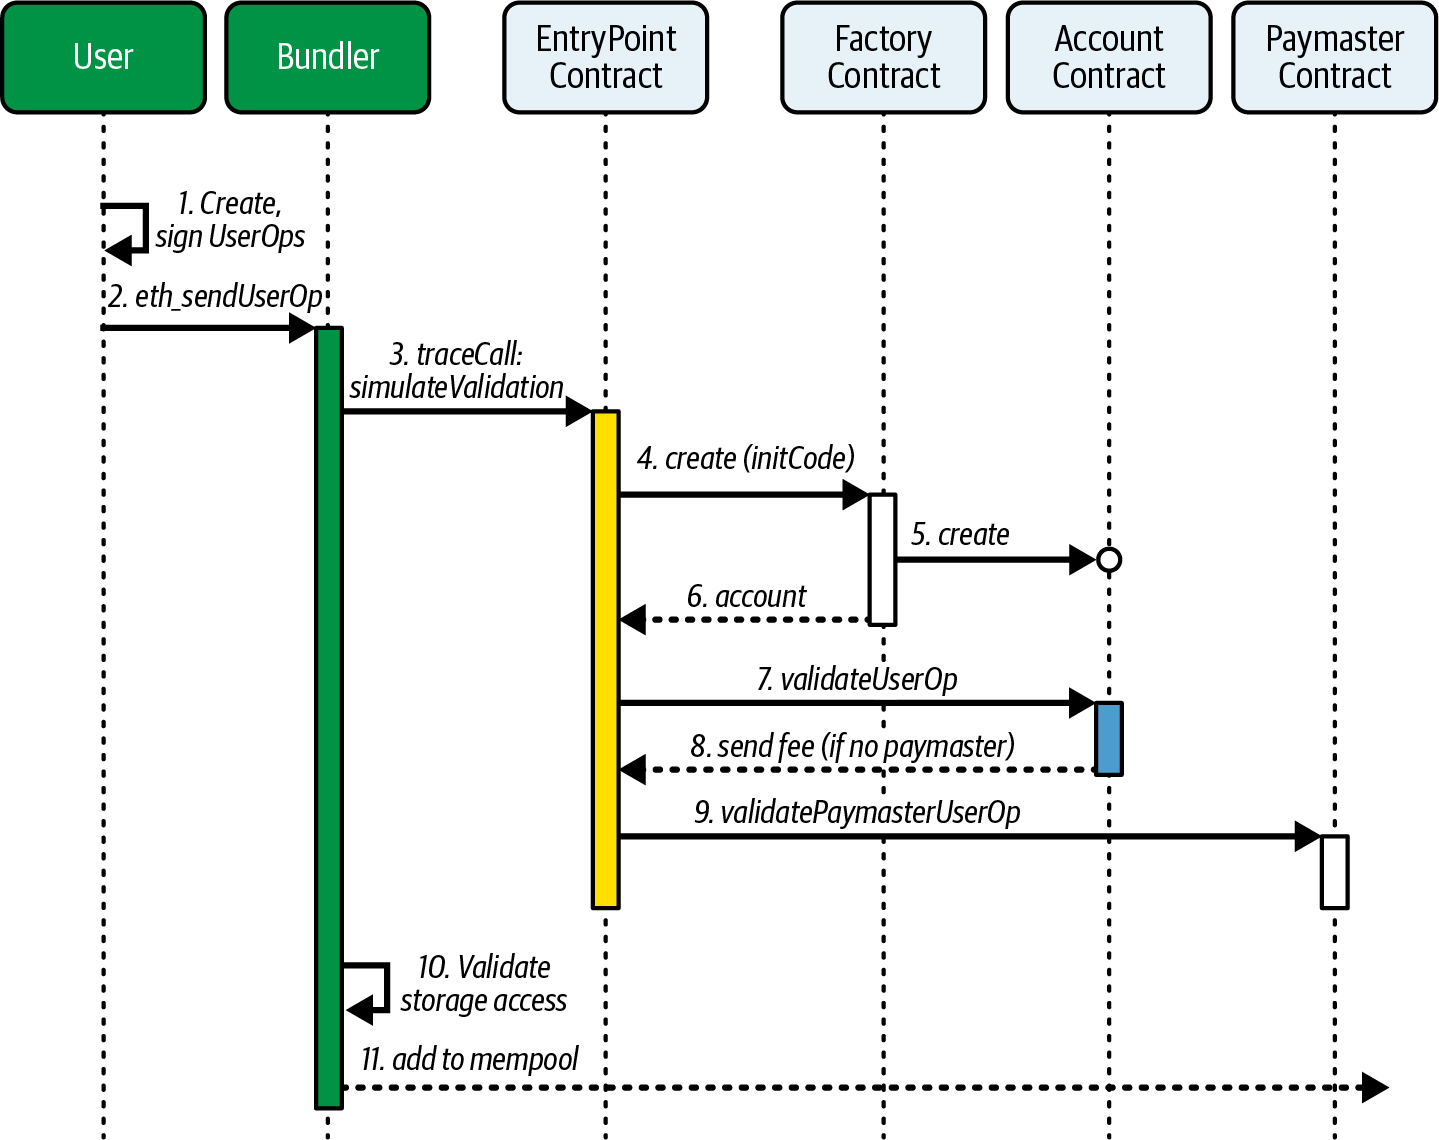
Figure 5-5. ERC-4337 implementation diagram
Instead of using the traditional public mempool, which hosts pending transactions for EOAs, UserOperations are sent to a specialized UserOperation mempool: a higher-level mempool specifically designed for these operations. Bundlers monitor the UserOperation mempool, collecting multiple UserOperations to package them into a single "classic" transaction. They start by verifying each UserOperation's validity through the EntryPoint methods. After validation, the bundler submits this bundled transaction directly to the next proposed block, bypassing the regular mempool. Bundlers can either act as block builders themselves or collaborate with block builders to add the transaction to the blockchain.
EIP-2938
While ERC-4337 focuses on AA at a high level via smart contracts without changing Ethereum's core, EIP-2938 goes a step further by proposing that AA be embedded within the protocol layer itself. This lower-level approach allows for even more direct and flexible interactions among users, smart contracts, and applications by fundamentally changing how the EVM treats accounts. Through EIP-2938, users could handle operations without traditional EOAs, removing reliance on private-key-based accounts and enabling a greater diversity of account management systems, such as multisignature accounts or social recovery accounts, directly on Ethereum's protocol level.
The main difference between EIP-2938 and some existing AA proposals lies in the focus on integrating abstraction directly into the protocol, rather than layering it on top. With EIP-2938, Ethereum would support "operations" rather than "transactions," where each operation could represent a more versatile, customizable transaction type. EIP-2938 can redefine Ethereum's transactions as programmable objects, supporting a broader spectrum of use cases. By treating accounts and transactions as inherently programmable, it expands Ethereum's utility beyond standard payments and contract interactions, fitting perfectly with the increasingly complex applications being built on the network.
RIP-7560
The RIP-7560 proposal integrates EIP-2938 and ERC-4337 into a unified approach for native AA, splitting Ethereum's transaction scope into validation, execution, and post-transaction steps. By separating transaction validation into distinct processes for authorization and payment of gas fees, it enables one contract to sponsor gas fees for another account's transaction. This approach maintains compatibility with ERC-4337's ecosystem while working toward the goal of fully native AA.
ERC-4337 introduces AA at the application level, but it comes with limitations due to its out-of-protocol design. These drawbacks include extra gas costs, limited censorship resistance, a dependency on nonstandard RPC methods, and restrictions that limit compatibility with existing contract expectations. Native AA, as proposed in EIP-2938, presents a more robust alternative by building these features directly into the protocol. However, EIP-2938 doesn't fully align with ERC-4337's structure, which has been widely tested and implemented without protocol changes.
By combining EIP-2938's built-in protocol-level features with the practical insights gained from ERC-4337, this proposal brings together the best of both approaches. This hybrid approach aims to lower gas costs, improve the reliability of transactions by making them more resistant to censorship, and ensure compatibility with current and future Ethereum contracts. Gradually moving from EOAs to smart contract accounts would also reduce risks tied to private keys, making Ethereum more secure and easier to use. Importantly, this setup ensures that those already using ERC-4337 can smoothly adopt these new features.
Figure 5-6 represents the transaction flow for AA as outlined in RIP-7560. The process incorporates several key contracts that handle validation, deployment, and execution, creating a streamlined, modular approach to managing user accounts and transactions on the Ethereum blockchain.
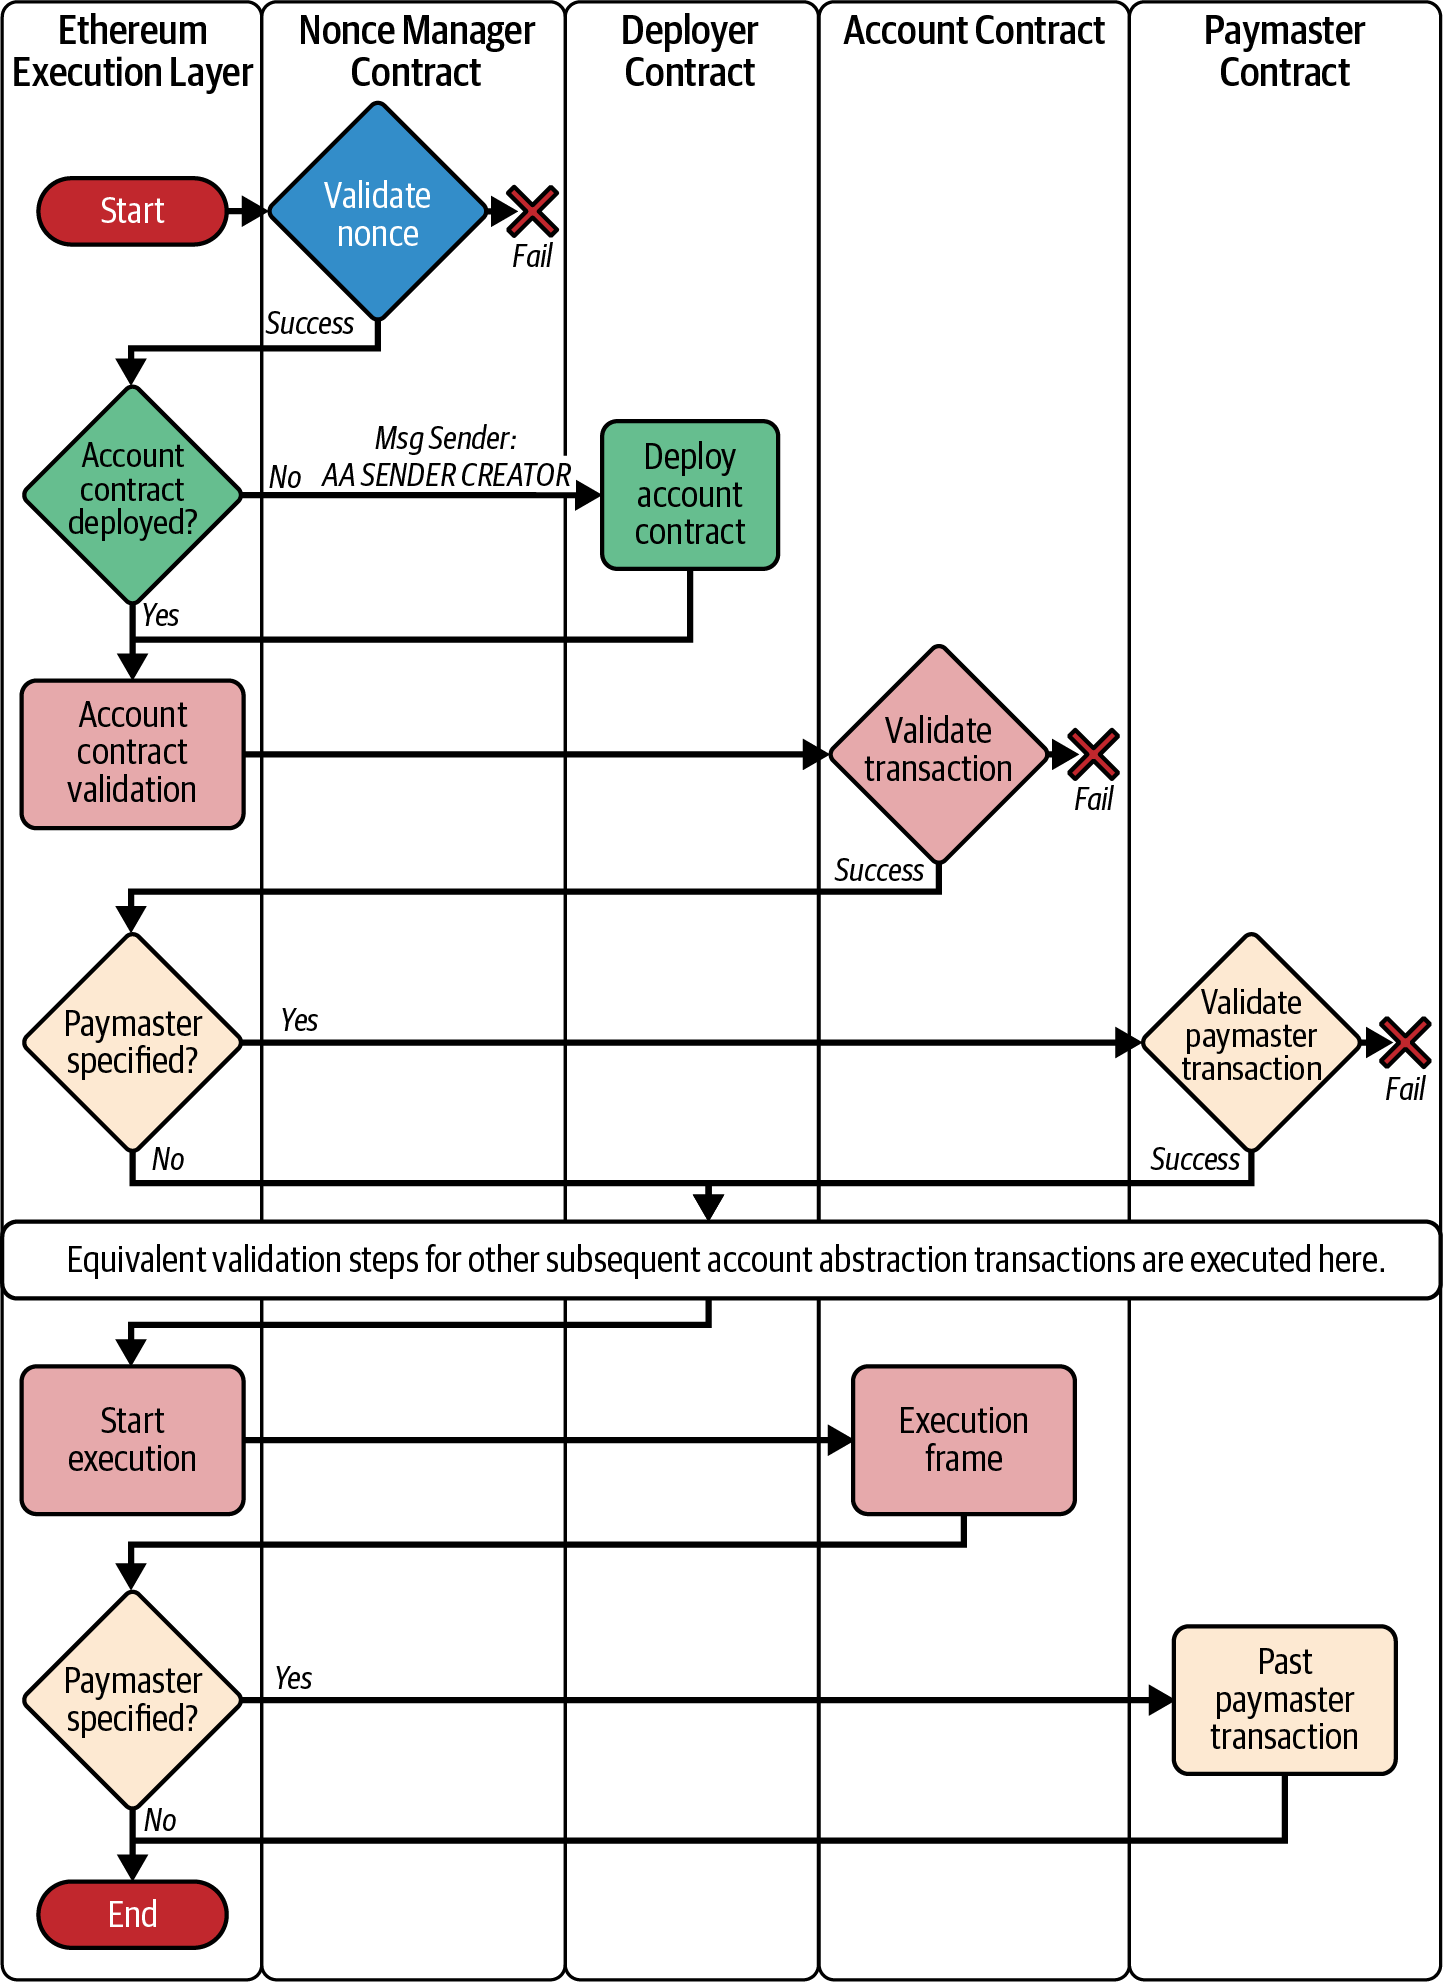
Figure 5-6. RIP-7560 transaction flow
The flow begins with a nonce check by the Nonce Manager Contract to ensure that the transaction is unique and hasn't been replayed. This is a crucial step for transaction integrity because it prevents double-spending or accidental repeats. If the nonce is valid, the system moves forward; otherwise, the transaction is halted.
Next, the process checks if the user's Account Contract (a smart wallet) already exists. If not, the Deployer Contract steps in to create this wallet, allowing the user to participate in transactions. Once it is deployed, or if it is already in place, the Account Contract itself performs a validation check to confirm that the transaction is legitimate and aligns with the contract's logic. This ensures that only authorized actions proceed, adding a layer of security and customization to each user's wallet.
An interesting feature of this flow is the optional involvement of a Paymaster Contract. If specified, this contract can cover the gas fees for the transaction or offer alternative payment methods. When a paymaster is involved, it undergoes its own validation process to ensure it can legitimately cover the transaction costs. This flexibility allows for sponsorship models and potentially reduces the burden of transaction fees on users.
Once all validations are complete, the Ethereum Execution Layer begins processing the transaction. During execution, an Execution Frame is used to handle the transaction details and monitor its progression. After execution, if a paymaster was involved, it performs any necessary postprocessing to finalize the transaction sponsorship.
EIP-5806
EIP-5806 introduces a new transaction type, enabling EOAs to run custom code through a "delegate call" mechanism.
Currently, EOAs can only deploy contracts or send "call" transactions, limiting user interactions with the blockchain. This restriction affects usability since EOAs cannot perform tasks like batching multiple actions into one transaction or executing complex operations. While AA could solve these issues, its adoption path remains uncertain, and not all users can migrate because of costs and nontransferable asset custody.
This proposal offers a straightforward way for EOAs to execute custom code with minimal EVM changes and familiar security standards. By allowing EOAs to delegate calls to specific contracts, users gain more control and flexibility, enabling complex operations like multicall batching or secure token transfers. Unlike other AA proposals, this approach aims to improve EOA user experience without replacing existing abstraction methods, making it an accessible option for enhanced EOA functionality in the near future.
EIP-3074
EIP-3074 introduces two opcodes, AUTH and AUTHCALL, to allow EOAs to delegate control of their transactions to an "invoker" contract. The user signs a message containing the invoker and a commit (a hash of transaction values), ensuring that the invoker only processes authorized transactions. Replay protection is handled by the invoker, and users must trust this contract to avoid malicious behavior. This proposal improves transaction batching and enables flexible account delegation.
AUTH lets users grant a smart contract permission to act on their behalf. It uses a digital signature (ECDSA) to verify this authorization, then stores the user's address for future transactions. AUTHCALL allows the authorized smart contract to perform transactions, such as sending tokens or interacting with other contracts. For example, if you want to swap 10 DAI for ETH, you can authorize the invoker (using AUTH) with one signature. The invoker will use AUTHCALL to approve Uniswap to spend your DAI and then execute the swap.
Initially, replay protection and fields like value, gas, and other AUTHCALL arguments were also signed. The design evolved to delegate these tasks to the invoker contract, making it crucial for users to trust the invoker. Users can "commit" to particular call properties by hashing them. The invoker validates only if the committed values, such as the nonce for replay protection, match the user's commitment, as shown in Figure 5-7. This ensures that the invoker processes exactly what the user authorized.
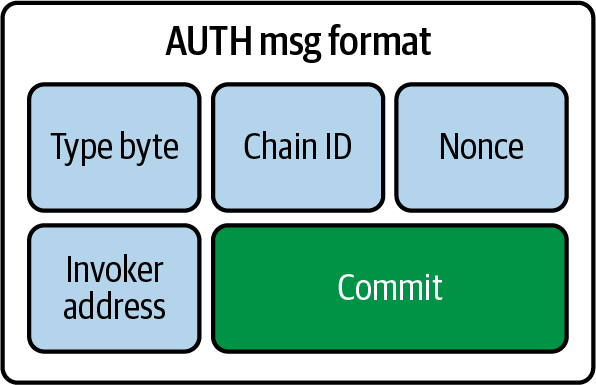
Figure 5-7. EIP-3074 commitment validation
The commit hash enables invokers to enforce various rules, such as allowing parallel nonces or bundling multiple calls under one signature. This enables multicall flows, such as consolidating an ERC-20 approve-transfer into a single transaction, as seen in Figure 5-8.
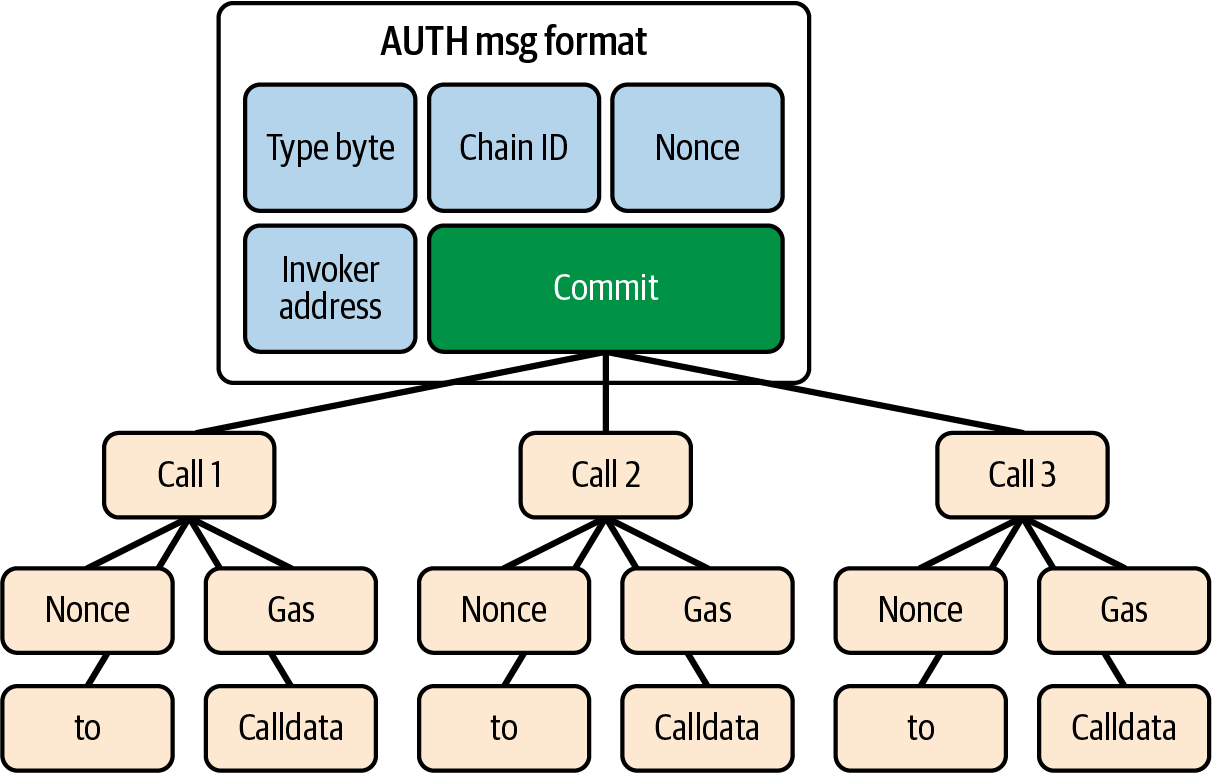
Figure 5-8. EIP-3074 multicall flow
Additionally, it supports delegating control of the EOA to other keys by signing a commit message with the delegate's address and an access policy, which the invoker verifies before relaying calls on behalf of the EOA, as seen in Figure 5-9.
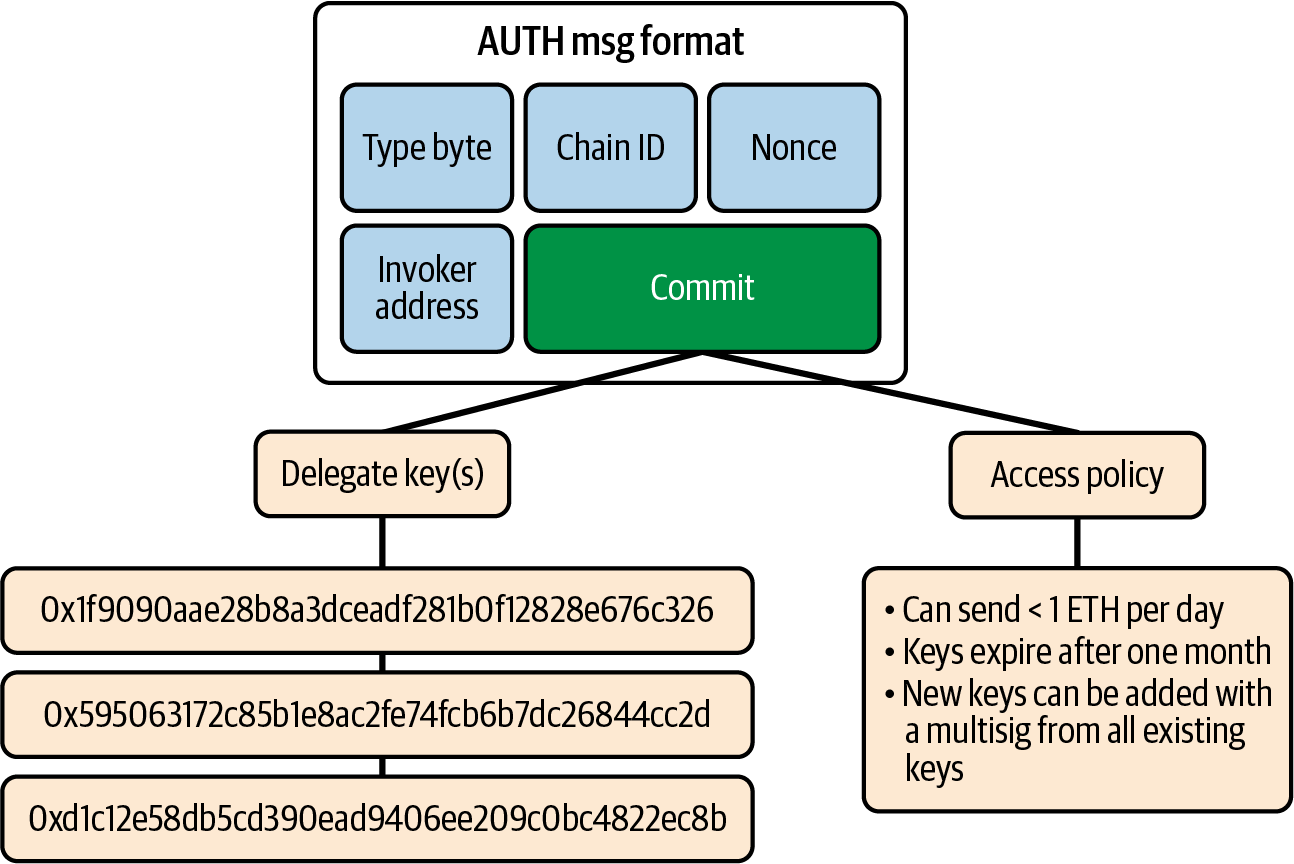
Figure 5-9. EIP-3074 delegation flow
EIP-5003
EIP-5003 introduces the AUTHUSURP opcode, which allows code deployment at an address authorized through EIP-3074, effectively removing the original EOA's signing key (when used with EIP-3607). Traditional EOAs control a lot of value on Ethereum but face limitations. There's no easy way to rotate keys, batch transactions for efficiency, or enable gas sponsorship without holding ETH. Contract accounts and AA address these issues, allowing users to customize security features, authentication methods, spending limits, key rotation, social recovery, and more. However, these benefits are mostly limited to users who actively adopt new standards through smart contract wallets and app-layer solutions, such as those proposed by ERC-4337. This leaves a substantial number of existing users, who have relied on EOAs since Ethereum's inception, with limited security and usability improvements.
While EIP-3074 offers an initial solution by enabling EOAs to delegate signing authority to a contract account, it stops short of allowing the EOA to completely revoke this original signing key. This gap introduces a security risk: even with delegated authority, the primary private key remains a potential vulnerability. If compromised, the entire account remains at risk, as there is currently no revocation option for an exposed private key. If a user's private key is leaked, either by accident or through a malicious attack, the only option is to create a new wallet and painstakingly migrate assets individually, an expensive and often incomplete process due to the immovability of certain assets within existing smart contracts.
With this EIP, AUTHUSURP provides a secure transition path for EOA holders. It allows EOAs to fully transfer control to a smart contract, removing the original key's authority and thereby eliminating it as a security threat.
EIP-7702
EIP-7702 is the main AA EIP expected to be implemented in Pectra by early 2025. (Note: this chapter was written in September and October 2024, which is why we are using future tense.) EIP-7702 introduces a "set code transaction" under EIP-2718, enabling an EOA to delegate certain code to be executed on its behalf by authorized addresses.
Note
EIP-2718 introduces a "typed transaction envelope" format for Ethereum, supporting multiple transaction types within the protocol. This standardized format allows backward-compatible transaction upgrades, enabling future improvements with new transaction types while maintaining existing structures. This will be explained in more detail in Chapter 6. This EIP also adjusts EIP-3607's restrictions, allowing transactions from EOAs flagged with a delegation designation. It enables secure delegation for EOAs, adding improved account-management capabilities to Ethereum.
A question arises around how users should specify the code they intend to run in their accounts. The main options are to include the bytecode directly in the transaction or to reference a pointer to the code. The simplest pointer is the address of some code deployed on chain. Direct code specification allows EOAs to execute arbitrary code within the transaction calldata. One consideration when signing a code pointer is whether that address points to the intended code on another chain; wallet maintainers can hardcode a single EIP-7702 authorization message, ensuring cross-chain code consistency.
There is an important security consideration to make. Once code is embedded in an EOA, EIP-7702 transactions may allow msg.sender == tx.origin, where the transaction creator is also the broadcasting address whenever the EOA code dispatches a call. Without EIP-7702, this scenario only occurs at the topmost execution layer of a transaction. Because EIP-7702 would enable transaction sponsoring, this would also be possible in other layers of execution. Consequently, this EIP breaks that invariant, affecting smart contracts that contain require(msg.sender == tx.origin) checks. This check serves at least three purposes:
-
Verifying that
msg.senderis an EOA (astx.originmust always be an EOA). This invariant remains unaffected by execution-layer depth; it is still possible to ensure that thetx.originis themsg.senderif the depth of the call is 1. -
Preventing atomic sandwich attacks, such as flash loans, which rely on altering state before and after target contract execution within the same atomic transaction. This protection is compromised by this EIP. However, using
tx.originfor this purpose is generally considered poor practice and can already be bypassed by miners selectively including transactions. -
Guarding against reentrancy.
Examples of the first two appear in Ethereum mainnet contracts, with the first being more common (and unaffected by this EIP). However, the third case is more vulnerable under this EIP, although no instances of reentrancy protection relying on tx.origin were observed during the initial review by the creators of the proposal.
Tip
Unlike prior versions of this EIP and similar proposals, the delegation designation can be revoked at any time by signing and submitting an EIP-7702 authorization targeting a new address, using the account's current nonce. Without such action, a delegation remains valid indefinitely.
There is considerable interest in adding functionality improvements to EOAs, improving usability and, in some cases, improving security. One key application is transaction sponsorship, which enables users to transact without holding ETH to cover gas fees. In traditional Ethereum transactions, gas fees are paid in ETH, which may be inconvenient for users holding only other tokens or those who are new to the ecosystem. EIP-7702 introduces a model where transaction fees can be covered by third parties, temporarily or permanently, allowing users to complete transactions without ETH. This could simplify onboarding, making Ethereum applications more accessible to new users interested in specific DApps or tokens without requiring ETH management.
Traditional Ethereum accounts rely solely on a single private key, so losing it means losing access to the account and assets. EIP-7702's structure supports various recovery mechanisms, enabling users to regain access if they lose their private keys. Recovery mechanisms are especially valuable for security-focused users and for those who are new to blockchain and may find key management daunting. Potential recovery options include multisignature and social recovery, which allow selected contacts to assist in account restoration; this is a big step in Ethereum accounts' security and user-friendliness.
EIP-7702 also introduces batching and privilege deescalation. Batching allows multiple actions to be processed within a single atomic transaction, enabling users to complete complex workflows—such as ERC-20 approval followed by token spending—in one step rather than two. Privilege deescalation offers subkeys with restricted permissions, authorizing actions like spending a specific amount or interacting only with certain applications, to improve security by minimizing exposure in case of compromise.
This EIP also modifies the invariants that traditionally govern account balance and nonce behaviors. It breaks the expectation that the balance of an EOA account can only decrease due to transactions from that account, and that an EOA's nonce cannot increment once transaction execution begins. These changes affect the mempool design and other EIPs. However, since the accounts are statically listed in the outer transaction, transaction-propagation rules can be adjusted to prevent forwarding of conflicting transactions. It does have forward compatibility with ERC-4337 and RIP-7560. Among other benefits, it enables EOAs to masquerade as contracts compatible with ERC-4337 bundles via the existing EntryPoint mechanism.
Note
A general design goal for state-transition changes is minimizing special cases in an EIP. Earlier iterations of this EIP resisted adding a special case for clearing an account's delegation designation. Generally, an account delegated to 0x0 behaves like a true EOA; however, most operations interacting with that account incur an additional cost. This extra cost may influence overall EIP adoption. For these reasons, a mechanism was included to allow users to restore their EOAs to their original state.
This EIP involves multiple security considerations, which will be the responsibility of the implementation and should be carefully evaluated. In addition to the noted tx.origin issue, there are three key considerations:
-
Enabling EOAs to act like smart contracts challenges transaction propagation. Traditionally, EOAs could only send value via transactions. With this EIP, an EOA's delegated code can be invoked by anyone at any time in a transaction, preventing static balance validation by nodes; it essentially makes it harder for nodes to validate the balance of an address.
-
Smart contract wallet developers must consider the implications of setting code in an account without execution. Normally, contracts are deployed with initcode, initializing storage slots deterministically. This EIP omits initcode execution for delegation, so developers must verify initial calldata to prevent an observer from front-running setup with an account they control.
-
Replay protection (e.g., nonce handling) should be implemented by the delegate and signed. Without this, a malicious actor could reuse a signature, gaining near-complete control over the signer's EOA.
The future of account abstraction
AA on Ethereum is a complex but promising idea, with many possible paths forward. Each proposal offers a different way to make user interactions simpler and more secure. Some improve on previous proposals, such as EIP-5003 building on EIP-3074, while others, such as EIP-5806, stand alone or even lack backward compatibility. This variety reflects a search for the best solution, with the final direction likely shaped by which options users find easiest and most effective. Although the exact future is unclear, AA holds real promise for improving the experience of using Ethereum.
Social Recovery
The primary EIP related to social recovery is EIP-2429. Titled "Secret Multisig Recovery," EIP-2429 introduces a mechanism that allows users to regain access to their wallets by assigning trusted individuals or entities as "guardians." In case a user loses their private key, they can use these guardians to help recover control of the wallet. The guardians are involved only during the recovery process, limiting their power, as shown in Figure 5-10.
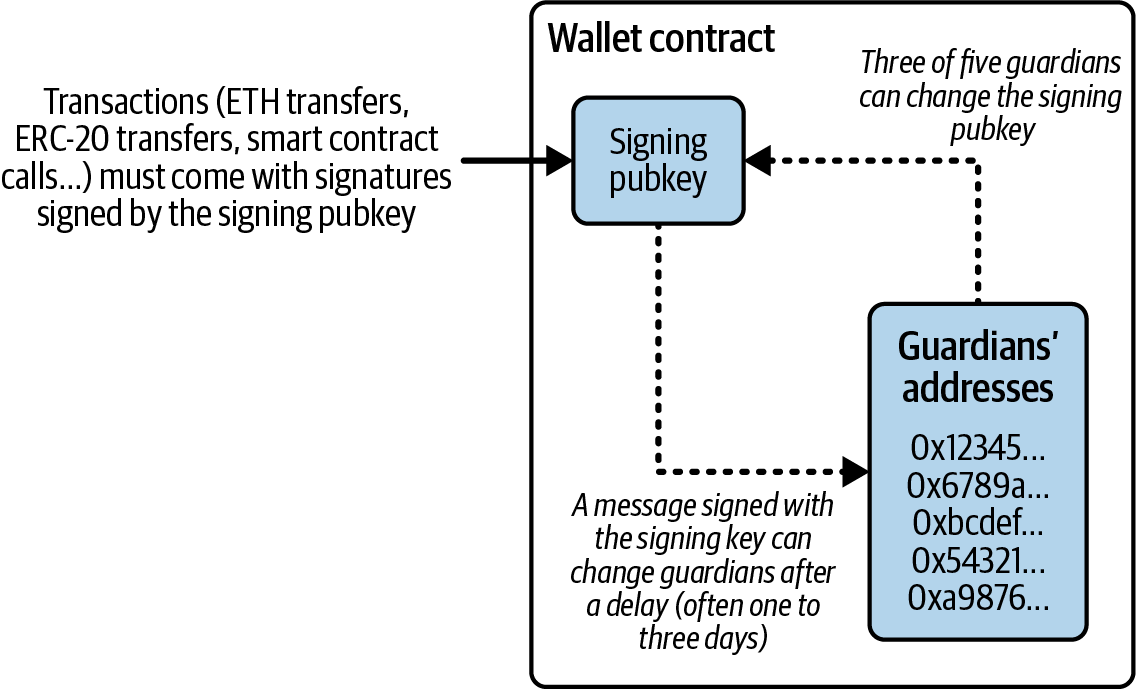
Figure 5-10. Social recovery flow
Note
Vitalik Buterin released an article in 2021 that said, and we are quoting, "This gets us to my preferred method for securing a wallet: social recovery." We do not know if the situation has changed, but it still might be the case that social recovery is Buterin's preferred method.
For normal use, a social recovery wallet functions like a regular one, allowing the user to sign transactions with their signing key. If the key is lost, social recovery activates, enabling the user to contact guardians, who sign a transaction to update the wallet's signing key. Guardians can be trusted individuals, devices, or institutions. Guardians can remain anonymous, and to prevent attacks, their identities aren't stored on chain. In case of the user's death, guardians can coordinate to recover the user's funds.
ENS
The Ethereum Name Service is like a Web3 version of traditional domain names, but instead of linking to websites, it connects human-readable names to Ethereum addresses. This makes dealing with long, complex blockchain addresses much easier. For instance, rather than having to send cryptocurrency to an address like 0xd8dA6BF..., you can simply send it to something like vitalik.eth. This simplifies transactions and makes the whole process far less intimidating, especially for newcomers to crypto.
If you compare ENS to the Web2 world, it's similar to how DNS works. DNS takes IP addresses (which are hard to remember) and connects them to URLs like google.com, so you don't have to remember a string of numbers to visit a website. However, there's a key difference between ENS and DNS: ENS is decentralized. No central authority controls your .eth name once you own it. In Web2, domain names are managed by registrars and can be censored, suspended, or restricted. In ENS, you control your name entirely through your Ethereum wallet, meaning your .eth name is as secure as the wallet that holds it.
When you're sending or receiving crypto, using a name like andreas.eth instead of a long, complex Ethereum address makes everything smoother and safer. It reduces the chance of making a mistake when entering an address, which can otherwise be a big risk in a transaction.
Another cool aspect of ENS is that it provides a sense of digital identity. Just like owning a domain name for your website, having a unique .eth name can serve as your public identity on the blockchain.
Conclusion
Wallets are the foundation of any user-facing blockchain application. They enable users to manage collections of keys and addresses. Wallets also allow users to demonstrate their ownership of ether and authorize transactions by applying digital signatures, as we will see in Chapter 6.
Chapter 6. Transactions
Transactions are signed messages originated by an externally owned account, transmitted by the Ethereum network, and recorded on the Ethereum blockchain. This basic definition conceals a lot of surprising and fascinating details. Another way to look at transactions is that they are the only things that can trigger a change of state, or cause a contract to execute in the EVM. Ethereum is a global singleton state machine, and transactions are what make that state machine "tick," changing its state. Contracts don't run on their own. Ethereum doesn't run autonomously. Everything starts with a transaction.
In this chapter, we will dissect transactions, show how they work, and examine the details. Note that much of this chapter is addressed to those who are interested in managing their own transactions at a low level, perhaps because they are writing a wallet app; you don't have to worry about this if you are happy using existing wallet applications, although you may find the details interesting!
The Structure of a Transaction
First, let's take a look at the basic structure of a transaction as it is serialized and transmitted on the Ethereum network. Each client that receives a serialized transaction will store it in memory using its own internal data structure, perhaps embellished with metadata that doesn't exist in the network serialized transaction itself. The network serialization is the only standard form of a transaction.
While in the first days of Ethereum, there was only a single type of transaction, EIP-2718 has introduced a way to deal with different transaction types and handle them in a different way. In particular, every transaction starts with a single byte that specifies the type of the transaction:
transaction = tx_type || tx_payload
At the time of writing (June 2025), five transaction types exist, listed in Table 6-1.
Table 6-1. EIP-2718 transaction types
| Type identifier | Name |
|---|---|
0x00 | Legacy transactions |
0x01 | EIP-2930 transactions |
0x02 | EIP-1559 transactions |
0x03 | EIP-4844 transactions |
0x04 | EIP-7702 transactions |
Let's analyze all of these in more detail.
Legacy Transactions
A legacy transaction is a serialized binary message that contains the following data:
Chain ID
The chain ID of the network you're sending the transaction to. It was added with EIP-155 as a simple replay-attack-protection mechanism.
Nonce
A sequence number, issued by the originating EOA and used to prevent message replay.
Gas price
The price of gas (in wei) that the originator is willing to pay.
Gas limit
The maximum amount of gas the originator is willing to buy for this transaction. Note that you will pay only for the real gas used in the transaction. Gas limit only represents the maximum amount of gas you're willing to pay for.
Recipient
The destination Ethereum address.
Value
The amount of ether to send to the destination.
Data
The variable-length binary data payload.
v,r,s
The three components of an ECDSA digital signature of the originating EOA.
The transaction message's structure is serialized using the recursive-length prefix (RLP) encoding scheme, which was created specifically for simple, byte-perfect data serialization in Ethereum. All numbers in Ethereum are encoded as big-endian integers, of lengths that are multiples of 8 bits.
Note that the field labels (to, gas limit, etc.) are shown here for clarity but are not part of the transaction serialized data, which contains the RLP-encoded field values. In general, RLP does not contain any field delimiters or labels. RLP's length prefix is used to identify the length of each field. Anything beyond the defined length belongs to the next field in the structure.
While this is the actual transaction structure that is transmitted, most internal representations and user interface visualizations embellish this with additional information derived from the transaction or from the blockchain. For example, you may notice there is no "from" data in the address identifying the originator EOA. That is because the EOA's public key can be derived from the v, r, s components of the ECDSA signature. The address can, in turn, be derived from the public key. When you see a transaction showing a from field, that was added by the software used to visualize the transaction. Other metadata frequently added to the transaction by client software include the block number (once it is published and included in the blockchain) and a transaction ID (calculated hash). Again, this data is derived from the transaction and does not form part of the transaction message itself.
EIP-2930 Transactions
EIP-2930 transactions are the first ones to use the EIP-2718 typed transaction envelope, with 0x01 as transaction type. They are basically equal to the previous transaction type, but a new field called access list is added. It's an array of (addresses, storage slots) that lets a user prepay for addresses and storage slots that are going to be touched by the transaction. This way, during the execution in the EVM, the user is charged less gas.
Note
To be more precise, addresses and their storage slots contained in the access list are included, respectively, in
accessed_addressesandaccessed_storage_keys, which are used by the EVM to differentiate between a warm and a cold access. Cold accesses charge way more gas than warm ones. For example, theSLOADopcode charges 100 gas if the storage slot accessed is warm, 2,100 otherwise.
This new transaction type was primarily introduced to address issues stemming from EIP-2929. EIP-2929 increased gas costs for state-access opcodes, which caused some smart contracts to fail when processing transactions correctly due to out-of-gas errors. By introducing access lists, users can prepay for the addresses and storage slots their transactions will access, preventing these failures.
EIP-1559 Transactions
EIP-1559 transactions were introduced during the London hard fork on August 5, 2021, using 0x02 as transaction type. They completely change the structure of the fee market on Ethereum by introducing a new protocol parameter: the base fee.
The base fee represents the minimum fee you need to pay to send a transaction on the Ethereum network. The block gas limit is doubled from 15 million to 30 million gas, and the block gas target is introduced equal to half the block gas limit: 15 million gas. The idea is to maintain the same amount of load on the Ethereum network than before on average but to let blocks be much bigger in size (potentially twice as big) if needed.
To keep blocks at an average of 15 million gas used, the base fee isn't a fixed value: it changes based on blocks' utilization rate. If a block's gas used is higher than the block gas target, then the base fee increases; if the gas used is lower than the gas target, then it decreases.
Block gas limit has (almost) always been increased at specific blocks at fixed, rounded values: 10 million, 12.5 million, 15 million, and 30 million, as you can see in Figure 6-1. In fact, even though validators (and miners with the old PoW consensus protocol) can slightly adjust the gas target on every block, which directly translates to the gas limit, block gas limit is a very crucial value, and everyone usually follows core developers' recommendations.

Figure 6-1. Block gas limit evolution
Base fees do not go to validators (or miners) who create blocks; instead, they are immediately burned, reducing the total supply of ETH. A new fee is introduced—the priority fee—which you can think of as the tip you pay to validators (or miners) to incentivize them to include your transactions in the next block.
Tip
In theory, you could create transactions that only pay the base fee—which is mandatory—and zero priority fee. The protocol doesn't oblige you to pay a tip to validators. But in reality, you should always include it to see your transactions confirmed in a reasonable amount of time. Note that wallets normally handle base and priority fees automatically for you and set them to the correct values.
An EIP-1559 transaction is a serialized binary message that contains the following data:
Chain ID
Same as legacy transactions
Nonce
Same as legacy transactions
Max priority fee per gas
The price of gas (in wei) that the originator is willing to pay directly to validators as a tip for including the transaction in the block
Max fee per gas
The price of gas (in wei) that the originator is willing to pay in total, comprehensive of base fee and priority fee
Gas limit
Same as legacy transactions
Recipient
Same as legacy transactions
Access list
Same as EIP-2930 transactions
Value
Same as legacy transactions
Data
Same as legacy transactions
v,r,s
Same as legacy transactions
As with all transaction types, the message structure is serialized using the RLP encoding scheme.
EIP-4844 Transactions
EIP-4844 transactions were introduced with the Cancun hard fork on March 13, 2024, using 0x03 as transaction type. We've already mentioned them in the section "KZG Commitment" in Chapter 4, and we'll discuss them further in Chapter 16. They are also called blob-carrying transactions because they come with a sidecar—a blob—which contains a large amount of data (about 131,000 bytes each) that is not accessible by the EVM but whose commitment can be accessed.
A new type of gas—the blob gas—is used for blobs. It's completely separated and independent from normal gas. It follows its own targeting rule even though it's still deeply inspired by EIP-1559. The idea is that if the blob gas used is greater than the target blob gas used, then the blob gas price increases; otherwise, it decreases.
The serialized binary message shares the same format as EIP-1559 with two new additions:
Max fee per blob gas
The price of blob gas (in wei) that the originator is willing to pay for blobs
Blob versioned hashed
A list of 32-byte values representing the versioned hash of every KZG commitment related to the blob
Note
With the Cancun hard fork and the introduction of EIP-4844 transactions, the block header is expanded with two new elements:
Blob gas used
The total amount of blob gas used by all EIP-4844 transactions in the block
Excess blob gas
A running total of blob gas consumed in excess of the target, prior to the block
EIP-7702 Transactions
EIP-7702 transactions were included in the Pectra hard fork on May 7, 2025, using 0x04 as transaction type. They allow EOAs to set the code in their account. Traditionally, EOAs have an empty code; they can just start a transaction but cannot really perform complex operations, unless they are interacting with a smart contract. EIP-7702 changes this, making it possible for EOAs to do operations such as the following.
Batching
Allows multiple operations from the same user in one atomic transaction, such as an ERC-20 approval followed by spending that approval, which is a very common workflow in many decentralized exchanges.
Sponsorship
Account X pays for a transaction on behalf of account Y.
Privilege deescalation
Users can sign subkeys and give them specific permissions that are much weaker than global access to the account—for example, a permission to spend up to 1% of the total balance per day or to interact only with a specific application.
The low-level details are quite complicated, and we recommend reading the EIP official website if you're interested. The high-level overview, though, is simple yet really powerful. EIP-7702 allows EOAs to assign themselves a delegation designator. This delegation designator points to a smart contract (live on the Ethereum mainnet), and when a transaction is sent to the EOA, it executes the code at the designated address as if that were the EOA's actual code, as shown in Figure 6-2.
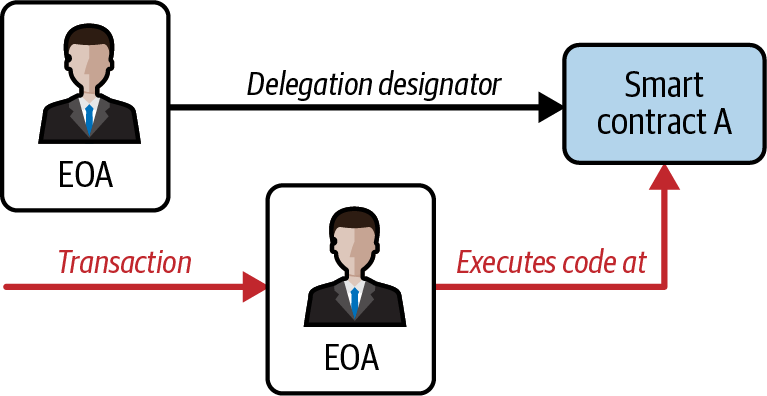
Figure 6-2. EIP-7702 delegation mechanism
The Transaction Nonce
The nonce is one of the most important and least understood components of a transaction. Its definition in the "Yellow Paper" reads:
Nonce: A scalar value equal to the number of transactions sent from this address or, in the case of accounts with associated code, the number of contract-creations made by this account.
Strictly speaking, the nonce is an attribute of the originating address—that is, it only has meaning in the context of the sending address. However, the nonce is not stored explicitly as part of an account's state on the blockchain. Instead, it is calculated dynamically by counting the number of confirmed transactions that have originated from an address.
There are two scenarios where the existence of a transaction-counting nonce is important: the usability feature of transactions being included in the order of creation and the vital feature of transaction-duplication protection. Let's look at an example scenario for each of these:
Scenario 1
Imagine you want to make two transactions. You have an important payment to make of 6 ether and another payment of 8 ether. You sign and broadcast the 6-ether transaction first because it is the more important one, and then you sign and broadcast the 8-ether transaction. Sadly, you have overlooked the fact that your account contains only 10 ether, so the network can't accept both transactions: one of them will fail. Because you sent the more important 6-ether one first, you understandably expect that one to go through and the 8-ether one to be rejected. However, in a decentralized system like Ethereum, nodes may receive the transactions in either order; there is no guarantee that a particular node will have one transaction propagated to it before the other. As such, it will almost certainly be the case that some nodes receive the 6-ether transaction first and others receive the 8-ether transaction first. Without the nonce, it would be random as to which one gets accepted and which rejected. However, with the nonce included, the first transaction you sent will have a nonce of, let's say, 3, while the 8-ether transaction has the next nonce value (i.e., 4). So that transaction will be ignored until the transactions with nonces from 0 to 3 have been processed, even if it is received first. Phew!
Scenario 2
Now imagine you have an account with 100 ether. Fantastic! You find someone online who will accept payment in ether for a mcguffin-widget that you really want to buy. You send them 2 ether, and they send you the mcguffin-widget. Lovely. To make that 2-ether payment, you signed a transaction sending 2 ether from your account to their account and then broadcast it to the Ethereum network to be verified and included on the blockchain. Now, without a nonce value in the transaction, a second transaction sending 2 ether to the same address a second time will look exactly the same as the first transaction. This means that anyone who sees your transaction on the Ethereum network (which means everyone, including the recipient or your enemies) can "replay" the transaction again and again and again until all your ether is gone, simply by copying and pasting your original transaction and resending it to the network. However, with the nonce value included in the transaction data, every single transaction is unique, even when sending the same amount of ether to the same recipient address multiple times. Thus, with the incrementing nonce as part of the transaction, it is simply not possible for anyone to "duplicate" a payment you have made.
In summary, it is important to note that use of the nonce is actually vital for an account-based protocol, in contrast to the unspent transaction output (UTXO) mechanism of the Bitcoin protocol.
Keeping Track of Nonces
In this and future sections, we'll use the Foundry suite—in particular, the cast tool, which is really helpful for interacting with the blockchain in a very easy way. Make sure to install it if you want to replicate the following examples.
First, we need to set up our wallet that we're going to use throughout this chapter. Open a terminal window and type:
$ cast wallet new
Successfully created new keypair.
Address:     0x7e41354AfE84800680ceB104c5Fc99eCB98A25f0
Private key: 0xd6d2672c6b4489e6bcd4e93b9af620fa0204b639b7d7f93765479c0846be0b58
Warning
If you send funds to the address mentioned here, you are wasting your money as the private key is known and anyone could use it to send all the funds to themselves.
Now, we need to import the private key into the computer keystore so that we can later leverage it easily:
$ cast wallet import example \
    --private-key 0xd6d2672c6b4489e6bcd4e93b9af620fa0204b639b7d7f93765479c0846be0b58
Enter password:
`example` keystore was saved successfully. Address: 0x7e41354afe84800680ceb104c5fc99ecb98a25f0
You can optionally (recommended) set a password that will be required when you create transactions with that account. Now we're correctly set up, but we still don't have any ETH.
You can always check your balance. First, you need to get the address associated with the account:
$ cast wallet address --account example
Enter keystore password:
0x7e41354AfE84800680ceB104c5Fc99eCB98A25f0
Then, you can query the blockchain for the balance. In all the examples in this chapter, we're going to use Ethereum Sepolia, a testnet blockchain:
$ cast balance 0x7e41354AfE84800680ceB104c5Fc99eCB98A25f0 --rpc-url https://ethereum-sepolia-rpc.publicnode.com
0
Note
Note the
--rpc-urlflag in the lastcastcommand. It should point to an RPC endpoint of the blockchain you're interested in. Reliable RPC endpoints often require a payment, but if you just want to experiment with it (as we'll do in this chapter), there are a lot of free options, such as:
To get some free Sepolia ETH tokens, you can use one of the online faucets. We're going to use the Google Cloud Web3 faucet that gives 0.05 ETH, shown in Figure 6-3. Go to Ethereum Sepolia Faucet. Paste your address and click the "Receive 0.05 Sepolia ETH" button. You should receive 0.05 ETH really soon.
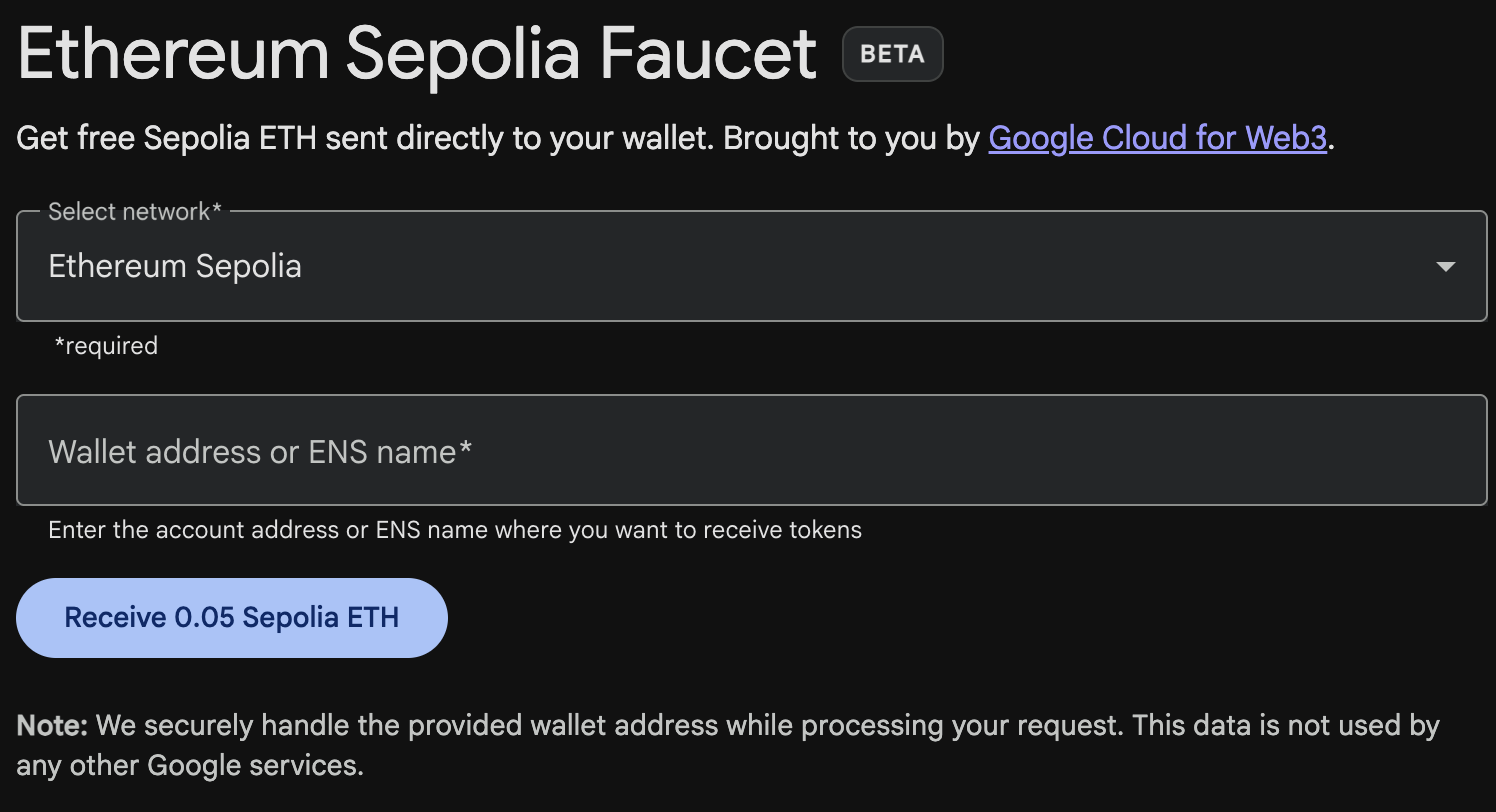
Figure 6-3. Google Cloud Web3 faucet
You can check that your balance is changed now and is different than 0:
$ cast balance 0x7e41354AfE84800680ceB104c5Fc99eCB98A25f0 --rpc-url https://ethereum-sepolia-rpc.publicnode.com
50000000000000000
Great! Now we're completely set up, and we can go back to our experiments with the transaction nonce.
In practical terms, the nonce is an up-to-date count of the number of confirmed (i.e., on-chain) transactions that have originated from an account. To find out what the nonce is, you can interrogate the blockchain using cast. Just open a new terminal window and type:
$ cast nonce 0x7e41354AfE84800680ceB104c5Fc99eCB98A25f0 --rpc-url https://ethereum-sepolia-rpc.publicnode.com
0
Tip
The nonce is a zero-based counter, meaning the first transaction has nonce 0. In fact, in this example we haven't sent any transactions yet. Also note that the RPC response always points to the next available nonce—for example, if an address has already sent 10 transactions, meaning that it has used nonces from 0 to 9, the RPC response to a nonce query would be 10.
Let's try to send some ETH now. We'll send 0.001 ether to vitalik.eth, which is the ENS address of Vitalik Buterin, cofounder of Ethereum:
$ cast send --account example vitalik.eth --value 0.001ether --rpc-url https://ethereum-sepolia-rpc.publicnode.com
blockHash               0xa1171309fd406e44e86be9695a597d2bf5c728738d140b9958cfb50276c32b1b
blockNumber             6989355
contractAddress
cumulativeGasUsed       18009816
effectiveGasPrice       11163498011
from                    0x7e41354AfE84800680ceB104c5Fc99eCB98A25f0
gasUsed                 21000
logs                    []
logsBloom               0x00000000000000000000000000000000000000000000000000000000000000000000000000000000000000000000000000000000000000000000000000000000000000000000000000000000000000000000000000000000000000000000000000000000000000000000000000000000000000000000000000000000000000000000000000000000000000000000000000000000000000000000000000000000000000000000000000000000000000000000000000000000000000000000000000000000000000000000000000000000000000000000000000000000000000000000000000000000000000000000000000000000000000000000000000000000
root
status                  1 (success)
transactionHash         0xeb7bb0322858a4e1ed85271a60d2f8353075dc0bcd0c80448ee1d5ca0bb85def
transactionIndex        60
type                    2
blobGasPrice
blobGasUsed
authorizationList
to                      0xd8dA6BF26964aF9D7eEd9e03E53415D37aA96045
Your wallet will keep track of nonces for each address it manages. It's fairly simple to do that as long as you are only originating transactions from a single point. Let's say you are writing your own wallet software or some other application that originates transactions. How do you track nonces?
When you create a new transaction, you assign the next nonce in the sequence. But until it is confirmed, it will not count toward the nonce total. Let's look at this example by quickly sending the following commands one after the other:
$ cast nonce 0x7e41354AfE84800680ceB104c5Fc99eCB98A25f0 --rpc-url https://ethereum-sepolia-rpc.publicnode.com
10
$ cast send --account example vitalik.eth --value 0.001ether --async --rpc-url https://ethereum-sepolia-rpc.publicnode.com
0x85f5b0db44407a6e9252590dc809087a2e232e00a951c9cb8853a109da5ddad4
$ cast nonce 0x7e41354AfE84800680ceB104c5Fc99eCB98A25f0 --rpc-url https://ethereum-sepolia-rpc.publicnode.com
10
$ cast nonce 0x7e41354AfE84800680ceB104c5Fc99eCB98A25f0 --rpc-url https://ethereum-sepolia-rpc.publicnode.com
11
As you can see, the transaction we sent didn't immediately increase the nonce count; it stayed equal to 10 even after sending the transaction. If we wait a few seconds to allow for network communications to settle down and the transaction to be included in a block, the nonce call will return the expected number, 11.
Note
Note the
--asyncflag used in thecast sendcommand: if you don't use it,castwill block the terminal until the transaction is confirmed inside a block. With that flag, it sends the transaction to the network and immediately returns the transaction hash, without waiting for it to be included in a block.
Now let's take a look at a different example:
$ cast nonce 0x7e41354AfE84800680ceB104c5Fc99eCB98A25f0 --rpc-url https://ethereum-sepolia-rpc.publicnode.com
11
$ cast send --account example vitalik.eth --value 0.001ether --async --rpc-url https://ethereum-sepolia-rpc.publicnode.com
0x63188aa73247ffe06388a9adf399fa715e42fbc37ca53f77642a7860c80feb9d
$ cast nonce 0x7e41354AfE84800680ceB104c5Fc99eCB98A25f0 --rpc-url https://ethereum-sepolia-rpc.publicnode.com
11
$ cast rpc eth_getTransactionCount 0x7e41354AfE84800680ceB104c5Fc99eCB98A25f0 pending --rpc-url https://ethereum-sepolia-rpc.publicnode.com
"0xc"
$ cast nonce 0x7e41354AfE84800680ceB104c5Fc99eCB98A25f0 --rpc-url https://ethereum-sepolia-rpc.publicnode.com
12
Before sending the transaction, our nonce count is 11; then we send the transaction and immediately ask for the new nonce. As we would expect from the previous example, the nonce is not updated yet since the transaction is still pending in the mempool and has not been included in a block. Nevertheless, we use a new query that is actually able to get the real nonce number even though the transaction is still not confirmed (0xc is 12 in hexadecimal format). After a few seconds, the transaction gets added to a block and the cast nonce call returns the new correct value.
The difference between cast nonce and eth_getTransactionCount pending is simply that the first considers only confirmed transactions—that is, included in a block—while the latter tries to also include transactions that are still pending in the mempool.
Warning
Be careful when using
eth_getTransactionCount pendingfor counting pending transactions. In fact, even though it tries to return the real nonce value for an address, there is no way to be completely sure that there are no other pending transactions waiting in the mempool to be confirmed.The public mempool is not a universal thing. Every node has its own mempool: a sort of dynamic repository for pending transactions, temporarily holding them until they are confirmed on the blockchain. It can be customized by setting different rules for accepting or rejecting new transactions. While it's true that RPC companies have a big network of nodes and should have a (almost) complete view of all pending transactions, you should still be wary of treating that value as 100% correct.
Gaps in Nonces, Duplicate Nonces, and Confirmation
It is important to keep track of nonces if you are creating transactions programmatically, especially if you are doing so from multiple independent processes simultaneously.
The Ethereum network processes transactions sequentially based on the nonce. That means that if you transmit a transaction with nonce 0 and then transmit a transaction with nonce 2, the second transaction will not be included in any blocks. It will be stored in the mempool, while the Ethereum network waits for the missing nonce to appear. All nodes will assume that the missing nonce has simply been delayed and that the transaction with nonce 2 was received out of sequence.
If you then transmit a transaction with the missing nonce 1, both transactions (nonces 1 and 2) will be processed and included (if valid, of course). Once you fill the gap, the network can mine the out-of-sequence transaction that it held in the mempool.
What this means is that if you create several transactions in sequence and one of them does not get officially included in any blocks, all the subsequent transactions will be "stuck," waiting for the missing nonce. A transaction can create an inadvertent "gap" in the nonce sequence because it is invalid or has insufficient gas. To get things moving again, you have to transmit a valid transaction with the missing nonce. You should be equally mindful that once a transaction with the "missing" nonce is validated by the network, all the broadcast transactions with subsequent nonces will incrementally become valid; it is not possible to "recall" a transaction!
If, on the other hand, you accidentally duplicate a nonce—for example, by transmitting two transactions with the same nonce but different recipients or values—then one of them will be confirmed and one will be rejected. Which one is confirmed will be determined by the sequence in which they arrive at the first validating node that receives them—that is, it will be fairly random.
As you can see, keeping track of nonces is necessary, and if your application doesn't manage that process correctly, you will run into problems. Unfortunately, things get even more difficult if you are trying to do this concurrently, as we will see in the next section.
Concurrency, Transaction Origination, and Nonces
Concurrency is a complex aspect of computer science, and it crops up unexpectedly sometimes, especially in decentralized and distributed real-time systems like Ethereum.
In simple terms, concurrency is when you have simultaneous computation by multiple independent systems. These can be in the same program (e.g., multithreading), on the same CPU (e.g., multiprocessing), or on different computers (e.g., distributed systems). Ethereum, by definition, is a system that allows concurrency of operations (nodes, clients, DApps) but enforces a singleton state through consensus.
Now, imagine that you have multiple independent wallet applications that are generating transactions from the same address or addresses. One example of such a situation would be an exchange processing withdrawals from the exchange's hot wallet (a wallet whose keys are stored online, in contrast to a cold wallet where the keys are never online). Ideally, you'd want to have more than one computer processing withdrawals, so it doesn't become a bottleneck or single point of failure. However, this quickly becomes problematic because having more than one computer producing withdrawals will result in some thorny concurrency problems, not least of which is the selection of nonces. How do multiple computers generating, signing, and broadcasting transactions from the same hot wallet account coordinate?
You could use a single computer to assign nonces, on a first-come, first-served basis, to computers signing transactions. However, this computer is now a single point of failure. Worse, if several nonces are assigned and one of them never gets used (because of a failure in the computer processing the transaction with that nonce), all subsequent transactions will get stuck.
Another approach would be to generate the transactions but not assign a nonce to them (and therefore leave them unsigned—remember that the nonce is an integral part of the transaction data and therefore needs to be included in the digital signature that authenticates the transaction). You could then queue them to a single node that signs them and keeps track of nonces. Again, though, this would be a choke point in the process: the signing and tracking of nonces is the part of your operation that is likely to become congested under load, whereas generating the unsigned transaction is the part you don't really need to parallelize. You would have some concurrency, but it would be lacking in a critical part of the process.
In the end, these concurrency problems, on top of the difficulty of tracking account balances and transaction confirmations in independent processes, force most implementations toward avoiding concurrency and creating bottlenecks, such as a single process handling all withdrawal transactions in an exchange or a setup of multiple hot wallets that can work completely independently for withdrawals and only need to be intermittently rebalanced.
Transaction Gas
We talked about gas a little in earlier chapters, and we'll discuss it in more detail in Chapter 14. However, let's cover some basics about the role of the gasPrice and gasLimit components of a transaction.
Gas is the fuel of Ethereum. Gas is not ether: it's a separate virtual currency with its own exchange rate against ether. Ethereum uses gas to control the amount of resources that a transaction can use, since it will be processed on thousands of computers around the world. The open-ended (Turing-complete) computation model requires some form of metering to avoid DoS attacks or inadvertent resource-devouring transactions.
Gas is separate from ether to protect the system from the volatility that might arise along with rapid changes in the value of ether and as a way to manage the important and sensitive ratios between the costs of the various resources that gas pays for (computation, memory, and storage).
The gasPrice field in a transaction allows the transaction originator to set the price they are willing to pay in exchange for gas. The price is measured in wei per gas unit.
Tip
The popular site Etherscan provides information on the current prices of gas and other relevant gas metrics for the Ethereum main network.
Wallets can adjust the gasPrice in transactions they originate to achieve faster confirmation of transactions. The higher the gasPrice, the faster the transaction is likely to be confirmed. Conversely, lower-priority transactions can carry a reduced price, resulting in slower confirmation. The minimum value that gasPrice can be set to is equal to the base fee (we've introduced it with EIP-1559 transactions) of the block in which they are included.
Note
Before the London hard fork and EIP-1559, the minimum acceptable
gasPricewas zero. That means that wallets could generate completely free transactions. Depending on capacity, these might never be confirmed, but there was nothing in the protocol that prohibited free transactions. You can find several examples of such transactions successfully included on the Ethereum blockchain during the first months of Ethereum.
EIP-1559: Base Fee and Priority Fee
As we have already briefly explained, EIP-1559 completely changes the structure of the fee market on Ethereum by introducing a new protocol parameter: the base fee. It represents the minimum gas price that a transaction needs to pay to be considered valid and included in a block.
The difference between the base fee and the actual gas fee paid by a transaction is called the priority fee. It flows directly to the validator that creates the block in which that transaction lives.
How to Know the "Correct" Gas Price
Cast offers a gas-price suggestion by calculating a median price across several blocks:
$ cast gas-price --rpc-url https://ethereum-sepolia-rpc.publicnode.com
4845187414
The second important field related to gas is gasLimit. In simple terms, gasLimit gives the maximum number of units of gas that the transaction originator is willing to buy in order to complete the transaction. For simple payments—meaning transactions that transfer ether from one EOA to another EOA—the gas amount needed is fixed at 21,000 gas units. To calculate how much ether that will cost, you multiply 21,000 by the gasPrice (or the maxFeePerGas for EIP-1559 transactions) you're willing to pay.
If your transaction's destination address is a contract, then the amount of gas needed can be estimated but cannot be determined with accuracy. That's because a contract can evaluate different conditions that lead to different execution paths, with different total gas costs. The contract may execute only a simple computation or a more complex one, depending on conditions that are outside of your control and cannot be predicted. To demonstrate this, let's look at an example: we can write a smart contract that increments a counter each time it is called and executes a particular loop a number of times equal to the call count. Maybe on the one-hundredth call, it gives out a special prize, like a lottery, but it needs to do additional computation to calculate the prize. If you call the contract 99 times, one thing happens, but on the one-hundredth call, something very different happens. The amount of gas you would pay for that depends on how many other transactions have called that function before your transaction is included in a block. Perhaps your estimate is based on being the 99th transaction, but just before your transaction is confirmed someone else calls the contract for the 99th time. Now you're the one-hundredth transaction to call, and the computation effort (and gas cost) is much higher.
To borrow a common analogy used in Ethereum, you can think of gasLimit as the capacity of the fuel tank in your car (your car is the transaction). You fill the tank with as much gas as you think it will need for the journey (the computation needed to validate your transaction). You can estimate the amount to some degree, but there might be unexpected changes to your journey, such as a diversion (a more complex execution path), that increase fuel consumption.
The analogy to a fuel tank is somewhat misleading, however. It's actually more like a credit account for a gas station company, where you pay after the trip is completed, based on how much gas you actually used. When you transmit your transaction, one of the first validation steps is to check that the account it originated from has enough ether to pay the maxFeePerGas × gasLimit (or the gasPrice × gasLimit for legacy transactions) fee. But the amount is not actually deducted from your account until the transaction finishes executing. You are billed only for gas actually consumed by your transaction, but you have to have enough balance for the maximum amount you are willing to pay before you send your transaction.
Transaction Recipient
The recipient of a transaction is specified in the to field. This contains a 20-byte Ethereum address. The address can be an EOA or a contract address.
Ethereum does no further validation of this field. Any 20-byte value is considered valid. If the 20-byte value corresponds to an address without a corresponding private key or without a corresponding contract, the transaction is still valid. Ethereum has no way of knowing whether an address was correctly derived from a public key (and therefore from a private key) in existence.
Warning
The Ethereum protocol does not validate recipient addresses in transactions. You can send to an address that has no corresponding private key or contract, thereby "burning" the ether, rendering it forever unspendable. Validation should be done at the user interface level.
Sending a transaction to the wrong address will probably burn the ether sent, rendering it forever inaccessible (unspendable), since most addresses do not have a known private key, and therefore no signature can be generated to spend it. It is assumed that validation of the address happens at the user interface level (see "Hex Encoding with Checksum in Capitalization (ERC-55)"). In fact, there are a number of valid reasons for burning ether—for example, as a disincentive to cheating in payment channels and other smart contracts—and since the amount of ether is finite, burning ether effectively distributes the value burned to all ether holders (in proportion to the amount of ether they hold).
Transaction Value and Data
The main "payload" of a transaction is contained in two fields: value and data. Transactions can have both value and data, only value, only data, or neither value nor data. All four combinations are valid.
A transaction with only value is a payment. A transaction with only data is an invocation. A transaction with both value and data is both a payment and an invocation. A transaction with neither value nor data—well, that's probably just a waste of gas! But it is still possible.
Let's try all of these combinations. We'll use cast in the same way we did before to send transactions on Sepolia testnet.
Our first transaction contains only a value (payment) and no data payload:
$ cast send --account example vitalik.eth --value 0.001ether --rpc-url https://ethereum-sepolia-rpc.publicnode.com
In Figure 6-4, you can see that the value sent is 0.001 ether and the data payload (input data on etherscan) is empty (0x00).
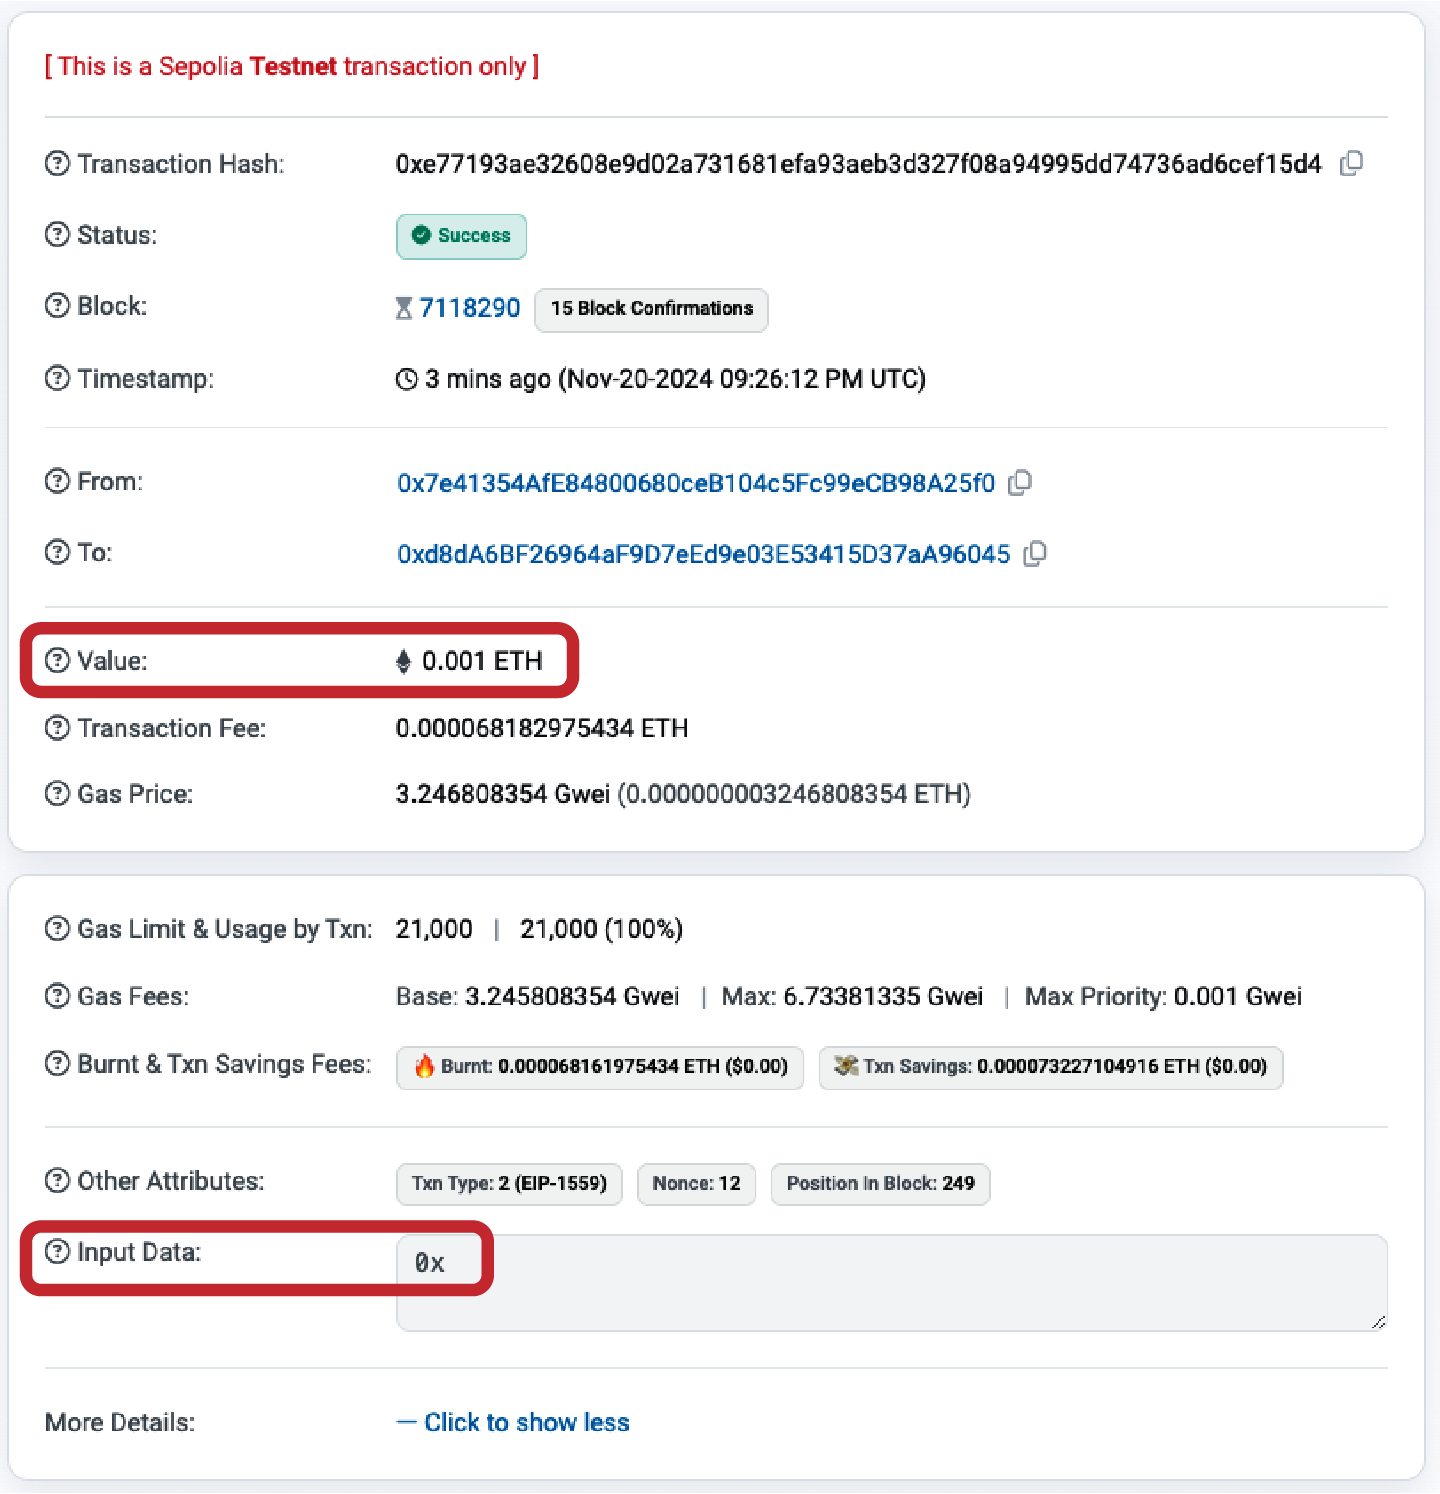
Figure 6-4. Transaction with only value (payment)
The next example specifies both a value and a data payload (even though this payload will be ignored as we'll send a transaction to an EOA):
$ cast send --account example vitalik.eth 0x0001 --value 0.001ether --rpc-url https://ethereum-sepolia-rpc.publicnode.com
In Figure 6-5, you can see that input data now contains some value, in particular 0x0001.
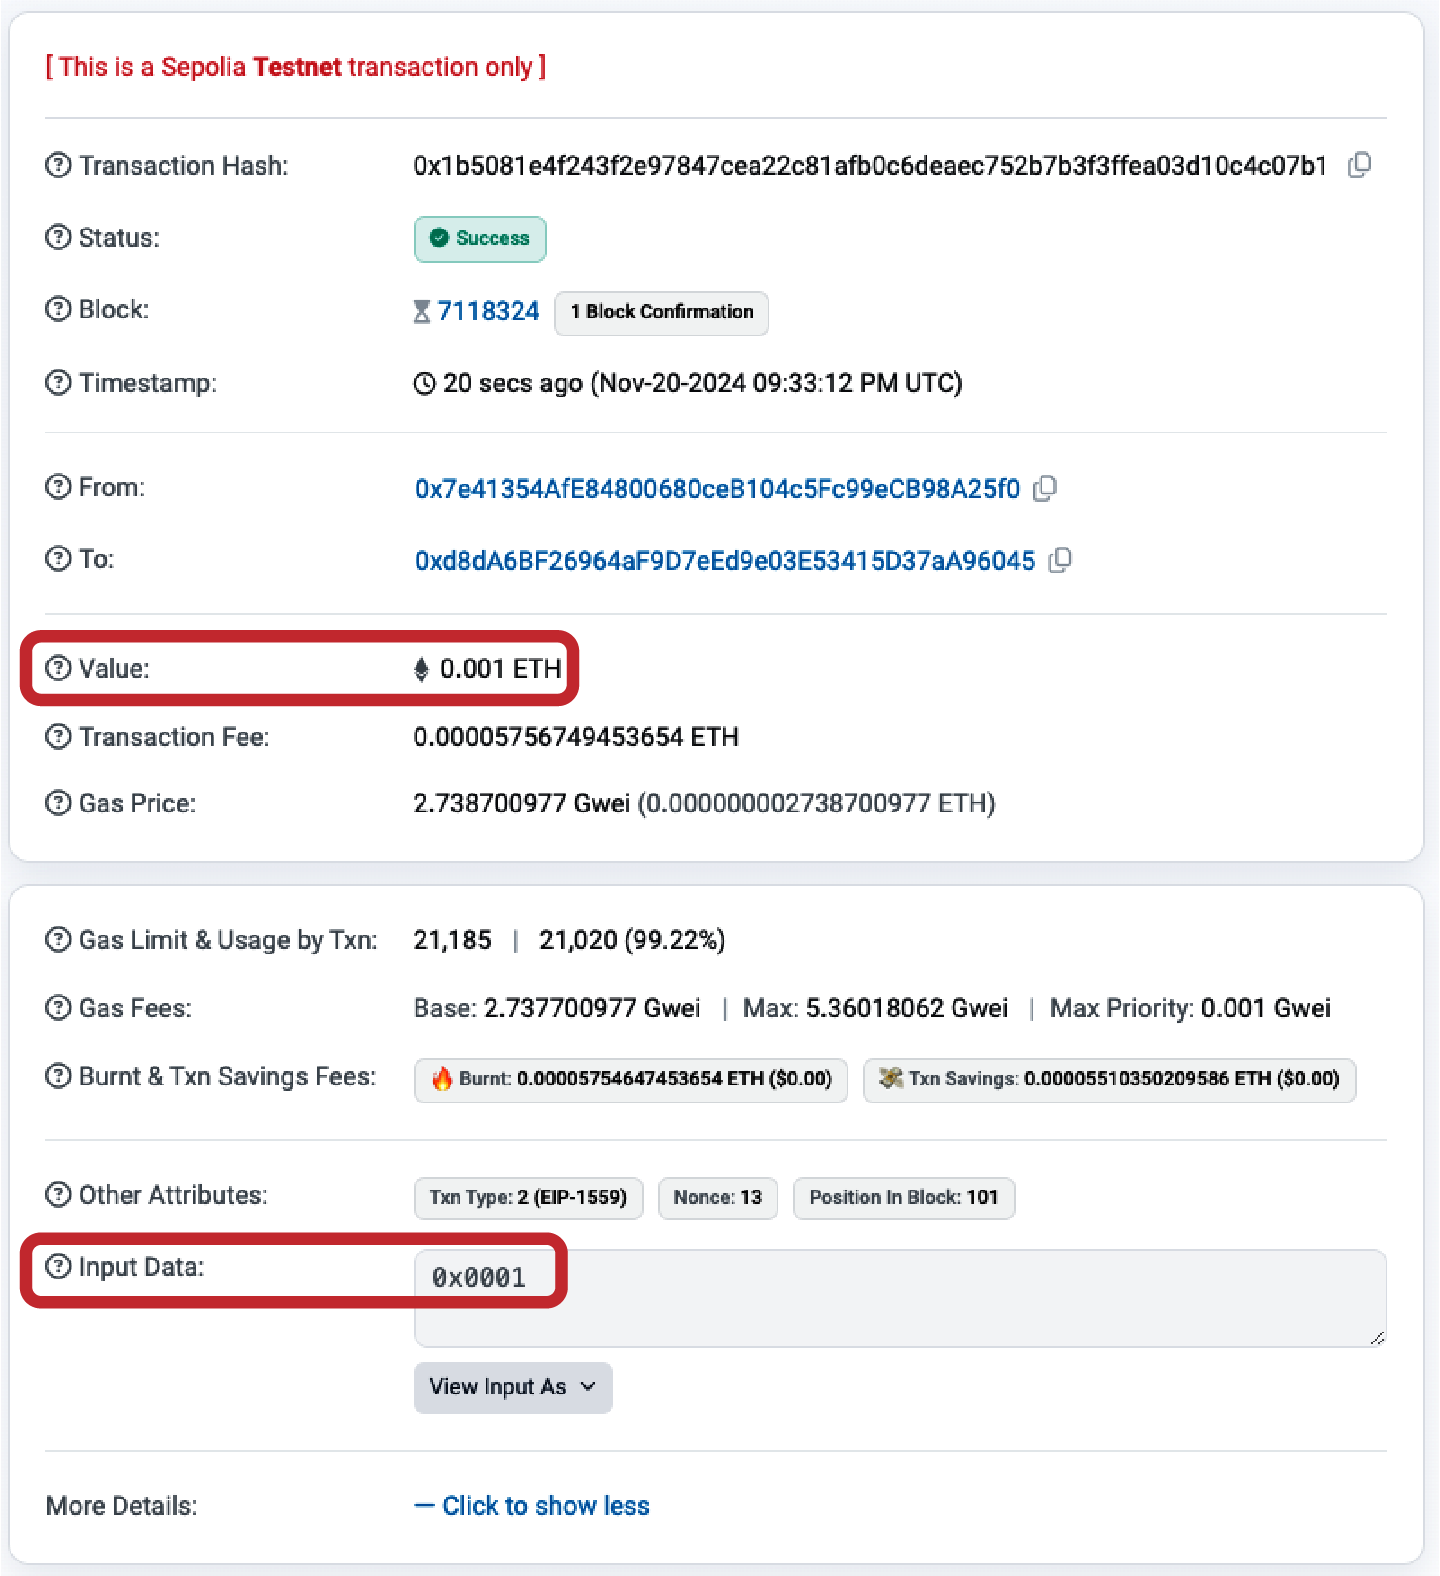
Figure 6-5. Transaction with both value and data
The next transaction includes a data payload but specifies a value of zero:
$ cast send --account example vitalik.eth 0x0001 --rpc-url https://ethereum-sepolia-rpc.publicnode.com
Figure 6-6 shows a confirmation screen indicating a value of zero ether sent in the transaction and the data payload equals to 0x0001.
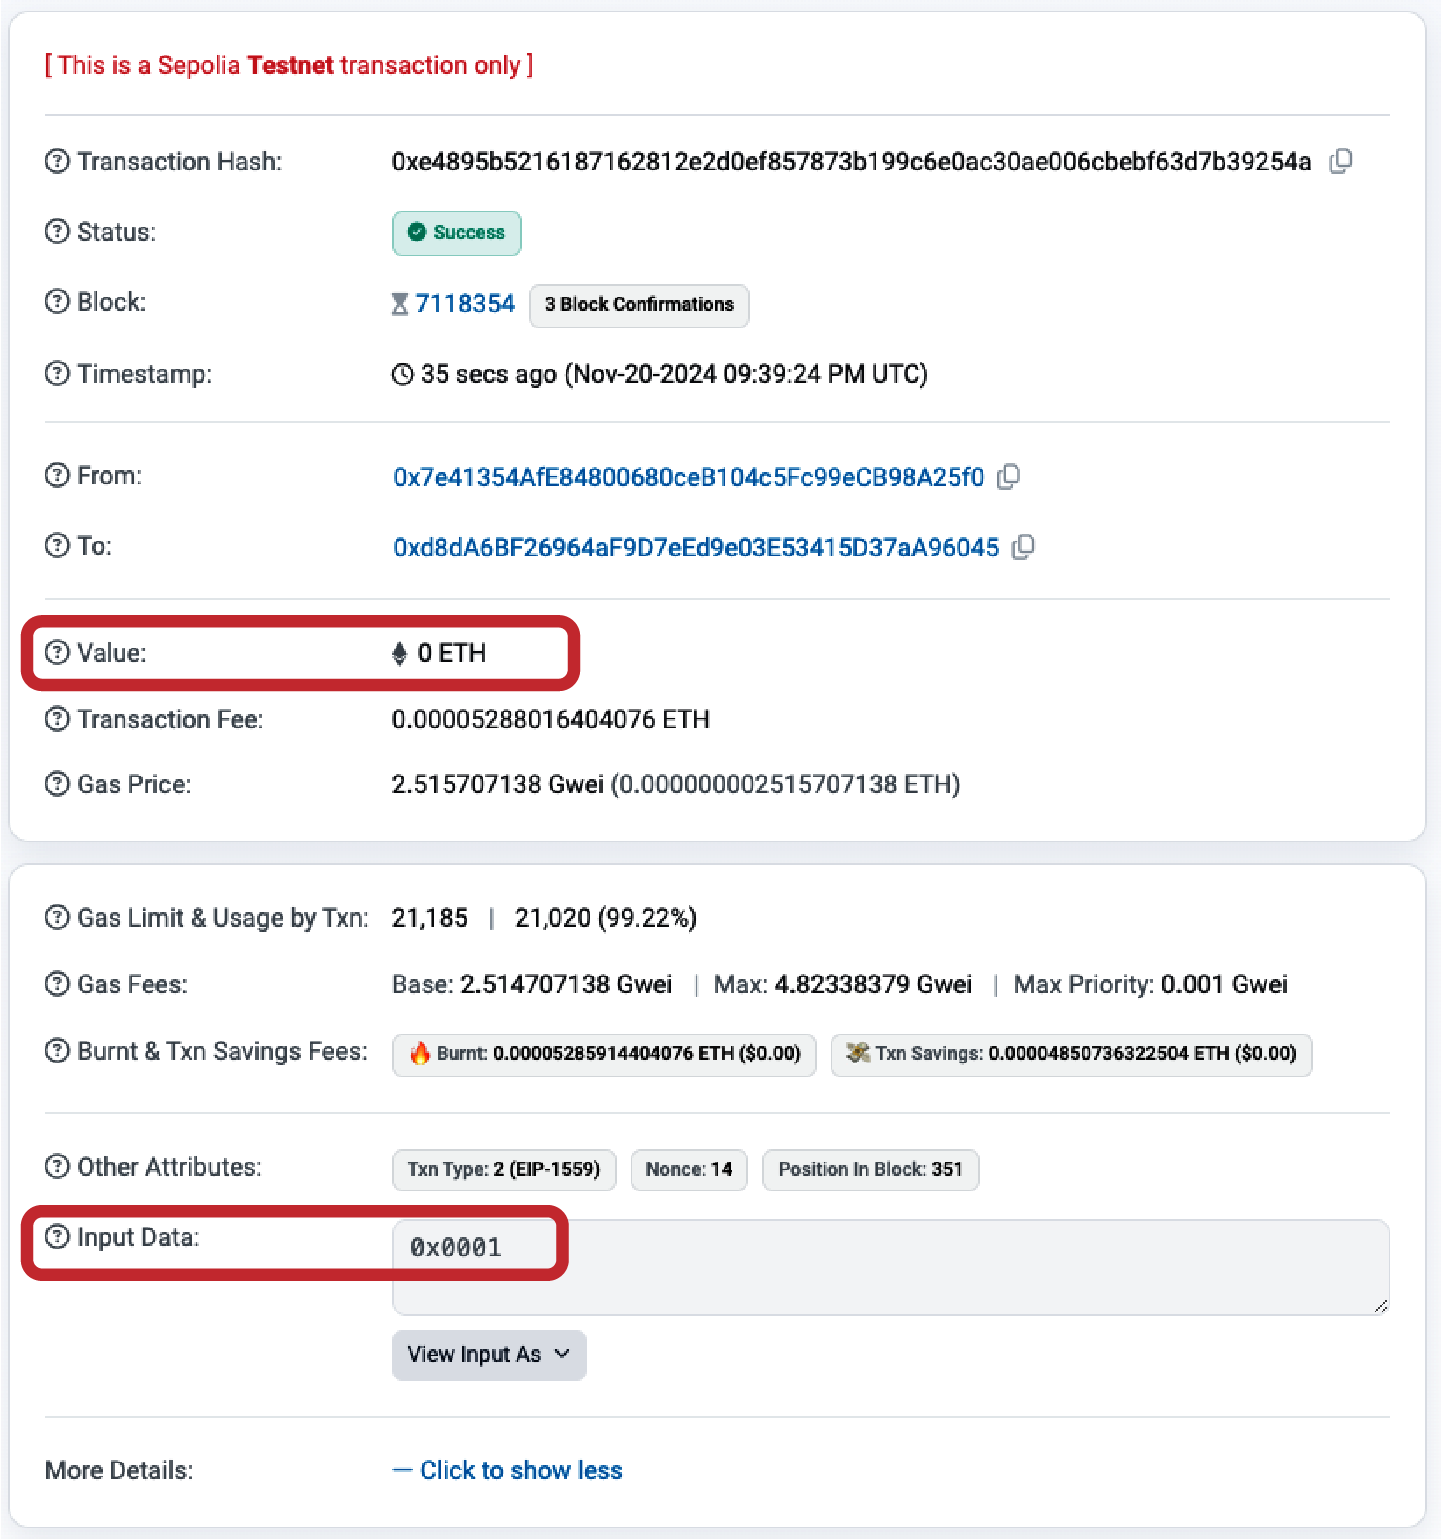
Figure 6-6. Transaction with only data (invocation)
Finally, the last transaction includes neither a value to send nor a data payload:
$ cast send --account example vitalik.eth --rpc-url https://ethereum-sepolia-rpc.publicnode.com
Figure 6-7 shows our transaction that sent zero ether and included an empty payload.
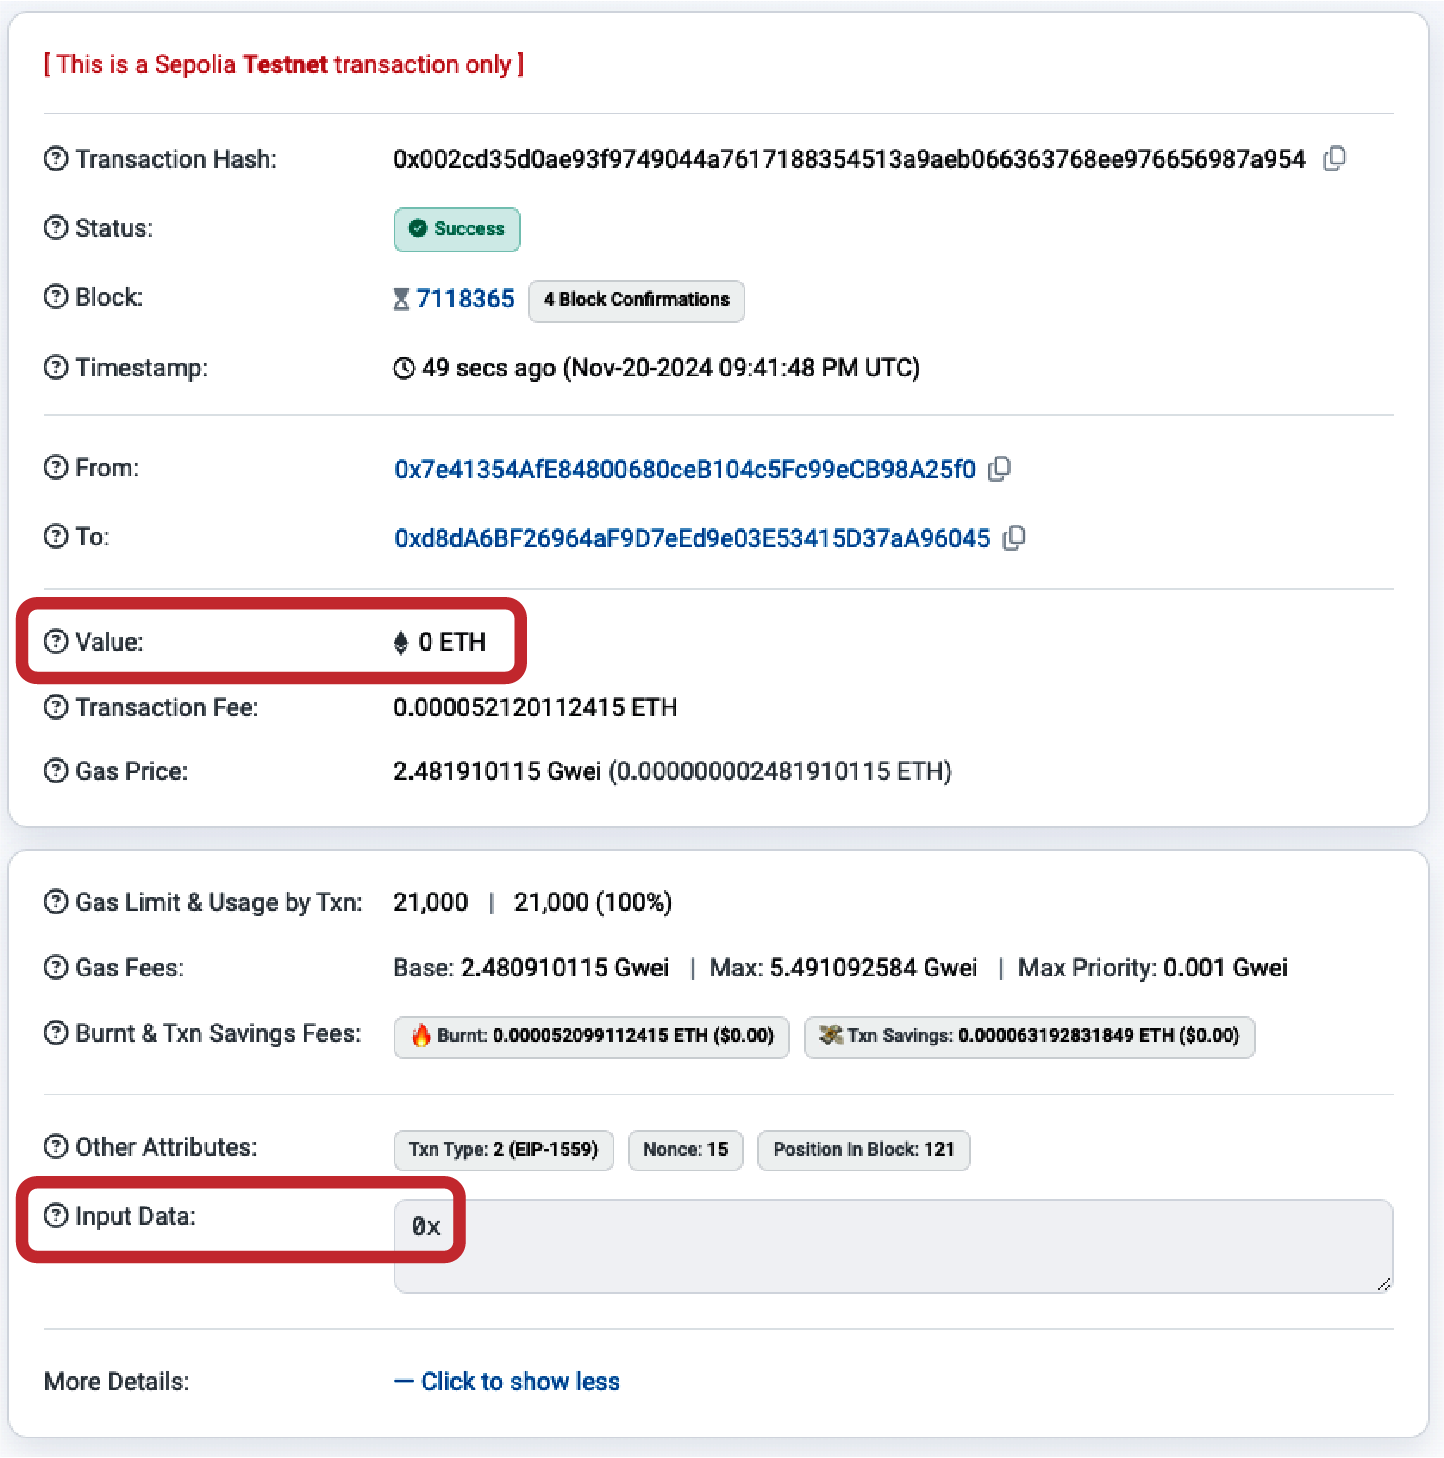
Figure 6-7. Transaction with neither value nor data
Transmitting Value to EOAs and Contracts
When you construct an Ethereum transaction that contains a value, that is the equivalent of a payment. Such transactions behave differently depending on whether the destination address is a contract or not.
For EOA addresses—or rather, for any address that isn't flagged as a contract on the blockchain—Ethereum will record a state change, adding the value you sent to the balance of the address. If the address has not been seen before, it will be added to the client's internal representation of the state and its balance initialized to the value of your payment.
If the destination address (to) is a contract (or an EOA that has previously delegated a contract through an EIP-7702 transaction), then the EVM will execute the contract and will attempt to call the function named in the data payload of your transaction. If there is no data in your transaction, the EVM will call a fallback function and, if that function is payable, will execute it to determine what to do next. If there is no fallback function, then the effect of the transaction will be to increase the balance of the contract, exactly like a payment to a wallet.
A contract can reject incoming payments by throwing an exception immediately when a function is called or as determined by conditions coded in a function. If the function terminates successfully (without an exception), then the contract's state is updated to reflect an increase in the contract's ether balance.
Transmitting a Data Payload to an EOA or Contract
When your transaction contains data, it is most likely addressed to a contract address. That doesn't mean you cannot send a data payload to an EOA—that is completely valid in the Ethereum protocol. However, in that case, the interpretation of the data is up to the wallet you use to access the EOA. It is ignored by the Ethereum protocol. Most wallets also ignore any data received in a transaction to an EOA they control. In the future, standards may emerge that allow wallets to interpret data the way contracts do, thereby allowing transactions to invoke functions running inside user wallets. The critical difference is that any interpretation of the data payload by an EOA is not subject to Ethereum's consensus rules, unlike a contract execution.
For now, let's assume your transaction is delivering data to a contract address. In that case, the data will be interpreted by the EVM as a contract invocation. Most contracts use this data more specifically as a function invocation, calling the named function and passing any encoded arguments to the function.
The data payload sent to a contract that is compatible with an application binary interface (ABI), which you can assume all contracts are, is a hex-serialized encoding of the following:
A function selector
The first 4 bytes of the Keccak-256 hash of the function's prototype. This allows the contract to unambiguously identify which function you wish to invoke.
The function arguments
The function's arguments, encoded according to the rules for the various elementary types defined in the ABI specification.
In Example 2-1, we defined a function for withdrawals:
function withdraw(uint256 _withdrawAmount, address payable _to) public {
The prototype of a function is defined as the string containing the name of the function, followed by the data types of each of its arguments, enclosed in parentheses and separated by commas. The function name here is withdraw, and it takes two arguments:
_withdrawAmountthat is auint256_tothat is anaddress
So the prototype of withdraw would be:
withdraw(uint256,address)
Note
The
payablekeyword is used in Solidity to indicate that the address can receive ether, but it's not part of the function selector calculation. Only the base typeaddressis included in the prototype.
Let's calculate the Keccak-256 hash of this string:
$ cast keccak256 "withdraw(uint256,address)"
0x00f714ce93c4a188ecc0c802ca78036f638c1c4b3ee9b98f3ed75364b45f50b1
The first 4 bytes of the hash are 0x00f714ce. That's our function selector value, which will tell the contract which function we want to call.
Next, let's calculate two values to pass as the argument withdraw_amount and _to. We want to withdraw 0.000001 ether to the address vitalik.eth, which is 0xd8dA6BF26964aF9D7eEd9e03E53415D37aA96045. Let's encode them together with the function selector calculated in the previous step in order to obtain the final data payload (it's also called calldata):
$ cast calldata "withdraw(uint256,address)" 0.000001ether 0xd8dA6BF26964aF9D7eEd9e03E53415D37aA96045
0x00f714ce000000000000000000000000000000000000000000000000000000e8d4a51000000000000000000000000000d8da6bf26964af9d7eed9e03e53415d37aa96045
That's the data payload for our transaction, invoking the withdraw function and requesting 0.000001 ether as the withdraw_amount and vitalik.eth as the _to address.
Special Transaction: Contract Creation
One special case that we should mention is a transaction that creates a new contract on the blockchain, deploying it for future use. Contract-creation transactions are identified by an empty to field (null). When the to field is empty, the Ethereum protocol interprets this as a request to deploy a new contract, with the bytecode provided in the data field.
Note that the zero address (0x0000000000000000000000000000000000000000) is a distinct concept: it is a valid 20-byte address that can receive ether. Sending a transaction to the zero address does not create a contract, it simply transfers ether to that address like any other transaction. The zero address sometimes receives payments from various addresses. There are two explanations for this: either this is by accident, resulting in the loss of ether, or it is an intentional ether burn (deliberately destroying ether by sending it to an address from which it can never be spent). However, if you want to do an intentional ether burn, you should make your intention clear to the network and use the specially designated burn address instead:
0x000000000000000000000000000000000000dEaD
Warning
Any ether sent to the designated burn address will become unspendable and will be lost forever.
A contract-creation transaction need only contain a data payload that contains the compiled bytecode that will create the contract. The only effect of this transaction is to create the contract. You can include an ether amount in the value field if you want to set the new contract up with a starting balance, but that is entirely optional. If you send a value (ether) to the contract-creation address without a data payload (no contract), then the effect is the same as sending to a burn address—there is no contract to credit, so the ether is lost.
As an example, we can create the Faucet.sol contract used in Chapter 2 by manually creating a transaction with an empty to field and the contract bytecode in the data payload. The contract needs to be compiled into a bytecode representation. This can be done with the Solidity compiler:
$ solc --bin Faucet.sol
Binary:
6080604052348015600e575f5ffd5…0033
The same information can be obtained from the Remix online compiler.
Now we can use the binary output to create the transaction:
$ cast send --account example --rpc-url https://ethereum-sepolia-rpc.publicnode.com --create 6080604052348015600e575f5ffd5…0033
Once the contract is published, we can see it on the Etherscan block explorer, as shown in Figure 6-8.
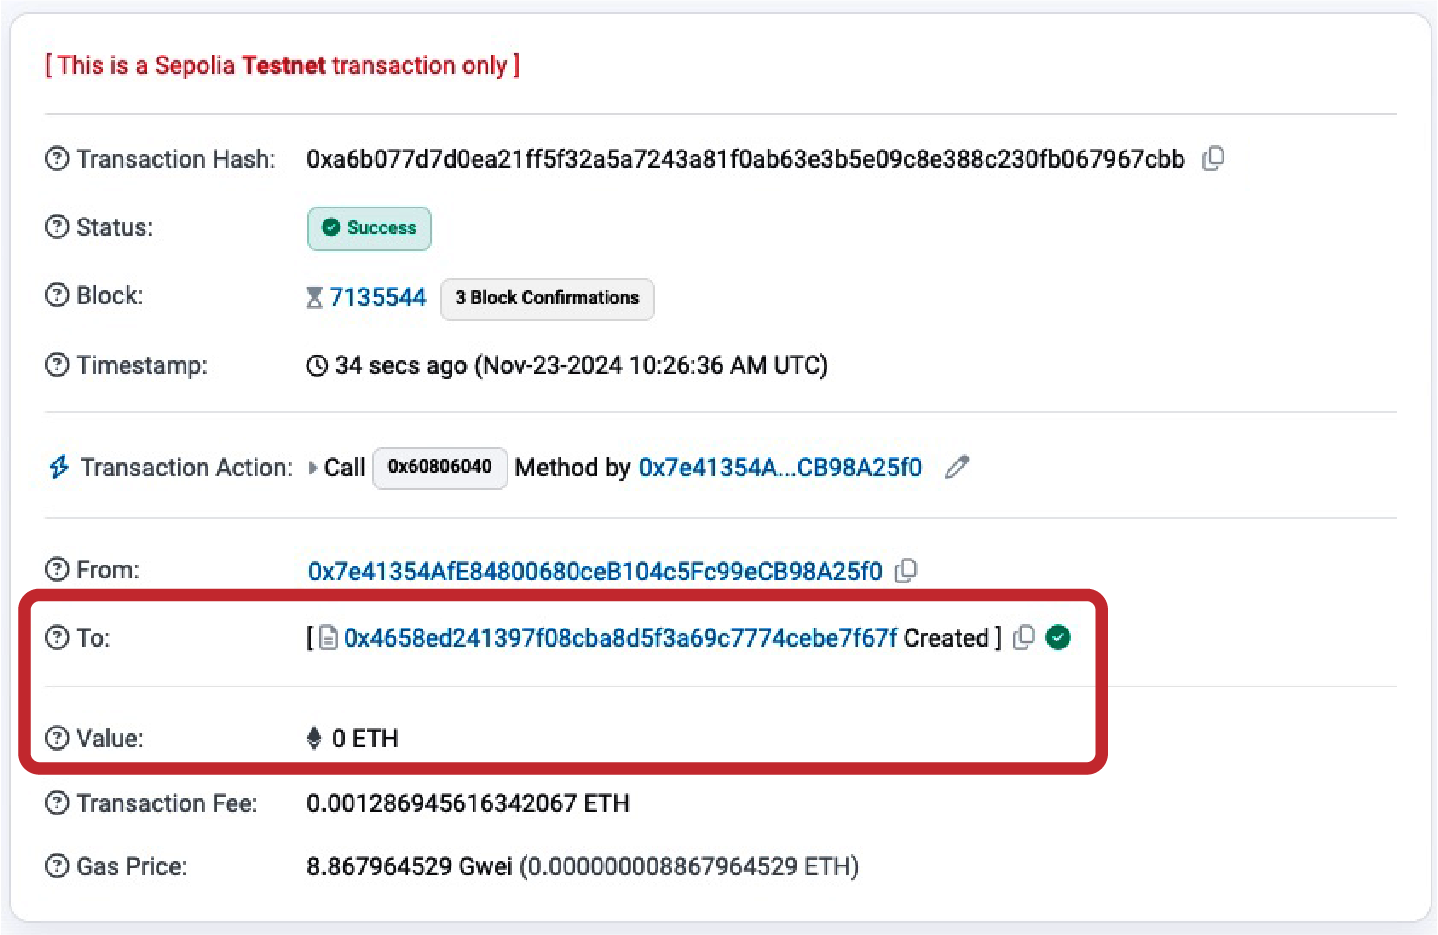
Figure 6-8. Contract creation transaction on Etherscan
We can look at the receipt of the transaction (using the transaction hash to reference it) to get information about the contract:
$ cast receipt 0xa6b077d7d0ea21ff5f32a5a7243a81f0ab63e3b5e09c8e388c230fb067967cbb \
    --rpc-url https://ethereum-sepolia-rpc.publicnode.com
blockHash               0x6eb071eac79a84793321b086af96b32c1d861f04b0efc7354d0f6b8d5a8fa36a
blockNumber             7135544
contractAddress         0x4658eD241397F08cba8d5F3a69c7774cebE7f67F
cumulativeGasUsed       28390874
effectiveGasPrice       8867964529
from                    0x7e41354AfE84800680ceB104c5Fc99eCB98A25f0
gasUsed                 145123
logs                    []
logsBloom               0x00000000000000000000000000000000000000000000000000000000000000000000000000000000000000000000000000000000000000000000000000000000000000000000000000000000000000000000000000000000000000000000000000000000000000000000000000000000000000000000000000000000000000000000000000000000000000000000000000000000000000000000000000000000000000000000000000000000000000000000000000000000000000000000000000000000000000000000000000000000000000000000000000000000000000000000000000000000000000000000000000000000000000000000000000000000
root
status                  1 (success)
transactionHash         0xa6b077d7d0ea21ff5f32a5a7243a81f0ab63e3b5e09c8e388c230fb067967cbb
transactionIndex        136
type                    2
blobGasPrice
blobGasUsed
authorizationList
This includes the address of the contract (see contractAddress), which we can use to send funds to and receive funds from the contract as shown in the previous section.
Let's start by saving the newly created contract address in a variable:
$ CONTRACT_ADDRESS=0x4658eD241397F08cba8d5F3a69c7774cebE7f67F
Now we can fund it with some ether:
$ cast send --account example $CONTRACT_ADDRESS --value 0.02ether --rpc-url https://ethereum-sepolia-rpc.publicnode.com
And finally, let's call the withdraw function using the data payload we calculated previously, withdrawing 0.000001 ether to the vitalik.eth address:
$ cast send --account example $CONTRACT_ADDRESS \
0x00f714ce000000000000000000000000000000000000000000000000000000e8d4a51000000000000000000000000000d8da6bf26964af9d7eed9e03e53415d37aa96045 \
  --rpc-url https://ethereum-sepolia-rpc.publicnode.com
After a while, both transactions are visible on Etherscan, as shown in Figure 6-9.
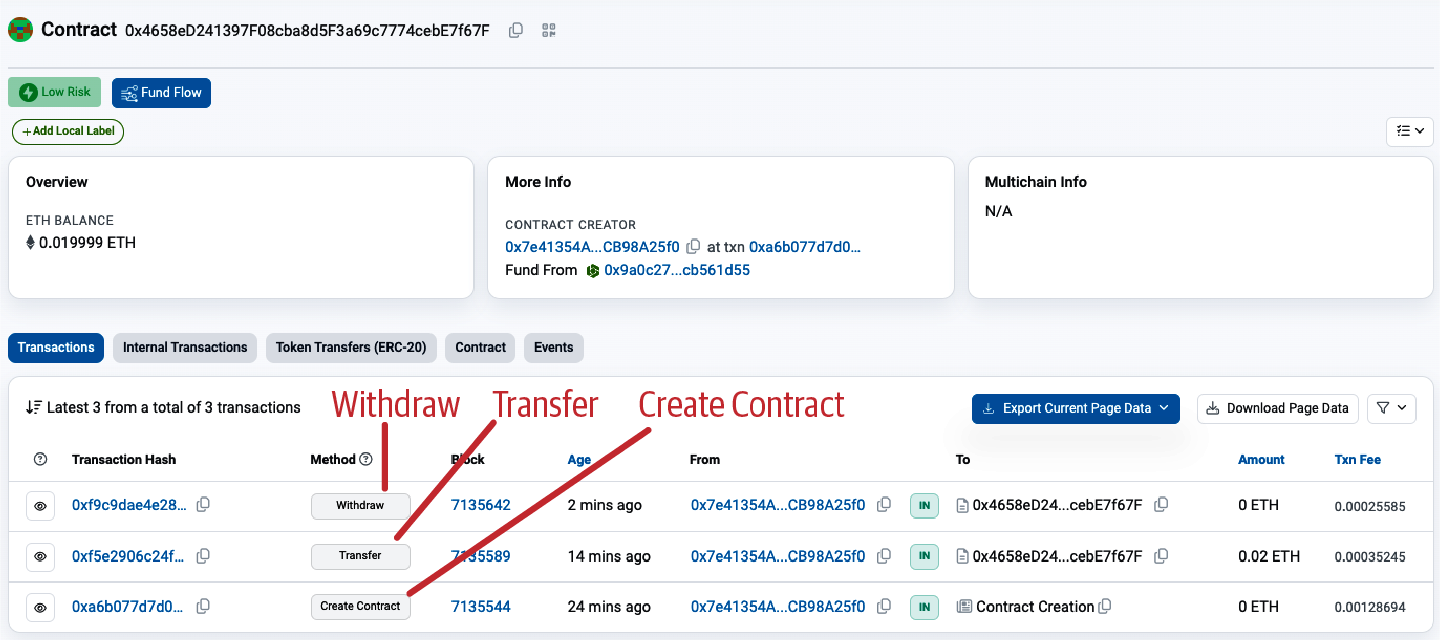
Figure 6-9. Contract funding and withdrawal transactions
Digital Signatures
So far, we have not delved into any detail about digital signatures. In this section, we will look at how digital signatures work and how they can be used to present proof of ownership of a private key without revealing that private key.
The ECDSA
The digital signature algorithm used in Ethereum is the Elliptic Curve Digital Signature Algorithm (ECDSA). It's based on elliptic curve private–public key pairs, as described in "Elliptic Curve Cryptography Explained".
A digital signature serves three purposes in Ethereum (see the following sidebar). First, the signature proves that the owner of the private key, who is by implication the owner of an Ethereum account, has authorized the spending of ether or the execution of a contract. Second, it guarantees nonrepudiation: the proof of authorization is undeniable. Third, the signature proves that the transaction data has not been and cannot be modified by anyone after the transaction has been signed.
Definition of a Digital Signature
According to Wikipedia, a digital signature is a mathematical scheme for presenting the authenticity of digital messages or documents. A valid digital signature gives a recipient reason to believe that the message was created by a known sender (authentication), that the sender cannot deny having sent the message (nonrepudiation), and that the message was not altered in transit (integrity).
How Digital Signatures Work
A digital signature is a mathematical scheme that consists of two parts. The first part is an algorithm for creating a signature, using a private key (the signing key), from a message (which in our case is the transaction). The second part is an algorithm that allows anyone to verify the signature by using only the message and a public key.
Creating a digital signature
In Ethereum's implementation of ECDSA, the "message" being signed is the transaction, or more accurately, the Keccak-256 hash of the RLP-encoded data from the transaction. The signing key is the EOA's private key. The result is the signature:
Sig = Fsig (Fkeccak256 (m), k)
where:
kis the signing private keymis the RLP-encoded transactionFkeccak256is the Keccak-256 hash functionFsigis the signing algorithmSigis the resulting signature
The function Fsig produces a signature Sig that is composed of two values, commonly referred to as r and s:
Sig = (r, s)
Verifying the signature
To verify the signature, you must have the signature (r and s), the serialized transaction, and the public key that corresponds to the private key used to create the signature. Essentially, verification of a signature means only the owner of the private key that generated this public key could have produced this signature on this transaction.
The signature-verification algorithm takes the message (i.e., a hash of the transaction for our usage), the signer's public key, and the signature (r and s values) and returns true if the signature is valid for this message and public key.
ECDSA Math
As mentioned previously, signatures are created by a mathematical function Fsig that produces a signature composed of two values, r and s. In this section, we'll look at the function Fsig in more detail.
The signature algorithm first generates an ephemeral (temporary) private key in a cryptographically secure way. This temporary key is used in the calculation of the r and s values to ensure that the sender's actual private key can't be calculated by attackers watching signed transactions on the Ethereum network.
As we know from Chapter 4, the ephemeral private key is used to derive the corresponding (ephemeral) public key, so we have:
- A cryptographically secure random number
q, which is used as the ephemeral private key - The corresponding ephemeral public key
Q, generated fromqand the elliptic curve generator pointG
The r value of the digital signature is then the x coordinate of the ephemeral public key Q.
From there, the algorithm calculates the s value of the signature, such that:
s ≡ q-1 (Keccak256(m) + r * k) (mod p)
where:
qis the ephemeral private keyris the x coordinate of the ephemeral public keykis the signing (EOA owner's) private keymis the transaction datapis the prime order of the elliptic curve
Verification is the inverse of the signature-generation function, using the r and s values and the sender's public key to calculate a value Q, which is a point on the elliptic curve (the ephemeral public key used in signature creation). The steps are as follows:
- Check all inputs are correctly formed.
- Calculate
w = s-1 mod p. - Calculate
u1 = Keccak256(m) * w mod p. - Calculate
u2 = r * w mod p. - Finally, calculate the point on the elliptic curve
Q ≡ u1 * G + u2 * K (mod p)
where:
randsare the signature valuesKis the signer's (EOA owner's) public keymis the transaction data that was signedGis the elliptic curve generator pointpis the prime order of the elliptic curve
If the x coordinate of the calculated point Q is equal to r, then the verifier can conclude that the signature is valid. Note that in verifying the signature, the private key is neither known nor revealed.
Tip
ECDSA is necessarily a fairly complicated piece of math; a full explanation is beyond the scope of this book. A number of guides online take you through it step-by-step: search for "ECDSA explained" or try this one.
Transaction Signing in Practice
To produce a valid transaction, the originator must digitally sign the message using the ECDSA. When we say "sign the transaction," we actually mean "sign the Keccak-256 hash of the RLP-serialized transaction data." The signature is applied to the hash of the transaction data, not the transaction itself.
To sign a transaction in Ethereum, the originator must:
- Create a transaction data structure, containing all the fields required for that particular transaction type.
- Produce an RLP-encoded serialized message of the transaction data structure.
- Compute the Keccak-256 hash of this serialized message.
- Compute the ECDSA signature, signing the hash with the originating EOA's private key.
- Append the ECDSA signature's computed
v,r, andsvalues to the transaction.
The special signature variable v indicates two things: the chain ID and the recovery identifier to help the ECDSArecover function check the signature. In nonlegacy transactions, the v variable no longer encodes the chain ID because that is directly included as one of the items that forms the transaction itself. For more information on the chain ID, see "Raw Transaction Creation with EIP-155". The recovery identifier is used to indicate the parity of the y component of the public key (see "The Signature Prefix Value (v) and Public Key Recovery" for more details).
Note
At block 2,675,000, Ethereum implemented the Spurious Dragon hard fork, which, among other changes, introduced a new signing scheme that includes transaction replay protection (preventing transactions meant for one network from being replayed on others). This new signing scheme is specified in EIP-155. This change affects the form of the transaction and its signature, so attention must be paid to the first of the three signature variables (i.e.,
v), which takes one of two forms and indicates the data fields included in the transaction message being hashed.
Raw Transaction Creation and Signing
In this section, we'll create a raw transaction and sign it, using the ethers.js library. Example 6-1 demonstrates the functions that would normally be used inside a wallet or an application that signs transactions on behalf of a user.
Example 6-1. Creating and signing a raw Ethereum transaction
// Load requirements first:
//
// npm install ethers
//
// Run with: node eip1559_tx.js
import { ethers } from "ethers";

// Create provider with your RPC endpoint
const provider = new ethers.JsonRpcProvider("https://ethereum-sepolia-rpc.publicnode.com");

// Private key
const privKey = "0xd6d2672c6b4489e6bcd4e93b9af620fa0204b639b7d7f93765479c0846be0b58";

// Create a wallet instance
const wallet = new ethers.Wallet(privKey);

// Get nonce and create transaction data
const txData = {
  nonce: await provider.getTransactionCount(wallet.address), // Get nonce from provider
  to: "0xb0920c523d582040f2bcb1bd7fb1c7c1ecebdb34", // Receiver address
  value: ethers.parseEther("0.0001"), // Amount to send (0.0001 ETH here)
  gasLimit: ethers.toBeHex(0x30000), // Gas limit
  maxFeePerGas: ethers.parseUnits("100", "gwei"), // Max fee per gas
  maxPriorityFeePerGas: ethers.parseUnits("2", "gwei"), // Max priority fee
  data: "0x", // Optional data
  chainId: 11155111, // Sepolia chain ID
};

// Calculate RLP-encoded transaction hash (pre-signed)
const unsignedTx = ethers.Transaction.from(txData).unsignedSerialized;
console.log("RLP-Encoded Tx (Unsigned): " + unsignedTx);
const txHash = ethers.keccak256(unsignedTx);
console.log("Tx Hash (Unsigned): " + txHash);

// Sign the transaction
async function signAndSend() {
  // Sign the transaction with the wallet
  const signedTx = await wallet.signTransaction(txData);
  console.log("Signed Raw Transaction: " + signedTx);

  // Send the signed transaction to the Ethereum network
  const txResponse = await provider.broadcastTransaction(signedTx);
  console.log("Transaction Hash: " + txResponse.hash);

  // Wait for the transaction to be mined
  const receipt = await txResponse.wait();
  console.log("Transaction Receipt: ", receipt);
}

signAndSend().catch(console.error);
Running the example code produces the following results:
$ node eip1559_tx.js
RLP-Encoded Tx (Unsigned): 0x02f283aa36a714847735940085174876e8008303000094b0920c523d582040f2bcb1bd7fb1c7c1ecebdb34865af3107a400080c0
Tx Hash (Unsigned): 0x31d43a580534a77c71324a8434df6f2df993b3d551b29d4b70d8a889768a53f7
Signed Raw Transaction: 0x02f87583aa36a714847735940085174876e8008303000094b0920c523d582040f2bcb1bd7fb1c7c1ecebdb34865af3107a400080c001a03f8ed18cb03ee0fe3fbc3f0a7477a2f68db6ec84450e77e702b82a3f2c873aa4a0205c4f6a16ea8ad13a148cc3105814cd4a6860cd26a771651199c85ccb7c7f0f
Transaction Hash: 0x07bfbeb337e19763a1f74d989dae2953807dcb06822354cfefb16405a11beb93
Transaction Receipt:  TransactionReceipt {
  provider: JsonRpcProvider {},
  to: '0xB0920c523d582040f2BCB1bD7FB1c7C1ECEbdB34',
  from: '0x7e41354AfE84800680ceB104c5Fc99eCB98A25f0',
  contractAddress: null,
  hash: '0x07bfbeb337e19763a1f74d989dae2953807dcb06822354cfefb16405a11beb93',
  index: 1,
  blockHash: '0x0ac051e8f615805c69eec6e193e39637adeb7cf314a0098d455e7d9ac395a7ee',
  blockNumber: 7135937,
  logsBloom: '0x00000000000000000000000000000000000000000000000000000000000000000000000000000000000000000000000000000000000000000000000000000000000000000000000000000000000000000000000000000000000000000000000000000000000000000000000000000000000000000000000000000000000000000000000000000000000000000000000000000000000000000000000000000000000000000000000000000000000000000000000000000000000000000000000000000000000000000000000000000000000000000000000000000000000000000000000000000000000000000000000000000000000000000000000000000000',
  gasUsed: 21000n,
  blobGasUsed: null,
  cumulativeGasUsed: 42000n,
  gasPrice: 3096751769n,
  blobGasPrice: null,
  type: 2,
  status: 1,
  root: undefined
}
Low-Level Manual Construction of an EIP-1559 Raw Transaction
The following example demonstrates the complete low-level process for creating and signing an EIP-1559 (type 0x02) transaction by manually building the field list, RLP-encoding it, and signing the typed payload. This approach reveals exactly what happens inside wallet.signTransaction.
// npm install ethers@6
import { ethers } from "ethers";
const RLP = require('@ethereumjs/rlp');

// Replace with your own RPC and private key
const rpcUrl = "https://ethereum-sepolia-rpc.publicnode.com"; // or mainnet, etc.
const provider = new ethers.JsonRpcProvider(rpcUrl);
const privateKey = "0xYOUR_PRIVATE_KEY_HERE";
const wallet = new ethers.Wallet(privateKey, provider);

const recipient = "0xRECIPENT_ADDRESS"; // example address

async function createAndSendRawEip1559Tx() {
  const network = await provider.getNetwork(); // This is a RPC call
  const chainId = network.chainId;
  const nonce = await provider.getTransactionCount(wallet.address); // This is a RPC call

  // Example parameters — adjust as needed (or use provider.estimateGas + getFeeData)
  const maxPriorityFeePerGas = ethers.parseUnits("2", "gwei");   // tip
  const maxFeePerGas = ethers.parseUnits("30", "gwei");         // fee cap (base fee + tip)
  const gasLimit = 21000n;
  const value = ethers.parseEther("0.01"); // 0.01 ETH
  const data = "0x"; // or contract calldata
  const accessList = []; // [] or proper access list for EIP-2930 style savings

  // Unsigned fields in strict order for Transaction Type 2
  const unsignedFields = [
    chainId,                              // chainId
    nonce,                                // nonce
    maxPriorityFeePerGas,                 // maxPriorityFeePerGas
    maxFeePerGas,                         // maxFeePerGas
    gasLimit,                             // gasLimit
    recipient,                            // to
    value,                                // value
    data,                                 // data
    accessList                            // accessList
  ];

  // RLP-encode the unsigned fields
  const encodedUnsigned = RLP.encode(unsignedFields);

  // Prepend the transaction type byte (0x02)
  const txType = Buffer.from('02', 'hex');
  const fullTx = Buffer.concat([txType, encodedUnsigned]);

  // This is the signing hash
  const signingHash = ethers.keccak256(fullTx);

  // Sign the hash
  const signingKey = new ethers.SigningKey(wallet.privateKey);
  const signature = signingKey.sign(ethers.getBytes(signingHash));

  // For typed transactions we use yParity (0 or 1) instead of legacy v
  const signedFields = [
    ...unsignedFields,
    signature.v - 27, // yParity (0 or 1)
    signature.r,
    signature.s
  ];

  const encodedSigned = RLP.encode(signedFields);

  const rawTransaction = '0x02' + Buffer.from(encodedSigned).toString('hex');

  console.log("Raw transaction hex:\n", rawTransaction);

  // Send the raw transaction
  const txHash = await provider.send("eth_sendRawTransaction", [rawTransaction]);
  console.log("Transaction sent! Hash:", txHash);

  const receipt = await provider.waitForTransaction(txHash);
  console.log("Mined in block", receipt.blockNumber);
}

createAndSendRawEip1559Tx().catch(console.error);
Deserializing the Transaction
Now that we have created and sent a transaction to the Ethereum network from scratch, we can follow the inverse process and try to rebuild each field of the transaction, starting with the signed raw transaction we get from the previous example. This will help you understand how each field of the transaction is actually included in the transaction itself—you just need to extract it in the correct way.
Let's start with the entire signed raw transaction:
0x02f87583aa36a714847735940085174876e8008303000094b0920c523d582040f2bcb1bd7fb1c7c1ecebdb34865af3107a400080c001a03f8ed18cb03ee0fe3fbc3f0a7477a2f68db6ec84450e77e702b82a3f2c873aa4a0205c4f6a16ea8ad13a148cc3105814cd4a6860cd26a771651199c85ccb7c7f0f
Recalling EIP-2718, all Ethereum transactions are made by:
- The first byte that specifies the transaction type
- The transaction type payload
This almost always translates in the RLP encoding of all the fields of that specific transaction type.
Our transaction starts with a 0x02. This represents the transaction type, and 0x02 means it's an EIP-1559 transaction. The next part is the RLP encoding of all the transaction fields that make up the EIP-1559 transaction.
To quickly decode them, we can use cast and the from-rlp command, providing the rest of the transaction as input:
$ cast from-rlp f87583aa36a714847735940085174876e8008303000094b0920c523d582040f2bcb1bd7fb1c7c1ecebdb34865af3107a400080c001a03f8ed18cb03ee0fe3fbc3f0a7477a2f68db6ec84450e77e702b82a3f2c873aa4a0205c4f6a16ea8ad13a148cc3105814cd4a6860cd26a771651199c85ccb7c7f0f
["0xaa36a7","0x14","0x77359400","0x174876e800","0x030000","0xb0920c523d582040f2bcb1bd7fb1c7c1ecebdb34","0x5af3107a4000","0x",[],"0x01","0x3f8ed18cb03ee0fe3fbc3f0a7477a2f68db6ec84450e77e702b82a3f2c873aa4","0x205c4f6a16ea8ad13a148cc3105814cd4a6860cd26a771651199c85ccb7c7f0f"]
You can see that the output of the last cast command contains a list of hexadecimal items: they are the fields of the EIP-1559 transaction. Let's analyze them one by one and reconstruct the transaction:
0xaa36a7
The Sepolia chain ID: 11155111 in decimal.
0x14
The nonce used in the transaction: 20. You can go to the block explorer and see that it's actually correct.
0x77359400
The max priority fee per gas: 2000000000 in decimal. It translates to 2 gwei per gas.
0x174876e800
The max fee per gas: 100000000000 in decimal. It translates to 100 gwei per gas.
0x030000
The gas limit: 196608 in decimal.
0xb0920c523d582040f2bcb1bd7fb1c7c1ecebdb34
The recipient address.
0x5af3107a4000
The value in wei sent from the sender to the recipient: 1014 in decimal. It translates to 0.0001 ether.
0x
The empty data payload.
[]
The empty access list.
0x01
The v value of the signature; 0x01 means an odd y coordinate of the elliptic curve (0x00 means an even y coordinate).
0x3f8ed18cb03ee0fe3fbc3f0a7477a2f68db6ec84450e77e702b82a3f2c873aa4
The r value of the signature.
0x205c4f6a16ea8ad13a148cc3105814cd4a6860cd26a771651199c85ccb7c7f0f
The s value of the signature.
Raw Transaction Creation with EIP-155
The EIP-155 "Simple Replay Attack Protection" standard specifies a replay-attack-protected transaction encoding, which includes a chain ID inside the transaction data prior to signing. This ensures that transactions created for one blockchain (e.g., the Ethereum main network) are invalid on another blockchain (e.g., Ethereum Classic or the Sepolia test network). Therefore, transactions broadcast on one network cannot be replayed on another, hence the name of the standard.
By including the chain ID in the data being signed, the transaction signature prevents any changes since the signature is invalidated if the chain ID is modified. Therefore, EIP-155 makes it impossible for a transaction to be replayed on another chain because the signature's validity depends on the chain ID.
The chain ID field takes a value according to the network the transaction is meant for, as outlined in Table 6-2.
Table 6-2. Chain identifiers
| Chain | Chain ID |
|---|---|
| Ethereum mainnet | 1 |
| Ethereum Sepolia | 11155111 |
| Ethereum Holesky | 17000 |
For an exhaustive list of chain identifiers, see ChainList.
The resulting transaction structure is RLP encoded, hashed, and signed. For more details, see the EIP-155 specification.
The Signature Prefix Value (v) and Public Key Recovery
As mentioned in "The Structure of a Transaction", the transaction message doesn't include a "from" field. That's because the originator's public key can be computed directly from the ECDSA signature. Once you have the public key, you can compute the address easily. The process of recovering the signer's public key is called public key recovery.
Given the values r and s that were computed in "ECDSA Math", we can compute two possible public keys.
First, we compute two elliptic curve points, R and R′, from the x coordinate r value that is in the signature. There are two points because the elliptic curve is symmetric across the x-axis, so for any value x, there are two possible values that fit the curve, one on each side of the x-axis.
From r we also calculate r–1, which is the multiplicative inverse of r.
Finally, we calculate z, which is the n lowest bits of the message hash, where n is the order of the elliptic curve.
The two possible public keys are then:
K1 = r–1 (sR – zG)
and:
K2 = r–1 (sR′ – zG)
where:
K1andK2are the two possibilities for the signer's public keyr-1is the multiplicative inverse of the signature'srvaluesis the signature'ssvalueRandR′are the two possibilities for the ephemeral public keyQzis the n-lowest bits of the message hashGis the elliptic curve generator point
To make things more efficient, the transaction signature includes a prefix value v, which tells us which of the two possible R values is the ephemeral public key. If v is even, then R is the correct value. If v is odd, then it is R′. That way, we need to calculate only one value for R and only one value for K.
Separating Signing and Transmission (Offline Signing)
Once a transaction is signed, it is ready to transmit to the Ethereum network. The three steps of creating, signing, and broadcasting a transaction normally happen as a single operation—for example, using the cast send command. However, as you saw in "Raw Transaction Creation and Signing", you can create and sign the transaction in two separate steps. Once you have a signed transaction, you can then transmit it using ethers.JsonRpcProvider("..."").broadcastTransaction, which takes a hex-encoded and signed transaction and transmits it on the Ethereum network.
Why would you want to separate the signing and transmission of transactions? The most common reason is security. The computer that signs a transaction must have unlocked private keys loaded in memory. The computer that does the transmitting must be connected to the internet (and be running an Ethereum client). If these two functions are on one computer, then you have private keys on an online system, which is quite dangerous.
Warning
If you keep your private keys online, you're exposed to several forms of attacks, such as malware and remote hacking, and you're much more susceptible to phishing attacks, too.
Separating the functions of signing and transmitting and performing them on different machines (on an offline and an online device, respectively) is called offline signing and is a common security practice.
Figure 6-10 shows the process, which follows these steps:
- Create an unsigned transaction on the online computer where the current state of the account—notably, the current nonce and funds available—can be retrieved.
- Transfer the unsigned transaction to an "air-gapped" offline device for transaction signing (e.g., via a QR code or USB flash drive).
- Transmit the signed transaction (back) to an online device for broadcast on the Ethereum blockchain (e.g., via a QR code or USB flash drive).
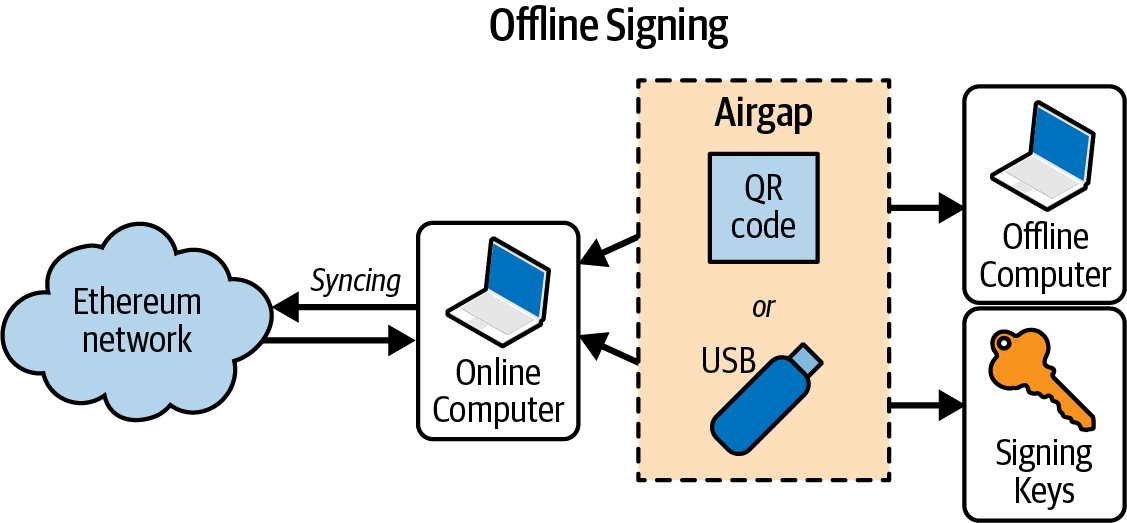
Figure 6-10. Offline signing process
Depending on the level of security you need, your "offline signing" computer can have varying degrees of separation from the online computer, ranging from an isolated and firewalled subnet (online but segregated) to a completely offline system known as an air-gapped system. In an air-gapped system, there is no network connectivity at all—the computer is separated from the online environment by a gap of "air." To sign transactions, you transfer them to and from the air-gapped computer using data storage media or (better) a webcam and QR code. Of course, this means you must manually transfer every transaction you want signed, and this doesn't scale.
While not many environments can utilize a fully air-gapped system, even a small degree of isolation has significant security benefits. For example, an isolated subnet with a firewall that allows through only a message-queue protocol can offer a much reduced attack surface and much higher security than signing on the online system. Many companies use a protocol such as ZeroMQ (0MQ) for this purpose. With a setup like that, transactions are serialized and queued for signing. The queuing protocol transmits the serialized message, in a way similar to a TCP socket, to the signing computer. The signing computer reads the serialized transactions from the queue (carefully), applies a signature with the appropriate key, and places them on an outgoing queue. The outgoing queue transmits the signed transactions to a computer with an Ethereum client that dequeues them and transmits them.
Transaction Life Cycle
In this section, we'll explore the full life cycle of a transaction, starting from the moment it's signed to when it's included in a block and the block gets finalized.
Creating and Signing the Transaction
The first step is to create the transaction, choosing the transaction type and filling all the fields required for it. For example, in the section "Raw Transaction Creation and Signing", we created an EIP-1559 transaction.
Once we have the transaction, we need to sign it with the correct private key (or the transaction will be invalid due to the invalid signature) in order to obtain the final and definitive signed transaction. This is the actual piece of data that we need to send to the network and wait for it to be included in a block.
Sending the Transaction to the Network
The transaction needs to be included in a block to be considered confirmed by the Ethereum protocol; otherwise, it's just a signed transaction that only we know about.
Tip
It's very important to understand that the Ethereum protocol considers valid only transactions that are included into blocks that are part of the valid chain. To update its state, you need to send your signed transaction to the network and wait for it to include your transaction into a block. Your signed transaction alone doesn't do anything if it's not included into a block.
So we need to send our signed transaction to the network. To do that, we just need to send our transaction to an Ethereum node: this can be our own node or a third-party one, such as Alchemy, Infura, or Public Node (which is the one we used in our previous example).
Note
By default, all wallets use a third-party node so that a user doesn't need to install anything to start using the Ethereum network. Nevertheless, if you want to maximize your privacy and really don't want to depend on anyone, you should use your own client. You can refer to Chapter 3 for a detailed guide on how to install your first Ethereum node.
When our signed transaction reaches the first node, the node performs some validation in order to immediately remove spam invalid transactions. If the validation succeeds, then the node adds the transaction to its mempool and propagates it to a subsection of all its peers. Each of them validates it, adds it to its own mempool, and propagates it further.
This process is part of the Ethereum P2P gossip protocol, and the result is that within just a few seconds, an Ethereum transaction propagates to all the Ethereum nodes around the globe. From the perspective of each node, it is not possible to discern the origin of the transaction. The neighbor that sent it to the node may be the originator of the transaction or may have received it from one of its neighbors. To be able to track the origins of transactions or interfere with propagation, an attacker would have to control a significant percentage of all nodes. This is part of the security and privacy design of P2P networks, especially as applied to blockchain networks.
Note
You may wonder why nodes don't flood transactions to all their neighbors and instead send them to just a subsection of neighbors. The answer is efficiency and bandwidth preservation. In fact, it would be highly inefficient to send all transactions to all nodes: there would be lots of duplicate messages, network traffic would be huge, and scalability would be poor as network traffic would grow exponentially with the number of transactions.
Building the Block
Right now, our transaction has reached almost all the Ethereum nodes, but it's still not confirmed because it's not included into a block—until a validator that is selected to propose the next block finally takes all the transactions from its own mempool, adds them to the block, and publishes the block to the network.
Once transactions are included into a block, they modify the Ethereum state, either by modifying the balance of an account (in the case of a simple payment) or by invoking contracts that change their internal state. These changes are recorded alongside the transaction, in the form of a transaction receipt, which may also include events. In the example in "Raw Transaction Creation and Signing", you can find the final receipt of our transaction.
Finalizing the Transaction
Our transaction is now included into a block and has already modified the Ethereum state. Nevertheless, the block that contains it could still be reverted and substituted with another one that doesn't include our transaction, even though that's highly unlikely to happen. This is called block reorganization, or block reorgs for short.
To be completely sure that our transaction cannot be reverted, we need to wait for the block that includes it to be finalized by the Ethereum consensus protocol (we'll explore that in much more detail in Chapter 15). This usually takes around 12 minutes.
Note
Even though it's true that you should wait for the finalization to be completely sure that your transaction is confirmed on the blockchain, you can usually wait for only a couple of blocks. Wallets usually show your transaction as confirmed immediately after it has been included into a block.
An Alternative Life Cycle
The life cycle we explored in the previous section is the old standard flow that a transaction follows, from its start to its end inside a finalized block. Over the past three to four years, and even more nowadays, a new life cycle has been established for transactions. To explain it, we need to introduce a concept called proposer and builder separation.
MEV and Proposer and Builder Separation
As we'll explore further in Chapter 15, every 12 seconds a validator is required to propose a new block to advance the Ethereum chain. The validator collects transactions from its mempool, organizes them to fill the block, and publishes the block to the network so that all other nodes can validate and propagate the block.
Traditionally, Ethereum nodes have prioritized transactions based on the transaction fees paid to the validator (specifically, the priority fee for EIP-1559 transactions) in order to maximize profit. This approach was the standard method for optimizing miner and validator earnings for many years.
However, with the rising popularity of Ethereum during the 2020 "DeFi Summer," and even more so during the 2021 bull run, a new phenomenon emerged: maximal extractable value (MEV, previously called miner extractable value). This concept has significantly altered how Ethereum miners and validators create blocks.
MEV refers to the maximum value that block producers can extract from a block by making strategic decisions about:
- Which transactions to include in the block
- The order of transactions within the block
- Which transactions to exclude from the block
While this may sound innocuous, it had and still has a huge impact on block-production dynamics. For example, think about a transaction that is going to buy a big quantity of a certain token X on a decentralized exchange such as Uniswap. The validator can see this transaction and know in advance that it'll make the price go up by a lot. That means the validator could add two transactions to profit from this situation:
- The first is a transaction that buys some tokens X, and it's ordered to happen before the big buy transaction.
- The second sells the tokens X bought in the previous transaction, and it's ordered to happen after the big buy transaction.
This is called a sandwich attack: the validator profits from the slippage created by the big buy transaction. Let's demonstrate this concept with a toy (and simplified) example.
A user submits a transaction (tx1) buying one thousand tokens xyz, as shown in Figure 6-11. Suppose the price of the token xyz is $1,000, so this user is going to buy $1 million worth of tokens. This buy pressure will raise the price of the token to $1,010.
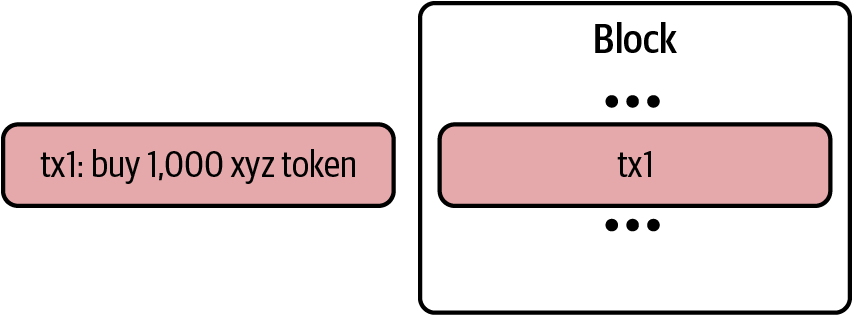
Figure 6-11. User transaction before MEV intervention
But the validator sees an opportunity to make money by front-running tx1. They create two transactions: tx0 and tx2, where tx0 contains a buy order of 10 xyz tokens and tx2 a sell order of the same amount. The validator places these transactions exactly before and after the user's tx1, as you can see in Figure 6-12. Remember that the validator can do this because they are the actor who is actually creating the block, so they can freely choose the ordering of transactions in it.
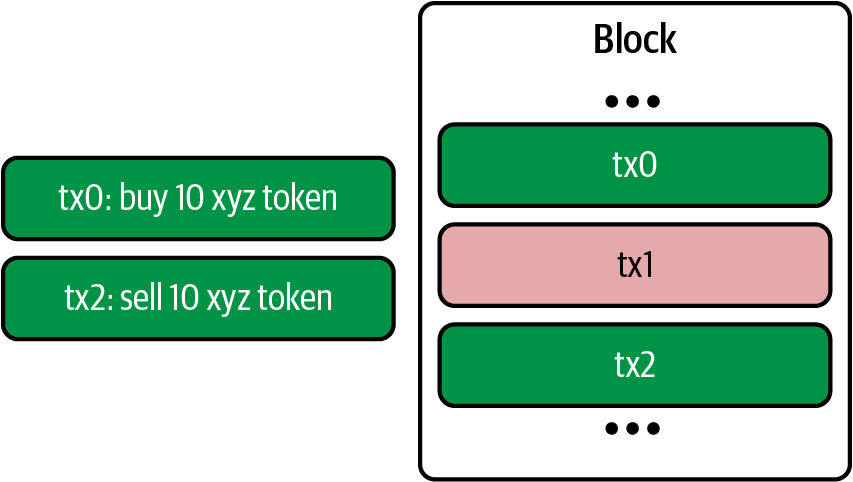
Figure 6-12. Sandwich attack by validator
The outcome is that the validator is able to buy 10 tokens xyz at $1,000 and sell them at $1,010, making a profit of $10 × 10 = $100.
This is a very simple strategy used by validators to maximize their profits. There are lots of other, more complex strategies. Competition is so high that a new actor has emerged: builders.
In fact, running all these strategies requires a lot of processing power, much more than the average validator has (remember, you can run a validator node with just 16 GB of ram). That means MEV was also threatening the decentralization of the validators, favoring big entities that could afford to spend millions of dollars on infrastructure and on people working hard on discovering new profitable strategies to build "better" blocks.
The solution to this problem came in January 2021 with the release of Flashbots v0.1. It enables block proposers (miners first, validators now) to trustlessly outsource the task of finding the optimal block construction to these new entities called builders. Thanks to this separation of duties—builders filling the block with transactions and creating the block with the highest amount of fee paid to validators (builders take a portion of this fee, too) and validators proposing the block to the network—validators can still run on average vendor machines.
Private Mempools
The MEV ecosystem has grown so much that right now, builders compete not only to find the best strategy to maximize profits but also on the transactions they can use to fill the block. The more transactions they have, the better they can apply their strategies.
That has led to the creation of private mempools. These mempools allow users or entities to submit transactions directly to block producers without exposing them to the general network. They play a significant role in mitigating risks like front-running and enabling privacy-focused workflows.
Flashbots developed its own solution called Flashbots Protect. MetaMask, the most popular wallet, has started to use private mempools by default for its users (called smart transactions).
New Transaction Life Cycle
MEV, proposer and builder separation, and private mempools have drastically changed the environment of block production. Nowadays, lots of transactions don't follow the usual life cycle we explained in the previous section; after they are created and signed, they are sent directly to a builder through a private mempool. The builder will take care of them, trying to include them in an optimal block and finally sending the whole block to the validator who is going to propose the next block. The transactions skip the public mempool propagation and directly appear in a built block.
Multiple-Signature Transactions
If you are familiar with Bitcoin's scripting capabilities, you know it is possible to create a Bitcoin multisig account that can only spend funds when multiple parties sign the transaction (e.g., two of two or three of four signatures). Ethereum's basic EOA value transactions have no provisions for multiple signatures; however, arbitrary signing restrictions can be enforced by smart contracts with any conditions you can think of to handle the transfer of ether and tokens alike.
To take advantage of this capability, ether has to be transferred to a wallet contract that is programmed with the desired spending rules, such as multisignature requirements or spending limits (or combinations of the two). The wallet contract then sends the funds when prompted by an authorized EOA once the spending conditions have been satisfied. For example, to protect your ether under a multisig condition, transfer the ether to a multisig contract. Whenever you want to send funds to another account, all the required users will need to send transactions to the contract using a regular wallet app, effectively authorizing the contract to perform the final transaction.
These contracts can also be designed to require multiple signatures before executing local code or to trigger other contracts. The security of the scheme is ultimately determined by the multisig contract code.
The ability to implement multisignature transactions as a smart contract demonstrates the flexibility of Ethereum. Currently, Gnosis Safe has become the de facto standard for creating multisignature accounts. This suite of battle-tested smart contracts is widely used by major protocols and DAOs, securing more than $6 billion in ETH and more than $74 billion worth of ERC-20 tokens as of November 2024, as illustrated in Figure 6-13.

Figure 6-13. Gnosis Safe securing billions in value
Note
With Gnosis Safe, the usual workflow to execute a transaction is as follows:
- One of the signers of the Safe proposes a transaction that they want to sign and send to the Ethereum network.
- Other signers see the transaction and sign it if they agree with its purpose.
- When a quorum is reached, the transaction is finally sent to the network, where it gets processed and executed.
Conclusion
Transactions are the starting point of every activity in the Ethereum system. Transactions are the "inputs" that cause the EVM to evaluate contracts, update balances, and more generally modify the state of the Ethereum blockchain. Next, we will work with smart contracts in a lot more detail and learn how to program in the Solidity contract-oriented language.
Chapter 7. Smart Contracts and Solidity
As we discussed in Chapter 2, there are two different types of accounts in Ethereum: EOAs and contract accounts. EOAs are controlled by users, often via software such as a wallet application that is external to the Ethereum platform. In contrast, contract accounts are controlled by program code (also commonly referred to as smart contracts) that is executed by the EVM.
In short, EOAs are simple accounts without any associated code or data storage, while contract accounts have both associated code and data storage. EOAs are controlled by transactions created and cryptographically signed with a private key in the “real world” external to and independent of the protocol, while contract accounts don’t have private keys and so “control themselves” in the predetermined way prescribed by their smart contract code. Both types of accounts are identified by an Ethereum address. In this chapter, we’ll discuss contract accounts and the program code that controls them.
What Is a Smart Contract?
The term smart contract has been used over the years to describe a wide variety of things. In the 1990s, cryptographer Nick Szabo coined the term and defined it as “a set of promises, specified in digital form, including protocols within which the parties perform on the other promises.” Since then, the concept of smart contracts has evolved, especially after the introduction of decentralized blockchain platforms with the launch of Bitcoin in 2009.
In the context of Ethereum, the term is actually a bit of a misnomer, given that Ethereum smart contracts are neither smart nor legal contracts, but the term has stuck. In this book, we use the term smart contracts to refer to immutable computer programs that run deterministically in the context of the EVM as part of the Ethereum network protocol—that is, on the decentralized Ethereum world computer.
Let’s unpack that definition:
Computer programs
Smart contracts are simply computer programs. The word contract has no legal meaning in this context.
Immutable
Once deployed, the code of a smart contract cannot change. Unlike with traditional software, the only way to modify a smart contract is to deploy a new instance.
Deterministic
The outcome of the execution of a smart contract is the same for everyone who runs it, given the context of the transaction that initiated its execution and the state of the Ethereum blockchain at the moment of execution.
EVM context
Smart contracts operate with a very limited execution context. They can access their own state, the context of the transaction that called them, and some information about the most recent blocks.
Decentralized world computer
The EVM runs as a local instance on every Ethereum node, but because all instances of the EVM operate on the same initial state and produce the same final state, the system as a whole operates as a single “world computer.”
Life Cycle of a Smart Contract
Smart contracts are typically written in a high-level language such as Solidity. But in order to run, they must be compiled to the low-level bytecode that runs in the EVM. Once compiled, they are deployed on the Ethereum platform using a special contract-creation transaction, which is identified by having an empty to field (see "Special Transaction: Contract Creation" in Chapter 6). Each contract is identified by an Ethereum address, which is derived from the contract-creation transaction as a function of the originating account and nonce. The Ethereum address of a contract can be used in a transaction as the recipient, sending funds to the contract or calling one of the contract’s functions. Note that, unlike with EOAs, there are no keys associated with an account created for a new smart contract. As the contract creator, you don’t get any special privileges at the protocol level (although you can explicitly code them into the smart contract). You certainly don’t receive the private key for the contract account, which in fact does not exist—we can say that smart contract accounts own themselves.
Importantly, contracts only run if they are called by a transaction. All smart contracts in Ethereum are executed, ultimately, because of a transaction initiated from an EOA. A contract can call another contract that can call another contract, and so on, but the first contract in such a chain of execution will always have been called by a transaction from an EOA. Contracts never run “on their own” or “in the background.” Contracts effectively lie dormant until a transaction triggers execution, either directly or indirectly as part of a chain of contract calls. It is also worth noting that smart contracts are not executed “in parallel” in any sense—the Ethereum world computer can be considered to be a single-threaded machine.
Transactions are atomic, regardless of how many contracts they call or what those contracts do when called. Transactions execute in their entirety, with any changes in the global state (contracts, accounts, etc.) recorded only if all execution terminates successfully. Successful termination means that the program executed without an error and reached the end of execution. If execution fails due to an error, all of its effects (changes in state) are “rolled back” as if the transaction never ran. A failed transaction is still recorded as having been attempted, and the ether spent on gas for the execution is deducted from the originating account, but it otherwise has no effects on contract or account state.
As previously mentioned, a contract’s code cannot be changed once it is deployed. Historically, a contract could be deleted, removing its code and internal state (storage) from its address and leaving a blank account. After such a deletion, any transactions sent to that address would not result in code execution because no code would remain. This deletion was accomplished using an EVM opcode called SELFDESTRUCT, which provided a gas refund, incentivizing the release of network resources by deleting stored state. However, the SELFDESTRUCT operation was deprecated by EIP-6780 in 2023 due to the significant changes it requires to an account’s state, particularly the removal of all code and storage. With the upcoming upgrades in the Ethereum roadmap, this operation will no longer be feasible.
Introduction to Ethereum High-Level Languages
The EVM is a virtual machine that runs a special form of code called EVM bytecode, analogous to your computer’s CPU, which runs machine code such as x86_64. We will examine the operation and language of the EVM in much more detail in Chapter 14. In this section, we will look at how smart contracts are written to run on the EVM.
While it is possible to program smart contracts directly in bytecode, EVM bytecode is rather unwieldy and very difficult for programmers to read and understand. Instead, most Ethereum developers use a high-level language to write programs and a compiler to convert them into bytecode.
Although any high-level language could be adapted to write smart contracts, adapting an arbitrary language to be compilable to EVM bytecode is quite a cumbersome exercise and would in general lead to some amount of confusion. Smart contracts operate in a highly constrained and minimalistic execution environment (the EVM). In addition, a special set of EVM-specific system variables and functions needs to be available. As such, it is easier to build a smart contract language from scratch than it is to make a general-purpose language suitable for writing smart contracts. As a result, a number of special-purpose languages have emerged for programming smart contracts. Ethereum has several such languages, together with the compilers needed to produce EVM-executable bytecode.
In general, programming languages can be classified into two broad programming paradigms: declarative and imperative, also known as functional and procedural, respectively. In declarative programming, we write functions that express the logic of a program but not its flow. Declarative programming is used to create programs where there are no side effects, meaning that there are no changes to state outside of a function. Declarative programming languages include Haskell and SQL. Imperative programming, by contrast, is where a programmer writes a set of procedures that combine the logic and flow of a program. Imperative programming languages include C++ and Java. Some languages are “hybrid,” meaning that they encourage declarative programming but can also be used to express an imperative programming paradigm. Such hybrids include Lisp, JavaScript, and Python. In general, any imperative language can be used to write in a declarative paradigm, but it often results in inelegant code. By comparison, pure declarative languages cannot be used to write in an imperative paradigm. In purely declarative languages, there are no “variables.”
While imperative programming is more commonly used by programmers, it can be very difficult to write programs that execute exactly as expected. The ability of any part of the program to change the state of any other makes it difficult to reason about a program’s execution and introduces many opportunities for bugs. Declarative programming, by comparison, makes it easier to understand how a program will behave: since it has no side effects, any part of a program can be understood in isolation.
In smart contracts, bugs literally cost money. As a result, it is critically important to write smart contracts without unintended effects. To do that, you must be able to clearly reason about the expected behavior of the program. So declarative languages play a much bigger role in smart contracts than they do in general-purpose software. Nevertheless, as you will see, the most widely used language for smart contracts (Solidity) is imperative. Programmers, like most humans, resist change!
Currently supported high-level programming languages for smart contracts include the following (ordered by popularity):
Solidity
A procedural (imperative) programming language with a syntax similar to JavaScript, C++, or Java. The most popular and frequently used language for Ethereum smart contracts.
Yul
An intermediate language used in standalone mode or inline within Solidity, which is ideal for high-level optimizations across platforms. Beginners should start with Solidity or Vyper before exploring Yul, as it requires advanced knowledge of smart contract security and the EVM.
Vyper
A contract-oriented programming language with Python-like syntax that prioritizes user safety and encourages clear coding practices via language design and efficient execution.
Huff
A low-level programming language primarily used by developers who require highly efficient and minimalistic contract code, allowing for advanced optimizations beyond what higher-level languages like Solidity offer. Like Yul, it’s not suggested for beginners.
Fe
A statically typed smart contract language for the EVM, inspired by Python and Rust. It aims to be easy to learn, even for developers who are new to Ethereum, with its development still in the early stages since its alpha release in January 2021.
Other languages were developed in the past but are not maintained anymore, such as LLL, Serpent, and Bamboo.
As you can see, there are many languages to choose from. However, of all of these, Solidity is by far the most popular, to the point of being the de facto high-level language of Ethereum and even other EVM-like blockchains.
Building a Smart Contract with Solidity
Solidity was created by Gavin Wood (coauthor of the first edition of this book) as a language explicitly for writing smart contracts with features to directly support execution in the decentralized environment of the Ethereum world computer. The resulting attributes are quite general, and so it has ended up being used for coding smart contracts on several other blockchain platforms. It was developed by Christian Reitwiessner and then by Alex Beregszaszi, Liana Husikyan, Yoichi Hirai, and several former Ethereum core contributors. Solidity is now developed and maintained as an independent project on GitHub.
The main “product” of the Solidity project is the Solidity compiler, solc, which converts programs written in the Solidity language to EVM bytecode. The project also manages the important ABI standard for Ethereum smart contracts, which we will explore in detail in this chapter. Each version of the Solidity compiler corresponds to and compiles a specific version of the Solidity language.
To get started, we will download a binary executable of the Solidity compiler. Then, we will develop and compile a simple contract, following on from the example we started with in Chapter 2.
Selecting a Version of Solidity
Solidity follows a versioning model called semantic versioning, which specifies version numbers structured as three numbers separated by dots: MAJOR.MINOR.PATCH. The “major” number is incremented for major and backward-incompatible changes, the “minor” number is incremented when backward-compatible features are added in between major releases, and the “patch” number is incremented for backward-compatible bug fixes.
At the time of writing, Solidity is at version 0.8.26. The rules for major version 0, which is for initial development of a project, are different: anything may change at any time. In practice, Solidity treats the “minor” number as if it were the major version and the “patch” number as if it were the minor version. Therefore, in 0.8.26, 8 is considered to be the major version and 26 the minor version. As you saw in Chapter 2, your Solidity programs can contain a pragma directive that specifies the minimum and maximum versions of Solidity that it is compatible with and can be used to compile your contract. Since Solidity is rapidly evolving, it is often better to install the latest release.
Note
Another consequence of the rapid evolution of Solidity is the pace at which documentation gets outdated. Right now, we’re working with Solidity version 0.8.26, and everything in this book is based on that version. While this book will always give you a solid foundation for learning Solidity, future versions might change some syntax and functionality. So, whenever you have questions or run into something new, it’s a good idea to check the official Solidity documentation to stay current.
Downloading and Installing Solidity
There are a number of methods you can use to download and install Solidity, depending on your operating system and requirements: either as a binary release or by compiling from source code. You can find detailed and updated instructions in the Solidity documentation.
Here’s how to install the latest binary release of Solidity on an Ubuntu/Debian operating system, using the apt package manager:
$ sudo add-apt-repository ppa:ethereum/ethereum
$ sudo apt update
$ sudo apt install solc
Once you have solc installed, check the version by running:
$ solc --version
solc, the solidity compiler commandline interface
Version: 0.8.26+commit.8a97fa7a.Linux.g++
Development Environment
While it’s entirely possible to develop Solidity smart contracts using a simple text editor, leveraging a development framework like Hardhat or Foundry can significantly enhance your efficiency and effectiveness as a developer. These frameworks offer a comprehensive suite of tools that simplify and improve the development process. For example, they provide robust testing environments, allowing you to write and run unit tests to validate your contracts’ behavior, and they offer forking capabilities to create local instances of the mainnet for realistic testing scenarios. With advanced debugging and tracing capabilities, you can easily step through your code execution and quickly identify and resolve issues, saving time and reducing errors. Additionally, these frameworks support scripting and deployment automation, plug-in ecosystems that extend functionality, and seamless network management across different environments. Integrating these capabilities into your workflow ensures a higher level of code quality and security, which is difficult to achieve with a simple text editor.
Beyond frameworks, adopting a modern IDE like VS Code further enhances productivity. VS Code offers a wide array of extensions for Solidity, including syntax highlighting, which makes your code easier to read; advanced commenting and bookmarking tools to help organize and navigate complex projects; and visual analysis tools that provide insights into your code’s structure and potential issues. There are also web-based development environments, such as Remix IDE.
Together, these tools not only improve code quality but also accelerate the development process, allowing us to build and deploy smart contracts more quickly and securely.
Writing a Simple Solidity Program
In Chapter 2, we wrote our first Solidity program. When we first built the Faucet contract, we used the Remix IDE to compile and deploy the contract. In this section, we will revisit, improve, and embellish Faucet.
Our first attempt looked like Example 7-1.
Example 7-1. Faucet.sol: a Solidity contract implementing a faucet
// SPDX-License-Identifier: GPL-3.0
// Our first contract is a faucet!
contract Faucet {
    // Give out ether to anyone who asks
    function withdraw(uint _withdrawAmount, address payable _to) public {
        // Limit withdrawal amount
        require(_withdrawAmount <= 100000000000000000);
        // Send the amount to the address that requested it
        _to.transfer(_withdrawAmount);
    }
    // Accept any incoming amount
    receive() external payable {}
}
As we saw in Chapter 2, the SPDX license identifier in the comment indicates that the smart contract is licensed under GPL-3.0, informing users and developers of their legal rights and obligations for using and distributing the code.
Compiling with the Solidity Compiler (solc)
Now, we will use the Solidity compiler on the command line to compile our contract directly. The Solidity compiler solc offers a variety of options, which you can see by passing the --help argument.
We use the --bin and --optimize arguments of solc to produce an optimized binary of our example contract:
$ solc --optimize --bin Faucet.sol
======= Faucet.sol:Faucet =======
Binary:
6080604052348015600e575f5ffd5b5060fa8061001b5f395ff3fe608060405260043610601d575f3560e01c806
2f714ce146027575f5ffd5b36602357005b5f5ffd5b3480156031575f5ffd5b506041603d366004608d565b6043
565b005b67016345785d8a00008211156056575f5ffd5b6040516001600160a01b0382169083156108fc0290849
05f818181858888f193505050501580156088573d5f5f3e3d5ffd5b505050565b5f5f60408385031215609d575f
5ffd5b8235915060208301356001600160a01b038116811460b9575f5ffd5b80915050925092905056fea264697
06673582212208935b6cf5d9070b7609ad59ac4b727e512522c674cacf09a2eff88dafa3242ee64736f6c634300
081b0033
The result that solc produces is a hex-serialized binary that can be submitted to the Ethereum blockchain.
The Ethereum Contract ABI
In computer software, an application binary interface is an interface between two program modules—often between the operating system and user programs. An ABI defines how data structures and functions are accessed in machine code; this is not to be confused with an API, which defines this access in high-level, often human-readable formats as source code. The ABI is thus the primary way of encoding and decoding data into and out of machine code.
In Ethereum, the ABI is used to encode contract calls for the EVM and to read data out of transactions. The purpose of an ABI is to define the functions in the contract that can be invoked and describe how each function will accept arguments and return its result.
A contract’s ABI is specified as a JSON array of function descriptions (see “Functions”) and events (see “Events”). A function description is a JSON object with fields type, name, inputs, outputs, constant, and payable. An event description object has fields type, name, inputs, and anonymous.
We use the solc command-line Solidity compiler to produce the ABI for our Faucet.sol example contract:
$ solc --abi Faucet.sol
======= Faucet.sol:Faucet =======
Contract JSON ABI
[{"inputs":[{"internalType":"uint256","name":"withdrawAmount","type":"uint256"}],
"name":"withdraw","outputs":[],"stateMutability":"nonpayable","type":"function"},
{"stateMutability":"payable","type":"receive"}]
As you can see, the compiler produces a JSON array describing the two functions that are defined by Faucet.sol. This JSON can be used by any application that wants to access the Faucet contract once it is deployed. Using the ABI, an application such as a wallet or DApp browser can construct transactions that call the functions in Faucet with the correct arguments and argument types. For example, a wallet would know that to call the function withdraw, it would have to provide a uint256 argument named withdrawAmount. The wallet could prompt the user to provide that value, then create a transaction that encodes it and executes the withdraw function.
All that is needed for an application to interact with a contract is an ABI and the address where the contract has been deployed.
Selecting a Solidity Compiler and Language Version
As we saw in the previous code, our Faucet contract compiles successfully with Solidity version 0.8.26. But what if we had used a different version of the Solidity compiler? The language is still in constant flux, and things may change in unexpected ways. Our contract is fairly simple, but what if our program used a feature that was added only in Solidity version 0.8.26 and we tried to compile it with 0.8.25?
To resolve such issues, Solidity offers a compiler directive known as a version pragma that instructs the compiler that the program expects a specific compiler (and language) version. Let’s look at an example:
pragma solidity 0.8.26;
The Solidity compiler reads the version pragma and will produce an error if the compiler version is incompatible with the version pragma. In this case, our version pragma says that this program can be compiled by a Solidity compiler with version 0.8.26. Pragma directives are not compiled into EVM bytecode; they are compile-time directives used by the compiler only to check compatibility.
Note
In the pragma directive, the symbol ^ states that we allow compilation with any minor revision equal to or above the specified one. For example, a pragma directive
pragma solidity ^0.7.1;means that the contract can be compiled with a solc version of 0.7.1, 0.7.2, and 0.7.3 but not 0.8.0 (which is a major revision, not a minor revision).
Let’s add a pragma directive to our Faucet contract. We will name the new file Faucet2.sol, to keep track of our changes as we proceed through these examples, starting in Example 7-2.
Example 7-2. Faucet2.sol: Adding the version pragma to Faucet
pragma solidity 0.8.26;
// SPDX-License-Identifier: GPL-3.0
// Our first contract is a faucet!
contract Faucet {
    // Give out ether to anyone who asks
    function withdraw(uint _withdrawAmount, address payable _to) public {
        // Limit withdrawal amount
        require(_withdrawAmount <= 100000000000000000);
        // Send the amount to the address that requested it
        _to.transfer(_withdrawAmount);
    }
    // Accept any incoming amount
    receive() external payable {}
}
Adding a version pragma is a best practice because it avoids problems with mismatched compiler and language versions. We will explore other best practices and continue to improve the Faucet contract throughout this chapter.
Programming with Solidity
In this section, we will look at some of the capabilities of the Solidity language. As we mentioned in Chapter 2, our first contract example was very simple and also flawed in various ways. We’ll gradually improve it here while exploring how to use Solidity. This won’t be a comprehensive Solidity tutorial, however, as Solidity is quite complex and rapidly evolving. We’ll cover the basics and give you enough of a foundation to be able to explore the rest on your own.
Data Types
First, let’s look at some of the basic data types offered in Solidity:
Boolean (bool)
Boolean value, true or false, with logical operators ! (not), && (and), || (or), == (equal), and != (not equal).
Integer (int, uint)
Signed (int) and unsigned (uint) integers, declared in increments of 8 bits from int8 to uint256. Without a size suffix, 256-bit quantities are used to match the word size of the EVM.
Fixed point (fixed, ufixed)
Fixed-point numbers, declared with (u)fixedMxN where M is the size in bits (increments of 8 up to 256) and N is the number of decimals after the point (up to 18)—for example, ufixed32x2.
Note
Fixed-point numbers are not fully supported by Solidity yet. They can be declared but cannot be assigned to or from.
Address
A 20-byte Ethereum address. The address object has many helpful member functions, the main ones being balance (returns the account balance) and transfer (transfers ether to the account).
Byte array (fixed)
Fixed-size arrays of bytes, declared with bytes1 up to bytes32.
Byte array (dynamic)
Variable-sized arrays of bytes, declared with bytes or string.
Enum
User-defined type for enumerating discrete values: enum NAME {LABEL1, LABEL 2, ...}. Enum’s underlying type is uint8; thus, it can have no more than 256 members and can be explicitly converted to all integer types.
Arrays
An array of any type, either fixed or dynamic: uint32[][5] is a fixed-size array of five dynamic arrays of unsigned integers.
Struct
User-defined data containers for grouping variables: struct NAME {TYPE1 VARIABLE1; TYPE2 VARIABLE2; ...}.
Mapping
Hash lookup tables for key ⇒ value pairs: mapping(KEY_TYPE ⇒ VALUE_TYPE) NAME.
In addition to these data types, Solidity offers a variety of value literals that can be used to calculate different units:
Time units
The global variable block.timestamp represents the time, in seconds, when a block was published and added to the blockchain, counting from the Unix Epoch (January 1. 70). The units seconds, minutes, hours, and days can be used as suffixes, converting to multiples of the base unit seconds.
Note
Since a block can contain multiple transactions, all transactions within a block share the same
block.timestamp, which reflects the time the block was published, not the exact moment each transaction was initiated.
Ether units
The units wei and ether can be used as suffixes, converting to multiples of the base unit wei. Previously, the denominations finney and szabo were also available, but they were dropped in Solidity version 0.7.0.
In our Faucet contract example, we used a uint (which is an alias for uint256) for the withdrawAmount variable. We also indirectly used an address variable, which we set with msg.sender. We will use more of these data types in our examples in the rest of this chapter.
Let’s use one of the unit multipliers to improve the readability of our example contract. In the withdraw function, we limit the maximum withdrawal, expressing the limit in wei, the base unit of ether:
require(withdrawAmount <= 100000000000000000);
That’s not very easy to read. We can improve our code by using the unit multiplier ether, to express the value in ether instead of wei:
require(withdrawAmount <= 0.1 ether);
Variables: Definition and Scope
In Solidity, the syntax for defining variables and functions is similar to other statically typed languages: we assign a type, a name, and an optional value to each variable. For state variables, we can also specify their visibility. The default visibility is internal, meaning the variable is accessible only within the contract and its derived contracts. To make them accessible from other smart contracts, we need to use the public visibility.
Solidity smart contracts feature three types of variable scopes:
State variables
These store permanent data in the smart contract, known as persistent state, by recording values on the blockchain. State variables are defined within the smart contract but outside any function. Example: uint public count;
Local variables
These are temporary pieces of data used during computations that hold information for short periods. Local variables are not stored on the blockchain; they exist within functions and are not accessible outside their defined scope. Example: uint count = 1;
Global variables
These are automatically provided by Solidity and are available without explicit declaration or import. They offer information about the blockchain environment and include utility functions for use within the program. The predefined global variables are exhaustively listed in the following section.
As we briefly mentioned, state variables can be declared specifying their visibility. Solidity offers three different visibility levels: public variables generate automatic getter functions, allowing external contracts to read their values, although they cannot modify them; internal variables are accessible only within the contract and its derived contracts; and private variables are similar to internal variables but cannot be accessed even by derived contracts.
Predefined Global Variables and Functions
When a contract is executed in the EVM, it has access to a small set of global objects. These include the block, msg, and tx objects. In addition, Solidity exposes a number of EVM opcodes as predefined functions. In this section we will examine the variables and functions you can access from within a smart contract in Solidity.
Transaction/message call context
The msg object is the transaction call (EOA originated) or message call (contract originated) that launched this contract execution. It contains a number of useful attributes:
msg.sender
We’ve already used this one. It represents the address that initiated this contract call, not necessarily the originating EOA that sent the transaction. If our contract was called directly by an EOA transaction, then this is the address that signed the transaction, but otherwise, it will be a contract address.
msg.value
The value of ether sent with this call (in wei).
msg.data
The data payload of this call into our contract.
msg.sig
The first four bytes of the data payload, which is the function selector.
Note
Whenever a contract calls another contract, the values of all the attributes of
msgchange to reflect the new caller’s information. The only exception to this is thedelegatecallfunction, which runs the code of another contract or library within the originalmsgcontext.
Transaction context
The tx object provides a means of accessing transaction-related information:
tx.gasprice
The gas price in the calling transaction
tx.origin
The address of the originating EOA for this transaction
Block context
The block object contains the following information about the current block:
block.basefee
The current block’s base fee, a dynamically adjusted value representing the minimum gas fee required for a transaction to be included in the block.
block.blobbasefee
The dynamically adjusting base fee for blob transactions, which was introduced to handle large data efficiently as part of Ethereum’s scalability improvements with EIP-4844.
block.chainid
The unique identifier of the blockchain on which the block is currently being built.
block.prevrandao
A pseudorandom value derived from the randomness beacon of the previous block, provided by the beacon chain. This can be useful for smart contracts that require random numbers—only for nonsensitive operations, as it can be manipulated to some extent.
block.coinbase
The address of the recipient of the current block’s fees and block reward.
block.difficulty
The difficulty (PoW) of the current block for EVM versions before Paris (The Merge). For subsequent EVM versions adopting a PoS consensus model, it behaves as a deprecated alias of block.prevrandao.
block.gaslimit
The maximum amount of gas that can be spent across all transactions included in the current block.
block.number
The current block number (blockchain height).
block.timestamp
The timestamp placed in the current block by the miner (number of seconds since the Unix epoch).
Address object
Any address, either passed as an input or cast from a contract object, has a number of attributes and methods.
address.balance
The balance of the address in wei. For example, the current contract balance is address(this).balance.
address.code
The contract bytecode stored at the address. Returns an empty-bytes array for EOA addresses.
address.codehash
The Keccak-256 hash of the contract bytecode stored at the address.
address.transfer(amount)
Transfers the amount (in wei) to this address, throwing an exception on any error. We used this function in our Faucet example as a method on the msg.sender address, as msg.sender.transfer.
address.send(amount)
Similar to transfer, only instead of throwing an exception, it returns false on error. Be careful to always check the return value of send.
address.call(payload)
Low-level CALL function that can construct an arbitrary message call with a data payload. Returns false on error. Be careful: a recipient can (accidentally or maliciously) use up all your gas, causing your contract to halt with an OOG (out of gas) exception; always check the return value of call.
address.delegatecall(payload)
Low-level DELEGATECALL function, like address(this).call(...) but with this contract’s code replaced with that of address. Particularly useful for implementing the proxy pattern. Returns false on error. Warning: advanced use only!
address.staticcall(payload)
Low-level STATICCALL function, like address(this).call(...) but in read-only mode, meaning that the called function cannot modify any state or send ether. Returns false on error.
Note
Both
address.send()andaddress.transfer()forward a fixed amount of 2,300 units of gas, which might be insufficient to execute fallback logic. With EIP-7702 going live, their usage is discouraged in favor of the more flexibleaddress.call(). More on this in Chapter 9.
Built-in functions
Other functions worth noting are:
addmod, mulmod
For modulo addition and multiplication. For example, addmod(x,y,k) calculates (x + y) % k.
keccak256, sha256, ripemd160
Functions to calculate hashes with various standard hash algorithms.
ecrecover
Recovers the address used to sign a message from the signature.
selfdestruct(recipient_address)
Deprecated. Used to delete the current contract and send any remaining ether in the account to the recipient address. After EIP-6780, this happens only if the self-destruct instruction is invoked in the same transaction as creation. In all other cases, the funds will be moved, but the contract and its state won’t be cleared.
this
The current contract, explicitly convertible to Address type to retrieve the address of the currently executing contract account: address(this).
super
The contract that is one level higher in the inheritance hierarchy.
gasleft
The amount of gas remaining for the current execution context.
blockhash(block_number)
The hash of a given block identified by its block number; only available for the most recent 256 blocks.
blobhash(index)
The hash of the index-th blob associated with the current transaction.
Contract Definition
Solidity’s principal data type is contract; our Faucet example simply defines a contract object. Similar to any object in an object-oriented language, the contract is a container that includes data and methods.
Solidity offers two other object types that are similar to a contract:
interface
An interface definition is structured exactly like a contract, except none of the functions are defined—they are only declared. This type of declaration is often called a stub; it tells you the functions’ arguments and return types without any implementation. An interface specifies the “shape” of a contract; when inherited, each of the functions declared by the interface must be defined by the child.
library
A library contract is one that is meant to be deployed only once and used by other contracts, using the delegatecall method (see “Address object”).
Functions
Within a contract, we define functions that can be called by an EOA transaction or another contract. In our Faucet example, we have two functions: withdraw and receive.
The syntax we use to declare a function in Solidity is as follows:
function FunctionName([parameters]) {public|private|internal|external} [virtual|override]
[pure|view|payable] [modifiers] [returns (return types)]
Let’s look at each of these components:
FunctionName
The name of the function, which is used to call the function in a transaction from an EOA, from another contract, or even from within the same contract.
parameters
Following the name, we specify the arguments that must be passed to the function, with their names and types. In our Faucet example, we defined uint withdrawAmount as the only argument to the withdraw function.
The next set of keywords (public, private, internal, external) specify the function’s visibility:
public
Public is the default; such functions can be called by other contracts or EOA transactions or from within the contract. In our Faucet example, both functions are defined as public.
private
Private functions are like internal functions but cannot be called by derived contracts.
internal
Internal functions are only accessible from within the contract—they cannot be called by another contract or EOA transaction. They can be called by derived contracts (those that inherit this one).
external
External functions are like public functions except they cannot be called from within the contract unless explicitly prefixed with the keyword this.
Keep in mind that the terms internal and private are somewhat misleading. Any function or data inside a contract is always visible on the public blockchain, meaning that anyone can see the code or data. The keywords described here affect only how and when a function can be called.
Note
Function visibility should not be confused with state variable visibility! They share keywords and semantics, but they are two different things. While state variable visibility is optional, function visibility must be explicitly defined.
The second set of keywords (pure, view, payable) affect the behavior of the function:
pure
A pure function is one that neither reads nor writes any variables in storage. It can only operate on arguments and return data, without reference to any stored data or blockchain state. Pure functions are intended to encourage declarative-style programming without side effects or state.
view
A function marked as a view does not modify any state. The compiler does not force the use of the view modifier; it only produces a warning when it can be applied.
payable
A payable function is one that can accept incoming payments. Functions not declared as payable will reject incoming payments. There are two exceptions, due to design decisions in the EVM: coinbase payments and SELFDESTRUCT inheritance will be paid even if the fallback function is not declared as payable, but this makes sense because code execution is not part of those payments anyway.
Let’s now explore the behavior of two special functions, receive and fallback:
receive()
The receive function is what allows our contracts to receive ether. It is triggered when a contract receives a call with empty calldata, typically during plain ether transfers (such as those made using .send() or .transfer()). It is declared with receive() external payable { ... }, and while it can’t have any arguments or return a value, it can be virtual, can override, and can have modifiers.
fallback()
The fallback function is executed when a contract is called with data that does not match any of the other function signatures. We can declare it using either fallback() external [payable] or fallback(bytes calldata input) external [payable] returns (bytes memory output). If the fallback function includes the input parameter, it will contain the entire data sent to the contract (equivalent to msg.data). Similar to the receive function, the fallback function can be payable and virtual, can override, and can include modifiers. Nowadays, it is primarily used to implement the proxy pattern: a design pattern that enables smart contract upgradability.
Note
If the contract lacks a
receivefunction but has a payablefallbackfunction, thefallbackfunction will be executed during such transfers. If the contract has neither areceivefunction nor a payablefallbackfunction, it cannot accept ether, and the transaction will revert with an exception.
Contract Constructor
There is a special function that is used only once. When a contract is created, it also runs the constructor function, if one exists, to initialize the state of the contract. The constructor is run in the same transaction as the contract creation. The constructor function is optional; you’ll notice that our Faucet example doesn’t have one.
Constructors can be specified through the constructor keyword. It looks like this:
pragma 0.8.26
// SPDX-License-Identifier: GPL-3.0
contract MEContract {
 address owner;
 constructor () { // This is the constructor
  owner = msg.sender;
 }
}
A contract’s life cycle starts with a creation transaction from an EOA or contract account. If there is a constructor, it is executed as part of contract creation to initialize the state of the contract as it is being created, and it is then discarded.
Note
Constructors can also be marked as payable. This is necessary if you want to send ETH along with the contract-creation transaction. If the constructor isn’t payable, any ETH sent during deployment will cause the transaction to revert.
Function Modifiers
Solidity offers a special type of function called a function modifier. You apply modifiers to functions by adding the modifier name in the function declaration. Modifiers are most often used to create conditions that apply to many functions within a contract. We have an access control statement already, in our destroy function. Let’s create a function modifier that expresses that condition:
modifier onlyOwner {
 require(msg.sender == owner);
 _;
}
This function modifier, named onlyOwner, sets a condition on any function it modifies requiring that the address stored as the owner of the contract is the same as the address of the transaction’s msg.sender. This is the basic design pattern for access control, allowing only the owner of a contract to execute any function that has the onlyOwner modifier.
You may have noticed that our function modifier has a peculiar syntactic “placeholder” in it: an underscore followed by a semicolon (_;). This placeholder is replaced by the code of the function that is being modified. Essentially, the modifier is “wrapped around” the modified function, placing its code in the location identified by the underscore character.
To apply a modifier, you add its name to the function declaration. More than one modifier can be applied to a function; they are applied in the sequence they are declared, as a space-separated list.
Let’s define a changeOwner function to use the onlyOwner modifier:
function changeOwner(address newOwner) public onlyOwner {
 require(newOwner != address(0), "New owner address not set");
 owner = newOwner;
}
The function modifier’s name (onlyOwner) is after the keyword public and tells us that the changeOwner function is modified by the onlyOwner modifier. Essentially, you can read this as “only the owner can set a new owner address.” In practice, the resulting code is equivalent to “wrapping” the code from onlyOwner around changeOwner.
Function modifiers are an extremely useful tool because they allow us to write preconditions for functions and apply them consistently, making the code easier to read and, as a result, easier to audit for security. They are most often used for access control, but they are quite versatile and can be used for a variety of other purposes.
Contract Inheritance
Solidity’s contract object supports inheritance, which is a mechanism for extending a base contract with additional functionality. To use inheritance, specify a parent contract with the keyword is:
contract Child is Parent {
 ...
}
With this construct, the Child contract inherits all the methods, functionality, and variables of Parent. Solidity also supports multiple inheritance, which can be specified by comma-separated contract names after the keyword is:
contract Child is Parent1, Parent2 {
 ...
}
We can call functions higher up in the inheritance chain by explicitly specifying the contract like Parent1.functionName() or by using super.functionName() if we want to call the function just one level above in the flattened inheritance hierarchy.
Contract inheritance allows us to write our contracts in such a way as to achieve modularity, extensibility, and reuse. We start with contracts that are simple and implement the most generic capabilities, then extend them by inheriting those capabilities in more specialized contracts.
In our Faucet contract, we introduced access control for an owner, assigned on construction. This capability is quite generic: many contracts will have it. We can define it as a generic contract, then use inheritance to extend it to the Faucet contract. To enrich the example, let’s add the pausable functionality together with the access control one.
We start by defining a base contract Owned, which has an owner variable, setting it in the contract’s constructor:
contract Owned {
    address owner;
    // Contract constructor: set owner
    constructor() {
        owner = msg.sender;
    }
    // Access control modifier
    modifier onlyOwner {
        require(msg.sender == owner);
        _;
    }
}
Next, we define a base contract Pausable, which inherits Owned:
contract Pausable is Owned {
    bool paused;
    // Status check modifier
    modifier whenNotPaused {
        require(paused == false);
        _;
    }
    // Functions to pause/unpause user operations
    function pause() public onlyOwner {
        paused = true;
    }
    function unpause() public onlyOwner {
        paused = false;
    }
}
As you can see, the Pausable contract can use the onlyOwner function modifier, defined in Owned. It indirectly also uses the owner address variable and the constructor defined in Owned. Inheritance makes each contract simpler and focused on its specific functionality, allowing us to manage the details in a modular way.
Now we can further extend the Owned contract, inheriting its capabilities in Faucet:
contract Faucet is Pausable {
    // Give out ether to anyone who asks
    function withdraw(uint _withdrawAmount, address payable _to) public whenNotPaused {
        // Limit withdrawal amount
        require(_withdrawAmount <= 0.1 ether);
        // Send the amount to the address that requested it
        _to.transfer(_withdrawAmount);
    }
    // Accept any incoming amount
    receive() external payable {}
}
By inheriting Pausable, which in turn inherits Owned, the Faucet contract can now use the whenNotPaused modifier, whose output can be controlled by the owner defined through the Owned contract constructor. The functionality is the same as if those functions were within Faucet, but thanks to this modular architecture, we can reuse functions and modifiers in other contracts without writing them again. Code reuse and modularity make our code cleaner, easier to read, and easier to audit.
Sometimes we might need to change some functionality of an inherited contract. Fortunately, Solidity comes with the right feature for us: function overriding. A function declared as virtual can be overridden by a contract higher in the inheritance chain, keeping the inheritance approach highly flexible.
Let’s see an example. Suppose we want to make the pausable feature one way: once paused, the contract cannot be unpaused anymore. In order to do this, we need to mark the unpause function in the Pausable contract as virtual and redeclare the unpause function in the Faucet contract with the override attribute, defining the new desired behavior, which is to revert:
contract Pausable is Owned {
    bool paused;
    // Status check modifier
    modifier whenNotPaused {
        require(paused == false);
        _;
    }
    // Functions to pause/unpause user operations
    function pause() public virtual onlyOwner {
        paused = true;
    }
    function unpause() public virtual onlyOwner {
        paused = false;
    }
}
contract Faucet is Pausable {
    // Give out ether to anyone who asks
    function withdraw(uint _withdrawAmount, address payable _to) public whenNotPaused {
        // Limit withdrawal amount
        require(_withdrawAmount <= 0.1 ether);
        // Send the amount to the address that requested it
        _to.transfer(_withdrawAmount);
    }
    function unpause() public view override onlyOwner {
        revert("Disabled feature”);
    }
    // Accept any incoming amount
    receive() external payable {}
}
As you can see, the unpause() function in Faucet has to be declared with the override keyword. In the Pausable contract, we marked both pause and unpause functions as virtual for consistency, while in our case we only needed to change unpause.
Note
When we override a function in Solidity, we can only make the visibility more accessible—specifically, we can change it from external to public but not the other way around. For mutability, we can tighten it up, like moving from nonpayable to view or pure (as we did with
unpause) and from view to pure. But there’s one big exception: if a function is marked as payable, it has to stay that way—we can’t change it to anything else.
Multiple Inheritance
When we use multiple inheritance in Solidity, it relies on something called the C3 linearization algorithm to figure out the order in which contracts are inherited. This algorithm ensures that inheritance order is strict and predictable, which helps avoid issues like cyclic inheritance. In its simplest form, we can say that it figures out the order in which base contracts are checked when looking for a function, and this order goes from right to left. That means the contract on the right is considered the “most derived.” For example, in the contract declaration contract C is A, B { }, contract B is more derived than contract A.
Now, besides using the C3 linearization, Solidity has additional safeguards in place. One key rule is that if multiple contracts have the same function, we have to explicitly state which contracts are being overridden. Let’s walk through an example:
contract A {
    function foo() public virtual returns(string memory){
        return "A";
    }
}
contract B {
    function foo() public virtual returns(string memory){
        return "B";
    }
}
contract C is A, B {
}
At first glance, this looks like it should work fine because the C3 linearization should handle everything. But in reality, it won’t compile. Solidity will throw an error that says, “TypeError: Derived contract must override function foo. Two or more base classes define a function with the same name and parameter types.” To fix the issue we need to explicitly override the foo() function from both A and B like this:
contract C is A, B {
    function foo() public override(A, B) returns(string memory){
        return "C";
    }
}
So even though Solidity uses C3 linearization, we don’t really need to worry about it for the most part while coding because Solidity forces us to handle function overrides explicitly.
However, one place where C3 linearization matters is when Solidity decides the order of constructor execution. The constructors follow the C3 linearized order, but here’s the twist: they’re executed in reverse. This makes sense if you think about it: the most derived contract’s constructor should run last because it might override things that earlier constructors set up. Let’s look at an example:
contract Base{
    uint x;
}
contract Derived1 is Base{
    constructor(){
        x = 1;
    }
}
contract Derived2 is Base{
    constructor(){
        x = 2;
    }
}
contract Derived3 is Derived1, Derived2 {
    uint public y;
    constructor() Derived1() Derived2() {
        y = x;
    }
}
In this case, the value of y will end up being 2, as expected, because Derived2’s constructor runs last and sets x to 2.
Something important to keep in mind is that the order in which you provide constructor arguments doesn’t affect the execution order. For example, we can flip the constructor calls like this:
contract Derived3 is Derived1, Derived2 {
    uint public y;
    constructor() Derived2() Derived1() { // we switched the order here
        y = x;
    }
}
Even though we changed the order in the constructor, the result will still be the same. The value of y will be 2 because the constructor-execution order is determined by the C3 linearization, not the order we call the constructors in.
A final heads-up: Solidity’s use of C3 linearization for multiple inheritance can make the super keyword behave in ways you might not expect. Sometimes, calling super might trigger a function from a sibling class instead of the direct parent. This can lead to some surprising results where a method gets called from a class you didn’t even list in the inheritance chain. It’s a bit of an edge case, so we won’t go too deep into it, but definitely keep this in mind when using the super keyword in contracts with complex inheritance setups.
Error Handling
A contract call can terminate and return an error. Error handling in Solidity is handled by three functions: assert, require, and revert.
When a contract terminates with an error, all the state changes (changes to variables, balances, etc.) are reverted, all the way up the chain of contract calls if more than one contract was called. This ensures that transactions are atomic, meaning they either complete successfully or have no effect on state and are reverted entirely.
The assert and require functions operate in the same way, evaluating a condition and stopping execution with an error if the condition is false. By convention, assert is used when the outcome is expected to be true, meaning that we use assert to test internal conditions. By comparison, require is used when testing inputs (such as function arguments or transaction fields), setting our expectations for those conditions. It’s also worth noting that assert behaves differently from require when it fails: it consumes all remaining gas. That makes it more expensive when triggered, and it’s one reason why we typically reserve it for invariants that should never break.
We’ve used require in our function modifier onlyOwner to test that the message sender is the owner of the contract:
require(msg.sender == owner);
The require function acts as a gate condition, preventing execution of the rest of the function and producing an error if it is not satisfied. It can also include a helpful text message that can be used to show the reason for the error. The error message is recorded in the transaction log, and its adoption is suggested in order to improve the user experience by letting users know what the error is and how to fix it. So we can improve our code by adding an error message in our require function:
require(msg.sender == owner, "Only the contract owner can call this function");
The revert function halts the execution of the contract and reverts any state changes. It can be used in two ways: either as a statement with a custom error passed directly without parentheses or as a function with parentheses that takes a string argument. The custom error would be much cheaper in terms of gas cost, while both the error string and the custom error are recorded in the transaction log:
revert();
revert("Error string");
revert CustomError(arg1, arg2);
Certain conditions in a contract will generate errors regardless of whether we explicitly check for them. For example, in our Faucet contract, we don’t check whether there is enough ether to satisfy a withdrawal request. That’s because the transfer function will fail with an error and revert the transaction if there is insufficient balance to make the transfer:
payable(msg.sender).transfer(withdrawAmount);
However, it might be better to check explicitly and provide a clear error message on failure. We can do that by adding a require statement before the transfer:
require(this.balance >= withdrawAmount,
 "Insufficient balance in faucet for withdrawal request");
payable(msg.sender).transfer(withdrawAmount);
Additional error-checking code like this will increase gas consumption slightly, but it offers better error reporting than if omitted. While minimizing gas consumption used to be a mandatory activity due to high costs on Ethereum mainnet, the introduction of EIP-4844 has significantly reduced that cost, making gas consumption less of a pressing issue today. However, it’s still important to strike the right balance between gas efficiency and thorough error checking.
Solidity gives us even more control over error handling through the try/catch functionality. This is a very handy feature that lets us handle errors more gracefully when we’re calling external contracts. Instead of our entire transaction failing and reverting when something goes wrong, we can catch the error and decide what to do next. When we use try/catch, we basically wrap the external call in a try block. If the call is successful, the code inside the try block executes as normal. But if something goes wrong—like the called contract running out of gas, hitting a require statement, or throwing an exception—the code jumps to the catch block, where we can handle the error.
Here’s a simple example:
function sampleExternalCall(address target, uint amount) public {
    try ITargetContract(target).someFunction(amount) {
        // This runs if the call is successful
        emit Success("Call succeeded!");
    } catch {
        // This runs if the call fails
        emit Error("Call failed!");
    }
}
We can catch errors in different ways depending on the type of error. The basic catch block catches all errors, but we can also catch specific errors. For instance, we can catch errors that return an error string using catch Error(string memory reason), or we can handle low-level errors that return no data with catch (bytes memory lowLevelData). Additionally, we can catch more serious panic errors, such as overflows or division by zero, using catch Panic(uint errorCode).
Try/catch works only with external calls. It doesn’t help with internal function calls within the same contract. If a function in the same contract fails, it will still revert as usual, and we can’t catch that with try/catch.
Events
When a transaction completes (successfully or not), it produces a transaction receipt. The transaction receipt contains log entries that provide information about the actions that occurred during the execution of the transaction. Events are the Solidity high-level objects that are used to construct these logs.
Events are especially useful for light clients and DApp services, which can “watch” for specific events and report them to the user interface or make a change in the state of the application to reflect an event in an underlying contract.
Event objects take arguments that are serialized and recorded in the transaction logs, in the blockchain. You can supply the keyword indexed before an argument to make the value part of an indexed table (hash table) that can be searched or filtered by an application.
Adding events
We have not added any events in our Faucet example so far, so let’s do that. We will add two events: one to log any withdrawals and one to log any deposits. We will call these events Withdrawal and Deposit, respectively. First, we define the events in the Faucet contract:
contract Faucet is Pausable {
 event Withdrawal(address indexed to, uint amount);
 event Deposit(address indexed from, uint amount);
 [...]
}
We’ve chosen to make the addresses indexed, to allow searching and filtering in any user interface built to access our Faucet.
Next, we use the emit keyword to incorporate the event data in the transaction logs:
// Give out ether to anyone who asks
function withdraw(uint withdrawAmount) public {
 [...]
 payable(msg.sender).transfer(withdrawAmount);
 emit Withdrawal(msg.sender, withdrawAmount);
}
// Accept any incoming amount
receive() external payable {
 emit Deposit(msg.sender, msg.value);
}
The resulting Faucet.sol contract looks like Example 7-3.
Example 7-3. Faucet.sol: Revised Faucet contract, with events
// Version of Solidity compiler this program was written for
pragma solidity 0.8.26;
// SPDX-License-Identifier: GPL-3.0
contract Owned {
    address owner;
    // Contract constructor: set owner
    constructor() {
        owner = msg.sender;
    }
    // Access control modifier
    modifier onlyOwner {
        require(msg.sender == owner);
        _;
    }
}
contract Pausable is Owned {
    event Paused();
    event Unpaused();
    bool paused;
    // Status check modifier
    modifier whenNotPaused {
        require(paused == false);
        _;
    }
    // Functions to pause/unpause user operations
    function pause() public onlyOwner {
        paused = true;
        emit Paused();
    }
    function unpause() public onlyOwner {
        paused = false;
        emit Unpaused();
    }
}
contract Faucet is Pausable {
    event Withdrawal(address indexed to, uint amount);
    event Deposit(address indexed from, uint amount);
    // Give out ether to anyone who asks
    function withdraw(uint withdrawAmount) public whenNotPaused {
        // Limit withdrawal amount
        require(withdrawAmount <= 0.1 ether);
        // Send the amount to the address that requested it
        payable(msg.sender).transfer(withdrawAmount);
        emit Withdrawal(msg.sender, withdrawAmount);
    }
    // Accept any incoming amount
    receive() external payable {
        emit Deposit(msg.sender, msg.value);
    }
}
Catching events
Let’s walk through how we can catch on-chain events with some code. Specifically, we’ll write a script to monitor USDT token transfers on the Ethereum mainnet. To do this, we need a Web3 library, and while web3.js was the first to become popular, ethers.js has overtaken it in recent years. As developers, we prefer ethers.js, so that’s what we’ll use here.
First, let’s set up our project. Start by creating a new project folder, then install the ethers library by running:
npm i ethers
Next, we need the USDT contract’s ABI. You can grab it from Etherscan, right below the contract source code (see Figure 7-1), and save it in your project folder.
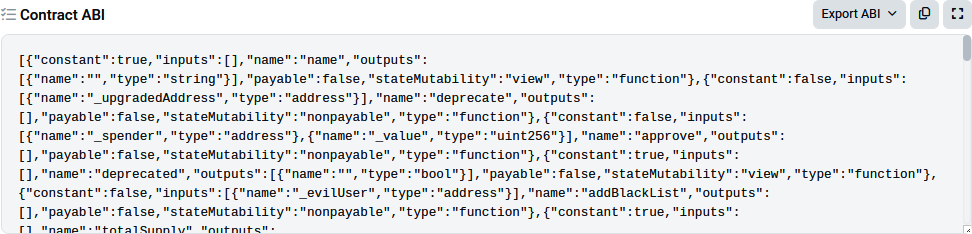
Figure 7-1. Etherscan’s USDT ABI section
Now, let’s talk about how we’ll connect to the Ethereum network. We need a WebSocket provider because we’re listening for events, which requires a continuous connection. You can choose between paid providers (which are more reliable and faster) or free, public ones you can find on websites like ChainList. For our example, a public one will do just fine, even though they might be rate limited.
Note
To listen for events, we need a WebSocket, not an RPC endpoint. RPC endpoints are great for single requests like calling a function or fetching data, but for catching events, a WebSocket connection is what allows us to keep an open line of communication between our client and the server.
Now, let’s dive into the code:
const ethers = require("ethers");
const ABI = require("./USDTabi.json"); // the ABI we fetched from etherscan
const usdtAddress = "0xdac17f958d2ee523a2206206994597c13d831ec7"; // USDT Contract
const wssProviderURL = "wss://ethereum-rpc.publicnode.com"; // a public websocket provider
const wssProvider = new ethers.providers.WebSocketProvider(wssProviderURL);
const usdtContract = new ethers.Contract(usdtAddress, ABI, wssProvider);
async function getTransfer(){
    usdtContract.on("Transfer", (from, to, value, event)=>{
        let transferEvent ={
            from: from,
            to: to,
            value: value,
            eventData: event,
        }
        console.log(JSON.stringify(transferEvent, null, 2))
    })
}
getTransfer()
After we declare the USDT address and the WebSocket provider URL, the script kicks off by creating a new WebSocketProvider instance using the ethers library. This provider connects us to the Ethereum network via the WebSocket URL we specified. Next, we use the ethers.Contract class to create an instance of the USDT smart contract. We pass in the USDT address, the ABI, and our WebSocket provider.
Now we get to the heart of the script. We set up an event listener on the contract instance to catch Transfer events emitted by the USDT contract. Whenever a Transfer event occurs, this listener triggers a callback function that receives four parameters related to the transfer. Inside the callback, we take the transfer details, wrap them up in an object, and then format this object as a JSON string. Finally, we print that JSON string to the console using console.log so that we can see exactly what’s happening with each transfer in real time.
Here’s a sample output of our script:
{
  "from": "0xc169e35abb35f8e712eCF9F6d9465C96962CA383",
  "to": "0x7E73F680243A93a9D98C5Ce4b349451805fc37ca",
  "value": {
    "type": "BigNumber",
    "hex": "0x55b27b90"
  },
  "eventData": {
    "blockNumber": 20687220,
    "blockHash": "0xa5c3c518d7246e516e076ef8d43c387dcb54d06702e9e059c583ce28a7a271b8",
    "transactionIndex": 166,
    "removed": false,
    "address": "0xdAC17F958D2ee523a2206206994597C13D831ec7",
    "data": "0x0000000000000000000000000000000000000000000000000000000055b27b90",
    "topics": [
      "0xddf252ad1be2c89b69c2b068fc378daa952ba7f163c4a11628f55a4df523b3ef",
      "0x000000000000000000000000c169e35abb35f8e712ecf9f6d9465c96962ca383",
      "0x0000000000000000000000007e73f680243a93a9d98c5ce4b349451805fc37ca"
    ],
    "transactionHash":
      "0xb527a5a18f10ed9b65dda7a914715a0b0bbfd6db053d8f6b35805ad49a588cfd",
    "logIndex": 300,
    "event": "Transfer",
    "eventSignature": "Transfer(address,address,uint256)",
    "args": [
      "0xc169e35abb35f8e712eCF9F6d9465C96962CA383",
      "0x7E73F680243A93a9D98C5Ce4b349451805fc37ca",
      {
        "type": "BigNumber",
        "hex": "0x55b27b90"
      }
    ]
  }
}
Events like these are incredibly useful, not just for off-chain communication but also for debugging. When you’re developing, you can find these events in the transaction receipt under the “logs” entry, which can be a lifesaver when things aren’t working as expected.
Calling Other Contracts
Calling other contracts from within your contract is a very useful but potentially dangerous operation. We’ll examine the various ways you can achieve this and evaluate the risks of each method. In short, the risks arise from the fact that you may not know much about a contract you are calling into or one that is calling into your contract. When writing smart contracts, you must keep in mind that while you may mostly expect to be dealing with EOAs, there is nothing to stop arbitrarily complex and perhaps malign contracts from calling into and being called by your code.
Creating a new instance
The safest way to call another contract is if you create that other contract yourself. That way, you are certain of its interfaces and behavior. To do this, you can simply instantiate it using the keyword new, as in other object-oriented languages. In Solidity, the keyword new will create the contract on the blockchain and return an object that you can use to reference it. Let’s say you want to create and call a Faucet contract from within another contract called Token:
contract Token is Pausable {
    Faucet _faucet;
    constructor() {
        _faucet = new Faucet();
    }
}
This mechanism for contract construction ensures that you know the exact type of the contract and its interface. The contract Faucet must be defined within the scope of Token, which you can do with an import statement if the definition is in another file:
import "Faucet.sol";
contract Token is Pausable {
    Faucet _faucet;
    constructor() {
        _faucet = new Faucet();
    }
}
You can optionally specify the value of ether transfer on creation and pass arguments to the new contract’s constructor:
import "Faucet.sol";
contract Token is Pausable {
    Faucet _faucet;
    constructor() {
        _faucet = new Faucet{value: 0.5 ether}();
    }
}
Note that this would require the Faucet constructor to be payable!
You can also then call the Faucet functions. In this example, we call the changeOwner function of Faucet from within the changeOwner function of Token:
import "Faucet.sol";
contract Token is Pausable {
    Faucet _faucet;
    constructor() {
         _faucet = new Faucet{value: 0.5 ether}();
    }
    function changeOwner(address newOwner) onlyOwner {
        _faucet.changeOwner(newOwner);
    }
}
It’s important to understand that while you are the owner of the Token contract, the Token contract itself owns the new Faucet contract, not you! As we saw earlier in this chapter, during an external call the msg.sender will change; in our case, in the Faucet execution context, it will be the Token address.
Addressing an existing instance
Another way you can call a contract is by casting the address of an existing instance of the contract. With this method, you apply a known interface to an existing instance. It is therefore critically important that you know, for sure, that the instance you are addressing is in fact of the type you assume. Let’s look at an example:
import "Faucet.sol";
contract Token is Pausable {
    Faucet _faucet;
    constructor(address _f) {
        _faucet = Faucet(_f);
        _faucet.withdraw(0.1 ether)
    }
}
Here, we take an address provided as an argument to the constructor, _f, and we cast it to a Faucet object. This is much riskier than the previous mechanism because we don’t know for sure whether that address actually is a Faucet object. When we call withdraw, we are assuming that it accepts the same arguments and executes the same code as our Faucet declaration, but we can’t be sure. For all we know, the withdraw function at this address could execute something completely different from what we expect, even if it is named the same. Using addresses passed as input and casting them into specific objects is therefore much more dangerous than creating the contract yourself.
Raw call, delegatecall, and staticcall
Solidity offers some even more “low-level” functions for calling other contracts. These correspond directly to EVM opcodes of the same name and allow us to construct a contract-to-contract call manually. As such, they represent the most flexible and the most dangerous mechanisms for calling other contracts. They return two values: bool success indicating whether the operation was successful and bytes memory data containing the return data.
Here’s the same example using a call method:
contract Token is Pausable {
    constructor(address _faucet) {
        _faucet.call(abi.encodeWithSignature("withdraw(uint256)", 0.1 ether));
    }
}
As you can see, this type of call is a blind call into a function, very much like constructing a raw transaction, only from within a contract’s context. The call function will return false if there is a problem, so you can evaluate the return value for error handling:
contract Token2 is Pausable {
    constructor(address _faucet) {
        (bool res, ) = _faucet.call(
            abi.encodeWithSignature("withdraw(uint256)", 0.1 ether)
        );
        if (!res) {
            revert("Withdrawal from faucet failed");
        }
    }
}
Variants of call are staticcall and delegatecall. As mentioned in the section “Address object”, staticcall invokes a function on another contract in a way that guarantees no state changes. This means that the called function cannot modify any state variables, interact with the blockchain’s state, or send ether.
A delegatecall is different from a call in that the msg context does not change. For example, whereas a call changes the value of msg.sender to be the calling contract, a delegatecall keeps the same msg.sender as in the calling contract. Essentially, delegatecall runs the code of another contract inside the context of the execution of the current contract. It is most often used to invoke code from a library. It also allows you to draw on the pattern of using library functions stored elsewhere but have that code work with the storage data of your contract; a clear example of this is the proxy pattern. The delegatecall should be used with great caution. It can have some unexpected effects, especially if the contract you call was not designed as a library.
Let’s use an example contract to demonstrate the various call semantics used by call and delegatecall for calling libraries and contracts. In Example 7-4, we use an event to log the details of each call and see how the calling context changes depending on the call type.
Example 7-4. CallExamples.sol: An example of different call semantics
pragma solidity 0.8.26;
contract CalledContract {
    event callEvent(address sender, address origin, address from);
    function calledFunction() public {
        emit callEvent(msg.sender, tx.origin, address(this));
    }
}
library CalledLibrary {
    event callEvent(address sender, address origin, address from);
    function calledFunction() public {
        emit callEvent(msg.sender, tx.origin, address(this));
    }
}
contract Caller {
    function makeCalls(CalledContract _calledContract) public {
        // Calling CalledContract and CalledLibrary directly
        _calledContract.calledFunction();
        CalledLibrary.calledFunction();
        // Low-level calls using the address object for CalledContract
        (bool res, ) = address(_calledContract).
            call(abi.encodeWithSignature("calledFunction()"));
        require(res);
        (res, ) = address(_calledContract).
            delegatecall(abi.encodeWithSignature("calledFunction()"));
        require(res);
    }
}
As you can see in this example, our main contract is Caller, which calls a library CalledLibrary and a contract CalledContract. Both the called library and the contract have identical calledFunction functions, which emit an event calledEvent. The event calledEvent logs three pieces of data: msg.sender, tx.origin, and this. Each time calledFunction is called, it may have a different execution context (with different values for potentially all the context variables), depending on whether it is called directly or through delegatecall.
In Caller, we first call the contract and library directly by invoking calledFunction in each. Then, we explicitly use the low-level functions call and delegatecall to call CalledContract.calledFunction. This way, we can see how the various calling mechanisms behave.
Let’s deploy the contracts, run the makeCalls function, and capture the events. For clarity, we will replace the address with their labels (e.g., CALLER_CONTRACT_ADDRESS).
We called the makeCalls function and passed the address of CalledContract, then caught the four events emitted by each of the different calls. Let’s look at the makeCalls function and walk through each step.
The first call is:
_calledContract.calledFunction();
Here, we’re calling CalledContract.calledFunction directly using the high-level ABI for calledFunction. The arguments of the event emitted are:
{
    sender: 'CALLER_CONTRACT_ADDRESS',
    origin: 'EOA_ADDRESS',
    from: 'CALLED_CONTRACT_ADDRESS'
}
As you can see, msg.sender is the address of the Caller contract. The tx.origin is the address of our account, web3.eth.accounts[0], that sent the transaction to Caller. The event was emitted by CalledContract, as we can see from the last argument in the event.
The next call in makeCalls is to the library:
CalledLibrary.calledFunction();
It looks identical to how we called the contract but behaves very differently. Let’s look at the second event emitted:
{
    sender: 'EOA_ADDRESS',
    origin: 'EOA_ADDRESS',
    from: 'CALLER_CONTRACT_ADDRESS'
}
This time, the msg.sender is not the address of Caller. Instead, it is the address of our account and is the same as the transaction origin. That’s because when you call a library, the call is always delegatecall and runs within the context of the caller. So, when the CalledLibrary code was running, it inherited the execution context of Caller as if its code were running inside Caller. The variable this (shown as from in the event emitted) is the address of Caller, even though it is accessed from within CalledLibrary.
The next two calls, using the low-level call and delegatecall, verify our expectations, emitting events that mirror what we just saw.
Gas Considerations
Gas, described in more detail in Chapter 14, is an incredibly important consideration in smart contract programming. Gas is a resource constraining the maximum amount of computation that Ethereum will allow a transaction to consume. If the gas limit is exceeded during computation, the following series of events occurs:
- An “out of gas” exception is thrown.
- The state of the contract prior to execution is restored (reverted).
- All ether used to pay for the gas is taken as a transaction fee; it is not refunded.
Best Practices
Because gas is paid by the user who initiates the transaction, users are discouraged from calling functions that have a high gas cost. It is thus in the programmer’s best interest to minimize the gas cost of a contract’s functions. To this end, there are certain practices that are recommended when constructing smart contracts so as to minimize the gas cost of a function call:
Avoid dynamically sized arrays
Any loop through a dynamically sized array where a function performs operations on each element or searches for a particular element introduces the risk of using too much gas. Indeed, the contract may run out of gas before finding the desired result or before acting on every element, thus wasting time and ether without giving any result at all.
Avoid calls to other contracts
Calling other contracts, especially when the gas cost of their functions is not known, introduces the risk of running out of gas. Avoid using libraries that are not well tested and broadly used. The less scrutiny a library has received from other programmers, the greater the risk of using it.
Avoid redundant storage access
Accessing storage variables, whether for reading or writing, costs a lot more gas than working with memory variables. So whenever we can, it’s better to avoid using storage directly. For example, if we need to read a storage variable several times during some calculations, it’s a good idea to first copy its value into a memory variable. This way, we can repeatedly access the cheaper memory variable instead of hitting the storage every time, saving on gas costs.
Note
To put this in context, Solidity uses several places to keep data: storage, which is persistent and expensive; memory, which is temporary and cheaper during execution; calldata, which is a read-only area used mainly for external function inputs; and the stack, which is used for very short-lived values and is the cheapest to access. Choosing the right one depends on how the data is used, whether it needs to persist, whether it’s mutable, and whether it’s passed from outside. We’ll dive deeper into these distinctions in Chapter 14, but it’s helpful to start thinking early about how they affect performance and cost.
Estimating Gas Cost
When Ethereum first launched, estimating gas costs was a bit like trying to guess the winning bid at an auction. It was similar to how Bitcoin handles transaction fees: we would set our own gas price, and miners would prioritize transactions with the highest bids. This meant that during busy times, we often had to offer more just to make sure our transactions went through quickly. It worked, but it also meant gas prices could be all over the place—sometimes sky-high when the network was congested.
Then in 2021 came EIP-1559, which changed the game. Instead of us having to guess the right gas price, Ethereum introduced a base fee that adjusts automatically based on network activity. This makes gas fees way more predictable. Plus, we can still add a tip (called a priority fee) to speed things up if we’re in a hurry. Now estimating gas costs is more straightforward, and we’re less likely to overpay just to get our transaction processed.
Let’s explore in detail how we can estimate the gas cost of our transaction. First, every transaction has two main components for gas costs: the base fee and the priority fee:
Base fee
This is the minimum amount of gas we need to pay for our transaction to be included in a block. The base fee is automatically determined by the network and adjusts dynamically based on how busy the network is. If blocks are full, the base fee goes up; if blocks are underused, it goes down.
Priority fee (tip)
This is an extra fee we add to incentivize miners (or validators in the PoS context) to prioritize our transaction. It’s like a tip we give to get our transaction processed faster. We can set this fee ourselves, but wallet applications will suggest appropriate values according to the desired speed of transaction inclusion.
Now, the total gas cost of our transaction is calculated by multiplying the gas used (which depends on the complexity of our transaction) by the effective gas price. The effective gas price is the sum of the base fee and the priority fee.
So to estimate our gas cost, we follow these steps:
- Look at the current base fee, which we can find using gas-tracking tools like Etherscan Gas Tracker or through Web3 libraries (e.g., ethers’
maxFeePerGas()). - Choose a priority fee (or tip) depending on how fast we want our transaction to go through. If we’re in a rush, we can bump up the tip. Gas-tracking tools can help us figure out the right tip amount based on current network conditions and how quickly we need things to happen.
- Multiply the total gas price (base fee + tip) by the estimated gas usage. If we’re developers, we can calculate this estimated gas usage using Web3 libraries (e.g., ethers’
estimateGas()). But if we’re just regular users, no worries—any wallet app will handle this for us automatically when we send out a transaction.
For example, if the base fee is 20 gwei, we set a tip of 2 gwei, and our transaction uses 50,000 gas, our estimated gas cost would be:
(20 gwei + 2 gwei) × 50,000 = 1,100,000 gwei
So, that’s 1.1 million gwei, or 0.0011 ETH.
It is recommended that you evaluate the gas cost of functions as part of your development workflow to avoid any surprises when deploying contracts to the mainnet.
Conclusion
In this chapter, we started working with smart contracts in detail and explored the Solidity contract programming language. We took a simple example contract, Faucet.sol, and gradually improved it and made it more complex, using it to explore various aspects of the Solidity language. In Chapter 8, we will work with Vyper, another contract-oriented programming language. We will compare Vyper to Solidity, showing some of the differences in the design of these two languages and deepening our understanding of smart contract programming.
Chapter 8. Smart Contracts and Vyper
Vyper is a well-established contract-oriented programming language for the EVM that strives to provide superior auditability by making it easier for developers to produce intelligible code. In fact, one of the principles of Vyper is to make it virtually impossible for developers to write misleading code.
In this chapter, we will look at common problems with smart contracts, introduce the Vyper contract programming language, and compare it to Solidity, demonstrating the differences.
Vulnerabilities and Vyper
In 2023 alone, almost $2 billion were stolen because of smart contract vulnerabilities in the Ethereum ecosystem. Vulnerabilities are introduced into smart contracts via code. It can be strongly argued that these and other vulnerabilities are not introduced intentionally, but regardless, undesirable smart contract code evidently results in the unexpected loss of funds for Ethereum users, and this is not ideal. Vyper is designed to make it easier to write secure code or, equally, to make it more difficult to accidentally write misleading or vulnerable code.
Comparison to Solidity
One of the ways in which Vyper tries to make unsafe code harder to write is by deliberately omitting some of Solidity’s features. This design choice reflects Vyper’s roots in security-first principles and its inspiration from Python’s clarity and simplicity. It is important for those who are considering developing smart contracts in Vyper to understand what features Vyper does not have and why. In this section, we will explore those features and provide justification for why they have been omitted.
Despite stripping down the feature set to reduce ambiguity, Vyper has evolved to meet the practical needs of developers and auditors. For example, the original philosophy of keeping contracts in a single file helped maximize auditability, but it eventually became a bottleneck as protocols grew larger and more complex. To address this, modern Vyper introduced a sophisticated module system that allows developers to split contracts into multiple files while maintaining strict control over state access and code reuse. This module system follows composition principles rather than traditional inheritance, striking a better balance between structure and readability. Vyper has found a growing role in high-assurance use cases such as decentralized finance (DeFi) protocols and staking systems, where developers place a strong emphasis on clarity and ease of auditing.
Modifiers
As we saw in Chapter 7, in Solidity you can write a function using modifiers. For example, the following function, changeOwner, will run the code in a modifier called onlyBy as part of its execution:
function changeOwner(address _newOwner)
 public
 onlyBy(owner)
{
 owner = _newOwner;
}
This modifier enforces a rule in relation to ownership. As you can see, this particular modifier acts as a mechanism to perform a precheck on behalf of the changeOwner function:
modifier onlyBy(address _account)
{
 require(msg.sender == _account);
 _;
}
But modifiers are not just there to perform checks, as shown here. In fact, as modifiers, they can significantly change a smart contract’s environment, in the context of the calling function. Put simply, modifiers are pervasive.
Let’s look at another Solidity-style example:
enum Stages {
 SafeStage,
 DangerStage,
 FinalStage
}
uint public creationTime = block.timestamp;
Stages public stage = Stages.SafeStage;
function nextStage() internal {
 stage = Stages(uint256(stage) + 1);
}
modifier stageTimeConfirmation() {
 if (stage == Stages.SafeStage &&
 block.timestamp >= creationTime + 10 days)
 nextStage();
 _;
}
function a()
 public
 stageTimeConfirmation
 // More code goes here
{
}
On the one hand, developers should always check any other code that their own code is calling. However, it is possible that in certain situations (such as when there are time constraints or exhaustion results in lack of concentration), a developer may overlook a single line of code. This is even more likely if the developer has to jump around inside a large file while mentally keeping track of the function call hierarchy and committing the state of smart contract variables to memory.
Let’s look at the preceding example in a bit more depth. Imagine that a developer is writing a public function called a. The developer is new to this contract and is utilizing a modifier written by someone else. At a glance, it appears that the stageTimeConfirmation modifier is simply performing some checks regarding the age of the contract in relation to the calling function. What the developer may not realize is that the modifier is also calling another function, nextStage. In this simplistic demonstration scenario, simply calling the public function a results in the smart contract’s stage variable moving from SafeStage to DangerStage.
Vyper has done away with modifiers altogether. The recommendations from Vyper are as follows: if you are only performing assertions with modifiers, then simply use inline checks and asserts as part of the function; if you are modifying smart contract state and so forth, again make these changes explicitly part of the function. Doing this improves auditability and readability since the reader doesn’t have to mentally (or manually) “wrap” the modifier code around the function to see what it does.
Class Inheritance
Inheritance allows programmers to harness the power of prewritten code by acquiring preexisting functionality, properties, and behaviors from existing software libraries. Inheritance is powerful and promotes the reuse of code. Solidity supports multiple inheritance as well as polymorphism, but while these are key features of object-oriented programming, Vyper does not support them. Vyper maintains that the implementation of inheritance requires coders and auditors to jump between multiple files in order to understand what the program is doing. Vyper also takes the view that multiple inheritance can make code too complicated to understand—a view tacitly admitted by the Solidity documentation, which gives an example of how multiple inheritance can be problematic.
Inline Assembly
Inline assembly gives developers low-level access to the EVM, allowing Solidity programs to perform operations by directly accessing EVM instructions. For example, the following assembly code adds 3 to memory location 0x80:
3 0x80 mload add 0x80 mstore
This would prevent the ability to search for a variable name to locate all occurrences where the variable is read or modified. Vyper considers the loss of readability to be too high a price to pay for the extra power and thus does not support inline assembly.
Function Overloading
Function overloading allows developers to write multiple functions of the same name. Which function is used on a given occasion depends on the types of the arguments supplied. Take the following two functions, for example:
function f(uint256 _in) public pure returns (uint256 out) {
 out = 1;
}
function f(uint256 _in, bytes32 _key) public pure returns (uint256 out) {
 out = 2;
}
The first function (named f) accepts an input argument of type uint256; the second function (also named f) accepts two arguments, one of type uint256 and one of type bytes32. Having multiple function definitions with the same name taking different arguments can be confusing, so Vyper does not support function overloading.
Variable Typecasting
Vyper takes a very different approach to type conversion compared to Solidity, prioritizing explicit and safe type handling over convenience. The language requires all type conversions to be made explicitly using the built-in convert() function, which ensures that developers are always aware of when and how data types are being modified.
We can think of type conversions in two categories: those that might lose information and those that don’t. Vyper’s convert() function handles both cases, but always with explicit bounds checking to prevent unexpected behavior. For example, when converting from a larger integer type to a smaller one, Vyper will revert the transaction if the value doesn’t fit within the bounds of the target type.
The syntax for type conversion in Vyper is straightforward:
# Converting between integer types
small_value: uint8 = 42
large_value: uint256 = convert(small_value, uint256)  # Safe upcast
back_to_small: uint8 = convert(large_value, uint8)   # Bounds-checked downcast
This explicit approach means that while Vyper code may be more verbose than Solidity when dealing with type conversions, it’s also much safer. There’s no possibility of accidentally truncating values or having unexpected overflow behavior because every conversion must be intentional and explicit. The convert() function will revert the transaction if the conversion would result in data loss or if the input value is outside the valid range for the target type.
Decorators
The following decorators may be used at the start of each function:
@internal
The @internal decorator makes the function inaccessible from outside the contract. This is the default function visibility, and as such, it is optional.
@external
The @external decorator makes the function both visible and executable publicly. For example, even the Ethereum wallet will display such functions when viewing the contract.
@view
Functions with the @view decorator are not allowed to change state variables. In fact, the compiler will reject the entire program (with an appropriate error) if the function tries to change a state variable.
@pure
Functions with the @pure decorator are not allowed to read any blockchain state or make a call to nonpure methods or to other contracts.
@payable
Only functions with the @payable decorator are allowed to transfer value.
@deploy
The @deploy decorator is used to mark the constructor function of a contract. This function runs exactly once when the contract is deployed to the blockchain, typically for setting up initial state variables and configuration. In Vyper, only the __init__() function can be marked with @deploy, and this decorator is required if you want to include constructor logic in your contract.
@raw_return
Functions with the @raw_return decorator return raw bytes without applying ABI encoding. This decorator is particularly useful in proxy contracts and helper contracts where you need to forward the exact output of another contract call without wrapping it in another layer of encoding. However, there are important limitations: this decorator can be used only on @external functions. It cannot be used in interface definitions, and when calling such functions from other contracts, you should use raw_call instead of interface calls since the return data may not be ABI encoded.
@nonreentrant
The @nonreentrant decorator places a lock on a function, preventing reentrant calls to any function covered by the decorator. The reentrancy lock ensures that such functions cannot be entered again until they have finished executing. This decorator is used to prevent reentrancy attacks, where an external contract might call back into the protected functions, potentially causing unexpected behavior or contract exploits. Vyper also supports a pragma for nonreentrancy by default, making all external functions nonreentrant unless explicitly overridden. For example, if contract A uses this decorator for reentrancy protection and makes an external call to contract B, any attempt by contract B to call back into a protected function on contract A will cause the transaction to revert.
Note
This nonreentrant feature in Vyper versions 0.2.15, 0.2.16, and 0.3.0 contained a critical bug that was discovered and exploited to attack the Curve protocol in mid-2023. We will dive deeper into the reentrancy vulnerability in Chapter 9.
Vyper implements the logic of decorators explicitly. For example, the Vyper compilation process will fail if a function has both a @payable decorator and a @view decorator. This makes sense because a function that transfers value has by definition updated the state so cannot be @view. Each Vyper function must be decorated with either @external or @internal (but not both!).
Function and Variable Ordering
Vyper’s approach to scoping and declarations follows C99 scoping rules, which provide more flexibility than you might initially expect. While Vyper contracts must still be contained within a single file (unless you are using the module system), the strict ordering requirements that were present in earlier versions have been relaxed for module-scope declarations.
Variables and functions that are declared at the module scope (outside of any function body) are visible throughout the entire contract, even before their formal declaration. This means you can reference state variables and call functions before they appear in the file, similar to how many modern programming languages handle forward declarations.
Here’s a practical example showing how scoping works in modern Vyper:
# This function can reference the state variable below
@external
def get_stored_value() -> uint256:
    return self.stored_data  # References variable declared later
# This function can call the function above
@external
def check_if_positive() -> bool:
    return self.get_stored_value() > 0
# State variable declaration - accessible by functions above
stored_data: public(uint256)
However, within function scope, Vyper still maintains strict ordering rules. Local variables must be declared before use, and you cannot shadow the names of constants, immutable variables, or other module-level declarations with local variables. This scoping approach strikes a balance between Python’s flexibility and the needs of smart contract development, where clear visibility of state variables and function relationships is important for security auditing.
Compilation
The easiest way to experiment with Vyper is to use the Remix online compiler, which allows you to write and then compile your smart contracts using only your web browser (you will need to activate the vyper-remix plug-in in the plug-in manager).
Note
Vyper comes with built-in common interfaces, such as ERC-20 and ERC-721, allowing interaction with such contracts out of the box. Contracts in Vyper must be declared as global variables. An example of declaring an ERC-20 variable is as follows:
from vyper.interfaces import ERC20token: ERC20
You can also compile a contract using the command line. Each Vyper contract is saved in a file with the .vy extension. Once Vyper is installed, you can compile a contract by running the following command:
vyper ~/hello_world.vy
The compiler offers extensive output options. To get the human-readable ABI description in JSON format, use:
vyper -f abi ~/hello_world.vy
For development and testing, you’ll likely want additional outputs like bytecode, opcodes, or interface files. The compiler supports numerous output formats:
vyper -f abi,bytecode,interface,source_map ~/hello_world.vy
Modern Vyper also includes advanced optimization modes. You can optimize for gas efficiency with --optimize gas (the default) or for smaller contract sizes with --optimize codesize. The newer, experimental Venom IR pipeline can be enabled with --experimental-codegen for even better optimizations.
While Remix and the command-line compiler are excellent for learning and experimentation, developers working on larger projects typically need comprehensive development frameworks. ApeWorx (formerly Ape) provides excellent Vyper support with features like automated testing, deployment scripting, and integration with various networks. Foundry, while primarily focused on Solidity, also supports Vyper development and offers powerful testing and simulation capabilities. These frameworks provide the kind of mature development environment that professional smart contract developers need for building complex applications.
Protecting Against Overflow Errors at the Compiler Level
Overflow errors in software can be catastrophic when dealing with real value. For example, one transaction from mid-April 2018 shows the malicious transfer of more than 57,896,044,618,658,100,000,000,000,000,000,000,000,000, 000,000,000,000,000,000 BEC tokens. This transaction was the result of an integer-overflow issue in Beauty Chain’s ERC-20 token contract (BecToken.sol).
One of the core features of Vyper has always been its built-in overflow protection, which mitigates the risk of the overflow errors that have historically plagued smart contract development. Vyper’s approach to overflow protection is comprehensive: it includes SafeMath-equivalent protection that handles the necessary exception cases for integer arithmetic, ensuring that operations like addition, subtraction, multiplication, and division are safe by default and throwing exceptions when an overflow or underflow occurs. Additionally, Vyper uses clamps to enforce value limits whenever a literal constant is loaded, a value is passed to a function, or a variable is assigned.
It’s worth noting that recent versions of Solidity (0.8.0 and later) have also integrated native overflow checks at the compiler level, similar to what Vyper has provided from the beginning. This means that arithmetic operations in modern Solidity now automatically include overflow checks, significantly reducing the risk of overflow errors without requiring additional libraries like SafeMath. While this change has brought Solidity closer to Vyper’s safety-first approach, Vyper’s implementation remains more comprehensive, including the clamp operations and more consistent bounds checking throughout the language. The key difference is philosophical: Vyper was designed from the ground up with overflow protection as a core principle, while Solidity added it as an enhancement to address historical vulnerabilities. This difference in approach reflects Vyper’s broader commitment to making unsafe code harder to write by default.
Reading and Writing Data
Even though it is costly to store, read, and modify data, these storage operations are a necessary component of most smart contracts. Smart contracts can write data to two places:
Global state
The state variables in a given smart contract are stored in Ethereum’s global state trie; a smart contract can only store, read, and modify data in relation to that particular contract’s address (i.e., smart contracts cannot directly read or write to other smart contracts).
Logs
A smart contract can write to Ethereum’s chain data through log events. In Vyper, the syntax for declaring and using events is clean and straightforward, aligning with Vyper’s focus on code clarity.
Event declarations in Vyper look similar to struct declarations. For example, the declaration of an event called MyLog is written as:
event MyLog:
    arg1: indexed(address)
    arg2: uint256
    message: indexed(bytes[100])
You can have up to four indexed arguments (these become searchable topics) and any number of nonindexed arguments that become part of the event data. Indexed arguments are useful for filtering and searching events, while nonindexed arguments can contain larger amounts of data.
The execution of the log event uses the log statement with straightforward syntax:
log MyLog(msg.sender, 42, b"Hello, Vyper!")
You can also create events with no arguments using the pass statement:
event SimpleEvent: pass
# Later in your code:
log SimpleEvent()
While smart contracts can write to Ethereum’s chain data through log events, they are unable to read the on-chain log events they’ve created. However, one of the advantages of writing to Ethereum’s chain data via log events is that logs can be discovered and read on the public chain by light clients. For example, the logsBloom value in a published block can indicate whether or not a log event is present. Once the existence of log events has been established, the log data can be obtained from a given transaction receipt.
Conclusion
Vyper is a powerful and fascinating contract-oriented programming language. Its design is biased toward “correctness,” prioritizing security and simplicity. This approach may allow programmers to write better smart contracts and avoid certain pitfalls that can cause serious vulnerabilities to arise.
However, it’s important to recognize that everything has trade-offs. While Vyper’s stringent design principles enhance security and code clarity, they also limit some of the flexibility that developers may find in other languages. Additionally, Vyper is not as widely used or as developed as Solidity, which means fewer resources, libraries, and tools are available for developers. This can pose challenges for those who are looking to find community support, prebuilt solutions, and comprehensive documentation.
Next, we will look at smart contract security in more detail. Some of the nuances of Vyper design may become more apparent once you read about all the possible security problems that can arise in smart contracts.
Chapter 9. Smart Contract Security
Security is one of the most important considerations when writing smart contracts. In the field of smart contract programming, mistakes are costly and easily exploited. In this chapter, we will look at security best practices and design patterns as well as security antipatterns, which are practices and patterns that can introduce vulnerabilities into smart contracts.
As with other programs, a smart contract will execute exactly what is written, which is not always what the programmer intended. Furthermore, all smart contracts are public, and any user can interact with them simply by creating a transaction. Any vulnerability can be exploited, and losses are almost always impossible to recover. It is therefore critical to follow best practices and use well-tested design patterns.
Think of robust development as the first layer in a “Swiss cheese model” of security. Each layer of protection acts like a slice of Swiss cheese: none is flawless on its own, but together they create a stronger defense. The very first layer is following solid development practices: using reliable design patterns, writing clear and intentional code, and actively avoiding known pitfalls. This foundational layer gives us the best start in securing our contracts from vulnerabilities. Beyond this, other layers like testing, code reviews, and bug bounties add extra protection, but it all begins with our development practices.
Security Best Practices
Defensive programming is a style of programming that is particularly well suited to smart contracts. It emphasizes the following, all of which are best practices:
Minimalism/simplicity
Before even writing code, it’s worth stepping back to question whether every component is really needed. Can the design be simplified? Are certain data structures introducing unnecessary surface area? Once the architecture is settled, we should still go back through the code with a critical eye, looking for opportunities to reduce lines, eliminate edge cases, or drop nonessential features. Simpler contracts are easier to reason about, test, and audit. And while some DeFi protocols legitimately grow into a few thousand lines, it’s still worth being skeptical when someone boasts about the size of their codebase. More code often means more bugs, not more value.
Code reuse
Try not to reinvent the wheel. If a library or contract already exists that does most of what you need, reuse it. OpenZeppelin, for instance, offers a suite of contracts that are widely adopted, thoroughly tested, and continuously reviewed by the community. Within your own code, follow the DRY principle: don’t repeat yourself. If you see any snippet of code repeated more than once, ask yourself whether it could be written as a function or library and reused. Code that has been battle-tested across many deployments is almost always more secure than something you’ve just written, no matter how confident you feel about it. Beware of “not invented here” syndrome, where you are tempted to “improve” a feature or component by building it from scratch. The security risk is often greater than the improvement value. Reuse isn’t laziness. It’s smart, defensive engineering.
Code quality
Smart contract code is unforgiving. Every bug can lead to monetary loss. You should not treat smart contract programming the same way you do general-purpose programming. Writing a DApp in Solidity is not like creating a web widget in JavaScript. Rather, you should apply rigorous engineering and software development methodologies as you would in aerospace engineering or any similarly unforgiving discipline. Once you “launch” your code, there is little you can do to fix any problems. And even if the code is upgradable, you often have very little time to respond if anything goes wrong. If someone spots a bug in your project before you do, the exploit will likely unfold in a single transaction or just a few, meaning the damage is done within seconds, long before you can intervene.
Readability/auditability
Your code should be clear and easy to comprehend. The easier it is to read, the easier it is to audit. Smart contracts are public: everyone can read the bytecode, and anyone skilled enough can reverse-engineer it. Therefore, it is beneficial to develop your work in public, using collaborative and open source methodologies, to draw upon the collective wisdom of the developer community and benefit from the highest common denominator of open source development. You should write code that is well documented and easy to read, following the style and naming conventions that are part of the Ethereum community.
Test coverage
Test everything you can. Smart contracts run in a public execution environment, where anyone can execute them with whatever input they want. You should never assume that input, such as function arguments, is well formed or properly bounded or that it has a benign purpose. Test all arguments to make sure they are within expected ranges and are properly formatted before allowing execution of your code to continue.
Security Risks and Antipatterns
As a smart contract programmer, you should be familiar with the most common security risks, so you can detect and avoid the programming patterns that leave your contracts exposed to these risks. In the next several sections, we will look at different security risks, examples of how vulnerabilities can arise, and countermeasures or preventative solutions that can be used to address them.
The following antipatterns are often combined to execute an exploit, much like in Web2 security. Real-world exploits are usually more complex than the examples in this chapter.
Reentrancy
One of the features of Ethereum smart contracts is their ability to call and utilize code from other external contracts. Contracts also typically handle ether and as such, often send ether to various external user addresses. These operations require the contracts to submit external calls. These external calls can be hijacked by attackers, who can force the contracts to execute further code (through a callback: either a fallback function or some hook, usually transfer), including calls back into themselves. Attacks of this kind were used in the infamous and still remembered DAO hack from 2016. Even after all these years, we’re still seeing a lot of attacks exploiting this vulnerability, even though it’s pretty straightforward to spot and inexpensive to fix.
The vulnerability
This type of attack happens when an attacker manages to take control during the execution of another contract before that contract has finished updating its state. Since the contract is still in the middle of its process, it has not yet updated its state (e.g., critical variables). The attacker can then “reenter” the contract at this vulnerable moment, taking advantage of the inconsistent state to trigger actions that weren’t intended or expected. This reentry allows the attacker to bypass safeguards, manipulate data, or drain funds, all because the contract hasn’t fully settled into a safe, consistent state yet.
Reentrancy can be tricky to grasp without a practical example. Take a look at the simple vulnerable contract in Example 9-1, which acts as an Ethereum vault that allows depositors to withdraw only 1 ether per week.
Example 9-1. EtherStore: a contract vulnerable to reentrancy
1 contract EtherStore {
2      uint256 public withdrawalLimit = 1 ether;
3      mapping(address => uint256) public lastWithdrawTime;
4    mapping(address => uint256) balances;
5
6    function depositFunds() public payable{
7      balances[msg.sender] += msg.value;
8    }
9
10    function withdrawFunds() public {
11        require(block.timestamp >= lastWithdrawTime[msg.sender] + 1 weeks);
12        uint256 _amt = balances[msg.sender];
13        if(_amt > withdrawalLimit){
14            _amt = withdrawalLimit;
15        }
16      (bool res, ) = address(msg.sender).call{value: _amt}("");
17        require(res, "Transfer failed");
18      balances[msg.sender] -= _amt; // assume Solidity <0.8: underflow wraps (exploitable); Solidity >=0.8: reverts here
19        lastWithdrawTime[msg.sender] = block.timestamp;
20    }
21 }
This contract has two public functions, depositFunds and withdrawFunds. The depositFunds function simply increments the sender’s balance. The withdrawFunds function allows the sender to withdraw their balance. This function is intended to succeed only if a withdrawal has not occurred in the last week.
The vulnerability is in line 16, where the contract sends the user their requested amount of ether. Consider an attacker who has created the contract in Example 9-2.
Example 9-2. Attack.sol: a contract used to exploit the reentrancy vulnerability in the EtherStore contract
1 contract Attack {
2  EtherStore public etherStore;
3
4  // initialize the etherStore variable with the contract address
5  constructor(address _etherStoreAddress) {
6      etherStore = EtherStore(_etherStoreAddress);
7  }
8
9  function attackEtherStore() public payable {
10      // attack to the nearest ether
11      require(msg.value >= 1 ether, "no bal");
12      // send eth to the depositFunds() function
13      etherStore.depositFunds{value: 1 ether}();
14      // start the magic
15      etherStore.withdrawFunds();
16  }
17
18  function collectEther() public {
19      payable(msg.sender).transfer(address(this).balance);
20  }
21
22  // receive function - the fallback() function would have worked out too
23  receive() external payable {
24      if (address(etherStore).balance >= 1 ether) {
25          // reentrant call to victim contract
26          etherStore.withdrawFunds();
27      }
28  }
29 }
How might the exploit occur? First, the attacker would create the malicious contract (let’s say at the address 0x0...123) with the EtherStore’s contract address as the sole constructor parameter. This would initialize and point the public variable etherStore to the contract to be attacked.
The attacker would then call the attackEtherStore function, with some amount of ether greater than or equal to 1—let’s assume 1 ether for the time being. In this example, we will also assume a number of other users have deposited ether into this contract, so its current balance is 10 ether. The following will then occur:
- Attack.sol, line 13: The
depositFundsfunction of theEtherStorecontract will be called with amsg.valueof1 ether(and a lot of gas). The sender (msg.sender) will be the malicious contract (0x0...123). Thus,balances[0x0..123] = 1 ether. - Attack.sol, line 15: The malicious contract will then call the
withdrawFundsfunction of theEtherStorecontract. This will pass the requirement (line 11 of theEtherStorecontract) as no previous withdrawals have been made. - EtherStore.sol, line 16: The contract will send
1 etherback to the malicious contract. - Attack.sol, line 23: The payment to the malicious contract will then execute the
receivefunction. - Attack.sol, line 24: The total balance of the
EtherStorecontract was 10 ether and is now 9 ether, so thisifstatement passes. - Attack.sol, line 26: The fallback function calls the
EtherStorewithdrawFundsfunction again and reenters theEtherStorecontract. - EtherStore.sol, line 10: In this second call to
withdrawFunds, the attacking contract’s balance is still 1 ether as line 18 has not yet been executed. Thus, we still havebalances[0x0..123] = 1 ether. This is also the case for thelastWithdrawTimevariable. Again, we pass the requirement. - EtherStore.sol, line 16: The attacking contract withdraws another
1 ether. - Reenter the EtherStore contract until it is no longer the case that
EtherStore.balance >= 1, as dictated by line 24 in Attack.sol. - Attack.sol, line 24: Once there is less than 1 ether left in the
EtherStorecontract, thisifstatement will fail. This will then allow lines 17–19 of theEtherStorecontract to be executed (for each call to thewithdrawFundsfunction). - EtherStore.sol, lines 18 and 19: The
balancesandlastWithdrawTimemappings will be set, and the execution will end.
The final result is that the attacker has withdrawn all ether from the EtherStore contract in a single transaction.
While native ether transfers intercepted by fallback functions are a common vector for reentrancy attacks, they are not the only mechanism that can introduce this risk. Several token standards, like ERC-721 and ERC-777, include callback mechanisms that can also enable reentrancy attacks. For instance, ERC-721’s safeTransfer function ensures that token transfers to contracts call the recipient’s onERC721Received function. Similarly, ERC-777 tokens allow hooks to be invoked via the tokensReceived function during transfers.
Beyond the Classic Reentrancy Pattern
Reentrancy attacks aren’t limited to a single function or contract. While classic reentrancy involves reentering the same function before it finishes, there are variations that are harder to spot, such as cross-function reentrancy, cross-contract reentrancy, and, the trickiest of all, read-only reentrancy. Read-only reentrancy takes advantage of contracts that depend on view functions of other contracts. These functions don’t modify state but return data that other contracts rely on, often without reentrancy protection. The problem occurs when a reentrant call lets an attacker temporarily put the target contract into an inconsistent state, allowing them to use another contract (the victim) to query this unstable state through a view function. Let’s look at how it plays out:
- The attacker’s contract interacts with a vulnerable contract—let’s call it Contract A—which can be reentered. This contract holds data that other protocols rely on.
- Contract A triggers a callback to the attacker’s contract, allowing the attacker’s contract logic to run.
- While still in the fallback, the attacker’s contract calls a different protocol, Contract B, which is connected to Contract A and depends on the data it provides.
- Contract B, unaware of any issues, reads data from Contract A. However, the state of Contract A is outdated because it hasn’t finished updating yet.
By the time this cycle ends, the attacker has already exploited Contract B by leveraging the outdated data from Contract A and then lets the callback and original call in Contract A complete as normal. The process is illustrated in Figure 9-1.

Figure 9-1. Read-only reentrancy
The key here is that Contract B trusts the data from Contract A, but Contract A’s state hasn’t caught up, allowing the attacker to exploit the lag. This type of attack is harder to defend against because developers often don’t protect view functions with reentrancy locks, thinking they are safe since they don’t modify state. Read-only reentrancy teaches us that even read-only functions can be dangerous when they’re relied upon by external contracts.
Preventative techniques
The first best practice to follow in order to prevent reentrancy issues is sticking to the check-effect-interaction pattern when writing smart contracts. This pattern is about ensuring that all changes to state variables happen before interacting with external contracts. For instance, in the EtherStore.sol contract, the lines that modify state variables should appear before any external calls. The goal is to ensure that any piece of code interacting with external addresses is the last thing executed in the function. This prevents external contracts from interfering with the internal state upon reentering because the necessary updates have already been made.
Another useful technique is applying a reentrancy lock. A reentrancy lock is a simple state variable that “locks” the contract while it’s executing a function, preventing other external calls from interrupting. This can be implemented with a modifier like this:
contract EtherStore {
    bool lock;
      uint256 public withdrawalLimit = 1 ether;
      mapping(address => uint256) public lastWithdrawTime;
    mapping(address => uint256) balances;

      modifier nonReentrant {
      require(!lock, "Can't reenter");
      lock = true;
      _;
      lock = false;
    }

    function withdrawFunds() public nonReentrant{
        [...]
    }
}
In this example, the nonReentrant modifier uses the lock variable to prevent the withdrawFunds function from being reentered while it’s still running. The nonReentrant modifier locks the contract when it starts and unlocks it once the function finishes. However, we shouldn’t reinvent the wheel. Instead of crafting our own reentrancy locks, it’s better to rely on well-tested libraries like OpenZeppelin’s ReentrancyGuard. These libraries provide secure, gas-optimized solutions.
Note
With the advent of transient storage on Ethereum in Solidity 0.8.24, OpenZeppelin has introduced ReentrancyGuardTransient, a new variant of ReentrancyGuard that leverages transient storage for significantly lower gas costs. Transient storage, enabled by EIP-1153, provides a cheaper way to store data that’s needed only for the duration of a single transaction, making it ideal for reentrancy guards and similar temporary logic. However, ReentrancyGuardTransient can be used only on chains where EIP-1153 is available, so make sure your target chain supports this feature before implementing it.
One more approach is to use Solidity’s built-in transfer and send functions to send ether. These functions forward only a limited amount of gas (2,300 units), which typically is not enough for the receiving contract to execute a reentrant call, so they are a simple way to guard against reentrancy. However, they come with notable drawbacks. If the recipient is a smart contract with nonmalicious logic in its fallback or receive function, the transfer might fail, potentially locking funds. This risk is becoming more relevant with the introduction of EIP-7702, which allows EOAs to have attached code, including fallback logic. As more EOAs adopt this capability, transactions using transfer or send are more likely to revert during regular execution of the transactions due to insufficient gas. And from a security perspective, this approach isn’t future proof: if a future hard fork reduces the gas cost of certain operations, 2,300 units might become sufficient to reenter, breaking assumptions that were previously safe. So, while transfer and send can still be helpful in narrow cases, we need to use them with caution and not rely on them as our primary defense.
Read-only and cross-contract reentrancy deserve special attention: these exploits can be tricky because they might involve two separate protocols, making coordinated prevention a challenge. When our project relies on external protocols for data, we need to dig into how the combined logic works. Even if each project is secure on its own, vulnerabilities can pop up during integration.
Real-world example: The DAO attack
Reentrancy played a major role in the DAO attack that occurred in 2016 and was one of the major hacks during the early development of Ethereum. At the time, the contract held more than $150 million, 15% of the circulating supply of ether. To revert the effects of the hack, the Ethereum community ultimately opted for a hard fork that split the Ethereum blockchain. As a result, Ethereum Classic (ETC) continued as the original chain, while the forked version with updated rules to reverse the hack became the Ethereum we know today.
Real-world example: Libertify
A recent exploit where reentrancy was the sole attack vector is the July 2023 case involving Libertify, a DeFi protocol that was breached for $400,000. Let’s check the code of the exploited function and see how it happened:
function _deposit(
    uint256 assets,
    address receiver,
    bytes calldata data,
    uint256 nav
) private returns (uint256 shares) {
        /*
        validations
    */
    uint256 returnAmount = 0;
    uint256 swapAmount = 0;
    if (BASIS_POINT_MAX > invariant) {
        swapAmount = assetsToToken1(assets);
        returnAmount = userSwap( // External call
            data,
            address(this),
            swapAmount,
            address(asset),
            address(other)
        );
    }
    uint256 supply = totalSupply(); // State update
    if (0 < supply) {
        uint256 valueToken0 = getValueInNumeraire(
            asset,
            assets - swapAmount,
            MathUpgradeable.Rounding.Down
        );
        uint256 valueToken1 = getValueInNumeraire(
            other,
            returnAmount,
            MathUpgradeable.Rounding.Down
        );
        shares = supply.mulDiv(
            valueToken0 + valueToken1,
            nav,
            MathUpgradeable.Rounding.Down
        );
    } else {
        shares = INITIAL_SHARE;
    }
    uint256 feeAmount = shares.mulDiv(
        entryFee, BASIS_POINT_MAX, MathUpgradeable.Rounding.Down
    );
    _mint(receiver, shares - feeAmount);
    _mint(owner(), feeAmount);
}
This is a classic example of a reentrancy issue—you don’t see one this straightforward very often these days! The core problem here was the lack of reentrancy protection. The userSwap() function allowed the attacker to reenter the deposit() function before the original call updated totalSupply. This meant the attacker could mint more shares than they were actually owed, exploiting the contract for a profit.
DELEGATECALL
The CALL and DELEGATECALL opcodes are useful for allowing Ethereum developers to modularize their code. Standard external message calls to contracts are handled by the CALL opcode, which executes the code in the context of the called contract. In contrast, DELEGATECALL runs the code from another contract, but in the context of the calling contract. That means the storage, msg.sender, and msg.value all remain unchanged. A helpful way to think about DELEGATECALL is that the calling contract is temporarily borrowing the bytecode of the called contract and executing it as if it were its own. This enables powerful patterns like proxy contracts and libraries, where you deploy reusable logic once and reuse it across many contracts. Although the differences between these two opcodes are simple and intuitive, the use of DELEGATECALL can lead to subtle and unexpected behavior, especially when it comes to storage layout. For further reading, see Loi.Luu’s Ethereum Stack Exchange question on this topic and the Solidity docs.
The vulnerability
As a result of the context-preserving nature of DELEGATECALL, building vulnerability-free custom libraries is not as easy as you might think. The code in libraries themselves can be secure and vulnerability free; however, when it is run in the context of another application, new vulnerabilities can arise. Let’s see a fairly complex example of this, using Fibonacci numbers. Consider the library in Example 9-3, which can generate the Fibonacci sequence and sequences of similar form. (Note: this code was modified from https://oreil.ly/EHjOb.)
Example 9-3. FibonacciLib: a faulty implementation of a custom library
1 // library contract - calculates Fibonacci-like numbers
2 contract FibonacciLib {
3     // initializing the standard Fibonacci sequence
4     uint256 public start;
5     uint256 public calculatedFibNumber;
6
7     // modify the zeroth number in the sequence
8     function setStart(uint256 _start) public {
9         start = _start;
10     }
11
12     function setFibonacci(uint256 n) public {
13         calculatedFibNumber = fibonacci(n);
14     }
15
16     function fibonacci(uint256 n) internal view returns (uint) {
17         if (n == 0) return start;
18         else if (n == 1) return start + 1;
19         else return fibonacci(n - 1) + fibonacci(n - 2);
20     }
21 }
This library provides a function that can generate the nth Fibonacci number in the sequence. It allows users to change the starting number of the sequence (start) and calculate the nth Fibonacci-like number in this new sequence.
Let us now consider a contract that utilizes this library:
contract FibonacciBalance {
    address public fibonacciLibrary;
    // the current Fibonacci number to withdraw
    uint256 public calculatedFibNumber;
    // the starting Fibonacci sequence number
    uint256 public start = 3;
    uint256 public withdrawalCounter;
    // the Fibonacci function selector
    bytes4 constant fibSig = bytes4(keccak256("setFibonacci(uint256)"));
    // constructor - loads the contract with ether
    constructor(address _fibonacciLibrary) payable {
        fibonacciLibrary = _fibonacciLibrary;
    }
    function withdraw() public {
        withdrawalCounter += 1;
        // calculate the Fibonacci number for the current withdrawal user
        // this sets calculatedFibNumber
        (bool success, ) = fibonacciLibrary.delegatecall(
            abi.encodeWithSelector(fibSig, withdrawalCounter)
        );
        require(success, "Delegatecall failed");
        payable(msg.sender).transfer(calculatedFibNumber * 1 ether);
    }
    // allow users to call Fibonacci library functions
    fallback() external {
        (bool success, ) = fibonacciLibrary.delegatecall(msg.data);
        require(success, "Delegatecall failed");
    }
}
This contract allows a participant to withdraw ether from the contract, with the amount of ether being equal to the Fibonacci number corresponding to the participant’s withdrawal order—that is, the first participant gets 1 ether, the second also gets 1, the third gets 2, the fourth gets 3, the fifth 5, and so on (until the balance of the contract is less than the Fibonacci number being withdrawn).
There are a number of elements in this contract that may require some explanation. First, there is an interesting-looking variable: fibSig. This holds the first 4 bytes of the Keccak-256 hash of the string "setFibonacci(uint256)". This is known as the function selector and is put into calldata to specify which function of a smart contract will be called. It is used in the delegatecall on line 18 to specify that we wish to run the setFibonacci(uint256) function. The calldata also includes the parameter we are passing to the function. Second, we assume that the address for the FibonacciLib library is correctly referenced in the constructor.
Can you spot any errors in this contract? If you were to deploy this contract, fill it with ether, and call withdraw, it would likely revert.
You may have noticed that the state variable start is used in both the library and the main calling contract. In the library contract, start is used to specify the beginning of the Fibonacci sequence and is set to 0, whereas it is set to 3 in the calling contract. You may also have noticed that the fallback function in the FibonacciBalance contract allows all calls to be passed to the library contract, which allows for the setStart function of the library contract to be called. Recalling that we preserve the state of the contract, it may seem that this function would allow you to change the state of the start variable in the local FibonacciBalance contract. If so, this would allow you to withdraw more ether since the resulting calculatedFibNumber is dependent on the start variable (as seen in the library contract). In actual fact, the setStart function does not (and cannot) modify the start variable in the FibonacciBalance contract. The underlying vulnerability in this contract is significantly worse than just modifying the start variable.
Before discussing the actual issue, let’s take a quick detour to understand how state variables actually get stored in contracts. State or storage variables (variables that persist over individual transactions) are placed into slots sequentially as they are introduced in the contract. (There are some complexities here; consult the Solidity docs for a more thorough understanding.)
As an example, let’s look at the library contract. It has two state variables: start and calculatedFibNumber. The first variable, start, is stored in the contract’s storage at slot[0] (i.e., the first slot). The second variable, calculatedFibNumber, is placed in the next available storage slot, slot[1]. The function setStart takes an input and sets start to whatever the input was. This function therefore sets slot[0] to whatever input we provide in the setStart function. Similarly, the setFibonacci function sets calculatedFibNumber to the result of fibonacci(n). Again, this is simply setting storage slot[1] to the value of fibonacci(n).
Now, let’s look at the FibonacciBalance contract. Storage slot[0] now corresponds to the fibonacciLibrary address, and slot[1] corresponds to calculatedFibNumber. It is in this incorrect mapping that the vulnerability occurs: delegatecall preserves contract context. This means that code that is executed via delegatecall will act on the state (i.e., storage) of the calling contract.
Now notice that in withdraw on line 18 we execute fibonacciLibrary.delegatecall(abi.encodeWithSelector(fibSig, withdrawalCounter)). This calls the setFibonacci function, which, as we discussed, modifies storage slot[1], which in our current context is calculatedFibNumber. This is as expected (i.e., after execution, calculatedFibNumber is modified). However, recall that the start variable in the FibonacciLib contract is located in storage slot[0], which is the fibonacciLibrary address in the current contract. This means that the function fibonacci will give an unexpected result. This is because it references start (slot[0]), which in the current calling context is the fibonacciLibrary address (which will often be quite large, when interpreted as a uint). Thus, it is likely that the withdraw function will revert since it will not contain uint(fibonacciLibrary) amount of ether, which is what calculatedFibNumber will return.
Even worse, the FibonacciBalance contract allows users to call all of the fibonacciLibrary functions via the fallback function at line 25. As we discussed earlier, this includes the setStart function. We discussed that this function allows anyone to modify or set storage slot[0]. In this case, storage slot[0] is the fibonacciLibrary address. Therefore, an attacker could create a malicious contract, convert the address to a uint256 (this can be done in Python easily using int('<address>',16)), and then call setStart(<attack_contract_address_as_uint>). This will change fibonacciLibrary to the address of the attack contract. Then, whenever a user calls withdraw or the fallback function, the malicious contract will run (which can steal the entire balance of the contract) because we’ve modified the actual address for fibonacciLibrary. An example of such an attack contract would be:
contract Attack {
    uint256 private storageSlot0; // corresponds to fibonacciLibrary
    uint256 private storageSlot1; // corresponds to calculatedFibNumber
    // fallback - this will run if a specified function is not found
    fallback() external {
        storageSlot1 = 0; // we set calculatedFibNumber to 0, so if withdraw
        // is called we don’t send out any ether
        payable(<attacker_address>).transfer(this.balance); // we take all the ether
    }
}
Notice that this attack contract modifies the calculatedFibNumber by changing storage slot[1]. In principle, an attacker could modify any other storage slots they choose to perform all kinds of attacks on this contract. We encourage you to put these contracts into Remix and experiment with different attack contracts and state changes through these delegatecall functions.
It is also important to notice that when we say that delegatecall is state preserving, we are not talking about the variable names of the contract but rather the actual storage slots to which those names point. As you can see from this example, a simple mistake can lead to an attacker hijacking the entire contract and its ether.
Preventative techniques
Solidity provides the library keyword for implementing library contracts (see the docs for further details). This ensures that the library contract is stateless and non-self-destructible. Forcing libraries to be stateless mitigates the complexities of storage context demonstrated in this section. Stateless libraries also prevent attacks wherein attackers modify the state of the library directly in order to affect the contracts that depend on the library’s code. As a general rule of thumb, when you are using DELEGATECALL, pay careful attention to the possible calling context of both the library contract and the calling contract and, whenever possible, build stateless libraries.
Real-world example: Parity multisig wallet (second hack)
The second Parity multisig wallet hack is an example of how well-written library code can be exploited if it is run outside its intended context. There are a number of good explanations of this hack, such as “Parity Multisig Hacked. Again”. To add to these references, let’s explore the contracts that were exploited.
Since the exploit is seven years old, the following code snippets have been updated to reflect the syntax of recent Solidity versions, making them easier to read and understand.
The library contract is as follows:
1 contract WalletLibrary is WalletEvents {
2
3   ...
4
5   // throw unless the contract is not yet initialized.
6   modifier only_uninitialized { if (m_numOwners > 0) revert(); _; }
7
8   // constructor - just pass on the owner array to multiowned and
9   // the limit to daylimit
10   function initWallet(address[] memory _owners, uint256 _required, uint256
11        _daylimit) public only_uninitialized {
12     initDaylimit(_daylimit);
13     initMultiowned(_owners, _required);
14   }
15
16   // kills the contract sending everything to `_to`.
17   function kill(address _to) onlymanyowners(keccak256(msg.data)) external {
18     selfdestruct(_to);
19   }
20
21   ...
22
23 }
And here’s the wallet contract:
1 contract Wallet is WalletEvents {
2
3   ...
4
5   // METHODS
6
7   // gets called when no other function matches
8   fallback() external payable {
9     // just being sent some cash?
10     if (msg.value > 0)
11       Deposit(msg.sender, msg.value);
12     else if (msg.data.length > 0)
13       _walletLibrary.delegatecall(msg.data);
14   }
15
16   ...
17
18   // FIELDS
19   address constant _walletLibrary =
20     0xcafecafecafecafecafecafecafecafecafecafe;
21 }
Notice that the Wallet contract essentially passes all calls to the WalletLibrary contract via a delegate call. The constant _walletLibrary address in this code snippet acts as a placeholder for the actually deployed WalletLibrary contract (which was at 0x863DF6BFa4469f3ead0bE8f9F2AAE51c91A907b4).
The intended operation of these contracts was to have a simple, low-cost, deployable Wallet contract whose codebase and main functionality were in the WalletLibrary contract. Unfortunately, the WalletLibrary contract is itself a contract and maintains its own state. Can you see why this might be an issue?
It is possible to send calls to the WalletLibrary contract itself. Specifically, the WalletLibrary contract could be initialized and become owned. In fact, a user did this, calling the initWallet function on the WalletLibrary contract and becoming an owner of the library contract. The same user subsequently called the kill function. Because the user was an owner of the library contract, the modifier passed, and the library contract self-destructed. As all Wallet contracts in existence refer to this library contract and contain no method to change this reference, all of their functionality, including the ability to withdraw ether, was lost along with the WalletLibrary contract. As a result, all ether in all Parity multisig wallets of this type instantly became lost or permanently unrecoverable.
Note
The exploiter later appeared on GitHub, leaving the memorable comment, “I accidentally killed it.” He claimed to be a newcomer to Ethereum who had been experimenting with smart contracts.
Entropy Illusion
All transactions on the Ethereum blockchain are deterministic state transition operations. This means that every transaction modifies the global state of the Ethereum ecosystem in a calculable way, with no uncertainty. This has the fundamental implication that there is no source of entropy or randomness in Ethereum. In the early days, finding a decentralized way to create randomness was a big challenge. But over the years, we’ve developed some solid solutions to solve this problem.
The vulnerability
When developers build smart contracts on Ethereum, they often need a source of randomness, whether for games, lotteries, or other features that require unpredictability. The challenge is that Ethereum, as a blockchain, is inherently deterministic: every node must reach the same result to maintain consensus. So introducing true randomness requires a bit of creativity.
One approach many developers have resorted to is using block variables (such as block hashes, timestamps, or block numbers) as seeds to generate random numbers. These values may appear random, but they are actually controlled by the validator proposing the current block. For example, imagine a DApp where the outcome of a game is based on whether the next block hash ends in an even number. A validator could manipulate the process: if they are about to propose a block and the hash doesn’t fit their desired outcome, they could, for example, change the transaction order to change the block hash in a favorable way.
Validator manipulation isn’t the only risk when deriving randomness from block variables. Other smart contracts are aware of the value of these block variables, enabling them to interact with a vulnerable contract only when the outcome is favorable.
Preventative techniques
Compared to the past, Ethereum developers now have reliable methods for generating randomness: PREVRANDAO and verifiable random functions (VRFs).
VRFs are cryptographic proofs ensuring that the randomness generated is fair and unbiased. VRFs are supported by multiple providers, such as Chainlink. The VRF generates a random number along with a proof that verifies its fairness. This proof is verifiable by anyone, ensuring that the randomness is secure. VRFs have become a standard decentralized solution for securely obtaining randomness in smart contracts.
Another solid option is the PREVRANDAO opcode, introduced to Ethereum with the transition to PoS. This opcode is used to obtain the PREVRANDAO value, which originates from the Randao process, an integral component of PoS block production. Essentially, Randao is a collective effort by validators to generate randomness by each contributing a piece of data. PREVRANDAO is the result of this process from the previous block, and it serves as a reliable source of randomness. It’s trustworthy because manipulating the PREVRANDAO value would require compromising a significant number of validators, making such exploitation impractical and economically unfeasible. Developers can use this value in their contracts, but they should keep in mind that PREVRANDAO represents the value from the previous block, which is already known. To avoid this value being predictable at the time of commitment, smart contracts should instead commit to the PREVRANDAO value of a future block. This way, the value won’t be known when the commitment is made.
Warning
Randao can be manipulated if an attacker gains control of the proposers assigned to the final slots in an epoch. To decide if
PREVRANDAOis a reliable choice for generating randomness in your smart contract, you should carefully weigh the costs and benefits of its manipulation. Although tampering with Randao can be expensive, if your contract involves valuable assets, it’s safer to use a decentralized oracle solution instead.
With solutions like PREVRANDAO and VRFs widely documented and accessible, it’s uncommon nowadays to see developers using insecure block variables as a randomness source. However, mistakes still occur when shortcuts are taken or when developers are unaware of these tools.
Real-world example: Fomo3D
Fomo3D was an Ethereum lottery game where players bought “keys” to extend a timer, competing to be the last buyer when the timer hit zero to win the prize pool. It included an airdrop feature with poor randomness, as shown in the following code:
function airdrop()
        private
        view
        returns(bool)
    {
        uint256 seed = uint256(keccak256(abi.encodePacked(

            (block.timestamp).add
            (block.difficulty).add
            ((uint256(keccak256(abi.encodePacked
            (block.coinbase)))) / (block.timestamp)).add
            (block.gaslimit).add
            ((uint256(keccak256(abi.encodePacked
            (msg.sender)))) / (block.timestamp)).add
            (block.number)
        )));
        if((seed - ((seed / 1000) * 1000)) < airDropTracker_) {
            return(true);
        } else {
            return(false);
        }
    }
A malicious contract would know in advance the values used to compute the seed, allowing it to trigger the airdrop function only when it would result in a win. It’s no surprise the contract was exploited.
Unchecked CALL Return Values
There are a number of ways to perform external calls in Solidity. Sending ether to external accounts is commonly performed via the transfer method. However, the send function can also be used, and for more versatile external calls, the CALL opcode can be directly employed in Solidity. The call and send functions return a Boolean indicating whether the call succeeded or failed. Thus, these functions have a simple caveat, in that the transaction that executes these functions will not revert if the external call (initialized by call or send) fails; rather, the functions will simply return false. A common error is that the developer expects a revert to occur if the external call fails and does not check the return value.
The vulnerability
Consider the contract in Example 9-4.
Example 9-4. Vulnerable Lotto contract
1 contract Lotto {
2
3     bool public payedOut;
4     address public winner;
5     uint256 public winAmount;
6
7     // ... extra functionality here
8
9     function sendToWinner() public {
10         require(!payedOut);
11         payable(winner).send(winAmount);
12         payedOut = true;
13     }
14
15     function withdrawLeftOver() public {
16         require(payedOut);
17         payable(msg.sender).send(address(this).balance);
18     }
19 }
This represents a Lotto-like contract, where a winner receives winAmount of ether, which typically leaves a little left over for anyone to withdraw. The vulnerability exists on line 11, where a send is used without checking the response. In this trivial example, a winner whose transaction fails (either by running out of gas or by being a contract that intentionally throws in the fallback function) allows payedOut to be set to true regardless of whether ether was sent or not. In this case, anyone can withdraw the winner’s winnings via the withdrawLeftOver function.
Preventative techniques
The first line of defense is always to check the return value of the send function and low-level calls, with no exceptions. Nowadays, any static analysis tool will flag this issue, making it hard to overlook.
When sending ether, we need to carefully consider which method to use. If we want the transaction to automatically revert on failure, transfer might seem appealing because it handles failure by default. But since both send and transfer forward only 2,300 gas units, they can easily fail when the recipient (whether a contract or, now with EIP-7702, even an EOA) has any fallback logic. Given this evolving context, the safer and more flexible approach is to use call instead, explicitly check its return value, and manage errors accordingly. That gives us full control over gas forwarding and keeps our contracts compatible with a wider range of recipients.
Real-world example: Etherpot and King of the Ether
Etherpot was a smart contract lottery, not too dissimilar to the contract in Example 9-4. The downfall of this contract was primarily due to incorrect use of block hashes (only the last 256 block hashes are usable; see “Predefined Global Variables and Functions”). However, this contract also suffered from an unchecked call value.
Consider the function cash in Example 9-5: again, the following code snippet has been updated to reflect the syntax of recent Solidity versions.
Example 9-5. Lotto.sol: code snippet
1 function cash(uint256 roundIndex, uint256 subpotIndex) public {
2    uint256 subpotsCount = getSubpotsCount(roundIndex);
3    if(subpotIndex>=subpotsCount)
4        return;
5    uint256 decisionBlockNumber = getDecisionBlockNumber(roundIndex,subpotIndex);
6    if(decisionBlockNumber>block.number)
7        return;
8    if(rounds[roundIndex].isCashed[subpotIndex])
9        return;
10    //Subpots can only be cashed once. This is to prevent double payouts
11    address winner = calculateWinner(roundIndex,subpotIndex);
12    uint256 subpot = getSubpot(roundIndex);
13    payable(winner).send(subpot);
14    rounds[roundIndex].isCashed[subpotIndex] = true;
15    //Mark the round as cashed
16 }
Notice that on line 13, the send function’s return value is not checked, and the following line then sets a Boolean indicating that the winner has been sent their funds. This bug can allow a state where the winner does not receive their ether but the state of the contract can indicate that the winner has already been paid.
A more serious version of this bug occurred in the King of the Ether contract. An excellent postmortem of this contract has been written that details how an unchecked, failed send could be used to attack the contract.
The ERC-20 case
When dealing with ERC-20 tokens in Solidity, simply checking the return value of token transfers isn’t enough to ensure safe interactions. This is because not all ERC-20 tokens strictly follow the ERC-20 standard, especially older tokens. Some tokens return a Boolean value upon completion of a transfer rather than revert or throw exceptions directly when the operation fails. Others might not return any value at all, leading to ambiguous behavior when interacting with them using the standard methods. Tether (USDT) is a prominent example of a widespread token that does not fully conform to the ERC-20 standard.
To mitigate this, we use libraries like OpenZeppelin’s SafeERC20. This library wraps standard ERC-20 operations (like transfer, transferFrom, and approve) in a way that gracefully handles these variations. If a token returns false, the library ensures that the transaction is reverted, and if a token doesn’t return a value, the library assumes the operation succeeded if no revert occurred.
Race Conditions and Front-Running
To really grasp this vulnerability, let’s briefly revisit how transactions work in Ethereum. When we send a transaction, it’s broadcast to the network of nodes and placed in the mempool, a kind of waiting room for pending transactions. Validators then pick up these transactions from the mempool to build a block. Transactions within a block are executed sequentially in a specific order, and because each transaction changes the blockchain’s global state, the outcome of a transaction can vary depending on its position in the block. This transaction ordering is important because it can significantly affect the results of transaction execution.
Note
In practice, controlling a transaction’s position in the block mostly comes down to payment. Originally, you could influence ordering simply by offering a higher gas price. Today, thanks to the Flashbots infrastructure implementing builder-proposer separation (which isn’t yet part of Ethereum natively), users can submit bundles of transactions in a specific order and bid for their inclusion via off-chain relay systems. These processes—both the legacy mempool-based system and the new builder-based one—are covered in more detail in Chapter 6.
The vulnerability
Front-running is the practice of exploiting this sequential execution by inserting other transactions into the block in a way that benefits the front-runner. Essentially, someone watches for pending transactions that could affect the market or a specific contract and then submits their own transaction to get processed before the original. By doing so, they can capitalize on the information from the pending transaction, often to the detriment of the original sender. It’s important that our code accounts for this dynamic and is designed to be resilient against changes in transaction order within a block.
Let’s see how this could work with a simple example. Consider the contract shown in Example 9-6.
Example 9-6. FindThisHash: a contract vulnerable to front-running
contract FindThisHash {
    bytes32 constant public hash =
      0xb5b5b97fafd9855eec9b41f74dfb6c38f5951141f9a3ecd7f44d5479b630ee0a;
    constructor() payable {} // load with ether
    function solve(string memory solution) public {
        // If you can find the pre-image of the hash, receive 1000 ether
        require(hash == keccak256(abi.encodePacked(solution)));
        payable(msg.sender).transfer(1000 ether);
    }
}
Say this contract has 1,000 ether. The user who can find the preimage of the SHA-3 hash 0xb5b5b97fafd9855eec9b41f74dfb6c38f5951141f9a3ecd7f44d5479b630ee0a can submit the solution and retrieve the 1,000 ether. Let’s say one user figures out that the solution is Ethereum!. They call solve with Ethereum! as the parameter. Unfortunately, an attacker spotted the transaction in the mempool, checked its validity, and then submitted an equivalent transaction with higher priority in the block. The original transaction will revert since the attacker’s transaction will be processed first.
Preventative techniques
Front-running vulnerabilities can appear in various forms, often depending on the specific logic of the smart contract or protocol. Whenever an operation can be exploited by means of transaction ordering, we have a front-running vulnerability. Therefore, the solutions are usually tailored to the specific problem. For instance, automated market maker (AMM) protocols address this issue by allowing users to set a minimum number of tokens they must receive during a swap. While this doesn’t prevent front-running entirely, it severely limits the potential profit an attacker can extract, reducing the damage and protecting users from extreme slippage.
Another general technique is the use of a commit-reveal scheme. In this approach, users first submit a transaction containing hidden information, typically represented as a hash (the commit phase). Once this transaction is included into a block, the user follows up with a second transaction that reveals the actual data (the reveal phase). This method effectively prevents front-running because attackers can’t see the details of the initial transaction until it’s too late to act on it. The trade-off, however, is that it requires two separate transactions, which means higher costs and added latency. In addition to the poorer user experience, the required delay between transactions can be a practical limitation in time-sensitive applications.
Real-world example: AMM and minAmountOut
Let’s explore a common real-world front-running vulnerability. It occurs when smart contracts integrating AMM protocols perform swaps that don’t set a minimum number of tokens to receive, making the said swaps susceptible to front-running attacks. If the minimum number of tokens to receive isn’t set properly (or is left too low), the swap transaction becomes vulnerable to sandwich attacks, a specific type of front-running.
Here’s how the sandwich attack unfolds: a front-runner monitors pending transactions in the mempool and spots our swap transaction that doesn’t enforce a minimum amount out. The attacker submits a buy transaction just before our swap to artificially inflate the token price. Our transaction then goes through at this inflated price, resulting in fewer tokens than we might have expected. On top of that, our transaction further inflates the price. Immediately afterward, the attacker sells their tokens at this higher price, bringing the price back down and profiting from the price difference created by our transaction. This strategy “sandwiches” our transaction between their two trades, hence the name sandwich attack. To fix the issue, smart contracts integrating AMMs need to fetch the real asset price from a trusted source like an oracle (even time-weight average price based), then compute and enforce a precise minimum amount out when performing a swap.
Denial of Service
This category is very broad but fundamentally consists of attacks where users can render a contract or part of it inoperable for a period of time or, in some cases, permanently. This can trap funds in these contracts forever, as was the case described in “Real-world example: Parity multisig wallet (second hack)”.
The vulnerability
There are various ways a contract can become inoperable. Here we highlight just a few less-obvious Solidity coding patterns that can lead to DoS vulnerabilities.
Looping through externally manipulated mappings or arrays
This pattern typically appears when an owner wishes to distribute tokens to investors with a distribute-like function, as in the contract in Example 9-7.
Example 9-7. DistributeTokens contract
1 contract DistributeTokens {
2     address public owner; // gets set somewhere
3     address[] investors; // array of investors
4     uint[] investorTokens; // the amount of tokens each investor gets
5
6     // ... extra functionality, including transfertoken()
7
8     function invest() public payable {
9         investors.push(msg.sender);
10         investorTokens.push(msg.value * 5); // 5 times the wei sent
11         }
12
13     function distribute() public {
14         require(msg.sender == owner); // only owner
15         for(uint256 i = 0; i < investors.length; i++) {
16             // here transferToken(to,amount) transfers "amount" of
17             // tokens to the address "to"
18             transferToken(investors[i],investorTokens[i]);
19         }
20     }
21 }
Notice that the loop in this contract runs over an array that can be artificially inflated. An attacker can create many user accounts, making the investors array very large. The risk isn’t just the loop itself but also the cumulative gas cost of the operations inside it, like transferToken or any other logic. Each additional iteration adds to the total gas used, and if the array gets large enough, the gas required to complete the loop can exceed the block gas limit. At that point, the distribute function effectively becomes unusable.
Note
This kind of DoS isn’t limited to state-changing functions. Even read-only view functions can become inaccessible if they loop over large arrays. While calling them doesn’t consume gas on chain, RPC endpoints enforce their own arbitrary gas caps on
eth_callexecutions. So if a view function runs enough logic to exceed those limits, the RPC call would fail.
Progressing state based on external calls
Contracts are sometimes written such that progressing to a new state requires sending ether to an address or waiting for some input from an external source. These patterns can lead to DoS when the external call fails or is prevented for external reasons. In the example of sending ether, a user can create a contract that does not accept ether. If a contract requires ether to be sent in order to progress to a new state, the contract will never achieve the new state since ether can never be sent to the user’s contract that does not accept ether.
Unexpected issues
DoS issues can pop up in unexpected ways, and they don’t always involve malicious attacks. Sometimes, a contract’s functionality can be disrupted just by unforeseen events. For instance, if a smart contract relies on an owner’s private key to call specific privileged functions and that key gets lost or compromised, we’re in trouble. Without that key, those crucial functions become permanently inaccessible, which might stall the entire contract’s operations. Imagine an initial coin offering (ICO) contract where the owner must call a function to finalize the sale. If the key is lost, no one can call it, and tokens will stay locked forever.
Another example of an unexpected disruption comes from ether sent to a contract without its knowledge or intention. Ether can be “forced” into a contract using a method called selfdestruct (now deprecated) or even by sending ether before the contract is deployed to its predetermined address. If a contract assumes it controls the accounting of all ether it receives through its own functions, it might not know what to do with these uninvited funds, leading to unintended behavior. It’s like getting money in your bank account you didn’t expect—sometimes it’s nice, but it could also mean your account balance is off, and any system relying on that exact number can start acting up.
Preventative techniques
Since DoS issues appear in different forms, the solutions are also usually situation specific.
Long lists that risk hitting the block gas limit are a fairly common situation, so we can give some suggestions for dealing with this. In the first example, contracts should not loop through data structures that can be artificially manipulated by external users. A withdrawal pattern is recommended, whereby each of the investors call a withdraw function to claim tokens independently (pull-over-push pattern). For functions iterating over long lists, a good solution is to implement a pagination feature.
The generic solution for DoS is to research as much as you can what could go wrong and implement safeguards.
Real-world example: ZKsync Era Gemholic funds lock
As we just said, the most unexpected errors can lead to a DoS issue in a smart contract. A recent example involves Gemholic, a project that deployed a smart contract on ZKsync Era, an Ethereum L2 solution. Gemholic faced a major problem when it couldn’t access 921 ETH (approximately $1.7 million) raised in a token sale. The root cause? The smart contract relied on the transfer() function, which is not supported by ZKsync Era. Although ZKsync Era is compatible with much of the EVM functionality, it isn’t fully EVM equivalent, meaning some features, like transfer(), don’t work as they would on the Ethereum mainnet. This incompatibility resulted in Gemholic’s funds being stuck because the smart contract wasn’t able to withdraw the ether as intended. Fortunately, ZKsync’s team was able to step in and develop what they described as an “elegant solution” to unlock the funds, allowing Gemholic to access them again. Unfortunately, the specifics of this “elegant solution” remain undisclosed.
Floating Point and Precision
As of this writing, v0.8.29 of Solidity doesn’t fully support fixed-point and floating-point numbers. This design choice stems from blockchain’s fundamental need for determinism: every node in the network must reach identical results from the same inputs to maintain consensus. Unfortunately, floating-point arithmetic is inherently nondeterministic across different hardware architectures, possibly producing subtly different results from identical calculations.
Since blockchain applications require absolute determinism to prevent network forks and maintain security, Solidity forces developers to implement floating-point representations using integer types. While this approach is more cumbersome and prone to errors if not implemented correctly, it ensures that financial calculations and smart contract logic produce identical results across all nodes in the network.
The vulnerability
Fixed-point numbers are not yet fully supported by Solidity. They can be declared but cannot be assigned to or from, meaning that developers are required to implement their own using the standard integer data types. There are a number of pitfalls developers can run into during this process. We will try to highlight some of these in this section. Let’s begin with a code example (Example 9-8).
Example 9-8. FunWithNumbers
1 contract FunWithNumbers {
2    uint256 constant public tokensPerEth = 10;
3    uint256 constant public weiPerEth = 1e18;
4    mapping(address => uint) public balances;
5
6    function buyTokens() public payable {
7        // convert wei to eth, then multiply by token rate
8        uint256 tokens = msg.value/weiPerEth*tokensPerEth;
9        balances[msg.sender] += tokens;
10    }
11
12    function sellTokens(uint256 tokens) public {
13        require(balances[msg.sender] >= tokens);
14        uint256 eth = tokens/tokensPerEth;
15        balances[msg.sender] -= tokens;
16        payable(msg.sender).transfer(eth*weiPerEth);
17    }
18 }
This simple token-buying and -selling contract has some obvious problems. Although the mathematical calculations for buying and selling tokens are correct, the lack of floating-point numbers will give erroneous results. For example, when buying tokens on line 8, if the value is less than 1 ether, the initial division will result in 0, leaving the result of the final multiplication as 0 (e.g., 200 wei divided by 1e18 weiPerEth equals 0). Similarly, when selling tokens, any number of tokens less than 10 will also result in 0 ether. In fact, rounding here is always down, so selling 29 tokens will result in 2 ether (29 tokens / 10 tokensPerEth = 2.9, which rounded down resolves to 2).
The issue with this contract is that the precision is only to the nearest ether (i.e., 1e18 wei). This can get tricky when dealing with decimals in ERC-20 tokens when you need higher precision. In practical cases, the precision losses may seem small, but they can easily be amplified and exploited. Flash loans, for example, allow attackers to borrow large amounts of capital with no up-front cost, making it possible to exploit even minor inconsistencies.
Preventative techniques
Keeping the right precision in your smart contracts is very important, especially when dealing with ratios and rates that reflect economic decisions. You should ensure that any ratios or rates you are using allow for large numerators in fractions. For example, we used the rate tokensPerEth in our example. It would have been better to use weiPerTokens, which would be a large number. To calculate the corresponding number of tokens, we could do msg.value/weiPerTokens. This would give a more precise result.
Another tactic is to be mindful of order of operations. In our example, the calculation to purchase tokens was msg.value/weiPerEth*tokenPerEth. Notice that the division occurs before the multiplication. Solidity, unlike some languages, guarantees to perform operations in the order in which they are written. This example would have achieved a greater precision if the calculation performed the multiplication first and then the division: msg.value*tokenPerEth/weiPerEth.
Finally, when defining arbitrary precision for numbers, it can be a good idea to convert values to higher precision, perform all mathematical operations, and then convert back down to the precision required for output. Typically, uint256s are used as they are optimal for gas usage; these give us approximately 60 orders of magnitude in their range, some of which can be dedicated to the precision of mathematical operations. It is better to keep all variables in high precision in Solidity and convert back to lower precision in external apps. This is essentially how the decimals variable works in ERC-20 token contracts: when we send 1,000 USDT on MetaMask, we are actually sending 1,000,000,000 units of USDT, which is 1,000 multiplied by USDT’s decimals (1e6).
To see an example of how to handle math operations with increased precision, let’s bring in Wad and Ray mathematics. A Wad represents a decimal number with 18 digits of precision, aligning perfectly with the 18 decimals common for ERC-20 tokens like ether. This makes it ideal for representing token balances, ensuring we have enough accuracy during computations. A Ray, on the other hand, goes even further with 27 digits of precision, useful for calculations of ratios very close to zero. The first Solidity fixed-point math library, known as DS-Math, provided a structure for working with these high-precision numbers.
The developers at MakerDAO originally created Wad and Ray specifically for their project’s needs. Given ether’s 18-decimal standard—and the fact that most ERC-20 tokens also follow this convention, although there are plenty of exceptions—Wad was perfect for the main financial units, while Ray was reserved for cases where precise fractional adjustments were needed. And while DS-Math pioneered this approach, many more libraries are now available for precise Solidity math operations. Aave’s WadRayMath, Solmate’s FixedPointMathLib, and OpenZeppelin’s Math library are just a few options available today.
Real-world example: ERC-4626 inflation attack
We will now see a precision-loss vulnerability commonly exploited in the wild, using a simplified version of OpenZeppelin’s ERC-4626 implementation. ERC-4626 is a tokenized vault standard that lets users deposit assets (like USDT) into a vault and receive shares representing their portion of the vault’s assets. Example 9-9 is a simplified version of the contract we’re working with.
Example 9-9. Simplified version of the original ERC4626 OpenZeppelin implementation
1 abstract contract ERC4626 is ERC20, IERC4626 {
2    using Math for uint256;
3    IERC20 private immutable _asset;
4
5    constructor(IERC20 asset_) {
6        _asset = asset_;
7    }
8
9    function totalAssets() public view returns (uint256) {
10        return _asset.balanceOf(address(this));
11    }
12    function deposit(address receiver, uint256 assets) public {
13        uint256 shares = _convertToShares(assets, Math.Rounding.Down);
14        SafeERC20.safeTransferFrom(_asset, msg.sender, address(this), assets);
15        _mint(receiver, shares);
16        emit Deposit(msg.sender, receiver, assets, shares);
17    }
18    function _withdraw(address receiver, uint256 assets) public {
19        uint256 shares = _convertToShares(assets, Math.Rounding.Up);
20        _burn(msg.sender, shares);
21        SafeERC20.safeTransfer(_asset, receiver, assets);
22        emit Withdraw(msg.sender, receiver, msg.sender, assets, shares);
23    }
24    function _convertToShares(uint256 assets, Math.Rounding rounding) internal view
      returns (uint256) {
25        uint256 supply = totalSupply();
26        return
27            (assets == 0 || supply == 0)
28                ? assets
29                : assets.mulDiv(supply, totalAssets(), rounding); // (assets * supply) /
                  totalAssets()
30    }
31    function _convertToAssets(uint256 shares, Math.Rounding rounding) public view returns
      (uint256) {
32        uint256 supply = totalSupply();
33        return
34            (supply == 0)
35                ? shares
36                : shares.mulDiv(totalAssets(), supply, rounding); // (shares * totalAssets())
                  / supply
37    }
38 }
Now, let’s examine how the attack plays out.
An attacker, keeping a close eye on newly created ERC-4626 vaults, sees one pop up. They waste no time and deposit a tiny amount, just one unit of the vault’s asset, to mint a share for themselves. At this point, the total assets in the vault are just one (because that’s all the attacker deposited), and the total supply of shares is also one (because the attacker minted one share).
Here’s where things get sneaky. The attacker now waits for another user to deposit a significant amount—let’s say 1,000 USDT. But before the legitimate transaction goes through, the attacker jumps in and front-runs the deposit by directly transferring 1,000 USDT to the vault contract. Importantly, the attacker doesn’t use the vault’s deposit function; they just call USDT.transfer(). This “donation” of 1,000 USDT inflates the vault’s totalAssets() to 1000e6 + 1, while the totalSupply() of shares remains 1. Keep in mind that 1,000 USDT are actually accounted as 1,000e6, which is 1,000 multiplied by USDT’s decimals (1e6).
When the victim’s deposit finally gets processed, the smart contract tries to calculate how many shares to mint for the user. Remember, the formula for calculating shares is:
(assets × supply) / totalAssets()
In our case, the victim is depositing 1,000e6 USDT, and the formula becomes:
1,000e6 × 1 / (1,000e6 + 1) = 0.999
Because of the rounding-down mechanism, this results in zero shares. The victim gets nothing for their 1,000 USDT deposit.
Meanwhile the attacker, still holding their one share, can now burn that share and withdraw the total vault balance, which is 2,000 USDT. The attacker walks away with all the funds while the victim is left empty-handed.
Note
OpenZeppelin has since updated its ERC-4626 implementation to prevent this attack by introducing both a virtual offset and a decimal offset. The decimal offset increases the number of decimal places used for vault shares, which helps minimize rounding errors and makes precision-loss attacks less profitable. The virtual offset adds virtual assets and shares to the exchange-rate calculation, limiting the attacker’s ability to manipulate the initial conversion rate and protecting the vault from dead-share creation.
Price Manipulation
Accurate asset pricing is essential for DeFi protocols to operate smoothly. These systems depend on price oracles to deliver current asset values. Think of an oracle as a data feed that supplies real-world information to smart contracts. Price manipulation attacks focus on these oracles—thus, not the smart contract’s code itself but the data that the contracts depend on. This manipulation can significantly change the behavior of DeFi protocols, creating arbitrage opportunities that wouldn’t normally exist. The outcome? An attacker can exploit the system to make substantial profits.
The vulnerability
Imagine this simple scenario: an attacker finds a lending protocol that relies on an insecure oracle for its pricing. By manipulating the price of an asset to make it appear lower than it actually is, the attacker can borrow more of that asset than they should be able to. They then sell the borrowed asset at its true market price, making a profit. The root of this vulnerability lies in the reliance on on-chain price metrics, which can be manipulated, to determine asset prices. The manipulation is often amplified using flash loans: instant and collateral-free loans that must be repaid within the same transaction block.
Preventative techniques
When we need to determine a price, our best bet is to use decentralized oracles like Chainlink, RedStone, Pyth, and many others. Because these oracles are decentralized, that makes them much harder to compromise since an attacker would need to control more than 50% of the nodes in the network. They do have their limitations, though. For instance, they may not be available for every asset. In such cases, we can turn to a time-weighted average price (TWAP) oracle.
TWAP oracles derive asset prices from on-chain data with some added security. They function by calculating the average price of an asset over a defined time frame, such as the past five minutes. By excluding the current block from their calculations, TWAP oracles effectively protect against flash-loan attacks. However, TWAP oracles aren’t completely immune to manipulation by a well-funded attacker. The key here is to adjust the period length: the longer the period, the more capital an attacker would need to manipulate the price. But a longer period also means the TWAP price might diverge more from the actual market price. Therefore, it’s important to fine-tune the TWAP based on the specific needs and risk profile of the project.
Regardless of the oracle we use, we shouldn’t blindly trust the data it provides. It’s a good practice to regularly verify the oracle data against other sources. For instance, we could write a script that compares the oracle prices with prices from other sources and flags any significant discrepancies. If such differences are found, the protocol can be paused to prevent further issues.
Prototype example: Reliance on AMM on-chain data
Often, the vulnerable oracle module is part of the protocol itself, as we will see in this example. A common exploit scenario occurs when a smart contract derives asset prices directly from on-chain AMM protocols like Uniswap. Imagine a Uniswap V2 pool with reserves of 4,000 USDC and 1 ETH. A smart contract might assume that 1 ETH is worth 4,000 USDC. However, this assumption can be very risky if the inferred price is used for further state-changing operations. In such a case, an attacker could take out a flash loan to perform a large swap, altering the pool’s balance and thus changing the inferred price of ETH. The vulnerable protocol, relying on this manipulated price, will then be exploited by the attacker.
Fortunately, this specific attack vector is well known. Although it’s not exploited as frequently as it once was, it still shows up in high-profile incidents. In May 2025, for example, Mobius Token was exploited for $2.1 million. Although the immediate trigger was a faulty multiplication by 10^18 in the mint function, the contract also contained a separate but equally critical vulnerability: it relied on on-chain metrics to compute the BNB/USDT price, exposing it to manipulation. Even if the math bug had been absent, the contract would still have been exploited in a short time. You might be wondering how code like this made it to production, ending up securing so much total value locked (TVL). The team had chosen not to publish the contract’s source code, assuming that keeping it hidden would provide safety—another reminder that security through obscurity doesn’t work, especially when the stakes are so high.
Note
Using prices inferred from on-chain data is risky only when these prices are applied to state-changing operations. If the prices are solely for informational purposes, such as in a view function that frontends use to fetch data, then the attack isn’t feasible. However, if an external contract retrieves the price from such a view function and then uses it for state-changing operations, it is vulnerable to manipulation.
Real-world example: Mango Markets
In the Mango Markets exploit, a trader took advantage of the platform’s price manipulation vulnerabilities to extract more than $116 million. By using $10 million across two wallets, the attacker opened 483 million Mango perpetual futures (MNGO-PERPs) at a price of 3.8 cents each. They then purchased $4 million worth of MNGO on three separate exchanges, driving the oracle-reported price up by 2,300%. Using this inflated perp position as collateral, the attacker borrowed $116 million from Mango Markets, leaving significant bad debt and fleeing with the funds. As commonly happens with price-manipulation exploits, this wasn’t a hack but rather a manipulation of the system’s mechanics, exploiting Mango’s liquidity without breaking any of its underlying code.
Negotiating with Exploiters
Exploiters and protocols often negotiate directly on chain to decide how much of the stolen funds the exploiter should return in exchange for the protocol agreeing to drop any charges. While these deals are common, they likely hold little legal weight in court. Typically, protocols offer a bounty of around 10% to the exploiter, meaning if the exploiter returns 90% of the stolen funds, the protocol will agree to stop pursuing them. Although these types of negotiations are common, what happened in this case was particularly remarkable. After the exploit, the attacker proposed a deal to Mango Markets’ DAO: they would return most of the stolen funds if the community agreed to cover some bad debt that had previously been taken on to save another Solana project, Solend. In response, the Mango team put forth a second proposal that would see the attacker return up to $67 million while keeping $47 million as a kind of bug bounty. The agreement included a waiver of any claims related to bad debt and a commitment not to pursue criminal charges or freeze the attacker’s funds once the tokens were returned. The first proposal got rejected, while the second one passed. This led to Mango Markets tweeting on October 15 that $67 million in assets had indeed been returned. Things took a legal turn when one of the attackers revealed himself on Twitter, calling the exploit a “highly profitable trading strategy” and claiming it was all done within the protocol’s intended design. But US authorities saw it differently and arrested him on charges of market manipulation. Mango Markets then filed a civil suit, arguing that the agreement should be void because it was made under duress, and it sought $47 million in damages. Since DAOs are a relatively new concept legally, the case has caught a lot of attention and could set a precedent for how decentralized organizations handle legal disputes. In a twist that perfectly captures crypto’s wild legal landscape, the attacker actually won his fraud case in May 2025: the judge ruled that you can’t defraud a permissionless protocol with no terms of service. But here’s the kicker: when authorities searched his devices during the original Mango Markets investigation, they discovered more than 1,200 images and videos of child sexual abuse material, and he’s now serving four-plus years for that, proving that even brilliant DeFi exploits can’t save you from violations of basic human decency.
Improper Input Validation
One major vulnerability often overlooked is improper input validation. When input from users or external sources isn’t properly validated, the consequences for smart contracts can vary widely, ranging from minor issues to significant loss of funds. Proper input validation helps protect against both malicious actors who might manipulate the contract’s behavior and genuine mistakes made by users or administrators, which could otherwise lead to loss of funds. If we don’t take the right precautions, a seemingly innocent oversight can result in significant issues in the contract’s execution.
The vulnerability
At its core, improper input validation occurs when a smart contract doesn’t thoroughly check the data or parameters it receives before processing them. If we don’t make sure that certain values meet specific conditions, we open the door for both genuine user mistakes and potential attacks. Users might accidentally input incorrect data, while attackers could intentionally feed our contracts unexpected data. This can bypass the intended logic and lead to unexpected state changes, causing our contracts to behave unpredictably.
A simple instance of this vulnerability occurs when a setter function doesn’t verify that an address isn’t the zero address before setting it as a recipient for funds. If we mistakenly set the zero address as the recipient, funds sent to the zero address will be locked forever, making them irretrievable.
A common and dangerous misconception in smart contract development is the belief that keeping the source code private will somehow protect it from exploitation. We’ve previously discussed in this chapter why security through obscurity doesn’t work, and this principle applies to input validation as well. Developers sometimes leave functions unprotected, assuming they won’t be discovered if the code isn’t published. But attackers can and do reverse-engineer contract bytecode to identify sensitive and unprotected functions. For instance, several closed-source MEV bots have been exploited through unprotected flash-loan callbacks, leading to millions in losses. Hiding the code doesn’t hide the risk.
Preventative techniques
So, how do we guard against improper input validation? The first step is simple: never assume that the inputs we receive are valid. Whether the input is coming from an EOA, another contract, or sometimes even the same contract, it should be rigorously checked. We need to validate not just input lengths but also edge cases and boundary conditions like minimum and maximum values. A classic edge case we shouldn’t overlook is the zero value.
Reusable validation logic is a key part of writing secure and maintainable smart contracts. We can implement these validation blocks using either modifiers or internal functions, depending on what fits best. Modifiers are particularly useful for attaching preconditions or postconditions to multiple functions in a consistent and declarative way. For example, we might use a modifier to ensure that a function’s input isn’t the zero address or to check that the caller has the right permissions before executing a sensitive operation. Internal functions can achieve the same goals and sometimes offer more flexibility, especially when validation depends on complex logic or needs to return values.
Access Control
Speaking of permissions, it’s important to implement robust access controls: msg.sender is a parameter and should be treated as such. While custom logic is an option, using trusted libraries like OpenZeppelin helps us manage access securely while minimizing complexity.
For simple projects where one entity needs full control, developers can use OpenZeppelin’s Ownable contract, which designates a single “owner” with authority over key functions. For added security, we recommend using Ownable2Step. This version includes a two-step ownership-transfer process that helps prevent accidental loss of ownership.
For more complex needs, OpenZeppelin’s AccessControl allows us to create multiple roles, each with different permissions. Role-based access control lets us assign specific tasks to different users, making it ideal for larger projects.
Before implementing proper access control, we need to validate all our assumptions about who might call external and public functions. Smart contracts operate in a public and trustless environment, so we can’t assume that only our intended entities will interact with the contract. In fact, we should always assume an attacker will attempt to call these functions to trigger unintended behaviors.
Prototype example: Arbitrary calls
The most common exploits entail arbitrary calls. Here, a vulnerable smart contract allows an attacker to provide an address to be called. Under these circumstances, the contract will effectively perform any call the attacker wants. One possible way to exploit this is by returning manipulated values that trick the contract into transferring tokens it shouldn’t.
Check this sample code of a vulnerable yield aggregator protocol:
contract Aggregator {
    function stake( ... ) external {
        ...
    }
    function claimMultipleStakingRewards(address[] calldata _claimContracts) external {
        uint256 totalRewards;
        for (uint256 i = 0; i < _claimContracts.length; i++) {
            totalRewards += IClaimContract(_claimContracts[i]).claimStakingRewards(
            msg.sender
            );
        }
        IERC20(stakingToken).transfer(msg.sender, totalRewards);
    }
}
Its goal is simple: the claimMultipleStakingRewards function loops through an array of staking contract addresses provided by the user, calls the claimStakingRewards function on each one, and tallies up the total rewards. Finally, it sends the accumulated rewards to the user’s address. The problem is that the contract doesn’t check whether the addresses in _claimContracts actually point to trusted staking contracts. That opens the door to arbitrary external calls.
For instance, an attacker can deploy a contract like this:
contract Attack {
    function claimStakingRewards(address ) external pure returns (uint256) {
        return 1_000_000 ether; // fabricated reward
    }
}
This malicious contract pretends to be a staking contract and simply returns an inflated reward value. When the Aggregator calls claimStakingRewards on it, it gets tricked into thinking the caller is owed a huge amount of tokens. Without additional checks, the Aggregator blindly adds that to the total and transfers real tokens to the attacker. This could have been avoided with a basic allowlist to ensure that only trusted contracts are allowed in claimMultipleStakingRewards.
Signature Replay Attack
Signatures on Ethereum are incredibly useful because they let us authorize actions off chain, reducing the need for costly on-chain transactions. For example, if you’re authorizing someone to take a specific action on your behalf, such as transferring tokens or accessing a certain feature in a smart contract, you can sign an off-chain message that gives them permission. The contract then verifies the signature and executes the action without needing you to interact directly on chain. This also enables gasless transactions, where you sign off chain and a relayer submits it on chain, paying the gas fees. Smart contracts can verify these signatures to ensure that actions are securely authorized without requiring constant on-chain interaction.
However, once a piece of data is signed, it should logically be used only once. If a signed transaction can be reused, it opens the door to replay attacks, where an attacker replays the signature to execute the same action multiple times, such as transferring funds or changing contract states without permission. Smart contracts must be designed to prevent this by ensuring that each signed message is unique and can’t be replayed.
The vulnerability
Let’s look at an example contract (Example 9-10) that’s vulnerable to replay attacks.
Example 9-10. Token: A contract vulnerable to signature replay attack
1 contract Token {
2    mapping(address => uint256) public balances;
3    struct Signature {
4        bytes32 r;
5        bytes32 s;
6        uint8 v;
7    }
8    event Transfer(address indexed from, address indexed to, uint256 amount);
9    function transfer(uint256[] memory _amount, address[] memory _from, address[]
     memory _to,  Signature memory _signature) public {
10        bytes32 messageHash = keccak256(abi.encodePacked(_from, _to, _amount));
11        address signer = ecrecover(messageHash, _signature.v, _signature.r, _signature.s);
12        for(uint256 i = 0; i < _from.length; i++){
13            address __from = _from[i];
14            address __to = _to[i];
15            uint256 __amount = _amount[i];
16            require(balances[__from] >= _amount[i], "Insufficient balance");
17            require(signer == _from[i], "Invalid signature");
18            balances[__from] -= __amount;
19            balances[__to] += __amount;
20            emit Transfer(__from, __to, __amount);
21        }
22    }
23 }
At first glance, this looks like a handy contract function. It allows anyone with a valid signature to perform multiple transfers without the signer needing to pay gas. An administrator could sign the data off chain, and someone else—perhaps a service—could submit the transaction on chain for them. Anyway, handling signatures is not trivial, and this very short code contains a significant number of issues.
The most obvious problem is that there’s no mechanism to prevent someone from reusing the same signature over and over. Without any way to track if a signature has been used, an attacker could simply repeat the transaction until the victim’s balance is drained. The fix is pretty simple: we need to add a nonce (a value to be used only once, usually a counter that increments with each transaction) into the data being signed. The contract verifying the signature has the responsibility to check that the provided nonces have not been previously used. This ensures that each signature is unique, too, preventing replays. Ethereum transactions already use nonces for this reason.
Another critical issue here is signature malleability. This happens when a cryptographic signature can be altered to produce a different but still valid signature for the same underlying message. The built-in ecrecover function used in the contract is vulnerable to this problem. Attackers can tweak a valid signature and create another one that also works, even though the underlying signed message remains the same. To avoid this, developers should use a safer signature-verification method, like the one provided by the OpenZeppelin ECDSA library. Malleable signatures are the reason why you don’t want to use signatures as unique identifiers, such as to avoid replay attacks—stick to nonces.
We’ve addressed potential signature manipulation, but what if the data being signed can also be manipulated? In this contract, it can. The problem lies with the use of abi.encodePacked, which is often chosen for its compact encoding that requires less memory. But that efficiency comes with trade-offs, and we’re about to explore them. Specifically, abi.encodePacked concatenates raw bytes without adding length information or boundaries, which means that different sets of inputs can end up producing the same output. Here’s how that can play out.
For the sake of simplicity, let’s suppose that amounts take 8 bits (two hex digits) and addresses take 12 bits (three hex digits). Let’s say the parameters are as follows:
_amount = [0x64, 0x64]
_from = [0x001, 0x002]
_to = [0x003, 0x003]
When we use abi.encodePacked, it combines these values into 0x6464001002003003. But here’s where things get tricky. If we move 0x002 from _from to _to, we still get the exact same output from abi.encodePacked as before:
_amount = [0x64, 0x64]
_from = [0x001]
_to = [0x002, 0x003, 0x003]
Over this new set of values, abi.encodePacked would return the same output: 0x6464001002003003. This means that user 0x002 can use the valid signature but change the input parameters _from and _to, tricking the contract into thinking that the only transfer to be performed is from 0x001 to 0x002. The code used in the example does a terrible job at validating inputs, allowing for this problematic situation. Anyway, it shows how encodePacked should be avoided when generating signatures over dynamic data types such as arrays. In these cases, we should use abi.encode, which produces unambiguous output even when concatenating dynamic data, effectively preventing this type of attack.
But wait, there’s one more issue. What happens if this contract is deployed on multiple chains? The same signature would be valid across all of them, creating an opportunity for cross-chain replay attacks. An attacker could monitor a user’s activity on one chain and then reuse their signature on other chains. To prevent this, we need to include contextual data in the signed message—at the very least, the chainId. Depending on the use case, you might also include the contract address or its version. Fortunately, we don’t have to come up with a new solution from scratch: EIP-712 is a standard that solves this by allowing for context-aware signatures. It also improves the user experience by showing users readable information about what they’re signing instead of a confusing byte string.
Preventative techniques
To prevent replay attacks and other vulnerabilities, we need to ensure that each signature is unique, secure, and usable only once. We can easily achieve that through nonces, secure signature handling, and context-aware signatures.
Nonces are used for ensuring uniqueness. By adding a nonce to each signed message, we prevent attackers from reusing signatures. Contracts validating signatures make sure that the nonces used are unique. Once a signature is used, its nonce becomes invalid, stopping replay attempts.
When validating signatures, we should avoid using the plain built-in ecrecover function and resort to OpenZeppelin’s ECDSA library, which is immune to signature malleability. We also should never use signatures as unique identifiers since they can be manipulated.
For signing dynamic data, using abi.encode instead of abi.encodePacked prevents the manipulation of the inputs by properly separating them, ensuring that they can’t be tampered with or misinterpreted.
Finally, we should implement EIP-712 any time we work with signatures. Beyond adding context awareness, such as the chainId to prevent cross-chain replays, EIP-712 improves user experience by letting users see a clear, meaningful visualization of the data they’re signing instead of an opaque byte string. This not only makes transactions easier to understand but also enhances user safety by making phishing attacks more difficult, since users can better recognize suspicious requests.
Real-world example: TCH token
In May 2024, the TCH token was exploited due to a common signature-malleability vulnerability. The issue lay in a contract’s burnToken function, which verified signatures to authorize token burns. To prevent signature replay attacks, the contract stored used signatures in a mapping. However, this defense could be bypassed if the signature was tampered with.
The attacker exploited this by collecting previously submitted signatures and modifying the v and s values, which are part of the signature. Although the signature was altered, it still passed verification using ecrecover. Since the modified signature differed from the original, it wasn’t recognized as already used, and the new version was stored in the mapping. With this trick, the attacker was able to repeatedly burn large amounts of TCH tokens owned by the PancakeSwap liquidity pair. This allowed the attacker to manipulate the token’s price in the pool and profit from the price fluctuations they had caused.
Smart Contracts Misconfiguration
Misconfiguration is one of those sneaky issues that isn’t technically a vulnerability but can still have serious consequences for smart contracts. After you have written your smart contract and gotten it audited, the job isn’t done; you still need to deploy, maintain, and sometimes upgrade it. And it’s during these stages when misconfigurations often occur. DeFi protocols, for example, come with tons of parameters, and if any of these are misconfigured, that can lead to significant losses. Unfortunately, these kinds of issues are tricky to catch, even in audits, because auditors often overlook deployment and upgrade scripts. So while misconfigurations aren’t vulnerabilities themselves, they can create an opening for vulnerabilities, making it critical to be extra cautious during the deployment and management stages.
Misconfiguration issues are hard to categorize because they can vary widely, so instead of trying to list them all, let’s jump straight into some real-world examples to get a sense of what can go wrong.
Real-world example: yUSDT
Let’s take a look at the simplest possible misconfiguration case: a misconfigured storage variable in the yUSDT token from Yearn Finance, which led to an exploit in April 2023. The yUSDT token is supposed to generate yield by investing in USDT-based derivatives, but due to a misconfiguration, it was actually using a different token (IUSDC) as its underlying asset. The crazy part is that this went unnoticed for more than one thousand days. The misconfiguration allowed an attacker to manipulate the system, drain value from the pool, and mint yUSDT essentially for free. As a result, the value of yUSDT dropped to zero, and the attacker walked away with $11.6 million in profit.
Real-world example: Ronin Bridge
In August 2024, the Ronin Bridge was hacked just an hour after a contract upgrade. The root cause was a misstep during the upgrade process: an important variable, _totalOperatorWeight, wasn’t initialized. This variable was supposed to be set in the initializeV3 function, but during the upgrade, only initializeV4 was called, skipping over the necessary setup from the previous version. This oversight left the contract exposed. In this case, a white-hat MEV bot was able to front-run the attack and return the stolen 4,000 ETH, but this underscores the importance of thorough review and testing of upgrade procedures.
Note
If you think a hack happening shortly after a contract upgrade is just a coincidence, you’re mistaken. Both black and white hats closely monitor contract upgrades: black hats look for weaknesses to exploit while white hats try to prevent attacks. Teams often underestimate the security risks of even small code changes and skip the audit process. Unfortunately, it doesn’t take much to break a contract, and as this case shows, the vulnerability isn’t always in the smart contract itself—sometimes it’s in how the upgrade is executed.
Real-world example: Sonne Finance
The root cause of the Sonne Finance May 2024 hack wasn’t just a typical protocol bug but rather a flaw in its market-activation process. Like many protocols, Sonne was aware of the “empty market” bug found in Compound v2, where an open but unfunded market could be exploited to drain the entire protocol. The standard fix for this bug is to ensure that funds are deposited into the market atomically when it’s activated, preventing the market from being empty at any point.
Sonne had a plan in place to handle this. It intended to add the market, deposit funds, and then open the market for use—all three actions through timelocks. The process would have worked, if it had been done in the right order. The issue arose because Sonne scheduled each of these steps as separate transactions in the governance timelock controller, meaning that their execution order was not enforced. The Sonne team made the governance EXECUTOR_ROLE accessible to everyone, allowing any user to execute governance transactions once the timelock expired. While this setup is unusual, it wasn’t inherently problematic; however, it proved devastating in this specific situation. It left the door open for anyone to execute the actions out of order once the timelock expired.
The attacker simply executed all of the queued timelock actions without waiting for the fund deposit, leaving an empty, vulnerable market open. By exploiting this unfunded market, they drained $20 million from the protocol.
The key takeaway here is that when governance actions need to occur in a specific order to ensure security, they should be made atomic. For example, if they are using the OpenZeppelin Timelock, they should be scheduled with scheduleBatch() instead of schedule(). Sonne’s mistake was to allow these actions to be queued separately, which left them exposed.
Preventative techniques
To avoid misconfiguration issues and the kind of costly mistakes we’ve discussed, we need to take a proactive approach during the entire life cycle of a smart contract, especially when it comes to deployment, upgrades, and any critical governance actions. We should always ensure that deployment and upgrade scripts are thoroughly tested and audited. We need to go beyond auditing the code itself and pay close attention to the scripts that touch the mainnet, ensuring that every aspect of the process has been tested in a live-like environment.
Contract Libraries
There is a lot of existing code available for reuse, both deployed on chain as callable libraries and off chain as code template libraries. In Ethereum, the most widely used resource is the OpenZeppelin suite, an ample library of contracts ranging from implementations of various tokens to different proxy architectures to simple behaviors commonly found in contracts, such as Ownable, Pausable, or ReentrancyGuard. The contracts in this repository have been extensively tested and, in some cases, even function as de facto standard implementations. They are free to use and are built and maintained by OpenZeppelin together with an ever-growing list of external contributors.
Other notable contract libraries include Paradigm’s Solmate and Vectorized’s Solady. Solmate is more opinionated in design, while Solady focuses primarily on gas optimization.
Additional Resources
Since smart contract security encompasses so much depth and nuance, here is a list of resources where curious readers can go to learn more about this very advanced subject:
Cyfrin Updraft Smart Contract Security and Auditing
A comprehensive 24-hour course (270+ lessons)
Secureum Bootcamp
A three-month intensive bootcamp focused on Ethereum smart contract security auditing
Ethernaut
A Solidity-based wargame by OpenZeppelin where players hack smart contract levels to learn common vulnerabilities
Damn Vulnerable DeFi
A capture-the-flag (CTF) platform featuring 18 challenges covering flash loans, price oracles, governance, NFTs, and more
Capture the Ether
A classic CTF-style Ethereum security game
QuillCTF
A collection of Ethereum security puzzles by QuillAudits
Paradigm CTF
An annual online CTF competition organized by Paradigm for experienced smart contract hackers where challenges are highly advanced and reflect cutting-edge exploits; official solutions and write-ups are often released, making it a learning resource as well
Conclusion
Thanks to its updates, the Solidity compiler now mitigates risks like integer overflows and default visibility issues. This allowed us to remove some of the older pitfalls mentioned in the first edition of the book and to use the space to focus on more current and relevant vulnerabilities instead. Anyway, there is still a lot for any developer working in the smart contract domain to know and understand. By following best practices in your smart contract design and code writing, you will avoid many severe pitfalls and traps.
Perhaps the most fundamental software security principle is to maximize reuse of trusted code. In cryptography, this is so important that it has been condensed into an adage: “Don’t roll your own crypto.” In the case of smart contracts, this amounts to gaining as much as possible from freely available libraries that have been thoroughly vetted by the community.
Chapter 10. Tokens
The word token derives from the Old English tācen, meaning a sign or symbol. It is commonly used to refer to privately issued, special-purpose, coin-like items of insignificant intrinsic value, such as transportation tokens, laundry tokens, and arcade-game tokens. Nowadays, tokens administered on blockchains are redefining the word to mean blockchain-based abstractions that can be owned and that represent assets, currency, or access rights.
The association between the word token and insignificant value has a lot to do with the limited use of the physical versions of tokens. Often restricted to specific businesses, organizations, or locations, physical tokens are not easily exchangeable and typically have only one function. With blockchain tokens, these restrictions are lifted or, to be more accurate, are completely redefinable. Many blockchain tokens serve multiple purposes globally and can be traded for one another or for other currencies on global liquid markets. With the restrictions on use and ownership gone, the “insignificant value” expectation is also a thing of the past.
In this chapter, we look at various uses for tokens and how they are created. We also discuss attributes of tokens, such as fungibility and intrinsicality. Finally, we examine the standards and technologies that they are based on and experiment by building our own tokens.
How Tokens Are Used
The most obvious use of tokens is as digital private currencies. However, this is only one possible use. Tokens can be programmed to serve many different functions, which often overlap. For example, a token can simultaneously convey a voting right, an access right, and ownership of a resource. As the following list shows, currency is just the first “app”:
Currency
A token can serve as a form of currency, with a value determined through private trade.
Resource
A token can represent a resource earned or produced in a sharing economy or resource-sharing environment—for example, a storage or CPU token representing resources that can be shared over a network.
Asset
A token can represent ownership of an intrinsic or extrinsic, tangible or intangible asset—for example, gold, real estate, a car, oil, energy, MMOG items, and so on.
Access
A token can represent access rights and can grant access to a digital or physical property, such as a discussion forum, an exclusive website, a hotel room, or a rental car.
Equity
A token can represent shareholder equity in a digital organization (e.g., a DAO) or legal entity (e.g., a corporation).
Voting
A token can represent voting rights in a digital or legal system.
Collectible
A token can represent a digital collectible (e.g., CryptoPunks) or physical collectible (e.g., a painting).
Identity
A token can represent a digital identity (e.g., an avatar) or a legal identity (e.g., a national ID).
Attestation
A token can represent a certification or attestation of fact by some authority or by a decentralized reputation system (e.g., a marriage record, birth certificate, or college degree).
Utility
A token can be used to access or pay for a service.
Often, a single token encompasses several of these functions. Sometimes it is hard to discern between them because the physical equivalents have always been inextricably linked. For example, in the physical world, a driver’s license (attestation) is also an identity document (identity), and the two cannot be separated. In the digital realm, previously commingled functions can be separated and developed independently (e.g., an anonymous attestation).
Tokens and Fungibility
Wikipedia says, “In economics, fungibility is the property of a good or a commodity whose individual units are essentially interchangeable.” Tokens are fungible when we can substitute any single unit of the token for another without any difference in its value or function.
Nonfungible tokens (NFTs) are tokens that each represent a unique tangible or intangible item and therefore are not interchangeable. For example, a token that represents ownership of a specific Van Gogh painting is not equivalent to another token that represents a Picasso, even though they may be part of the same “art ownership token” system. Similarly, a token representing a specific digital collectible, such as a specific CryptoKitty, is not interchangeable with any other CryptoKitty. Each NFT is associated with a unique identifier, such as a serial number.
We will see examples of both fungible and nonfungible tokens later in this chapter.
Note
Note that fungible is often used to mean “directly exchangeable for money” (for example, a casino token can be “cashed in,” while laundry tokens typically cannot). This is not the sense in which we use the word here.
Counterparty Risk
Counterparty risk is the risk that the other party in a transaction will fail to meet their obligations. Some types of transactions suffer additional counterparty risk because there are more than two parties involved. For example, if you hold a certificate of deposit for a precious metal and you sell that to someone, there are at least three parties in that transaction: the seller, the buyer, and the custodian of the precious metal. Someone holds the physical asset; by necessity, they become party to the fulfillment of the transaction and add counterparty risk to any transaction involving that asset. In general, when an asset is traded indirectly through the exchange of a token of ownership, there is additional counterparty risk from the custodian of the asset. Do they have the asset? Will they recognize (or allow) the transfer of ownership based on the transfer of a token (such as a certificate, deed, title, or digital token)? In the world of digital tokens representing assets, as in the nondigital world, it is important to understand who holds the asset that is represented by the token and what rules apply to that underlying asset.
Tokens and Intrinsicality
The word intrinsic derives from the Latin intra, meaning “from within.” Some tokens represent digital items that are intrinsic to the blockchain. Those digital assets are governed by consensus rules, just like the tokens themselves. This has an important implication: tokens that represent intrinsic assets do not carry additional counterparty risk. If you hold the keys for a CryptoKitty, there is no other party holding that CryptoKitty for you—you own it directly. The blockchain consensus rules apply, and your ownership (i.e., control) of the private keys is equivalent to ownership of the asset, without any intermediary.
Conversely, many tokens are used to represent extrinsic things, such as real estate, corporate voting shares, trademarks, gold bars, and bonds. The ownership of these items, which are not “within” the blockchain, is governed by law, custom, and policy, separate from the consensus rules that govern the token. In other words, token issuers and owners may still depend on real-world nonsmart contracts. As a result, these extrinsic assets carry additional counterparty risk because they are held by custodians, recorded in external registries, or controlled by laws and policies outside the blockchain environment.
One of the most important ramifications of blockchain-based tokens is the ability to convert extrinsic assets into intrinsic assets and thereby remove counterparty risk. A good example is moving from equity in a corporation (extrinsic) to an equity or voting token in a DAO or similar (intrinsic) organization. Stablecoins serve as another example, acting as blockchain-based tokens pegged to fiat currencies and backed by extrinsic assets like treasury bills and cash reserves.
Utility, Equity, or Cash Grab?
Almost every Ethereum project seems to launch with some sort of token. But do all these projects really need tokens? The slogan “Tokenize all the things” sounds catchy, but the reality is far more complex. Tokens can be powerful tools for organizing and incentivizing communities, but they’ve also become synonymous with speculation and hype.
In theory, tokens serve two primary purposes. First, there are utility tokens. These are designed to provide access to a service or resource within a specific ecosystem. For example, a token might represent storage space on a decentralized network or access to premium features in a DApp. The token’s value, in this case, is tied to its function within the platform. Second, we have equity tokens, which are supposed to function like shares in a company. These tokens can represent ownership or control in a project, such as voting rights in a DAO or a share of profits.
In practice, the distinction between these categories is often blurred. Many utility tokens remain largely speculative, with users holding them more as assets than as access credentials. Equity-like tokens may grant governance rights but often lack mechanisms to ensure meaningful participation. Some projects integrate their tokens deeply into their economic models, but these cases remain the exception rather than the rule.
This brings us to the question: are tokens inherently bad? Not at all. Tokens can be incredibly effective for creating and incentivizing communities or powering decentralized governance in a DAO. But the reality is that most tokens are launched with profit, not utility, as the primary motivator. If you’re thinking of launching a token or investing in one, it’s worth asking some tough questions. Does the token truly serve a necessary purpose in the protocol, or is it just a fundraising tool? Would the project work just as well without it? Answering these questions honestly can help you distinguish between genuine innovation and marketing-driven hype.
It’s clear that the token landscape is still evolving, and tokens are not inherently good or bad; their value depends on how they’re designed and implemented. The challenge lies in separating the meaningful from the meaningless and resisting the lure of the next meme coin.
Note
During the writing of this chapter (January 2025), the newly elected president Donald Trump launched his own meme coin, which reached a market cap of $15 billion within a single day. Many had anticipated favorable crypto policies from his presidency, but instead, we got a meme coin. This event highlights the speculative frenzy dominating crypto, where hype often triumphs over substance.
It’s a Duck!
Tokens have long been a favorite fundraising tool for startups. They promise innovation, decentralization, and sometimes outright financial freedom. But here’s the catch: offering securities to the public is a regulated activity in most jurisdictions, and tokens can easily cross the line into securities territory. For years, projects have tried to sidestep regulations by branding their tokens as “utility tokens,” claiming they’re just a presale of access to future services. The logic goes: if the token isn’t an equity share, it’s not a security. But as the old saying goes, “If it walks like a duck and quacks like a duck, it’s a duck.” And regulators, especially the US Securities and Exchange Commission (SEC), are paying attention to these ducks.
Over the last few years, the SEC has taken an increasingly aggressive stance against token offerings, striking down projects that try to straddle the line between utility and equity. For example, in 2020, the SEC sued Ripple Labs over their XRP token, arguing it was an unregistered security. Ripple claimed XRP was a currency, not a security, but the court’s partial rulings showed how nuanced these cases can be.
Even Ethereum itself wasn’t exempt from scrutiny. Back in 2018, former SEC officials declared that ether was “sufficiently decentralized” and thus not a security. But as recently as 2024, the SEC suggested that Ethereum’s transition to PoS could bring it back under the microscope. Why? Because staking rewards resemble dividends, and dividends are a hallmark of securities. These developments show just how fluid and unpredictable the regulatory landscape has become.
What’s fascinating—and frustrating—is how often these cases boil down to semantics. Projects claim their tokens are utility tools, like tickets to a service. But if the primary motivation for buyers is speculation, the SEC sees a security, plain and simple. The challenge is that the legal framework used to make these determinations was created long before blockchain technology existed. The Howey Test, developed in the 1940s to define investment contracts, wasn’t designed for decentralized networks or programmable assets. As a result, applying it to crypto projects isn’t always straightforward. Innovators want to raise money and build communities, but regulators want to protect investors from being misled. The result? A courtroom drama that plays out over and over, with billions of dollars and entire ecosystems hanging in the balance.
Tokens on Ethereum
Blockchain tokens existed before Ethereum. In some ways, the first blockchain currency, Bitcoin, is a token itself. Many token platforms were also developed on Bitcoin and other cryptocurrencies before Ethereum. However, the introduction of the first token standard on Ethereum led to an explosion of tokens.
Vitalik Buterin suggested tokens as one of the most obvious and useful applications of a generalized programmable blockchain such as Ethereum. In fact, during Ethereum’s first year, it was common to see Buterin and others wearing T-shirts emblazoned with the Ethereum logo and a smart contract sample on the back. There were several variations of this T-shirt, but the most common showed an implementation of a token.
Before we delve into the details of creating tokens on Ethereum, it is important to have an overview of how tokens work on Ethereum. Tokens are different from ether because the Ethereum protocol does not know anything about them. Sending ether is an intrinsic action of the Ethereum platform, but sending or even owning tokens is not. The ether balance of Ethereum accounts is handled at the protocol level, whereas the token balance of Ethereum accounts is handled at the smart contract level. To create a new token on Ethereum, you must create a new smart contract. Once the smart contract is deployed, it handles everything, including ownership, transfers, and access rights. You can write your smart contract to perform all the necessary actions any way you want, but it is probably wisest to follow an existing standard. We will look at such standards next.
The ERC-20 Token Standard
The first standard was introduced in November 2015 by Fabian Vogelsteller as an ERC. It was automatically assigned GitHub issue number 20, giving rise to the name “ERC-20 token.” The vast majority of tokens are currently based on the ERC-20 standard. The ERC-20 request for comments eventually became EIP-20, but it is still mostly referred to by the original name, ERC-20.
ERC-20 is a standard for fungible tokens, meaning that different units of an ERC-20 token are interchangeable and have no unique properties. The ERC-20 standard defines a common interface for contracts implementing a token such that any compatible token can be accessed and used in the same way. The interface consists of a number of functions that must be present in every implementation of the standard as well as some optional functions and attributes that may be added by developers.
ERC-20 required functions and events
A token contract that is compliant with ERC-20 must provide at least the following functions and events:
totalSupply
Returns the total units of this token that currently exist. ERC-20 tokens can have a fixed or a variable supply.
balanceOf
Given an address, returns the token balance of that address.
transfer
Given an address and amount, transfers that number of tokens to that address from the balance of the address that executed the transfer.
transferFrom
Given a sender, recipient, and amount, transfers tokens from one account to another. Used in combination with approve.
approve
Given a recipient address and amount, authorizes that address to execute several transfers up to that amount from the account that issued the approval.
allowance
Given an owner address and a spender address, returns the remaining amount that the spender is approved to withdraw from the owner.
transfer
Event triggered upon a successful transfer (call to transfer or transferFrom), even for zero-value transfers.
approval
Event logged upon a successful call to approve.
ERC-20 optional functions
In addition to the required functions listed in the previous section, the following optional functions are also defined by the standard:
Name
Returns the human-readable name (e.g., “US dollars”) of the token.
Symbol
Returns a human-readable symbol (e.g., “USD”) for the token.
decimals
Returns the number of decimals used to divide token amounts. For example, if the number of decimals is 2, then a token amount of 1,000 actually means a balance of 10.
The ERC-20 interface defined in Solidity
Here’s what an ERC-20 interface specification looks like in Solidity:
contract ERC20 {
   function totalSupply() public view returns (uint256 theTotalSupply);
   function balanceOf(address _owner) public view returns (uint256 balance);
   function transfer(address _to, uint256 _value) public returns (bool success);
   function transferFrom(address _from, address _to, uint256 _value) public returns
      (bool success);
   function approve(address _spender, uint256 _value) public returns (bool success);
   function allowance(address _owner, address _spender) public view returns
      (uint256 remaining);
   event Transfer(address indexed _from, address indexed _to, uint256 _value);
   event Approval(address indexed _owner, address indexed _spender, uint256 _value);
}
ERC-20 data structures
If you examine any ERC-20 implementation, you will see that it contains two data structures: one to track balances and one to track allowances. In Solidity, they are implemented with a data mapping.
The first data mapping implements an internal table of token balances, by owner. This allows the token contract to keep track of who owns the tokens. Each transfer is a deduction from one balance and an addition to another balance:
mapping(address account => uint256) _balances;
The second data structure is a data mapping of allowances. As we will see in the next section, with ERC-20 tokens, an owner of a token can delegate authority to a spender, allowing them to spend a specific amount (allowance) from the owner’s balance. The ERC-20 contract keeps track of the allowances with a two-dimensional mapping, with the primary key being the address of the token owner, mapping to a spender address and an allowance amount:
mapping(address account => mapping(address spender => uint256)) public _allowances;
ERC-20 workflows: “Transfer” and “approve and transferFrom”
The ERC-20 token standard has two transfer functions. You might be wondering why.
ERC-20 allows for two different workflows. The first is a straightforward single-transaction workflow using the transfer function. This workflow is the one used by wallets to send tokens to other wallets. The vast majority of token transactions happen with the transfer workflow.
Executing the transfer contract is very simple. If Alice wants to send 10 tokens to Bob, her wallet sends a transaction to the token contract’s address, calling the transfer function with Bob’s address and 10 as the arguments. The token contract adjusts Alice’s balance (–10) and Bob’s balance (+10) and issues a Transfer event.
The second workflow is a two-transaction workflow that uses approve followed by transferFrom. This workflow allows a token owner to delegate their control to another address. It is most often used to delegate control to a contract for distribution of tokens, but it can also be used by exchanges. For example, if a company is selling tokens for an ICO, they can approve a crowdsale contract address to distribute a certain number of tokens. The crowdsale contract can then transferFrom the token contract owner’s balance to each buyer of the token, as illustrated in Figure 10-1.
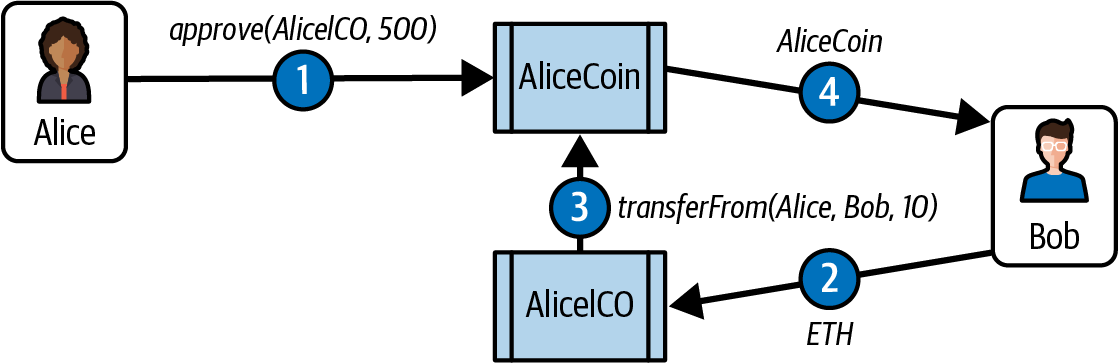
Figure 10-1. The two-step approve and transferFrom workflow of ERC-20 tokens
Note
An initial coin offering (ICO) is a crowdfunding mechanism used by companies and organizations to raise money by selling tokens. The term is derived from initial public offering (IPO), which is the process by which a public company offers shares for sale to investors on a stock exchange. Unlike the highly regulated IPO markets, ICOs are open, global, and messy.
For the approve and transferFrom workflow, two transactions are needed. Let’s say that Alice wants to allow the AliceICO contract to sell 50% of all the AliceCoin tokens to buyers like Bob and Charlie. First, Alice launches the AliceCoin ERC-20 contract, issuing all the AliceCoin to her own address. Then, Alice launches the AliceICO contract that can sell tokens for ether. Next, Alice initiates the approve and transferFrom workflow. She sends a transaction to the AliceCoin contract, calling approve with the address of the AliceICO contract and 50% of the totalSupply as arguments. This will trigger the Approval event. Now, the AliceICO contract can sell AliceCoin.
When the AliceICO contract receives ether from Bob, it needs to send some AliceCoin to Bob in return. Within the AliceICO contract is an exchange rate between AliceCoin and ether. The exchange rate that Alice set when she created the AliceICO contract determines how many tokens Bob will receive for the amount of ether sent to the AliceICO contract. When the AliceICO contract calls the AliceCoin transferFrom function, it sets Alice’s address as the sender and Bob’s address as the recipient and uses the exchange rate to determine how many AliceCoin tokens will be transferred to Bob in the value field. The AliceCoin contract transfers the balance from Alice’s address to Bob’s address and triggers a Transfer event. The AliceICO contract can call transferFrom an unlimited number of times, as long as it doesn’t exceed the approval limit Alice set. The AliceICO contract can keep track of how many AliceCoin tokens it can sell by calling the allowance function.
ERC-2612: Gasless transfers with “permit”
In Chapter 9, we fully explored the ins and outs of the traditional transfer and transferFrom flows with ERC-20 tokens. While these methods have been the backbone of token transfers, they’re not without their limitations. Both require the sender to interact directly with the blockchain, which means they must have some native cryptocurrency on hand to cover gas fees. This creates a significant hurdle, especially when tokens are sent to a brand-new address without any native funds. It’s a frustrating experience and far from ideal.
This is where ERC-2612 steps in. It’s a clever addition to the ERC-20 token standard that lets users approve token transfers without having to touch the blockchain themselves. Here’s how it works: instead of sending an on-chain transaction to approve a transfer, you just sign the necessary data—things like the recipient’s address, the number of tokens, the expiration time, and a nonce—using your wallet. This creates a signature, and whoever needs to execute the transfer (whether it’s the recipient or another party) can submit that signature to the permit method of the token contract. The contract reads the signature, verifies it, and processes the approval, all without you needing to pay gas for the initial step. It’s efficient and secure, and it takes a lot of the hassle out of the process.
For ERC-2612 to work, token developers need to extend their ERC-20 contracts to include this functionality. Once it’s in place, it offers two key benefits for users. First, it simplifies the whole process. Instead of having to approve every single transfer, users can grant permission with one signature. Second, it saves on gas costs since you’re cutting down the number of transactions needed.
ERC-20 implementations
While it is possible to implement a token that is compatible with ERC-20 in about 30 lines of Solidity code, most implementations are more complex. This is to account for potential security vulnerabilities. The EIP-20 standard mentions two implementations, developed by Consensys and OpenZeppelin. The Consensys EIP-20 token has not been maintained since 2018, while OpenZeppelin’s ERC-20 token became the de facto standard for developers and is actively maintained. This implementation forms the basis of OpenZeppelin libraries implementing more complex ERC-20-compatible tokens with fundraising caps, tokenized vaults, vesting schedules, and other features.
Launching Our Own ERC-20 Token
Let’s create and launch our own token. For this example, we will use the Foundry framework. The example assumes that you have already installed Foundry and configured it and that you are familiar with its basic operation.
We will call our token the “Mastering Ethereum Token,” with the symbol MET. First, let’s create and initialize a Foundry project directory with the following commands:
$ mkdir METoken
$ cd METoken
$ forge init
You should now have the following directory structure:
METoken/
├── foundry.toml
├── lib
│   └── forge-std
│       └── ...
├── README.md
├── script
│   └── Counter.s.sol
├── src
│   └── Counter.sol
└── test
    └── Counter.t.sol
Counter is Foundry’s default example contract, which comes with its own test and deploy scripts. We will remove all its related files to make room for our token contract.
For our example, we will import the OpenZeppelin library, the industry standard for Solidity-based tokens:
$ forge install OpenZeppelin/openzeppelin-contracts
[...]
Installed openzeppelin-contracts v5.2.0
Inside METoken/lib/openzeppelin-contracts/contracts, we can now see all the OpenZeppelin contracts. The OpenZeppelin library includes a lot more than the ERC-20 token, but we will use only a small part of it.
Next, let’s write our token contract. Create a new file, METoken.sol, and copy the code in Example 10-1. Our contract is very simple since it inherits all its functionality from the OpenZeppelin library.
Example 10-1. METoken.sol: a Solidity contract implementing an ERC-20 token
pragma solidity 0.8.28;
import "@openzeppelin/contracts/token/ERC20/ERC20.sol";
contract METoken is ERC20 {
    constructor(uint256 initialSupply) ERC20("METoken", "MET") {
        _mint(msg.sender, initialSupply);
    }
}
Here we are passing "METoken" and "MET" as name and symbol to the constructor of the ERC-20 contract. The token initial supply is provided during the deployment as a constructor parameter and will be sent to the deployer of this token contract (msg.sender). We are using the default value for decimals, 18, which is the widely adopted standard for ERC-20 tokens.
We can now use Foundry to compile the METoken contract:
$ forge build
[⠊] Compiling...
[⠒] Compiling 6 files with Solc 0.8.28
[⠢] Solc 0.8.28 finished in 36.18ms
Compiler run successful!
Let’s set up a deploy script to bring the METoken contract to the blockchain. Create a new file METokenDeploy.s.sol, in the METoken/script folder and copy the following code:
pragma solidity 0.8.28;
import {Script, console} from "forge-std/Script.sol";
import {METoken} from "../src/METoken.sol";
contract METokenDeployer is Script {
    METoken public _METoken;
    function run() public {
        vm.startBroadcast();
        _METoken = new METoken(50_000_000e18);
        vm.stopBroadcast();
    }
}
In this example, we are passing 50 million as the initial supply. Did you notice that we are multiplying by 1e18? Those are the token decimals. Remember that in order to have a balance of X tokens, we need a token amount of X × 10 ^ decimals.
Note
The suffix .s.sol for scripts is a Foundry naming convention to quickly identify the purpose of a file. It is not a requirement—it’s enough to place the script files inside the script folder—but it’s a very good practice that will come in handy during development. The same applies to tests with the .t.sol suffix.
Before we deploy on one of the Ethereum test networks, let’s start a local blockchain to test everything. We will use another tool in the Foundry toolbox: Anvil, a local Ethereum development node. To use it, just open a new terminal and type anvil. The console will show a list of available accounts, their private keys, the chain ID, the RPC URL, and other information. The RPC URL is the endpoint that allows Foundry (or any Ethereum client) to communicate with our local blockchain node, enabling transactions, contract deployment, and data retrieval. Anvil’s default RPC is http://127.0.0.1:8545. To tell our deploy script to deploy on our local blockchain, we need to provide Anvil’s RPC URL as a console parameter with the flag --rpc-url "http://127.0.0.1:8545".
The final piece we need is the private key of the deployer account. Since this is a local blockchain, the addresses we use on Ethereum mainnet or testnets won’t have any funds here, and we don’t want to expose real private keys unnecessarily. Instead, we’ll use the test accounts generated by Anvil when it starts up. These accounts come preloaded with 10,000 ETH on our local chain, making them perfect for development and testing.
We are ready to deploy our token by running:
$ forge script script/METokenDeploy.s.sol --broadcast --rpc-url "http://127.0.0.1:8545"
--private-key <DEPLOYER_PRIVATE_KEY>
[⠊] Compiling...
No files changed, compilation skipped
Script ran successfully.
Note
You might be wondering what the
--broadcastflag is for. That is to tell Foundry to actually broadcast the transaction to the blockchain. Without that, Foundry would just simulate the transaction.
The console output informed us that the deploy script ran successfully. If we take a look at the terminal where we are running Anvil, we will notice a lot of activity, among which is our contract creation:
   Transaction: 0xd01e3a90e1f2ee60112658e92f4ebf04c24df67d2ec1315cfb79d145729d15ec
    Contract created: 0xe7f1725E7734CE288F8367e1Bb143E90bb3F0512
    Gas used: 941861
    Block Number: 1
    Block Hash: 0x748b6058dea932317cacf45bb63be82f253554f359b97ace224e35979a92b00a
    Block Time: "Fri, 31 Jan 2025 19:10:42 +0000"
Our METoken was successfully deployed at the following address:
0xe7f1725E7734CE288F8367e1Bb143E90bb3F0512
Alternatively, we can deploy our token using forge’s create console command:
$ forge create METoken --broadcast --rpc-url http://127.0.0.1:8545 --private-key
<DEPLOYER_PRIVATE_KEY> --constructor-args 50000000000000000000000000
Here, the total supply is passed as a constructor argument, taking decimals into account.
Interacting with METoken
We can interact with our contract in several ways. We could use Remix (as we did in Chapter 2), a Solidity REPL like Foundry’s Chisel, or a JavaScript library like ethers.js. We could also execute transactions using Foundry scripts, which are what we are going to use for our examples.
Ethereum addresses are 40-character hexadecimal strings, which aren’t exactly easy to read. To make our examples clearer, we’ll assign nicknames to the two addresses we’re using: Deployer for the address that deployed the MET contract and Alice for a secondary address. We will also use one of Anvil’s prefunded addresses for Alice.
Let’s create a Foundry script to check the Deployer’s METoken balance and send some METoken to Alice. Copy the contents from the following code snippet and paste them in a new file METoken/script/METokenInteraction.s.sol:
pragma solidity 0.8.28;
import {Script, console} from "forge-std/Script.sol";
import {METoken} from "../src/METoken.sol";
contract METokenInteraction is Script {
    METoken public _METoken = METoken(0xe7f1725E7734CE288F8367e1Bb143E90bb3F0512);
    address alice = 0x70997970C51812dc3A010C7d01b50e0d17dc79C8;
    function run() public {
        vm.startBroadcast();
        uint256 ourBalance = _METoken.balanceOf(msg.sender);
        console.log("Deployer initial balance:", ourBalance);
        uint256 aliceBalance = _METoken.balanceOf(alice);
        console.log("Alice initial balance:", aliceBalance);
        uint256 amountToTransfer = 50e18;
        bool success = _METoken.transfer(alice, amountToTransfer);
        if (success) {
            console.log("Transfer successful");
        } else {
            console.log("Transfer failed");
            revert();
        }
        ourBalance = _METoken.balanceOf(msg.sender);
        console.log("Deployer final balance:", ourBalance);
        aliceBalance = _METoken.balanceOf(alice);
        console.log("Alice final balance:", aliceBalance);
        vm.stopBroadcast();
    }
}
We can run the script with the following console command:
$ forge script script/METokenInteraction.s.sol --private-key <DEPLOYER_PRIVATE_KEY>
--rpc-url "http://127.0.0.1:8545" -vv
It’s important to use the same private key that was used for deployment. This ensures that msg.sender corresponds to the deployer address, which holds the initial token supply.
Note
Foundry’s
-vflags control the verbosity level of output when running commands likeforge scriptorforge build. Increasing the number ofvs increases the output verbosity to include more information. To show the console logs, we need at least-vvwhile the maximum verbosity is provided by-vvvv.
Once we run the script, the following will be printed in the console:
[⁘] Compiling...
[:] Compiling 1 files with Solc 0.8.28
[⁖] Solc 0.8.28 finished in 312.39ms
Compiler run successful!
Script ran successfully.
== Logs ==
  Deployer initial balance: 50000000000000000000000000
  Alice initial balance: 0
  Transfer successful
  Deployer final balance: 49999950000000000000000000
  Alice final balance: 50000000000000000000
In this script, we first log the current token balances of the deployer and Alice. Next, we transfer 50 tokens from the deployer to Alice and log the balances again. Keep in mind that 50 tokens are represented as 50e18 because our token has 18 decimals, hence the large number of zeros.
Sending ERC-20 tokens to contract addresses
So far, we’ve set up an ERC-20 token and transferred some tokens from one account to another. All the accounts we used for these demonstrations are EOAs, meaning they are controlled by a private key, not a contract. What happens if we send MET tokens to a contract address? Let’s find out!
First, let’s deploy another contract into our test environment. For this example, we will use the NaiveFaucet.sol contract that follows:
pragma solidity 0.8.28;
contract NaiveFaucet {
    receive() external payable {}
    // Function to withdraw Ether from the contract
    function withdraw(uint256 amount) public {
        require(amount <= address(this).balance, "Insufficient balance in faucet");
        payable(msg.sender).transfer(amount);
    }
}
Our directory should look like this:
METoken/
+---- src
|   +---- NaiveFaucet.sol
|   +---- METoken.sol
Let’s compile and deploy the NaiveFaucet contract:
$ forge create NaiveFaucet --broadcast --rpc-url http://localhost:8545
--private-key <DEPLOYER_PRIVATE_KEY>
[⁘] Compiling...
[:] Compiling 1 files with Solc 0.8.28
[⁖] Solc 0.8.28 finished in 8.69ms
Compiler run successful!
Deployer: 0xf39Fd6e51aad88F6F4ce6aB8827279cffFb92266
Deployed to: 0x9fE46736679d2D9a65F0992F2272dE9f3c7fa6e0
Transaction hash: 0x4d1947547e3cfec8db670f3c1b7ff309b41de8aacee42165578a3ddf8619f63f
Great, our NaiveFaucet contract has been deployed to the address 0x9fE46736679d2D9a65F0992F2272dE9f3c7fa6e0. Now, let’s send some MET to the NaiveFaucet contract by copying the following script to METoken/script/METokenSend.s.sol:
pragma solidity 0.8.28;
import {Script, console} from "forge-std/Script.sol";
import {METoken} from "../src/METoken.sol";
contract METokenSend is Script {
    METoken public _METoken = METoken(0xe7f1725E7734CE288F8367e1Bb143E90bb3F0512);
    address naiveFaucet = 0x9fE46736679d2D9a65F0992F2272dE9f3c7fa6e0;
    function run() public {
        vm.startBroadcast();
        uint256 amountToSend = 100e18;
        bool success = _METoken.transfer(naiveFaucet, amountToSend);
        if (success) {
            console.log("Transfer successful");
        } else {
            console.log("Transfer failed");
            revert();
        }
        uint256 faucetBalance = _METoken.balanceOf(naiveFaucet);
        console.log("Faucet balance:", faucetBalance);
        vm.stopBroadcast();
    }
}
We can run it with:
$ forge script script/METokenSend.s.sol --private-key <DEPLOYER_PRIVATE_KEY>
--rpc-url "http://127.0.0.1:8545" -vv
[⁘] Compiling...
[:] Compiling 1 files with Solc 0.8.28
[⁖] Solc 0.8.28 finished in 413.41ms
Compiler run successful!
Script ran successfully.
== Logs ==
  Transfer successful
  Faucet balance: 100000000000000000000
Again, we need to use the deployer private key to make it work as that is the address that initiates the transfer.
We have transferred 100 MET to the NaiveFaucet contract. Now, how do we withdraw those tokens?
Remember, NaiveFaucet.sol is a pretty simple contract. It only has one function, withdraw, which is for withdrawing ether. It doesn’t have a function for withdrawing MET or any other ERC-20 token. If we use withdraw, it will try to send ether, but since NaiveFaucet doesn’t have a balance of ether yet, it will fail.
The METoken contract knows that NaiveFaucet has a balance, but the only way it can transfer that balance is if it receives a transfer call from the address of the contract. Somehow, we need to make the NaiveFaucet contract call the transfer function in METoken.
If you’re wondering what to do next, don’t. There is no solution to this problem. The MET sent to NaiveFaucet is stuck, forever. Only the NaiveFaucet contract can transfer it, and the NaiveFaucet contract doesn’t have code to call the transfer function of an ERC-20 token contract.
Perhaps you anticipated this problem. Most likely, you didn’t. In fact, neither did hundreds of Ethereum users who accidentally transferred various tokens to contracts that didn’t have any ERC-20 capability. Over the years, a staggering amount of millions of dollars has gotten “stuck” like this and is lost forever.
Demonstrating the “approve and transferFrom” workflow
Our NaiveFaucet contract couldn’t handle ERC-20 tokens. Sending tokens to it using the transfer function resulted in the loss of those tokens. Let’s rewrite the contract now and make it handle ERC-20 tokens. Specifically, we will turn it into a faucet that gives out MET to anyone who asks.
Our new faucet contract, METFaucet.sol, will look like Example 10-2.
Example 10-2. METFaucet.sol: A faucet for METoken
pragma solidity 0.8.28;
import "@openzeppelin/contracts/token/ERC20/IERC20.sol";
contract METFaucet {
    IERC20 public _METoken;
    address public _METOwner;
    constructor(address _metokenAddress, address metOwner) {
        _METoken = IERC20(_metokenAddress);
        _METOwner = metOwner;
    }
    // Function to withdraw METoken from the contract
    function withdraw(uint256 amount) public {
        require(amount <= 10e18, "At most 10 MET");
        require(_METoken.transferFrom(_METOwner, msg.sender, amount), "Transfer failed");
    }
}
We’ve made quite a few changes to the basic Faucet example. Since METFaucet will use the transferFrom function in METoken, it will need two additional variables. One will hold the address of the METoken contract. The other will hold the address of the owner of the MET, who will approve the faucet withdrawals. In our case, the owner is the deployer since they received the initial supply. The METFaucet contract will call METoken.transferFrom and instruct it to move MET from the owner to the address where the faucet withdrawal request came from.
We declare these two variables here:
IERC20 public _METoken;
address public _METOwner;
Since our faucet needs to be initialized with the correct addresses for METoken and METOwner, we need to declare a custom constructor:
// METFaucet constructor - provide the address of the METoken contract and
// the owner address we will be approved to transferFrom
constructor(address _metokenAddress, address metOwner) {
    _METoken = IERC20(_metokenAddress);
    _METOwner = metOwner;
}
The next change is to the withdraw function. Instead of calling transfer, METFaucet uses the transferFrom function in METoken and asks METoken to transfer MET to the faucet recipient:
// Use the transferFrom function of METoken
_METoken.transferFrom(metOwner, msg.sender, withdraw_amount);
Finally, since our faucet no longer sends ether, we should probably prevent anyone from sending ether to METFaucet since we wouldn’t want it to get stuck. To reject incoming ether, it suffices to remove the receive function from our contract.
Now that our METFaucet.sol code is ready, we can deploy it by providing the MET token address and its deployer as address parameters:
$ forge create METFaucet --broadcast --rpc-url http://localhost:8545 --private-key
<DEPLOYER_PRIVATE_KEY> --constructor-args
"0xe7f1725E7734CE288F8367e1Bb143E90bb3F0512""0xf39Fd6e51aad88F6F4ce6aB8827279cffFb92266"
[⁘] Compiling...
No files changed, compilation skipped
Deployer: 0xf39Fd6e51aad88F6F4ce6aB8827279cffFb92266
Deployed to: 0xCf7Ed3AccA5a467e9e704C703E8D87F634fB0Fc9
Transaction hash: 0xa8bfbde9489ee40d41328a80538d0d3e7778b7f3b896c1d51897bf85bb25cec2
The METFaucet contract has been deployed to 0xCf7Ed3AccA5a467e9e704C703E8D87F634fB0Fc9, and we are almost ready to test it. First let’s write a METApprove.s.sol script to allow the METFaucet contract to spend the owner’s MET tokens:
pragma solidity 0.8.28;
import {Script, console} from "forge-std/Script.sol";
import {METoken} from "../src/METoken.sol";
contract METApprove is Script {
    METoken public _METoken = METoken(0xe7f1725E7734CE288F8367e1Bb143E90bb3F0512);
    address _METFaucet = 0xCf7Ed3AccA5a467e9e704C703E8D87F634fB0Fc9;
    function run() public {
        vm.startBroadcast();
        bool success = _METoken.approve(_METFaucet, type(uint256).max);
        if (success) {
            console.log("Approve successful");
        } else {
            console.log("Approve failed");
            revert();
        }
        vm.stopBroadcast();
    }
}
We can run it with:
$ forge script script/METApprove.s.sol --broadcast --private-key <DEPLOYER_PRIVATE_KEY>
--rpc-url "http://127.0.0.1:8545" -vv
[⠊] Compiling...
[⠰] Compiling 2 files with Solc 0.8.28
[⠔] Solc 0.8.28 finished in 327.90ms
Compiler run successful!
Script ran successfully.
== Logs ==
  Approve successful
Now, we can write a script to let a secondary address interact with the METFaucet contract to withdraw 10 MET tokens and log its balance before and after the operation. Let’s create a METFaucetWithdraw.s.sol script as in Example 10-3.
Example 10-3. METFaucetWithdraw: a faucet withdrawal script
pragma solidity 0.8.28;
import {Script, console} from "forge-std/Script.sol";
import {METoken} from "../src/METoken.sol";
import {METFaucet} from "../src/METFaucet.sol";
contract METFaucetWithdraw is Script {
    METoken public _METoken = METoken(0xe7f1725E7734CE288F8367e1Bb143E90bb3F0512);
    METFaucet public _METFaucet = METFaucet(0xCf7Ed3AccA5a467e9e704C703E8D87F634fB0Fc9);
    function run() public {
        vm.startBroadcast();
       uint256 balanceBefore = _METoken.balanceOf(msg.sender);
       console.log("Alice balance before:", balanceBefore);
       _METFaucet.withdraw(10e18);
       uint256 balanceAfter = _METoken.balanceOf(msg.sender);
       console.log("Alice balance after:", balanceAfter);
        vm.stopBroadcast();
    }
}
We can now run this script from Alice’s address by providing her private key while running the script:
$ forge script script/METFaucetWithdraw.s.sol --broadcast --private-key <ALICE_PRIVATE_KEY>
--rpc-url "http://127.0.0.1:8545" -vv
[⠊] Compiling...
[⠰] Compiling 1 files with Solc 0.8.28
[⠔] Solc 0.8.28 finished in 330.97ms
Compiler run successful!
Script ran successfully.
== Logs ==
  Alice balance before: 0
  Alice balance after: 10000000000000000000
As you can see from the results, we can use the approve and transferFrom workflow to authorize one contract to transfer tokens defined in another token. If properly used, ERC-20 tokens can be used by EOAs and other contracts. However, the burden of managing ERC-20 tokens correctly is pushed to the user interface. If a user incorrectly attempts to transfer ERC-20 tokens to a contract address and that contract is not equipped to receive ERC-20 tokens, the tokens will be lost.
Issues with ERC-20 Tokens
The adoption of the ERC-20 token standard has been truly explosive. Thousands of tokens have been launched, both to experiment with the new capabilities and to raise funds in various “crowdfunding” auctions and ICOs. However, there are some potential pitfalls, as we saw with the issue of transferring tokens to contract addresses.
One of the less obvious issues with ERC-20 tokens is that they expose subtle differences between tokens and ether itself. Whereas ether is transferred by a transaction that has a recipient address as its destination, token transfers occur within the specific token contract state and have the token contract as their destination, not the recipient’s address. The token contract tracks balances and issues events. In a token transfer, no transaction is actually sent to the recipient of the token. Instead, the recipient’s address is added to a mapping within the token contract itself. A transaction sending ether to an address changes the state of an address. A transaction transferring a token to an address only changes the state of the token contract, not the state of the recipient address. Even a wallet that has support for ERC-20 tokens does not become aware of a token balance unless the user explicitly adds a specific token contract to “watch.” Some wallets watch the most popular token contracts to detect balances held by addresses they control, but that’s limited to a small fraction of existing ERC-20 contracts.
In fact, it’s unlikely that a user would want to track all balances in all possible ERC-20 token contracts. Many ERC-20 tokens are more like email spam than usable tokens. They automatically create balances for accounts that have ether activity in order to attract users. If you have an Ethereum address with a long history of activity, especially if it was created in the presale, you will find it full of “junk” tokens that appeared out of nowhere. Of course, the address isn’t really full of tokens; it’s the token contracts that have your address in them. You only see these balances if these token contracts are being watched by the block explorer or wallet you use to view your address.
Tokens don’t behave the same way as ether. Ether is sent with the send function and accepted by any payable function in a contract or any externally owned address. Tokens are sent using the transfer or approve and transferFrom functions that exist only in the ERC-20 contract and do not (at least in ERC-20) trigger any payable functions in a recipient contract. Tokens are meant to function just like a cryptocurrency such as ether, but they come with certain differences that break that illusion.
Let’s focus on the approve and transferFrom pattern. For newer users, the approve-transferFrom system can be especially misleading. Many assume that transferring tokens is a single operation, so encountering a two-step process feels confusing and counterintuitive. Worse, the approve action seems harmless but can be a trap. When users approve a contract, they might unknowingly grant unlimited permissions, allowing malicious actors to drain their tokens later. This gap in understanding makes phishing attacks easier and highlights how the system’s design doesn’t align with how newcomers expect to interact with the blockchain.
Consider another issue. To send ether or use any Ethereum contract, you need ether to pay for gas. To send tokens, you also need ether. You cannot pay for a transaction’s gas with a token, and the token contract can’t pay for the gas for you. For example, let’s say you use an exchange to convert some Bitcoin to a token. You “receive” the token in a wallet that tracks that token’s contract and shows your balance. It looks the same as any of the other cryptocurrencies you have in your wallet. Try sending the token, though, and your wallet will inform you that you need ether to do that. You might be confused—after all, you didn’t need ether to receive the token. Perhaps you have no ether. Perhaps you didn’t even know the token was an ERC-20 token on Ethereum; maybe you thought it was a cryptocurrency with its own blockchain. The illusion just broke.
We can partially address this issue with ERC-2612’s permit function and the gas fee sponsorship functionality offered by smart wallets like EIP-4337 and EIP-7702. ERC-2612 lets you approve token allowances by signing off-chain messages, skipping the need for the on-chain approval transaction. EIP-4337 and other smart wallet architectures let third parties pay your gas fees in exchange for reimbursement in ERC-20 tokens. The challenge lies in the limited adoption of ERC-2612 among tokens and the lack of widespread use of smart wallets.
Some of these issues are specific to ERC-20 tokens. Others are more general issues that relate to abstraction and interface boundaries within Ethereum. Some can be solved by changing the token interface, while others may need changes to fundamental structures within Ethereum (such as the distinctions between EOAs and contracts and between transactions and messages). Some may not be “solvable” exactly and may require user interface design to hide the nuances and make the user experience consistent regardless of the underlying distinctions.
In the following sections, we will look at various proposals that attempt to address some of these issues.
ERC-223: A proposed token contract interface standard
The ERC-223 proposal attempts to solve the problem of inadvertent transfer of tokens to a contract (that may or may not support tokens) by detecting whether the destination address is a contract or not. ERC-223 requires that contracts designed to accept tokens implement a function named tokenFallback. If the destination of a transfer is a contract and the contract does not have support for tokens (i.e., does not implement tokenFallback), the transfer fails.
To detect whether the destination address is a contract, the ERC-223 reference implementation uses a small segment of inline bytecode in a rather creative way:
function isContract(address _addr) private view returns (bool is_contract) {
  uint256 length;
    assembly {
       // retrieve the size of the code on target address; this needs assembly
       length := extcodesize(_addr)
    }
    return (length>0);
}
Note
extcodesizereturns the size of the bytecode stored at a given address. Historically, this was the main difference between EOAs and smart contracts: EOAs had no code, and contracts did. But that assumption no longer holds. With EIP-7702, EOAs can now have code attached, blurring the line entirely. There’s also an important edge case: during the constructor phase of a contract, its code has not yet been stored on chain. The EVM only writes the contract’s bytecode to the address after the constructor finishes executing. So if you callextcodesizeon a contract’s own address from within its constructor (or on another contract that hasn’t finished deploying), it will return0, even though that address will eventually contain code. As a result, if an address has no code, it could be an EOA or a contract still under construction. And if it does have code, it could be either a deployed contract or an EOA using a custom code payload. In short, this check no longer reliably tells us whether an address is a contract.
The ERC-223 contract-interface specification is:
interface ERC223Token {
  uint256 public totalSupply;
  function balanceOf(address who) public view returns (uint256);
  function name() public view returns (string _name);
  function symbol() public view returns (string _symbol);
  function decimals() public view returns (uint8 _decimals);
  function totalSupply() public view returns (uint256 _supply);
  function transfer(address to, uint256 value) public returns (bool success);
  function transfer(address to, uint256 value, bytes data) public returns (bool success);
  function transfer(address to, uint256 value, bytes data, string custom_fallback)
      public returns (bool success);
  event Transfer(address indexed from, address indexed to, uint256 value,
                 bytes indexed data);
}
ERC-223 is not widely implemented, and there is some debate in the ERC discussion thread about backward compatibility and trade-offs between implementing changes at the contract interface level versus the user interface. The debate continues.
ERC-777: The future that could have been
ERC-777 brings a fresh approach to token interactions by introducing hooks: functions triggered during token transfers. These hooks are fully compatible with ERC-20, ensuring that existing systems can interact with ERC-777 tokens seamlessly.
The sender’s hook, tokensToSend, is executed before tokens leave the account, allowing senders to add logic like logging or conditional checks. On the other hand, the receiver’s hook, tokensReceived, springs into action when tokens land in an account. At the core of ERC-777’s hook architecture is the ERC-1820 registry, which keeps track of which addresses have implemented the required hooks: tokensToSend for senders and tokensReceived for recipients. This ensures that transfers are successful only when both parties are prepared to handle them, preventing common issues like lost tokens.
Hooks also simplify transactions. With ERC-20, transferring tokens to a contract often requires a cumbersome two-step process: approve and then transferFrom. ERC-777 does away with that, allowing atomic transactions through its hooks. It’s efficient, intuitive, and, frankly, overdue.
Another interesting feature of ERC-777 is its operator mechanism, which allows authorized addresses—often smart contracts, such as exchanges or payment processors—to send and burn tokens on behalf of a holder. Holders have the ability to grant or withdraw authorization for operators whenever they choose, giving them full control over which third parties can manage their tokens on their behalf at any given moment. Every authorization or revocation emits an event, providing visibility into authorization changes.
The ERC-777 contract interface specification is:
interface ERC777Token {
    function name() public view returns (string);
    function symbol() public view returns (string);
    function totalSupply() public view returns (uint256);
    function granularity() public view returns (uint256);
    function balanceOf(address owner) public view returns (uint256);
    function send(address to, uint256 amount, bytes userData) public;
    function authorizeOperator(address operator) public;
    function revokeOperator(address operator) public;
    function isOperatorFor(address operator, address tokenHolder)
        public constant returns (bool);
    function operatorSend(address from, address to, uint256 amount,
                          bytes userData,bytes operatorData) public;
    event Sent(address indexed operator, address indexed from,
               address indexed to, uint256 amount, bytes userData,
               bytes operatorData);
    event Minted(address indexed operator, address indexed to,
                 uint256 amount, bytes operatorData);
    event Burned(address indexed operator, address indexed from,
                 uint256 amount, bytes userData, bytes operatorData);
    event AuthorizedOperator(address indexed operator,
                             address indexed tokenHolder);
    event RevokedOperator(address indexed operator, address indexed tokenHolder);
}
Issues with ERC-777 tokens
While ERC-777 makes token interactions more intuitive, its hooks introduce some significant challenges—most notably, the risk of reentrancy attacks. These attacks take advantage of a contract’s ability to reenter its own logic before fully updating its state, often resulting in severe consequences. The very nature of ERC-777 hooks, which pass execution control to both the sender and receiver during a token transfer, creates an ideal scenario for such exploits. This design means developers must handle these hooks carefully to avoid vulnerabilities.
The most infamous case of reentrancy caused by ERC-777 tokens integration was the Uniswap v1 incident in April 2020. Uniswap, a decentralized exchange protocol, inadvertently exposed its reserves to exploitation due to ERC-777’s hooks. Attackers could call back into the Uniswap contract mid-operation, exploiting the discrepancy between token and ether reserves to siphon out funds. While this vulnerability was specific to how Uniswap interacted with ERC-777, it’s a stark reminder of the risks these hooks introduce.
Another issue worth noting is the potential for DoS attacks. Let’s say a contract distributes ERC-777 tokens to multiple accounts. If one of the recipients is a malicious contract programmed to revert the transaction during the tokensReceived hook, the entire distribution process would be prevented.
These risks highlight why integrating ERC-777 isn’t as simple as swapping out ERC-20. Developers need to adopt best practices like relying on reentrancy locks to mitigate vulnerabilities.
The future that could have been
ERC-777 could have been the next evolution of Ethereum’s token standard. It addresses many pain points of ERC-20, particularly around the user experience and token handling. The ability to prevent lost tokens, enable atomic transactions, and build richer contract interactions are all compelling advancements.
The Ethereum community, however, became hesitant. The potential DoS and reentrancy scenarios cast a long shadow. Developers feared the complexities and risks of integrating ERC-777, even though those risks are manageable with the right precautions. Instead of rising to the challenge, we stuck with the familiar but limited ERC-20. It’s a missed opportunity to embrace a standard that aligns tokens more closely with Ethereum’s philosophy while offering superior functionality.
In the end, ERC-777’s hooks aren’t the villain; improper implementation is. With a bit of effort and adherence to secure coding practices, ERC-777 could pave the way for a more seamless Ethereum ecosystem. To further research the matter, a suggested read is the discussion on the deprecation of ERC-777 by the OpenZeppelin library.
ERC-721: NFT Standard
So far, we’ve explored token standards for fungible tokens, like ERC-20, where each unit is interchangeable and the system cares only about account balances. Now, let’s dive into something different and far more unique: ERC-721, the standard for nonfungible tokens, or as everyone knows them now, NFTs. You may have heard of NFTs during the mania of 2021 when digital collectibles like CryptoPunks, Bored Ape Yacht Club, and NBA Top Shot captured headlines and sold for jaw-dropping sums. Trading platforms like OpenSea and Rarible became household names in the crypto world.
But what exactly makes NFTs special? Unlike ERC-20 tokens, NFTs are all about uniqueness. Each token represents ownership of a distinct item, and that item can be anything: a digital collectible, an in-game asset, a piece of art, or even a real-world asset like property or a car. The beauty of ERC-721 lies in its flexibility. It doesn’t care what the token represents as long as it’s unique and can be identified by a number. Under the hood, this is accomplished with a uint256 identifier for each NFT. Think of it as a serial number that distinguishes one token from another. In ERC-20, we track balances by mapping an account to the amount it holds, but in ERC-721, on top of balances we’re also mapping each unique token ID to its owner:
mapping (uint256 => address) private _owners;
This subtle shift in structure changes everything. Each NFT is tied to a specific owner, and its history, provenance, and unique attributes can be tracked directly. This is what makes ERC-721 perfect for applications where individuality matters, such as proving ownership of a one-of-a-kind artwork, a rare in-game sword, or even a plot of land in the metaverse.
What makes ERC-721 truly powerful and versatile is the optional ERC-721 metadata extension, which allows each token ID to be tied to a uniform resource identifier (URI). This URI can point to metadata describing the NFT, such as its name, description, and image. The URI might be a standard HTTP link pointing to a centralized server or an Inter-Planetary File System (IPFS) link for decentralized storage. Centralized servers can go offline or disappear entirely, making NFTs dependent on third-party infrastructure. By contrast, IPFS helps ensure that metadata remains accessible and tamper resistant, and it is thus the preferred choice for storing NFT metadata. The ability to associate each token with a metadata URI is what enables NFTs to carry rich, descriptive data and multimedia content, further enhancing their uniqueness and usability.
The speculative use of NFTs, particularly as digital collectibles, has undeniably dominated the public narrative. These tokens became a symbol of hype, with values driven by scarcity, celebrity endorsements, and community sentiment. Yet, beyond the flashy headlines is a world of practical applications that have the potential to redefine industries. For instance, NFTs can be used in supply chain management to track the provenance of goods, ensuring authenticity and transparency for consumers. They can represent property deeds, streamlining real estate transactions by automating ownership transfers and reducing fraud. NFTs can also be leveraged in education to issue verifiable credentials, like degrees and certificates, that are tamper proof and universally accessible.
While collectibles brought NFTs into the spotlight, their real promise lies in these practical, transformative uses. By combining uniqueness, traceability, and programmability, ERC-721 tokens are poised to become a foundational building block for the digital economy. Whether you’re minting a quirky piece of art or tokenizing a life-saving medical record, ERC-721 empowers developers to create solutions that go far beyond speculation.
The ERC-721 contract interface specification is as follows:
interface ERC721 /* is ERC165 */ {
    event Transfer(address indexed _from, address indexed _to, uint256 _deedId);
    event Approval(address indexed _owner, address indexed _approved,
                   uint256 _deedId);
    event ApprovalForAll(address indexed _owner, address indexed _operator,
                         bool _approved);
    function balanceOf(address _owner) external view returns (uint256 _balance);
    function ownerOf(uint256 _deedId) external view returns (address _owner);
    function transfer(address _to, uint256 _deedId) external payable;
    function transferFrom(address _from, address _to, uint256 _deedId)
        external payable;
    function approve(address _approved, uint256 _deedId) external payable;
    function setApprovalForAll(address _operator, boolean _approved) payable;
    function supportsInterface(bytes4 interfaceID) external view returns (bool);
}
ERC-1155: Multitoken Standard
Ethereum has come a long way since ERC-20 and ERC-721, which set the foundations for fungible and nonfungible tokens. ERC-1155, the multitoken standard, combines the strengths of both to enable efficient and versatile token management.
Imagine you’re a game developer. You want to create a system where players can collect gold coins (fungible), unique swords (nonfungible), and potions that are consumable in stacks (semifungible). With ERC-20 or ERC-721, you’d need a separate smart contract for each type of token. Each new contract would increase gas costs and add complexity because you’d also need to manage permissions and interactions between these contracts. ERC-1155 solves this problem. It lets us deploy a single contract to manage multiple token types. Each token type is identified by a unique ID, and the contract can handle all operations, including transfers, balances, and metadata retrieval, for any combination of token types. This streamlined approach reduces redundancy and transaction costs, making ERC-1155 a widely adopted standard.
ERC-1155’s batch operations are a standout feature. They let us transfer or query multiple tokens in a single transaction, saving gas and making the standard more scalable. Additionally, ERC-1155 includes safety mechanisms to prevent issues like locked tokens. When transferring tokens to a smart contract, the receiving contract must implement the IERC1155Receiver interface; otherwise, the transaction will revert. These hooks enable advanced interactions during token transfers. For example, a contract could implement custom logic to execute when it receives tokens, such as updating an in-game leaderboard or triggering an event. However, as seen in ERC-777, if these hooks are not handled carefully, they can introduce vulnerabilities, such as reentrancy attacks. Developers must ensure proper safeguards, such as using checks-effects-interactions patterns and reentrancy locks, to secure their contracts when implementing ERC-1155 tokens.
The ERC-1155 contract interface specification is as follows:
interface IERC1155 /* is IERC165 */ {
    event TransferSingle(address indexed operator, address indexed from, address indexed to,
uint256 id, uint256 value);
    event TransferBatch(
        address indexed operator,
        address indexed from,
        address indexed to,
        uint256[] ids,
        uint256[] values
    );
    event ApprovalForAll(address indexed account, address indexed operator, bool approved);
    event URI(string value, uint256 indexed id);
    function balanceOf(address account, uint256 id) external view returns (uint256);
    function balanceOfBatch(
        address[] calldata accounts,
        uint256[] calldata ids
    ) external view returns (uint256[] memory);
    function setApprovalForAll(address operator, bool approved) external;
    function isApprovedForAll(
        address account,
        address operator
    ) external view returns (bool);
    function safeTransferFrom(
        address from,
        address to,
        uint256 id,
        uint256 value,
        bytes calldata data
    ) external;
    function safeBatchTransferFrom(
        address from,
        address to,
        uint256[] calldata ids,
        uint256[] calldata values,
        bytes calldata data
    ) external;
}
Using Token Standards
In the previous section, we reviewed several proposed standards and a couple of widely deployed standards for token contracts. What exactly do these standards do? Should you use these standards? How should you use them? Should you add functionality beyond these standards? Which standards should you use? We will examine some of those questions next.
What Are Token Standards and What Is Their Purpose?
Token standards are the minimum specifications for an implementation. What that means is that in order to be compliant with, say, ERC-20, you need to at minimum implement the functions and behavior specified by the ERC-20 standard. You are also free to add to the functionality by implementing functions that are not part of the standard.
The primary purpose of these standards is to encourage interoperability between contracts. Thus, all wallets, exchanges, user interfaces, and other infrastructure components can interface in a predictable manner with any contract that follows the specification. In other words, if you deploy a contract that follows the ERC-20 standard, all existing wallet users can seamlessly start trading your token without any wallet upgrade or effort on your part.
The standards are meant to be descriptive rather than prescriptive. How you choose to implement those functions is up to you; the internal functioning of the contract is not relevant to the standard. They have some functional requirements, which govern the behavior under specific circumstances, but they do not prescribe an implementation. An example of this is how a transfer function behaves when the value is set to zero. The ERC-20 standard does not specify whether the transaction should revert or not in this case.
Should You Use These Standards?
Given all these standards, each developer faces a dilemma: use the existing standards or innovate beyond the restrictions they impose?
This dilemma is not easy to resolve. Standards necessarily restrict your ability to innovate by creating a narrow “rut” that you have to follow. On the other hand, the basic standards have emerged from experience with hundreds of applications and often fit well with the vast majority of use cases.
As part of this consideration is an even bigger issue: the value of interoperability and broad adoption. If you choose to use an existing standard, you gain the value of all the systems designed to work with that standard. If you choose to depart from the standard, you have to consider the cost of building all the support infrastructure on your own or persuading others to support your implementation as a new standard. The tendency to forge your own path and ignore existing standards is known as “not invented here” syndrome and is antithetical to open source culture. On the other hand, progress and innovation depend on departing from tradition sometimes. It’s a tricky choice, so consider it carefully!
Note
Per Wikipedia, “not invented here” is a stance adopted by social, corporate, or institutional cultures that avoid using or buying already existing products, research, standards, or knowledge because of their external origins and costs, such as royalties.
Detecting Standards: EIP-165
As we’ve seen, standards like ERC-20 simplify interactions between tokens and wallets. But how do we identify which interfaces a smart contract supports? This is where EIP-165 comes in, providing a standardized way for contracts to declare and detect interfaces.
EIP-165 defines a method for contracts to announce the interfaces they implement. Contracts use the supportsInterface function to return a true or false value for a given interface ID (a unique identifier calculated as the XOR of all the function selectors in an interface). For instance, if an interface includes foo() and bar(int256), its ID is derived as:
foo.selector ^ bar.selector
This approach enables other contracts and tools to verify compatibility before interacting. For example, a marketplace can confirm that an NFT contract supports the ERC-721 interface before listing its tokens.
To implement EIP-165, a contract inherits from a base class, such as OpenZeppelin’s ERC-165, and overrides the supportsInterface method to include the contract’s supported interfaces:
contract MyContract is IMyContract, ERC165 {
    function supportsInterface(bytes4 interfaceId) public view override returns (bool) {
        return interfaceId == type(IMyContract).interfaceId ||
super.supportsInterface(interfaceId);
    }
}
To better grasp how EIP-165 works in practice, let’s look at ERC-1155, a versatile and widely used standard for multitoken contracts:
abstract contract ERC1155 is Context, ERC165, IERC1155, IERC1155MetadataURI,
    IERC1155Errors {
[...]
    /**
     * @dev See {IERC165-supportsInterface}.
     */
    function supportsInterface(bytes4 interfaceId) public view virtual override(ERC165,
IERC165) returns (bool) {
        return
            interfaceId == type(IERC1155).interfaceId ||
            interfaceId == type(IERC1155MetadataURI).interfaceId ||
            super.supportsInterface(interfaceId);
    }
[...]
}
Warning
EIP-165 relies on contracts honestly reporting their capabilities. A malicious or poorly implemented contract could falsely claim to support an interface, leading to potential issues. While EIP-165 improves developer experience and reduces friction, it should not be treated as a security guarantee.
For more advanced scenarios, such as when contracts implement interfaces on behalf of others, developers could explore ERC-1820, which uses a global registry to track interface support. While ERC-1820 is more complex than EIP-165, it offers greater flexibility for decentralized systems.
Security by Maturity
Beyond the choice of standard, there is the parallel choice of implementation. When you decide to use a standard such as ERC-20, you have to then decide how to implement a compatible design. There are a number of existing “reference” implementations that are widely used in the Ethereum ecosystem, or you could write your own from scratch. Again, this choice represents a dilemma that can have serious security implications.
Existing implementations are “battle-tested.” While it is impossible to prove that they are secure, many of them underpin millions of dollars’ worth of tokens—billions, in some cases. They have been attacked, repeatedly and vigorously. So far, no significant vulnerabilities have been discovered. Writing your own is not easy; there are many subtle ways a contract can be compromised. It is much safer to use a well-tested, widely used implementation. In our examples, we used the OpenZeppelin implementation of the ERC-20 standard because this implementation is security focused from the ground up.
If you use an existing implementation, you can also extend it. Again, be careful with this impulse. Complexity is the enemy of security. Every single line of code you add expands the attack surface of your contract and could represent a vulnerability lying in wait. You might not notice a problem until you put a lot of value on top of the contract and someone breaks it.
Tip
Standards and implementation choices are important parts of overall secure smart contract design, but they’re not the only considerations (see Chapter 9).
Extensions to Token Interface Standards
The token standards we’ve discussed so far provide essential functionality for creating and managing tokens. However, they’re intentionally minimal, leaving room for projects to extend and adapt them to fit specific needs. Over time, many projects have built on these standards, introducing features that enhance usability, security, and flexibility. OpenZeppelin, a leading library for Ethereum smart contracts, has become the go-to source for such extensions. Let’s explore some of the most notable extensions for ERC-20, ERC-721, and ERC-1155 tokens.
With ERC-20, for example, we see the addition of burning mechanisms. Burning allows tokens to be permanently removed from circulation, reducing supply, which is useful for deflationary models or token economics that require deliberate supply control. On the flip side, some projects incorporate caps to set hard limits on the total supply, ensuring that no more tokens can ever be minted beyond a predefined threshold.
Another interesting addition to ERC-20 is voting functionality. This allows token holders to participate in governance decisions directly through their tokens. Projects that implement this create decentralized decision-making processes, enabling stakeholders to have a say in how a protocol evolves.
ERC-721 has seen similar creativity in its extensions. Features like royalty payments let creators earn a percentage of sales whenever their NFTs are traded. URI storage is another common addition that enables metadata to be stored and retrieved dynamically, which is particularly useful for NFTs with evolving properties. Enumerable extensions allow developers to efficiently list all tokens held by an address, making it easier to build marketplaces or wallets.
ERC-1155, the multitoken standard, hasn’t been left behind. Extensions for ERC-1155 include burnable tokens and pausable contracts, allowing for added flexibility in use cases like gaming or tokenized supply chains. Some implementations also enhance metadata handling, ensuring that token details remain accessible and easy to update.
Beyond these, countless other extensions exist, addressing needs like crowdfunding, blocklisting, allowlisting, and implementing fees on transfers. Developers often combine these features with other standard libraries like OpenZeppelin’s Ownable or Access Control, tapping into even more battle-tested resources.
With flexibility comes responsibility. Extending token standards involves balancing innovation with interoperability. Writing custom features may seem appealing, but it often introduces unnecessary complexity and risks. Instead, leveraging well-established libraries and extensions, like those from OpenZeppelin, ensures security and code quality and significantly reduces development costs. There’s no need to reinvent the wheel when robust, tested solutions already exist.
Conclusion
Tokens are more than just digital currency; they can represent governance rights, access credentials, identities, and real-world assets. Their versatility is only possible thanks to standards like ERC-20, ERC-721, and ERC-1155, which ensure seamless interoperability across wallets, exchanges, and DApps, creating a more efficient and interconnected blockchain ecosystem. In this chapter, we looked at the different types of tokens and token standards, and you built your first token and related application.
Chapter 11. Oracles
In this chapter, we discuss oracles, which are systems that can provide external data sources to Ethereum smart contracts. The term oracle comes from Greek mythology, where it referred to a person in communication with the gods who could see visions of the future. In the context of blockchains, an oracle is a system that can answer questions that are external to Ethereum. Ideally, oracles are systems that are trustless, meaning that they do not need to be trusted because they operate on decentralized principles.
Why Oracles Are Needed
A key component of the Ethereum platform is the EVM, with its ability to execute programs and update the state of Ethereum, constrained by consensus rules, on any node in the decentralized network. To maintain consensus, EVM execution must be totally deterministic and based only on the shared context of the Ethereum state and signed transactions. This has two particularly important consequences: the first is that there can be no intrinsic source of randomness for the EVM and smart contracts to work with, and the second is that extrinsic data can only be introduced as the data payload of a transaction.
Let's unpack those two consequences further. To understand the prohibition of a true random function in the EVM to provide randomness for smart contracts, consider the effect on attempts to achieve consensus after the execution of such a function: node A would execute the command and store 3 on behalf of the smart contract in its storage, while node B, executing the same smart contract, would store 7 instead. Thus, nodes A and B would come to different conclusions about what the resulting state should be, despite having run exactly the same code in the same context. Indeed, it could be that a different resulting state would be achieved every time the smart contract is evaluated. As such, there would be no way for the network, with its multitude of nodes running independently around the world, to ever come to a decentralized consensus on what the resulting state should be. In practice, it would get much worse than this example very quickly because knock-on effects, including ether transfers, would build up exponentially.
Note that pseudorandom functions, such as cryptographically secure hash functions (which are deterministic and therefore can be—and indeed are—part of the EVM), are not enough for many applications. Take a gambling game that simulates coin flips to resolve bet payouts, which needs to randomize heads or tails: a block proposer can gain an advantage by playing the game and only including their transactions in blocks for which they will win. So how do we get around this problem? Well, all nodes can agree on the contents of signed transactions, so extrinsic information, including sources of randomness, price information, weather forecasts, and so on, can be introduced as the data part of transactions sent to the network. However, such data simply cannot be trusted because it comes from unverifiable sources. As such, we have just deferred the problem. We use oracles to attempt to solve these problems, which we will discuss in detail in the rest of this chapter.
Oracle Use Cases and Examples
Oracles, ideally, provide a trustless (or at least near-trustless) way of getting extrinsic (i.e., "real-world" or off-chain) information, such as the results of football games, the price of gold, or truly random numbers, onto the Ethereum platform for smart contracts to use. They can also be used to relay data securely to DApp frontends directly. Oracles can therefore be thought of as a mechanism for bridging the gap between the off-chain world and smart contracts. Mostly, they are used to pass information between different blockchains, such as token prices.
Allowing smart contracts to enforce contractual relationships based on real-world events and data broadens their scope dramatically. However, this can also introduce external risks to Ethereum's security model. Consider a "smart will" contract that distributes assets when a person dies. This is something frequently discussed in the smart contract space and highlights the risks of a trusted oracle. If the inheritance amount controlled by such a contract is high enough, the incentive to hack1 the oracle and trigger distribution of assets before the owner dies is very high.
This could also mean corrupting the human operator of a centralized oracle.
Note that some oracles provide data that is particular to a specific private data source, such as academic certificates or government IDs. The source of such data, such as a university or government department, is fully trusted, and the truth of the data is subjective (truth is only determined by appeal to the authority of the source). Such data cannot therefore be provided trustlessly—that is, without trusting a source—as there is no independently verifiable objective truth. As such, we include these data sources in our definition of what counts as "oracles" because they also provide a data bridge for smart contracts. The data they provide generally takes the form of attestations, such as passports or records of achievement. Attestations will become a big part of the success of blockchain platforms in the future, particularly with regard to the related issues of verifying identity or reputation, so it is important to explore how they can be served by blockchain platforms.
Some more examples of data that oracles may provide include:
-
Random numbers or entropy from physical sources, such as quantum or thermal processes (e.g., to fairly select a winner in a lottery smart contract)
-
Parametric triggers indexed to natural hazards (e.g., triggering of catastrophe bond smart contracts, such as Richter scale measurements for an earthquake bond)
-
Exchange rate data (e.g., for accurate pegging of cryptocurrencies to fiat currency)
-
Capital markets data (e.g., pricing baskets of tokenized assets or securities)
-
Benchmark reference data (e.g., incorporating interest rates into smart financial derivatives)
-
Static or pseudostatic data (e.g., security identifiers, country codes, currency codes, etc.)
-
Time and interval data for event triggers grounded in precise time measurements
-
Weather data (e.g., insurance premium calculations based on weather forecasts)
-
Political events for prediction-market resolution
-
Sporting events for prediction-market resolution and fantasy sports contracts
-
Geolocation data (e.g., as used in supply chain tracking)
-
Damage verification for insurance contracts
-
Events occurring on other blockchains for interoperability functions
-
Ether market price (e.g., for fiat gas price oracles)
-
Flight statistics (e.g., as used by groups and clubs for flight ticket pooling)
In the following sections, we will examine some of the ways oracles can be implemented, including basic oracle patterns, computation oracles, decentralized oracles, and oracle client implementations in Solidity.
Oracle Design Patterns
All oracles provide a few key functions by definition. These include the ability to:
-
Collect data from an off-chain source
-
Transfer the data on chain with a signed message
-
Make the data available
Once the data is available in a smart contract, it can be accessed by other smart contracts via message calls that invoke a retrieve function of the oracle's smart contract; it can also be accessed by Ethereum nodes or network-enabled clients directly.
The three main ways to set up an oracle can be categorized as immediate-read, publish-subscribe, and request-response.
Immediate-Read
Let's start with the simplest type of oracle. Immediate-read oracles are those that provide data that is needed only for an immediate decision, such as, "What is the address for ethereumbook.info?" or "Is this person over 18?" This is illustrated in Figure 11-1.

Figure 11-1. Immediate-read oracle
Those who wish to query this kind of data tend to do so on a "just-in-time" basis; the lookup is done when the information is needed and possibly never again. Examples of such oracles include those that hold data about or that are issued by organizations, such as academic certificates, dial codes, institutional memberships, airport identifiers, self-sovereign IDs, and the like.
This type of oracle stores data once in its contract storage where any other smart contract can look it up using a request call to the oracle contract. It may be updated. The data in the oracle's storage is also available for direct lookup by blockchain-enabled (i.e., Ethereum client–connected) applications without having to go through the palaver and incur the gas costs of issuing a transaction. A shop that needs to check the age of a customer who wants to purchase alcohol could use an oracle in this way. This type of oracle is attractive to an organization or company that might otherwise have to run and maintain servers to answer such data requests.
Note that the data stored by the oracle is likely not to be the raw data that the oracle is serving—for efficiency or privacy reasons, for example. A university might set up an oracle for the certificates of academic achievement of past students. However, storing the full details of the certificates (which could run to pages of courses taken and grades achieved) would be excessive. Instead, a hash of the certificate is sufficient. Likewise, a government might want to put citizen IDs onto the Ethereum platform where clearly the details included need to be kept private. Again, hashing the data (more carefully, in Merkle trees with salts) and only storing the root hash in the smart contract's storage would be an efficient way to organize such a service.
Publish-Subscribe
The next setup is publish-subscribe, where an oracle that effectively provides a broadcast service for data that is expected to change (perhaps both regularly and frequently) is either polled by a smart contract on chain or watched by an off-chain daemon for updates, as shown in Figure 11-2.
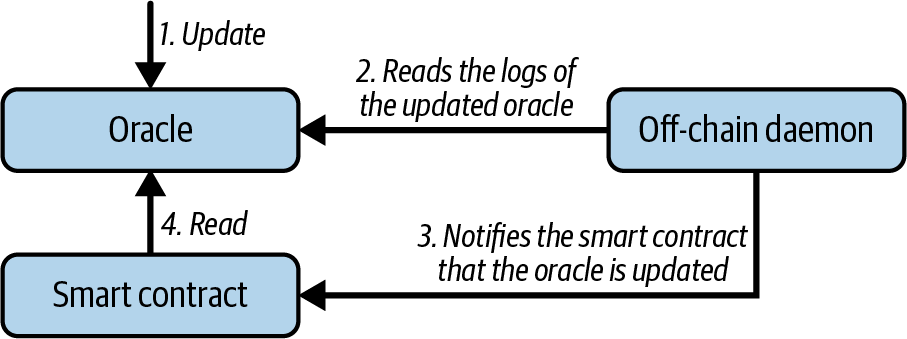
Figure 11-2. Publish-subscribe oracle
Note
It is also possible to remove the off-chain daemon. The oracle can save the timestamp of the update and pass it to the smart contract when the data is being read. This way, the smart contract knows the last update of the data and can choose to use it or not.
This category has a pattern similar to RSS feeds, WebSub, and the like, where the oracle is updated with new information and a flag signals that new data is available to those who consider themselves "subscribed." Interested parties must either poll the oracle to check whether the latest information has changed or listen for updates to oracle contracts and act when they occur. Examples include price feeds, weather information, economic or social statistics, traffic data, and so on.
Polling is very inefficient in the world of web servers but not so in the P2P context of blockchain platforms. Ethereum clients have to keep up with all state changes, including changes to contract storage, so polling for data changes is a local call to a synced client. Ethereum event logs make it particularly easy for applications to look out for oracle updates, so this pattern can in some ways even be considered a "push" service.
Request-Response
The request-response category is the most complicated: this is where the data space is too huge to be stored in a smart contract and users are expected to need only a small part of the overall dataset at a time, as shown in Figure 11-3. It is also an applicable model for data-provider businesses.

Figure 11-3. Request-response oracle
In practical terms, such an oracle might be implemented as a system of on-chain smart contracts and off-chain infrastructure used to monitor requests and retrieve and return data. A request for data from a decentralized application would typically be an asynchronous process involving a number of steps. In this pattern, first an EOA transacts with a decentralized application, resulting in an interaction with a function defined in the oracle smart contract. This function initiates the request to the oracle, with the associated arguments detailing the data requested in addition to supplementary information that might include callback functions and scheduling parameters. Once this transaction has been validated, the oracle request can be observed as an EVM event emitted by the oracle contract or as a state change; the arguments can be retrieved and used to perform the actual query of the off-chain data source. The oracle may also require payment for processing the request, gas payment for the callback, and permissions to access the requested data. Finally, the resulting data is signed by the oracle owner, attesting to the validity of the data at a given time, and delivered in a transaction to the decentralized application that made the request—either directly or via the oracle contract, as shown in Figure 11-3. Depending on the scheduling parameters, the oracle may broadcast further transactions updating the data at regular intervals (e.g., end-of-day pricing information).
The steps for a request-response oracle can be summarized as follows:
-
Receive a query from a DApp.
-
Parse the query.
-
Check that payment and data access permissions are provided.
-
Retrieve relevant data from an off-chain source (and encrypt it if necessary).
-
Sign the transaction(s) with the data included.
-
Broadcast the transaction(s) to the network.
-
Schedule any further necessary transactions, such as notifications and the like.
A range of other schemes is also possible; for example, data can be requested from and returned directly by an EOA, removing the need for an oracle smart contract. Similarly, the request and response could be made to and from an Internet of Things–enabled hardware sensor. Therefore, oracles can be human, software, or hardware.
The request-response pattern described here is commonly seen in client-server architectures. While this is a useful messaging pattern that allows applications to have a two-way conversation, it is perhaps inappropriate under certain conditions. For example, a smart bond requiring an interest rate from an oracle might have to request the data on a daily basis under a request-response2 pattern to ensure that the rate is always correct. Given that interest rates change infrequently, a publish-subscribe pattern may be more appropriate here—especially when taking into consideration Ethereum's limited bandwidth.
Due to this asynchronicity, the requesting DApp/contract needs to be designed to handle delayed responses and cannot expect data immediately in the same transaction.
Publish-subscribe is a pattern where publishers (in this context, oracles) do not send messages directly to receivers but instead categorize published messages into distinct classes. Subscribers are able to express an interest in one or more classes and retrieve only those messages that are of interest. Under such a pattern, an oracle might write the interest rate to its own internal storage each time it changes. Multiple subscribed DApps can simply read it from the oracle contract, thereby reducing the impact on network bandwidth while minimizing storage costs.
In a broadcast or multicast pattern, an oracle would post all messages to a channel, and subscribing contracts would listen to the channel under a variety of subscription modes. For example, an oracle might publish messages to a cryptocurrency exchange rate channel. A subscribing smart contract could request the full content of the channel if it required the time series for, say, a moving average calculation; another might require only the latest rate for a spot price calculation. A broadcast pattern is appropriate where the oracle does not need to know the identity of the subscribing contract.
Data Authentication
If we assume that the source of data being queried by a DApp is both authoritative and trustworthy (a not insignificant assumption), an outstanding question remains: given that the oracle and the request-response mechanism may be operated by distinct entities, how are we able to trust this mechanism? There is a distinct possibility that data may be tampered with in transit, so it is critical that off-chain methods are able to attest to the returned data's integrity. Two common approaches to data authentication are authenticity proofs and trusted execution environments (TEEs).
Authenticity proofs rely on cryptographic guarantees that data has not been altered on its way from the source to the blockchain. These proofs shift reliance from the transport mechanism to a verifiable attestor, such as a data provider, a secure third party, or even a decentralized network of nodes. By validating cryptographic signatures or zero-knowledge attestations on chain, a smart contract can confirm that the information it receives indeed comes from the proper authority and has not been tampered with, often without needing the original data source to implement special signing logic.
Note
One practical example would be Chainlink VRF. From the documentation on Chainlink, we can read, "For each request, Chainlink VRF generates one or more random values and cryptographic proof of how those values were determined. The proof is published and verified on-chain before any consuming applications can use it." So Chainlink VRF is able to prove how it generated the random value, and that is in fact an authenticity proof.
Chainlink VRF works by having a deployed smart contract request a random number from the Chainlink oracle network, providing a hint that the oracle cannot predict. Each oracle uses its private key to generate a random number off chain and then publishes the result and a corresponding cryptographic proof on chain. The smart contract can use the oracle's public key and the original hint to verify that this random output has not been manipulated. Since the proof is validated entirely on chain, an attacker cannot tamper with the result without invalidating the cryptographic checks. In the event that a node is compromised or becomes unresponsive, its failure is recorded on chain, and it is ultimately excluded from providing further randomness.
TEEs reinforce these guarantees by leveraging specialized hardware enclaves that protect and attest to code and data. When a computation runs inside such an enclave, the CPU ensures that outside processes cannot interfere with it or see the underlying data, thus preserving both integrity and confidentiality. The enclave can then provide a digitally signed "attestation" (or proof) that a particular piece of code, identified by a cryptographic hash, is running inside the secure environment. This allows smart contracts to have stronger assurances that any external data or computation hasn't been maliciously altered before arriving on chain. Secure enclaves also enable privacy features since sensitive inputs can be encrypted and processed inside the enclave without ever being revealed to the wider world.
In many modern oracle networks, these methods can be combined to further strengthen data authentication. Some rely on decentralized sets of independent nodes that pull and verify data from different sources, then reach consensus on the correct result. This multioperator system greatly reduces the risk that a single bad actor could compromise the data feed since nodes are incentivized and often economically bonded to remain honest. Others incorporate advanced cryptographic protocols to prove that data was sourced from a particular endpoint without exposing the underlying details, thus reducing dependence on fully centralized verifiers. Certain network operators also deploy hardware enclaves to run their data-fetching logic, ensuring that even if the host environment is compromised, the final results submitted to the blockchain remain unaltered and can be independently verified.
Regardless of the specific implementation, the biggest challenge is to ensure that any data retrieved and passed into a DApp is precise and trustworthy. Authenticity proofs provide a robust way to track and verify where and how data was obtained, while TEEs offer a hardware-backed means of safeguarding the entire process of collecting and relaying off-chain information.
Warning
Because TEEs are relatively new, they remain largely untested and could contain numerous undiscovered vulnerabilities, making it likely that new exploits will be discovered and compromised in the future.
Computation Oracles
So far, we have only discussed oracles in the context of requesting and delivering data. However, oracles can also be used to perform arbitrary computation, a function that can be especially useful given Ethereum's inherent block gas limit and comparatively expensive computation costs. Rather than just relaying the results of a query, computation oracles can be used to perform computation on a set of inputs and return a calculated result that may have been infeasible to calculate on chain. For example, you could use a computation oracle to perform a computationally intensive regression calculation in order to estimate the yield of a bond contract.
Lagrange and Brevis, known as ZK coprocessors, enable smart contracts to run intensive computations off chain while still ensuring on-chain verification. Brevis, for example, lets DApps request complex tasks or historical data without generating an upfront zero-knowledge proof. Instead, the network posts results "optimistically," assuming they are correct. Once the results are published on chain, there is a challenge window when anyone can dispute them. If the results are challenged, the proposer must then produce a full zero-knowledge proof to validate the outcome. If no proof is provided or if the proof shows that the initial results were incorrect, challengers are rewarded, and those who submitted false results are penalized. If no challenges arise, the results are accepted as valid, dramatically cutting down on the number of zero-knowledge proofs required and reducing costs.
Decentralized Oracles
While centralized data or computation oracles suffice for many applications, they represent single points of failure in the Ethereum network. A number of schemes have been proposed around the idea of decentralized oracles as a means of ensuring data availability and the creation of a network of individual data providers with an on-chain data aggregation system.
Chainlink has proposed a decentralized oracle network consisting of three key smart contracts—a reputation contract, an order-matching contract, and an aggregation contract—and an off-chain registry of data providers. The reputation contract is used to keep track of data providers' performance. Scores in the reputation contract are used to populate the off-chain registry. The order-matching contract selects bids from oracles using the reputation contract. It then finalizes a service-level agreement, which includes query parameters and the number of oracles required. This means that the purchaser needn't transact with the individual oracles directly. The aggregation contract collects responses (submitted using a commit-reveal scheme) from multiple oracles, calculates the final collective result of the query, and finally feeds the results back into the reputation contract.
One of the main challenges with such a decentralized approach is the formulation of the aggregation function. Chainlink proposes calculating a weighted response, allowing a validity score to be reported for each oracle response. Detecting an invalid score here is nontrivial since that relies on the premise that outlying data points, measured by deviations from responses provided by peers, are incorrect. Calculating a validity score based on the location of an oracle response among a distribution of responses risks penalizing correct answers over average ones. Therefore, Chainlink offers a standard set of aggregation contracts but also allows customized aggregation contracts to be specified.
A related idea is the SchellingCoin protocol. Here, multiple participants report values, and the median is taken as the "correct" answer. Reporters are required to provide a deposit that is redistributed in favor of values that are closer to the median, therefore incentivizing the reporting of values that are similar to others. A common value, also known as the Schelling point, which respondents might consider as the natural and obvious target around which to coordinate, is expected to be close to the actual value.
Cross-Chain Messaging Protocols
Numerous applications frequently call for data transfers and interactions among several chains, each with its own community governance, consensus rules, and token standards. Cross-chain protocols have emerged as critical tools for facilitating communication among blockchains, allowing smart contracts and decentralized applications to access a wider range of services, liquidity, and data. While oracles bridge external information into a single blockchain, cross-chain protocols extend that concept by connecting entire ecosystems.
One way to understand cross-chain protocols is as specialized "communication layers" that connect blockchains. Instead of being used solely to ingest external data, these protocols facilitate the transfer of information between chains.
Among the popular cross-chain initiatives, LayerZero offers a framework for lightweight message passing across blockchains. It aims to provide a more efficient and flexible interoperability layer by focusing on the "transport" and "validation" of messages. LayerZero's design revolves around two key off-chain entities—the Oracle and the Relayer—that collaborate to verify cross-chain transactions, as illustrated in Figure 11-4.
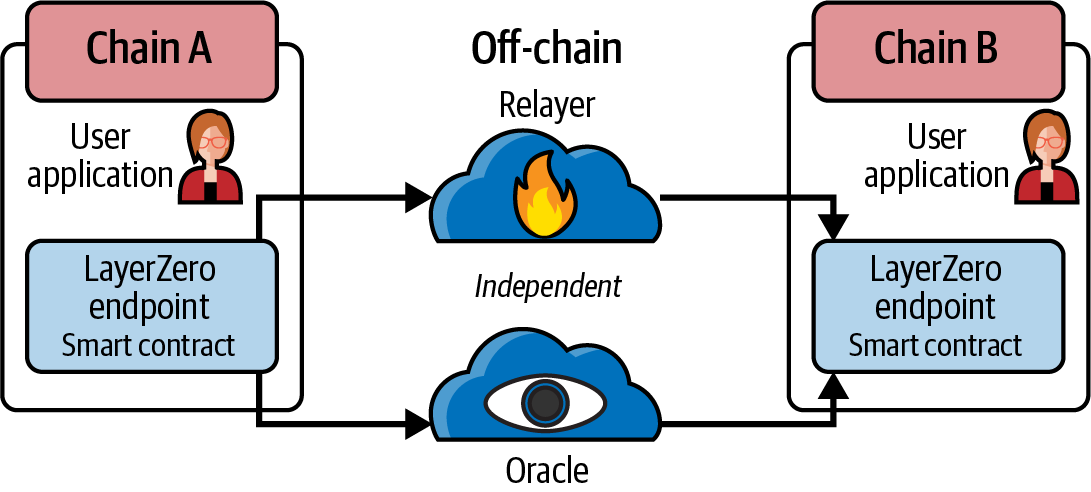
Figure 11-4. LayerZero cross-chain architecture
The Oracle performs an independent query on a transaction's proof or block header, whereas the Relayer passes the proof itself. A user-configurable set of Oracles and Relayers can be used to decentralize trust. If the Oracle and Relayer provide the same data, LayerZero's smart contracts on the destination chain accept the message as valid, allowing developers to create complex interoperability solutions without relying on a single bridging provider or centralized entity.
Another well-known project, Wormhole, originated to enable transfers primarily between Solana and Ethereum. It has since expanded to include other networks, such as Binance Smart Chain, Hyperliquid, and Avalanche. Wormhole's approach is based on a network of guardians that monitor events on a single chain and sign messages attesting to them. Once enough guardians have signed, the attestation is considered valid, allowing the corresponding event (such as a token transfer) to be recognized on the destination chain, as illustrated in Figure 11-5. This scheme can help not only with token bridging but also with more complex tasks, such as cross-chain governance proposals and NFT transfers. Wormhole seeks to reduce the risk of a single point of failure by utilizing the combined security of several guardians; however, this necessitates careful selection and upkeep of guardian sets.
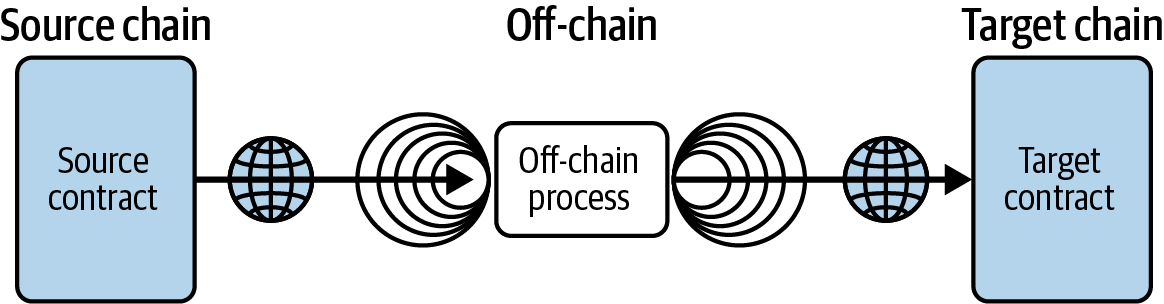
Figure 11-5. Wormhole cross-chain architecture
Chainlink's Cross-Chain Interoperability Protocol (CCIP) builds on the organization's existing oracle network to provide a generalized framework for secure messaging and token transfers between blockchains. Its focus is on delivering a high level of trust minimization, relying on decentralized oracles to verify events across different networks. CCIP can lock or burn tokens on a source chain, then mint or unlock them on the destination chain, making it possible for DApps to extend their functionalities across multiple ecosystems. By reusing the robust infrastructure that Chainlink has developed for decentralized data feeds and verifiable randomness, CCIP offers a natural path for projects already relying on these services to expand into cross-chain operations.
Note
Circle's Cross-Chain Transfer Protocol (CCTP) is also worth mentioning. It works similarly to CCIP, but its use is primarily to bridge USDC between different chains. CCTP has been integrated by Chainlink into CCIP.
Alongside these protocols, an increasing number of interoperability layers and bridging solutions are available, each of which fills a slightly different niche. Projects like Polkadot and Cosmos, for instance, were built from the ground up with cross-chain capabilities, utilizing designs like parachains and hubs to promote seamless asset and data exchange. The Inter-Blockchain Communication (IBC) protocol in Cosmos uses client verification, where each connected chain stores "light clients" of other chains. Polkadot secures parachains via a shared set of validators in the Relay Chain, bundling transactions from each parachain into a unified consensus. These architectures prioritize scalability and security but introduce their own learning curves, especially for developers who are accustomed to Ethereum-like environments.
Conclusion
As you can see, cross-chain protocols and oracles give smart contracts an essential function by bringing outside information into the contract's execution. With that, of course, oracles also introduce a significant risk—if they are trusted sources and can be compromised, they can result in compromised execution of the smart contracts they feed. When you are considering using an oracle, you should generally be very careful about the trust model. Your smart contract may be vulnerable to potentially erroneous inputs if you presume the oracle can be relied upon. However, if the security assumptions are carefully thought out, oracles can be very helpful.
Decentralized oracles can resolve some of these concerns and offer trustless external data for Ethereum smart contracts. Choose carefully, and you can start exploring the bridge between Ethereum and the "real world" that oracles offer.
We also looked at how cross-chain protocols act as a bridge between Ethereum and other ecosystems, carrying over much of the potential and risk associated with oracles but expanding the range of use cases and functionalities even further.
Chapter 12. Decentralized Applications
In this chapter, we'll demystify DApps, explaining what they are, how they work, and how their core architecture is structured. After covering the fundamentals, we'll walk through a practical, hands-on example where you'll build your first DApp from the ground up. This includes deploying the necessary smart contracts, integrating a frontend, and preparing the entire stack for a near-production environment. By the end, you'll have both a working DApp and a solid understanding of the core concepts that underpin these innovative applications.
What Is a DApp?
DApp stands for decentralized application; it's a completely new paradigm shift compared to legacy applications, where you usually have the following architecture, as shown in Figure 12-1:
- A closed source code for the logic part of the app
- A centralized database to store application data into
- A unique frontend to let users access the app
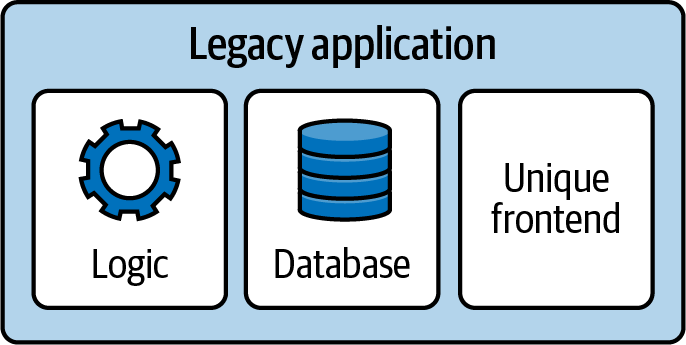
Figure 12-1. General architecture of a legacy application
Think about Instagram, TikTok, your bank, or whatever applications you have on your phone right now. They probably rely on a very similar architecture. You have access to the application only if the team behind it wants you to access it; there are no alternative websites you can visit to log into your Instagram account if the official one is out of service.
DApps have two clear goals: don't have a single point of failure and be a product that people can still use even if the whole team disappears. Their architecture can be simplified in the following way, as shown in Figure 12-2:
- Several Ethereum smart contracts form the basis of the logic part of the DApp. Most of the time, the Solidity (or Vyper) code is open source, too.
- Smart contracts can also contain data, working as a proper database and collecting all necessary user information.
- People can access the app via an official frontend, which is easily replaceable with an alternative one (even one that is made by the community) if the main one doesn't work for whatever reason.
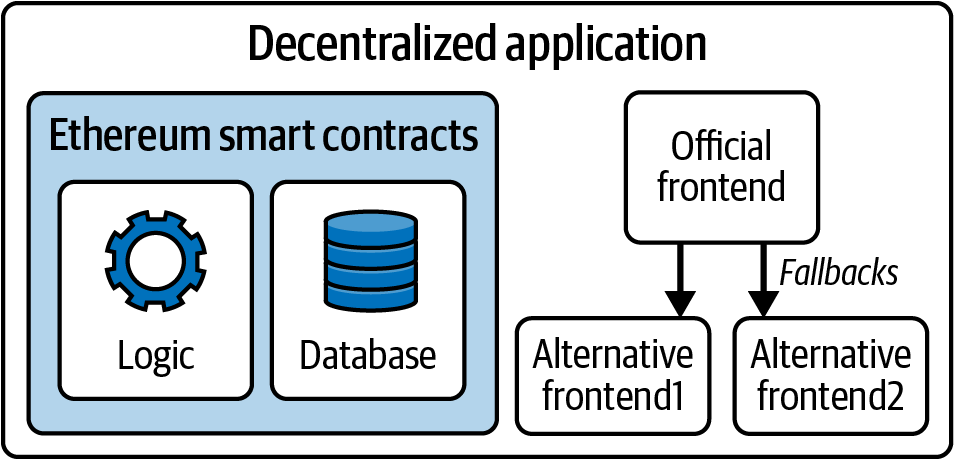
Figure 12-2. General architecture of a DApp
Note
DApps can have some off-chain components with some degree of centralization, too, but usually these components are not fundamental for the core logic of the application. They may be helpful to speed up the application in the average case, but it should always be possible to fully rely on on-chain data in the worst case. This is not always true, and there are definitely some DApps that have core logic parts dependent on centralized components. They are not truly decentralized apps but are more like a hybrid form between legacy and fully decentralized applications.
In the next sections, we'll further explore each component of the DApp stack to better understand how they work and how they relate to one another and the Ethereum protocol.
Backend (Smart Contract)
In a DApp, core business logic and data storage are encoded into smart contracts and run on the Ethereum blockchain instead of residing on a centralized server. The blockchain acts as a decentralized backend where transaction execution, state changes, and record keeping are trustlessly enforced by the network rather than a single entity.
Users don't need to trust any centralized team to access a DApp because they can expect the Ethereum network to always be working properly, handling all their transactions and correctly updating smart contracts' state, no matter the day or the hour.
Furthermore, this architecture introduces a very powerful property: censorship resistance. With traditional applications, you very often have a list of countries that are forbidden to access the app because of government laws or whatever reason. For example, as of 2025, Facebook is banned in Brazil, China, Iran, North Korea, Myanmar, Russia, Turkmenistan, and Uganda. People in those countries cannot create a profile or log into the platform.
With DApps built on Ethereum, this type of censorship is not achievable anymore. Even though it's still possible to ban an official website for a particular DApp, no one can prevent an address from interacting with some random smart contracts on chain. Anyone could jump in and create an alternative frontend for the DApp, and everybody could use it to interact with the DApp again.
The Tornado Cash Saga
It's worth mentioning the story of Tornado Cash here. Tornado Cash is a decentralized mixing service that enables anyone, anywhere, to mix traceable or "tainted" cryptocurrencies with others, obscuring the trail back to their original source by breaking all links between the real sender and receiver of the funds.
On August 8, 2022, the US Treasury Department's Office of Foreign Assets Control blocklisted Tornado Cash, effectively prohibiting US citizens and companies from using it. The platform was accused of laundering more than $7 billion in cryptocurrencies. Two days later, on August 10, one of Tornado Cash's developers, Alexey Pertsev, was arrested in Amsterdam for only the crime of creating the platform itself. The official GitHub repository was removed, and developer accounts were suspended. As of December 2024, the official website remains inaccessible.
Given all of this, you might assume that the Tornado Cash DApp has ceased operations, but this couldn't be further from the truth. While the service has received less attention (and liquidity) since these events, the protocol remains fully functional and accessible through various IPFS-hosted gateways. In other words, anyone in the world can still use Tornado Cash as much as they could before, even without the original official website.
Data Storage
Data storage refers to the solution used to save users' data. Storing and reading data into and out of smart contracts is possible, but it's an expensive operation, and it doesn't scale well; further, not everything needs to be saved on chain.
Usually, smart contracts store critical state information and enforce the DApp logic. Key pieces of information, such as account balances, ownership records, or results of computations, are stored directly in the smart contract. This ensures that sensitive and value-bearing data remains fully transparent, tamper resistant, and accessible to anyone with an Ethereum node.
All other information can be saved in a less decentralized data storage solution, such as a classical database. For example, DApp developers often use indexers for fast data query or centralized databases to store user data, so the frontend doesn't need to interact with the Ethereum chain at all.
Note
A blockchain indexer is a tool that lets developers query and analyze data stored on the blockchain in a fast and efficient way. It takes transaction data, transforms it into machine- and human-readable data, and loads it into a database for easy querying.
In fact, you cannot directly "search" data in the blockchain. For example, let's say you'd like to know how many USDC tokens a certain account held on block 15364050. You cannot just go to the USDC smart contract and look for it because it doesn't store historical data. You could take all the transactions that happened from that block up to now, filter them, and extract all the USDC transfer information that is related to that account, and then you could finally get your answer back. As you can imagine, this is not a desirable approach to follow. This is where indexers come into play. They maintain a database-like structure that lets you immediately run a query for whatever information you need, including historical information, and get an answer back quickly.
The idea is that you only need to store essential data and application logic on chain so that anyone can verify the DApp is working correctly; anything else can and should be left off chain.
IPFS
IPFS is a decentralized, content-addressable storage system that distributes stored objects among peers in a P2P network. Content addressable means that each piece of content (file) is hashed and the hash is used to identify that file. You can then retrieve any file from any IPFS node by requesting it by its hash.
IPFS aims to replace HTTP as the protocol of choice for delivery of web applications. Instead of storing a web application on a single server, the files are stored on IPFS and can be retrieved from any IPFS node. Read the IPFS docs to learn more.
Merkle trees
An interesting and frequently used solution is to save data off chain with a Merkle tree structure and store only the Merkle root on chain. This way, you don't have to store all the data in smart contracts, which would cost you a lot of money in gas fees, but you're still able to perform some sort of validation on chain.
Note
Editor's note: the following code examples refer to "whitelist" in a very specific technical context. Though this term has problematic connotations, it is also widely used throughout the industry and its documentation. While we greatly value inclusivity, the authors have opted to keep the term as-is here for the sake of clarity in this presentation of technical concepts.
The most common use case is when you create an NFT collection and you want to whitelist different addresses so that they can mint those NFTs at a lower price before the public sale is open to everyone. You have two options.
The first is to create a storage variable inside the smart contract that maps each address to a Boolean value, which is true for all whitelisted addresses. Then, you can use this map to verify if a certain address is indeed whitelisted. The user doesn't have to provide anything when submitting the mint transaction; the contract simply checks that msg.sender is included in the whitelisted map, as follows:
// SPDX-License-Identifier: MIT
pragma solidity 0.8.28;

// import OpenZeppelin contracts.
import "@openzeppelin/contracts/token/ERC721/ERC721.sol";
import "@openzeppelin/contracts/access/Ownable.sol";

// A simplified NFT contract with a whitelist mint function that uses a mapping to
// store whitelisted addresses.
contract MyWhitelistNFT is ERC721, Ownable {
    // ... rest of the contract

    // mapping for whitelisted addresses
    mapping(address => bool) public isWhitelisted;

    /**
     * @notice Whitelist mint function.
     */
    function whitelistMint() payable {
        // ... rest of the function

        // check if the user is whitelisted.
        require(isWhitelisted[msg.sender], "You are not whitelisted");

        // mint the NFT.
        _safeMint(msg.sender, nextTokenId);
        nextTokenId++;
    }
}
The second is to create a Merkle tree off chain and store the Merkle root on chain in the contract. Then, you give each whitelisted user its Merkle proof. The user submits the Merkle proof to the contract, which verifies on chain the validity of that proof (usually through some libraries), as follows:
// SPDX-License-Identifier: MIT
pragma solidity 0.8.28;

// import OpenZeppelin contracts.
import "@openzeppelin/contracts/token/ERC721/ERC721.sol";
import "@openzeppelin/contracts/access/Ownable.sol";
import "@openzeppelin/contracts/utils/cryptography/MerkleProof.sol";

// A simplified NFT contract with a whitelist mint function that uses a merkle tree to
// store whitelisted addresses.
contract MyWhitelistNFT is ERC721, Ownable {
    // ... rest of the contract

    // the merkle root of the off-chain generated Merkle Tree.
    bytes32 public merkleRoot;

    /**
     * @notice Whitelist mint function.
     * @dev User must provide a merkle proof to prove they are whitelisted.
     * @param _merkleProof The proof that msg.sender is whitelisted.
     */
    function whitelistMint(bytes32[] calldata _merkleProof) external payable {
        // ... rest of the function

        // verify that (msg.sender) is in the merkle tree using the provided proof.
        bytes32 leaf = keccak256(abi.encodePacked(msg.sender));
        bool isValidLeaf = MerkleProof.verify(_merkleProof, merkleRoot, leaf);
        require(isValidLeaf, "Invalid Merkle Proof: Not whitelisted");

        // mint the NFT.
        _safeMint(msg.sender, nextTokenId);
    }
}
The second option is a lot cheaper and more efficient than the first, especially for large whitelists.
Note
This method greatly reduces gas costs but introduces the potential risk of a dishonest whitelist creator unless the tree and proofs are auditable. Ideally, the original list used to generate the tree should be open source and accessible so that anyone can verify the validity of the resulting Merkle root.
Frontend (Web User Interface)
The frontend of a DApp is created by using any of the most well-known Web2 frameworks, such as React, Angular, or Vue. The interaction with the Ethereum chain, if needed, is abstracted through libraries like viem or ethers.js.
A naive approach to building a DApp frontend is to read data only directly from the chain to update all the components. For example, if you need to display the balances of some tokens that an account holds, you could query the blockchain and get the answer back, repeating this step for every new block.
The main problem with this naive approach is that your website becomes really slow, and it could be very frustrating for users to interact with such a frontend. This is why, as we've mentioned previously, developers often use centralized data storage components in their DApp architecture, minimizing the interaction with the chain: it makes the whole user experience better. So you usually end up with a frontend that relies on some centralized components, but you can always verify all the information by double-checking on the blockchain. Eventually, you could create your own alternative frontend for a particular DApp if you don't trust the official one or simply don't like it at all.
Figure 12-3 shows a complete (simplified) DApp architecture.
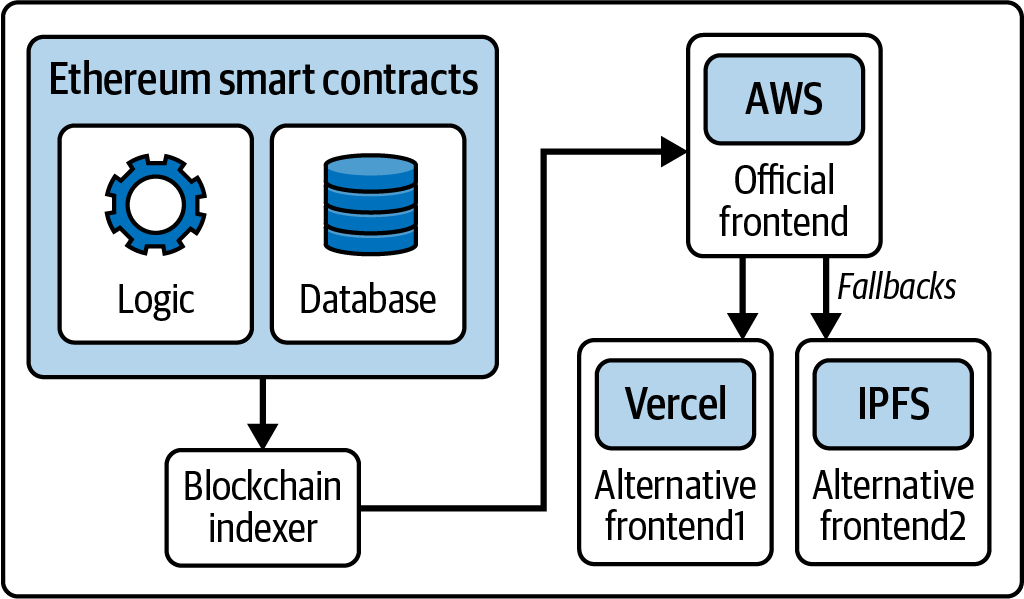
Figure 12-3. Complete DApp architecture
A Basic DApp Example
So far, we've explored the basic concepts behind a DApp. Now, it's time to roll up our sleeves and build a DApp ourselves.
You can find lots of tutorials online to help you build your first DApp on Ethereum from scratch, but we really recommend Speedrun Ethereum. It's the most effective way to learn quickly and immediately start building cool stuff. To increase your knowledge of building DApps on Ethereum, we suggest that you complete all the challenges you can find on Speedrun Ethereum and join the BuidlGuidl community.
In this section, we're going to build a very basic decentralized application, a sort of "Hello World" DApp. You don't need any previous experience; all you need is a computer and an internet connection.
Installation Requirements
To follow this tutorial, you need to install node.js and yarn on your computer. Refer to the official websites to download and install them. We'll use Scaffold-ETH 2, a very cool tool that lets you create your development environment very quickly.
Creating the DApp
Let's open a terminal and run the following command:
$ npx create-eth@latest
It will ask for a project name. We chose "mastering-ethereum" for this demonstration:
 +-+-+-+-+-+-+-+-+-+-+-+-+-+-+
 | Create Scaffold-ETH 2 app |
 +-+-+-+-+-+-+-+-+-+-+-+-+-+-+

? Your project name: mastering-ethereum
Then, it will ask for the Solidity framework we want to use. We'll use Hardhat here, but feel free to choose the one you are more familiar with:
? What solidity framework do you want to use?
❯ hardhat
   foundry
  none
After a couple of seconds, you should see a "Congratulations" and some "Next steps" similar to these:
  Congratulations! Your project has been scaffolded! 🎉

  Next steps:

  cd mastering-ethereum

        Start the local development node

        yarn chain

        In a new terminal window, deploy your contracts

        yarn deploy

    In a new terminal window, start the frontend

    yarn start

 Thanks for using Scaffold-ETH 2 🙏 , Happy Building!
Starting the Chain
We now have everything in place to start building our DApp. Enter the project folder:
$ cd mastering-ethereum
Here, you can find an example smart contract called YourContract.sol if you go into packages/hardhat/contracts. The contracts folder is where you should put every smart contract you will need for your DApp project.
Inside packages/nextjs, you will find the nextjs framework structure already in place for your DApp frontend.
Since this is a very basic tutorial, we won't write any contracts from scratch or modify the frontend. We'll stick with defaults to quickly show the usual workflow.
First, you need to start a chain for local development. In fact, even though the final product will use smart contracts that are deployed on the Ethereum mainnet, you shouldn't use a real chain to build and test your DApp. It would be really slow and a waste of a lot of money, too. Scaffold-ETH comes with a very useful and easy command to immediately start a new chain for local development. You just need to run:
$ yarn chain
Deploying Your Contract
Now, you need to deploy your contract to the local chain that you set up in the previous step. Again, Scaffold-ETH has an easy command for that. Open a new terminal and type:
$ yarn deploy
You should see something like this:
Generating typings for: 2 artifacts in dir: typechain-types for target: ethers-v6
Successfully generated 6 typings!
Compiled 2 Solidity files successfully (evm target: paris).
deploying "YourContract" (tx: 0x8ec9ba16869588c2826118a0043f63bc679a4e947f739e8032e911475e77dcb4)...: deployed at 0x5FbDB2315678afecb367f032d93F642f64180aa3 with 532743 gas
👋  Initial greeting: Building Unstoppable Apps!!!
📝  Updated TypeScript contract definition file on ../nextjs/contracts/deployedContracts.ts
As you can see, this command deploys the contract called YourContract—the example smart contract—on the local chain. In the future, when you build a new DApp, you'll need to go to packages/hardhat/deploy and change the 00_deploy_your_contract.ts file so that you can deploy all the contracts you actually need.
If you go back to the terminal where you previously ran the command yarn chain, you should have some new logs, specifically one similar to this:
eth_sendTransaction
  Contract deployment: <UnrecognizedContract>
  Contract address:    0x5fbdb2315678afecb367f032d93f642f64180aa3
  Transaction:         0x8ec9ba16869588c2826118a0043f63bc679a4e947f739e8032e911475e77dcb4
  From:                0xf39fd6e51aad88f6f4ce6ab8827279cfffb92266
  Value:               0 ETH
  Gas used:            532743 of 532743
  Block #1:            0xa7b8e3b6f82eccb3542279573dbf8efa2b876ff00807a8619feef191007e06d9
Note the Contract deployment and the Contract address lines. That proves that you have successfully deployed your contract on the local chain at that particular contract address.
Starting the Frontend
The Scaffold-ETH example comes with a basic built-in frontend so that you can immediately start interacting with your contracts with a graphical interface. Open a new terminal window and type:
$ yarn start
It should return something like:
yarn start
  ▲ Next.js 14.2.21
  - Local:        http://localhost:3000

 ✓ Starting...
 ✓ Ready in 1767ms
Now copy the localhost URL, open your browser, and paste the link. You should see the frontend, as shown in Figure 12-4.
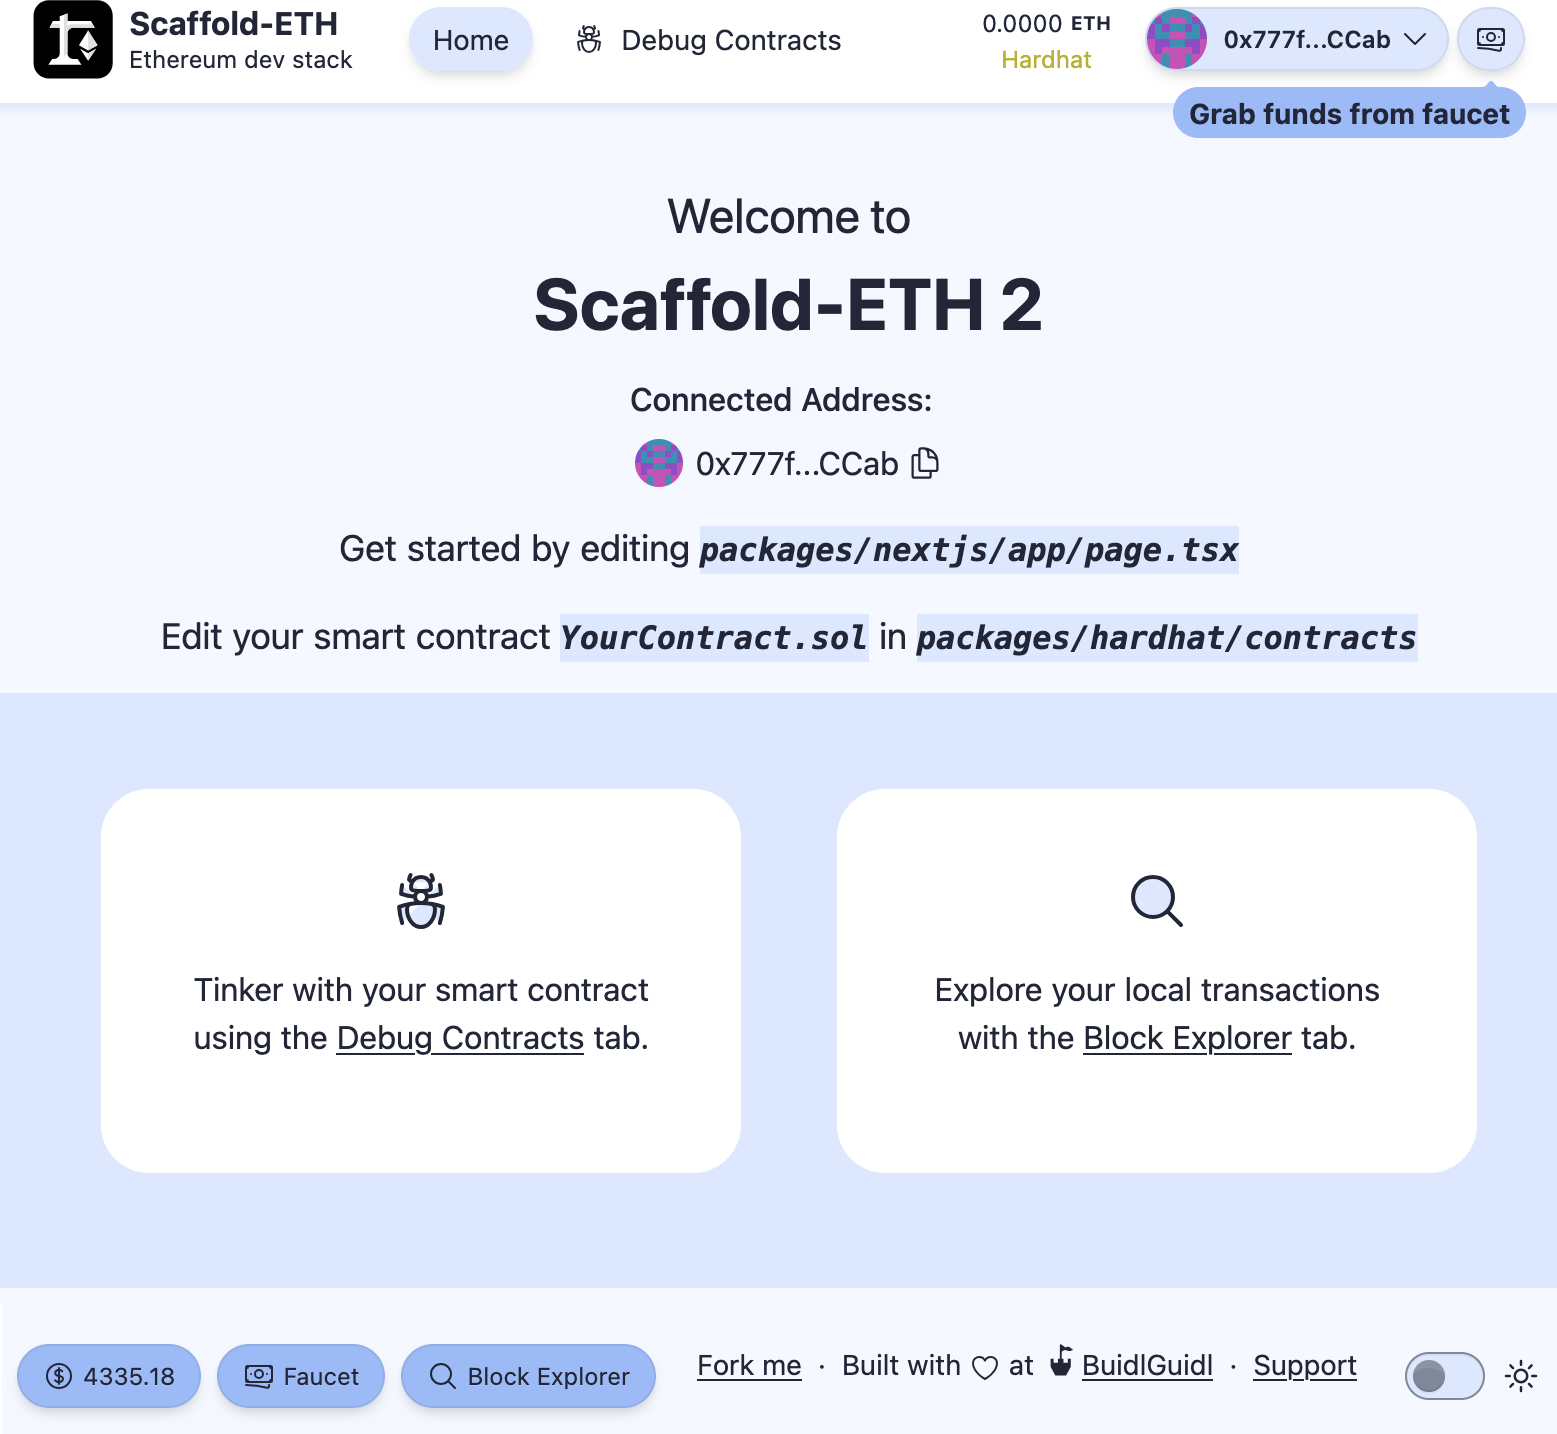
Figure 12-4. Scaffold-ETH frontend
Interacting with Your Contract
Congratulations, you're all set up. You can now experiment and interact with your DApp. There are a couple of really useful features that you'll find fundamental for your development workflow:
- Burner wallets
- Debug Contracts section
As you can see in Figure 12-4, in the upper-right corner, we are already connected to the website with a wallet that may look random and unfamiliar to us. That's because it's a burner wallet: an auto-generated address whose private key is temporarily saved in your web browser. In fact, if you try to update the page, you'll notice that your burner address doesn't change.
Burner wallets are a killer feature for your development workflow since you don't have to open your Web3 wallet and connect it to the website every time. You can still do that once you're ready; you just need to click on the drop-down menu and select Disconnect; then, you can click Connect Wallet and choose your preferred wallet from the list, as shown in Figures 12-5, 12-6, and 12-7.
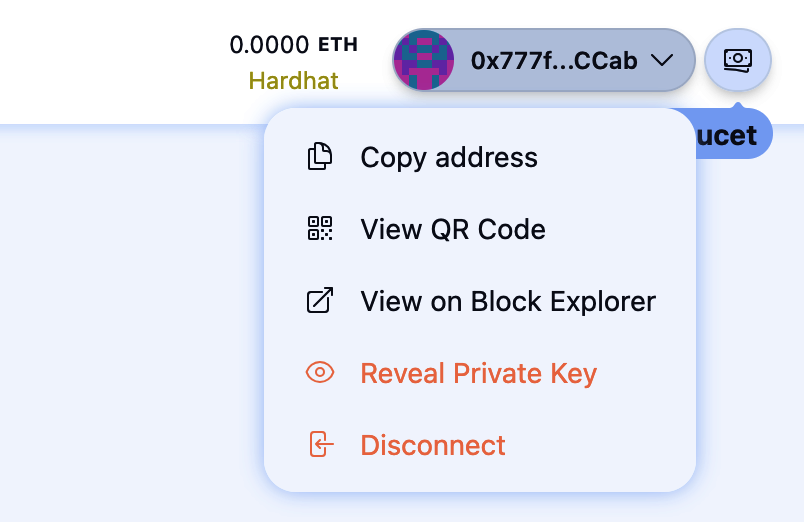
Figure 12-5. Disconnect burner wallet
Figure 12-6. Connect Wallet button
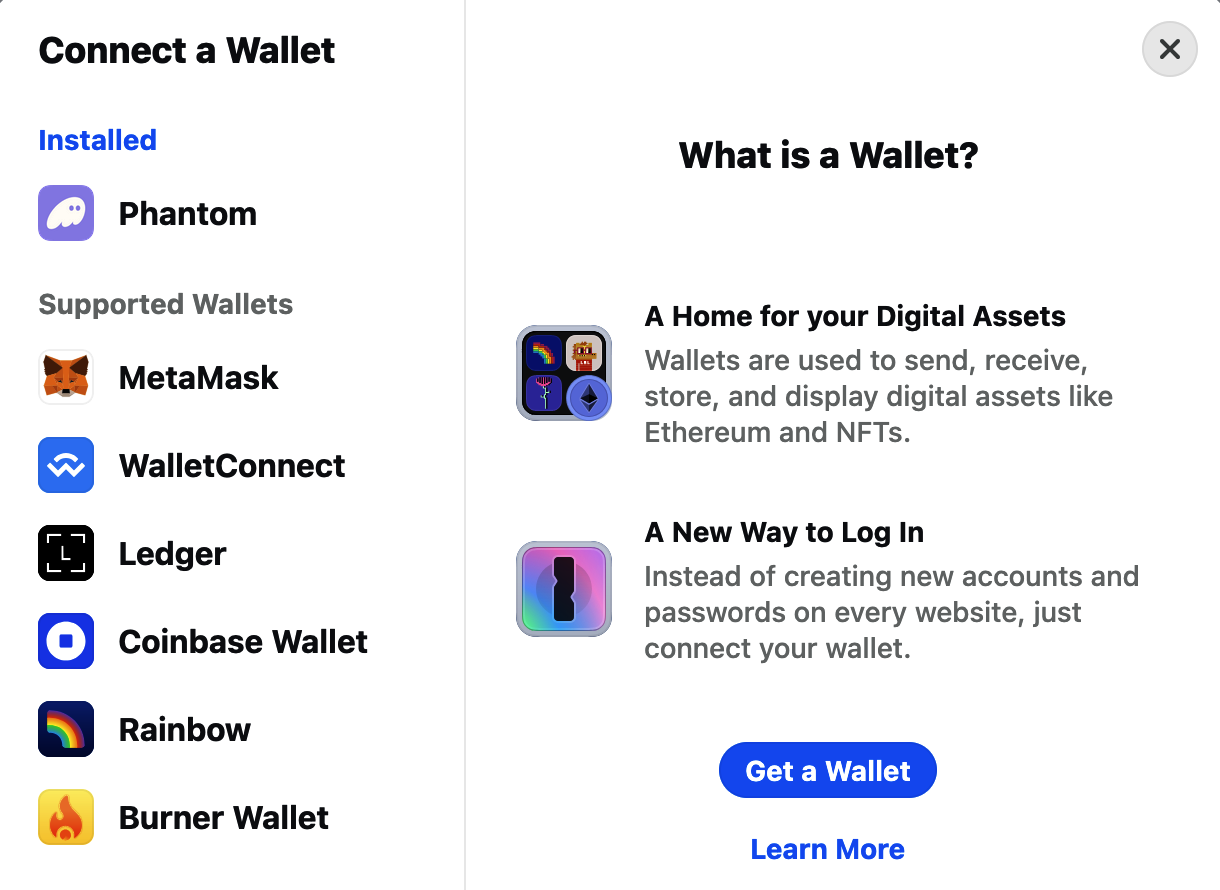
Figure 12-7. Choose wallet
The second killer feature is the Debug Contracts section. To open it, just click the Debug Contracts link at the center of the page. With the default example, you should now see something like Figure 12-8.
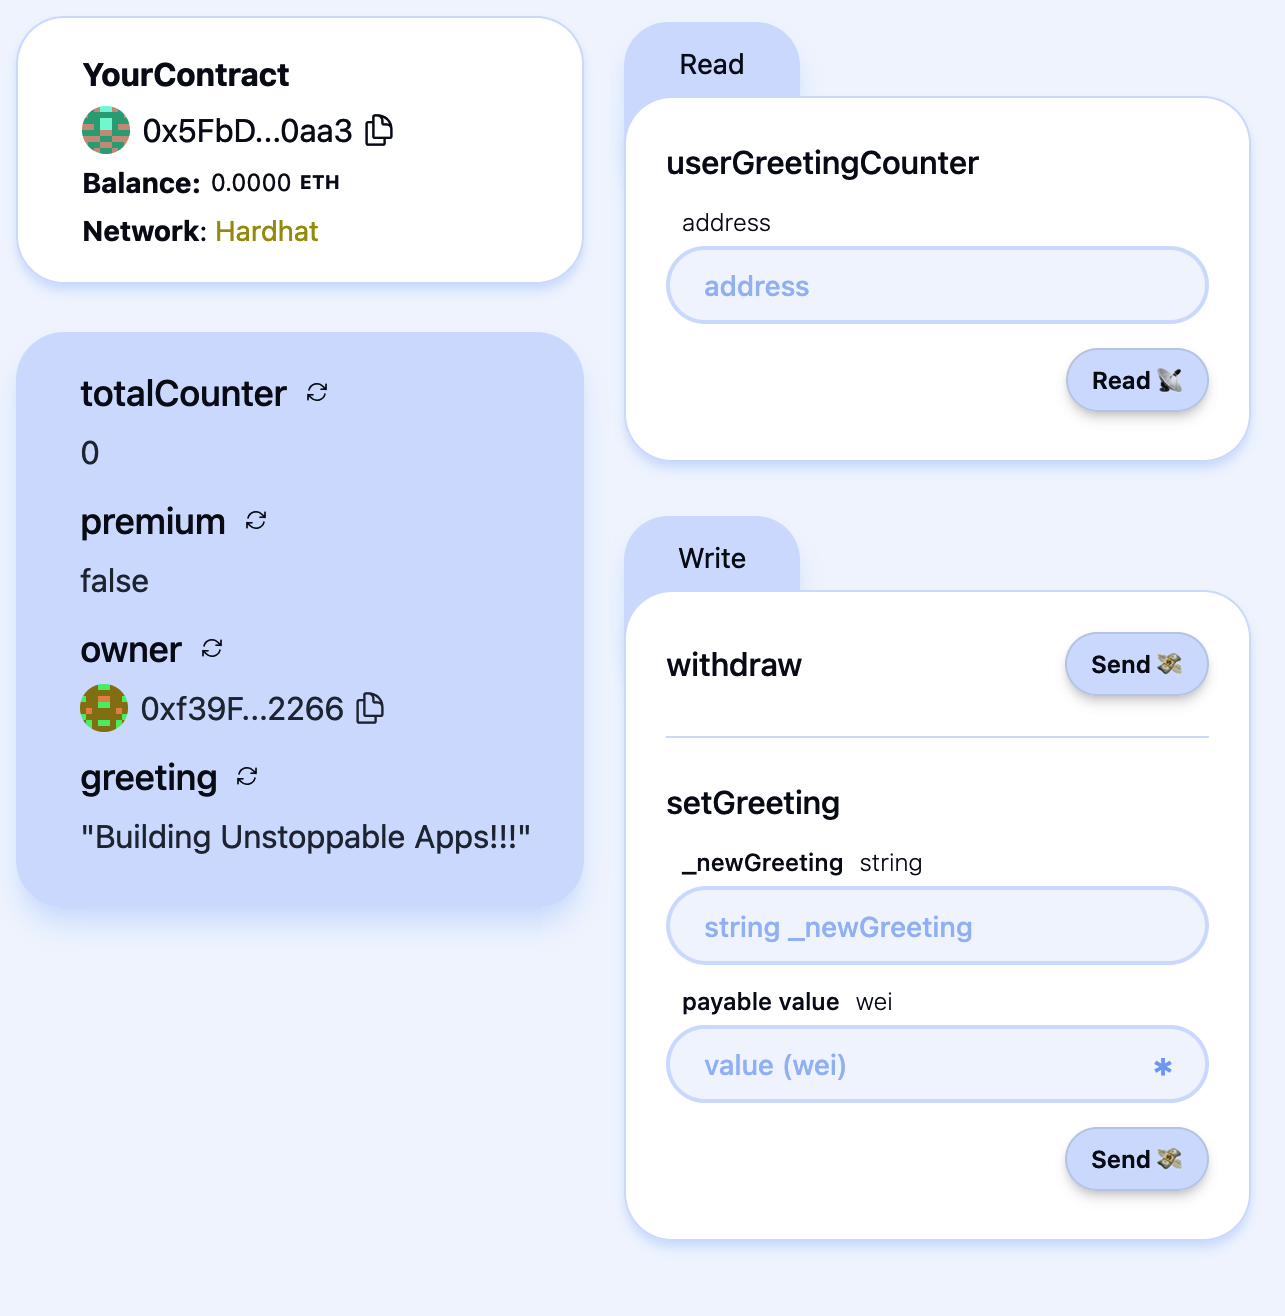
Figure 12-8. Debug Contracts section
Here, you can easily interact with all your contracts without having to build any kind of frontend on top of them. This is really useful during development to constantly check that your contracts work as you expect them to.
Let's do a small demonstration. First, we need to fund our burner wallet so that we can later send some transactions to interact with the deployed contract. To do that, you just need to click on the right-most button, as shown in Figure 12-9. You'll almost immediately receive some ETH, and you'll see your ETH balance increase.
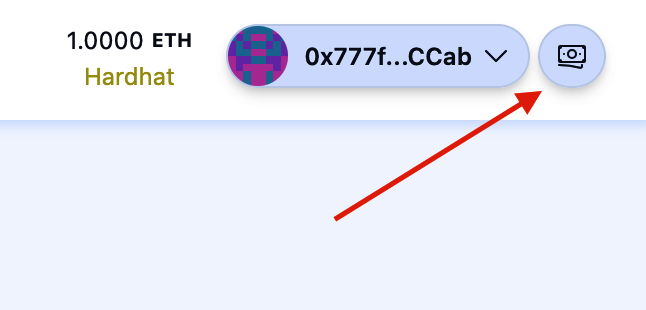
Figure 12-9. Grab funds button
Now go to the setGreeting section and type hello world in the "_newGreeting" field and 0.1 in the "payable value" field. Then, click the asterisk you can find on the right of the "payable value" field: it will transform the ETH value into the same amount represented in wei (1 ETH = 1018 wei). Finally, you can click Send to send your transaction and see how it changes the state of your contract.
Figure 12-10 shows the state of the contract before hitting the Send button. You can see that your contract holds 0 ETH, the greeting is "Building Unstoppable Apps!!!," premium is false, and totalCounter is equal to 0.
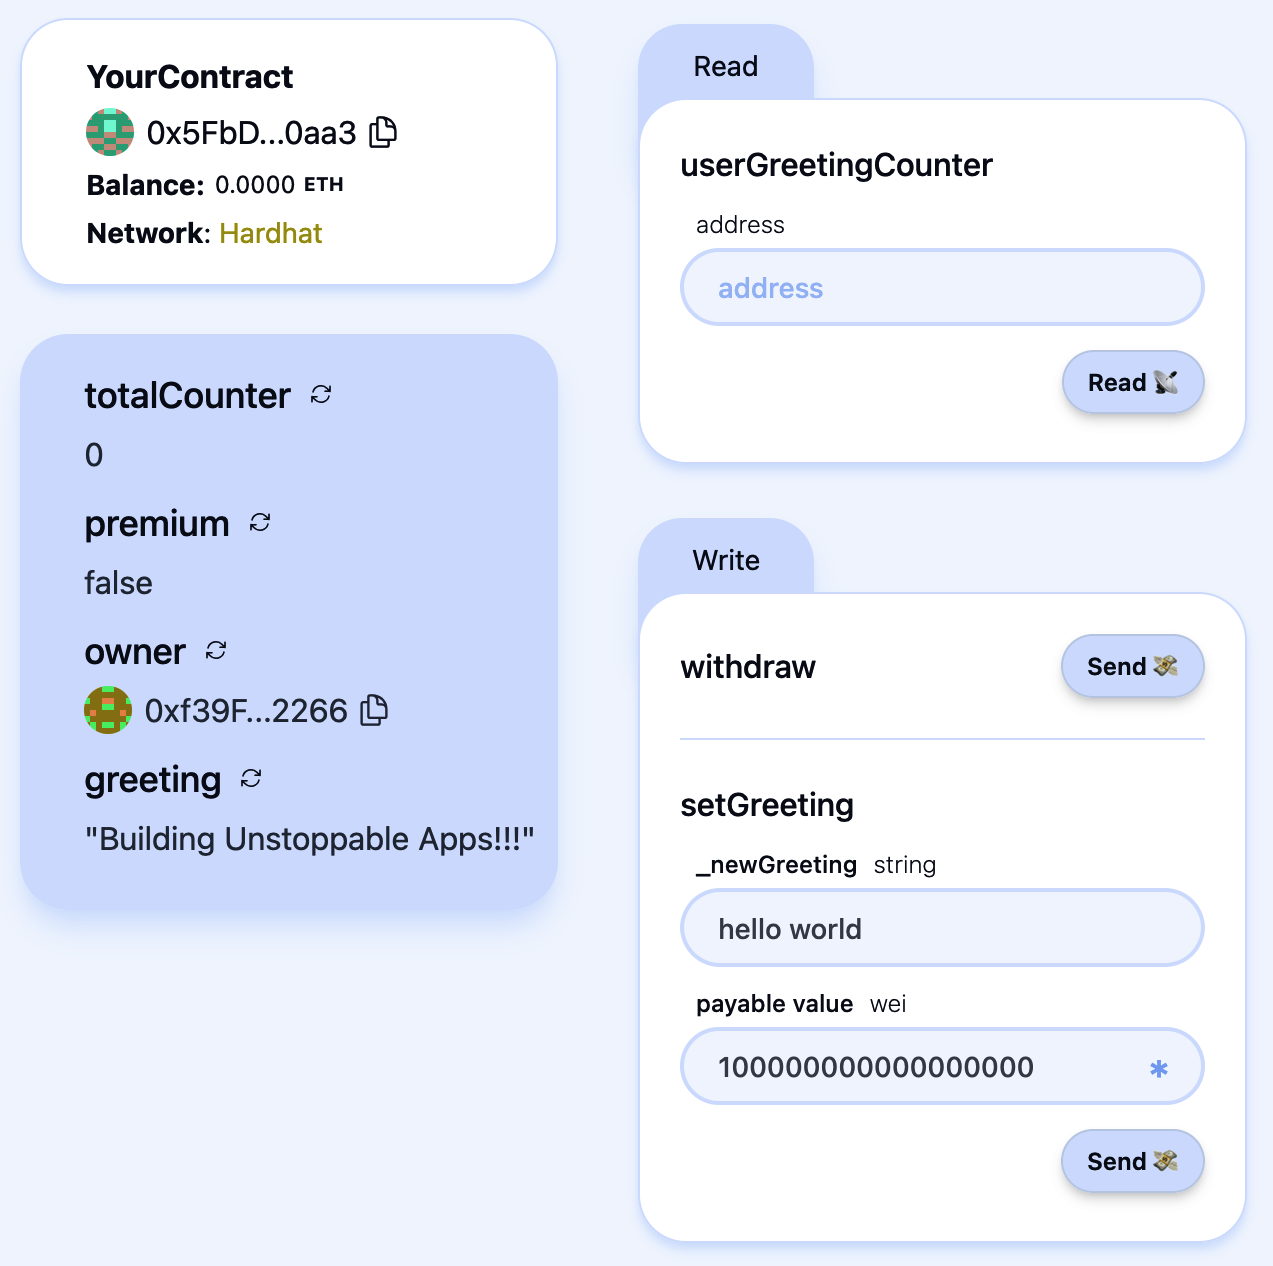
Figure 12-10. Contract state before transaction
Figure 12-11 captures the state of the contract after sending the transaction. You can immediately see that your contract now holds 0.1 ETH, the greeting is "hello world," premium is true, and totalCounter is equal to 1.
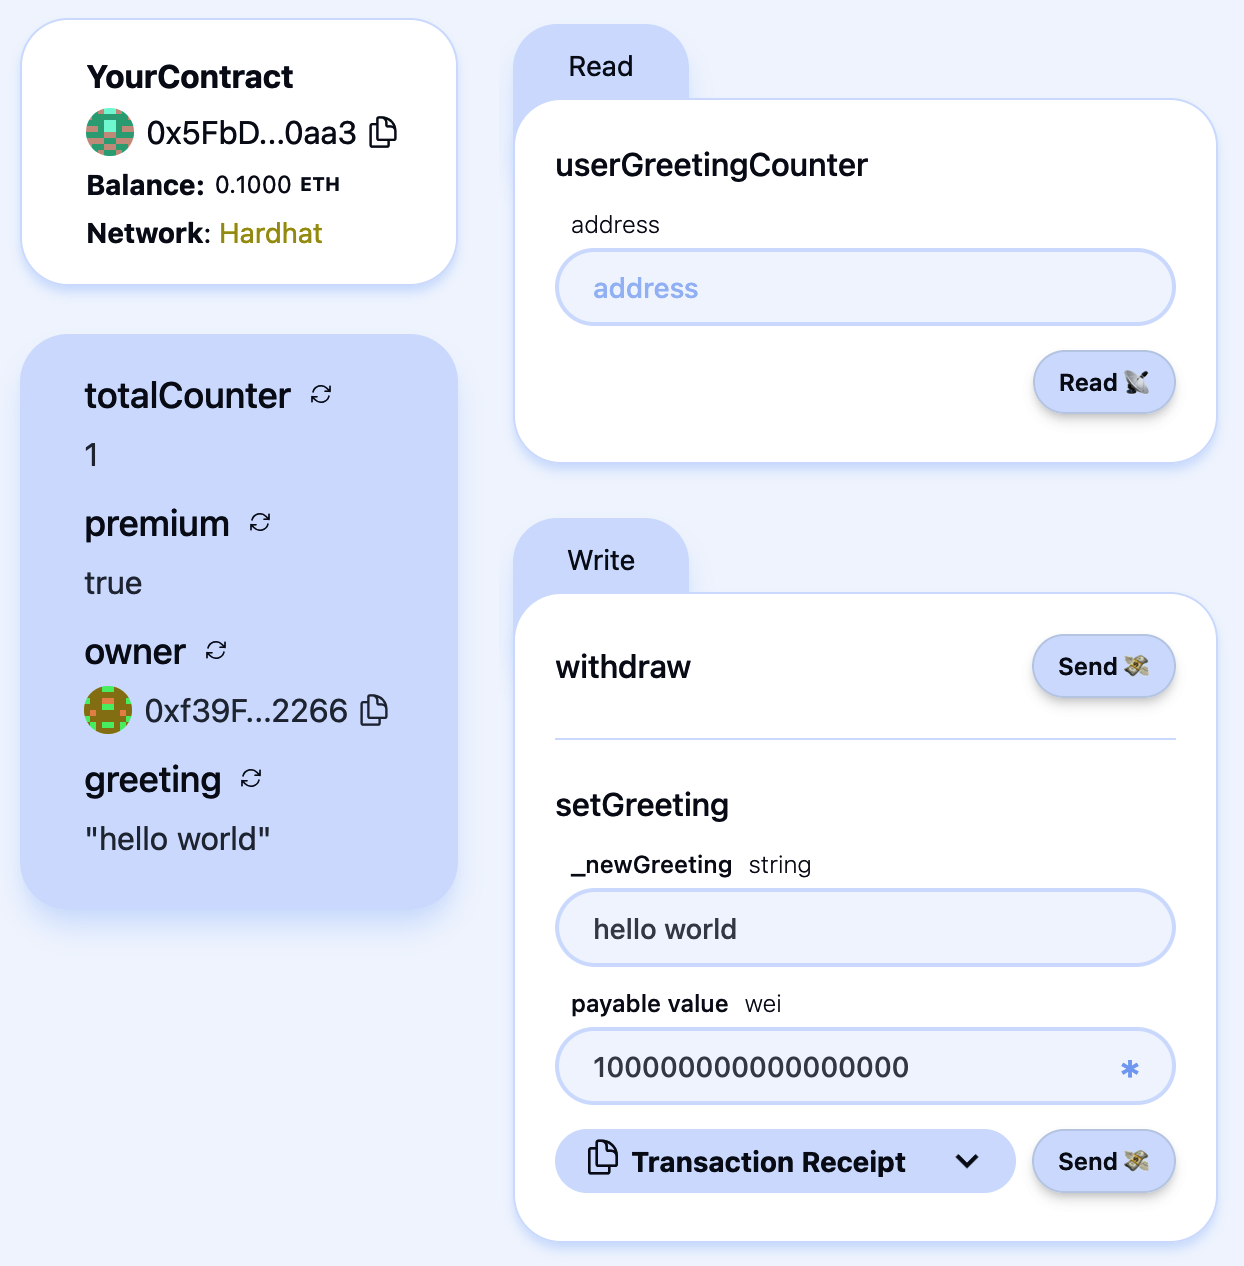
Figure 12-11. Contract state after transaction
You can play around with this and see how your contract behaves based on your inputs and actions.
Deploying Your Contract to a Live Blockchain
Now that you've experimented with your contracts, it's time to deploy them to a real blockchain before publishing your dApp to the world. Up until now, running yarn deploy has only deployed your contracts to your local testnet, which no one else can access, meaning your dApp wouldn't work for anyone but you.
The first step is to generate a deployer account - i.e. the on-chain account that will submit the transaction to deploy your contracts.
$ yarn generate
You'll be prompted for an optional password. If everything goes well, you should see output similar to this:
👛 Generating new Wallet

✔ Enter a password to encrypt your private key:
✔ Confirm password:

📄 Encrypted Private Key saved to packages/hardhat/.env file
🪄 Generated wallet address: 0x3a08bC7AF33bfED880C41A90FeE0D2776C98e3BF

⚠️ Make sure to remember your password! You'll need it to decrypt the private key.
Next, you need to fund your newly generated account with some ETH on the target blockchain. To view your account details and current balance, run:
$ yarn account
Now you're ready to deploy your contract to Ethereum by running:
$ yarn deploy --network mainnet
To complete the setup, update the scaffold.config.ts file to point to the deployed network (Ethereum in our example). Change:
targetNetworks: [chains.hardhat],
to:
targetNetworks: [chains.mainnet],
Your frontend will now connect to the contracts you've deployed on Ethereum mainnet.
Optionally, you can verify your contracts on Etherscan with:
$ yarn verify --network mainnet
Note
Verifying a contract on Etherscan allows anyone to view and read your contract's source code on Ethereum's most popular block explorer, confirming that it matches the actual deployed bytecode.
Deploying to Vercel
When you're satisfied with your decentralized application, you can publish it to a production environment such as Vercel. Vercel is a really useful frontend-as-a-service tool that lets you easily deploy your application to the internet. You can also attach a custom domain that you have bought so that people can reach your DApp just by typing the domain name.
Scaffold-ETH again comes to your aid by providing a single command to immediately deploy your DApp to Vercel. Open a terminal and type:
$ yarn vercel:yolo
You'll need to link your Vercel account (or create a new one if you don't have it) and choose a name for your project—that's it. After a few minutes, you'll have your entire DApp deployed to Vercel, and anyone in the world can go try it out.
If you go to your Vercel profile, you can now see your newly created project. As shown in Figure 12-12, there is a Domains field where you can find the website domain that Vercel auto-generated for you.
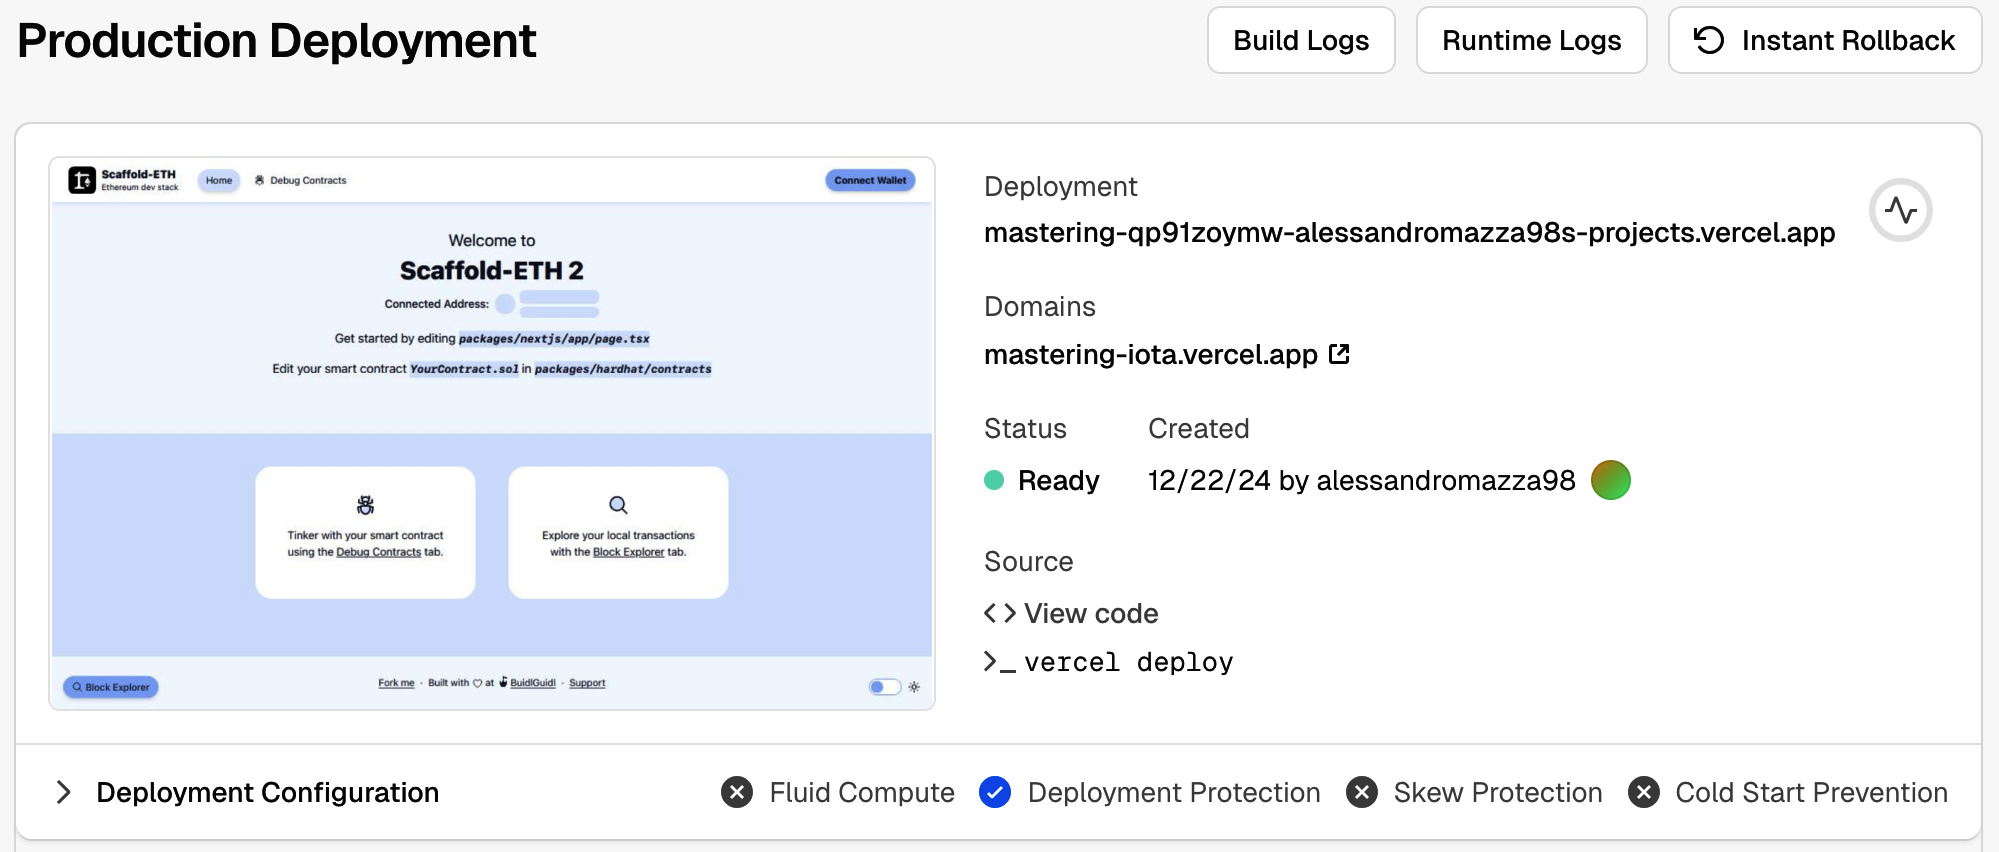
Figure 12-12. Vercel project page
Further Decentralizing the DApp
In the previous section, we deployed our DApp to Vercel. While Vercel is one of the most popular solutions for hosting DApps, it is not a decentralized service. Everything resides on its proprietary servers, which means Vercel could potentially censor any user based on its policies and track the IP addresses of everyone interacting with your DApp.
To further decentralize our DApp, we can host the frontend on solutions like IPFS, a global P2P network of nodes. An emerging service worth mentioning is eth.limo, which aims to match the user experience of mainstream websites—typically served via centralized platforms—with the robustness and decentralization provided by IPFS and similar technologies.
Decentralized Websites
Eth.limo is the missing piece of the puzzle to create better decentralized websites—also called DWebsites—that can be accessed in the same way you usually would with a classic app. It's based on the ENS technology, which makes Ethereum addresses user-friendly with .eth domain names. Vitalik Buterin, one of the cofounders of Ethereum, uses ENS to link his wallet address—0xd8dA6BF26964aF9D7eEd9e03E53415D37aA96045—with the easy-to-remember name vitalik.eth.
ENS goes beyond just linking a domain with an Ethereum address: it can also resolve to an IPFS website (actually the content hash), something like bafybeif3dy…ga4zu. The main problem related to IPFS websites is that most popular web browsers are not able to properly resolve them and show their contents to the user. This is where eth.limo comes into play: it operates a reverse proxy for ENS names and IPFS contents. It captures all requests to *.eth.limo (basically all websites ending with .eth.limo) and automatically resolves the IPFS contenthash of the requested ENS record, returning the corresponding static content over HTTPS. For example, when you go to Vitalik Buterin's official blog, this is what's happening under the hood:
- Eth.limo sees the incoming requests to the
vitalik.ethENS domain. - It resolves it to the IPFS contenthash (that Buterin previously set) containing the home page of his website.
- It returns the corresponding static content over HTTPS.
This way, anyone in the world with a web browser can easily access content that is stored on IPFS with zero configuration or setup needed.
Limitations
Even though DWebsites in general—and eth.limo in particular—are an evolving technology and are improving pretty fast, there are still some limitations at the time of writing this chapter (June 2025). First, IPFS can only handle static files, so it cannot perform any kind of server-side computation. Furthermore, to use eth.limo, you need to buy an ENS and link it to the IPFS contenthash of your frontend. And you must always use the *.eth.limo custom domain; you cannot cut the .limo final part of it, or your web browser will not be able to resolve your ENS name to the IPFS frontend for your DApp. This is probably why most DApps do not use eth.limo.
Tip
Although it's true that most web browsers are not compatible with ENS and IPFS yet, certain browsers are starting to add support for them. One example is Brave.
It must be said that eth.limo is another potentially centralized third party that could stop working without any notice. In case that happens, your DApps would still be reachable through IPFS, but the .eth.limo URL would not redirect users to them anymore.
If you're interested and want to deep-dive into this solution for building fully decentralized websites, you can find a lot more details on the official website.
Deploying to IPFS
Scaffold-ETH 2 has another easy command that lets you quickly push your DApp to IPFS. You just need to open a new terminal and type:
$ yarn ipfs
And it's done! You should see something like this:
   Creating an optimized production build ...

 ✓ Compiled successfully
 ✓ Linting and checking validity of types

 ✓ Collecting page data

 ✓ Generating static pages (8/8)
 ✓ Collecting build traces

 ✓ Finalizing page optimization

…

🚀  Upload complete! Your site is now available at: https://community.bgipfs.com/ipfs/bafybei…
If you go to the displayed website, you should see your DApp working fine with the frontend hosted on IPFS. The string "bafy…" is the IPFS contenthash. You still need to configure eth.limo if you have a personal ENS and want to redirect it to this IPFS-hosted site.
This is what actually happens under the hood of this yarn ipfs command:
- The frontend is built in order to have the static files ready to be uploaded to IPFS.
- The static files are uploaded to IPFS through the BuidlGuidl (the maintainers of Scaffold-ETH 2) IPFS community node.
- A URL is returned that redirects to the static files, working as a reverse proxy for the IPFS content (
community.bgipfs.com/<ipfs-content-hash>).
See BuidlGuidl IPFS if you want to learn how to run your own IPFS node and pin a cluster.
From App to DApp
Over the past several sections, we have gradually built a decentralized application. We used a tool called Scaffold-ETH to facilitate our development workflow: we started a local chain, deployed our contract, and launched a local frontend to immediately begin interacting with and testing our DApp. Next, we published our DApp's frontend to Vercel to show how simple it is to deploy a DApp in a production-ready environment. Finally, we explored how to further decentralize our DApp by posting the frontend to IPFS and using solutions such as ENS and eth.limo, allowing anyone to access it without installing a special app.
Figure 12-13 provides a concise overview of the engineering stack required to create a fully decentralized application.
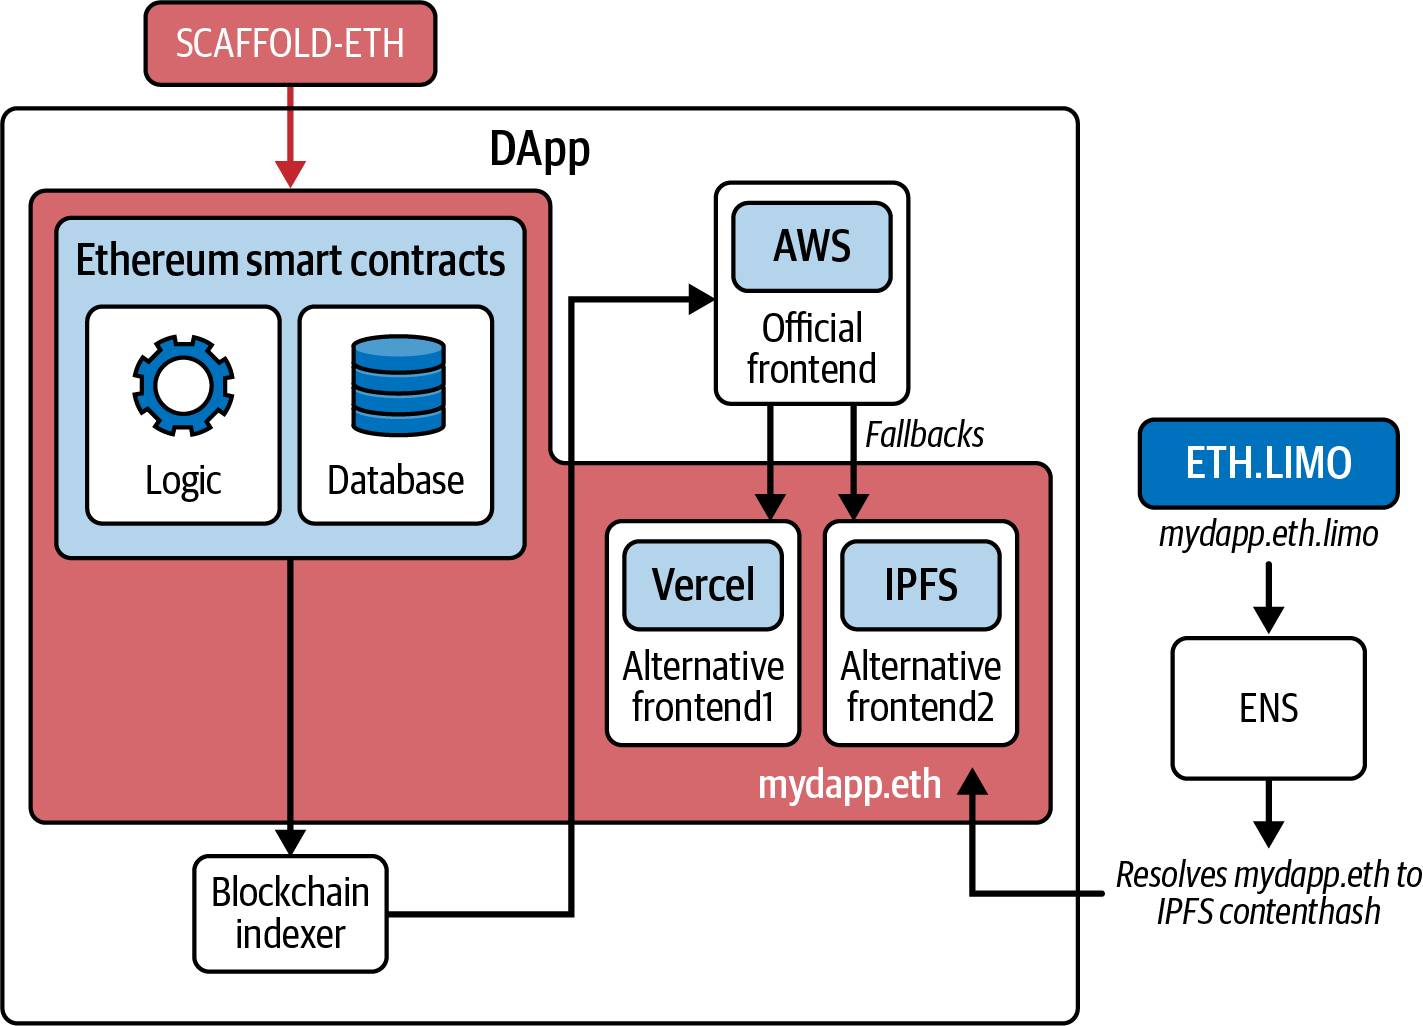
Figure 12-13. Concise overview of the full engineering stack of a DApp
Conclusion
In this chapter, we've explored how to build a basic DApp from scratch using modern tools to streamline the development workflow. In the next chapter, we'll take a closer look at some of the most important DApps—and categories of DApps—on Ethereum that collectively create what is known as DeFi.
Chapter 13. Decentralized Finance
Ethereum's smart contracts have opened up a world of possibilities beyond simple cryptocurrency transactions. Decentralized finance (DeFi) takes this to the next level by creating a complete financial ecosystem that operates entirely on the blockchain. Imagine traditional financial services like lending, borrowing, trading, and investing but without the need for banks, brokers, or any centralized authority. Instead, smart contracts on the Ethereum blockchain handle everything, bringing about a new era of financial autonomy and innovation.
This decentralized approach democratizes access to financial services and introduces a level of transparency and security that is often missing in traditional finance. Every transaction on the blockchain is publicly recorded and immutable, allowing anyone to verify the authenticity and integrity of the data. This level of transparency reduces the risk of fraud and corruption, creating a more trustworthy financial environment.
DeFi also opens opportunities for financial inclusion on a global scale. In regions where traditional banking infrastructure is underdeveloped or inaccessible, DeFi provides a viable alternative. People can participate in the global economy using just a smartphone and an internet connection. This capability can potentially uplift millions by providing access to credit, savings accounts, and investment opportunities that were previously out of reach. The programmability of Ethereum's smart contracts allows for the creation of complex financial instruments and services that are difficult or impossible to implement in the traditional financial system.
Currently, the primary users of DeFi are probably not the underbanked or unbanked populations of developing countries, but rather individuals from first-world nations looking to capitalize on the highly speculative nature of cryptocurrencies. While there will always be room for speculation, it's important to ensure that inclusive financial products are accessible to everyone worldwide.
DeFi Versus Traditional Finance
DeFi is the cryptopunk response to the traditional financial (TradFi) system, representing a field that is still evolving but has already found its niche of dedicated users and innovative builders. The distinction between DeFi and TradFi is complex. However, the most significant differences lie in the mediums of exchange and the inherent properties of the blockchain, such as openness and transparency. DeFi primarily uses cryptocurrencies, which are often decentralized to varying degrees, while TradFi relies on fiat currencies, which are always centralized to the maximum degree.
TradFi systems often have high barriers to entry. Opening a bank account, obtaining a loan, or investing in financial markets typically requires significant documentation and compliance with various regulatory requirements. This process can exclude large segments of the global population, particularly those in underbanked regions. This can be seen in Figure 13-1.
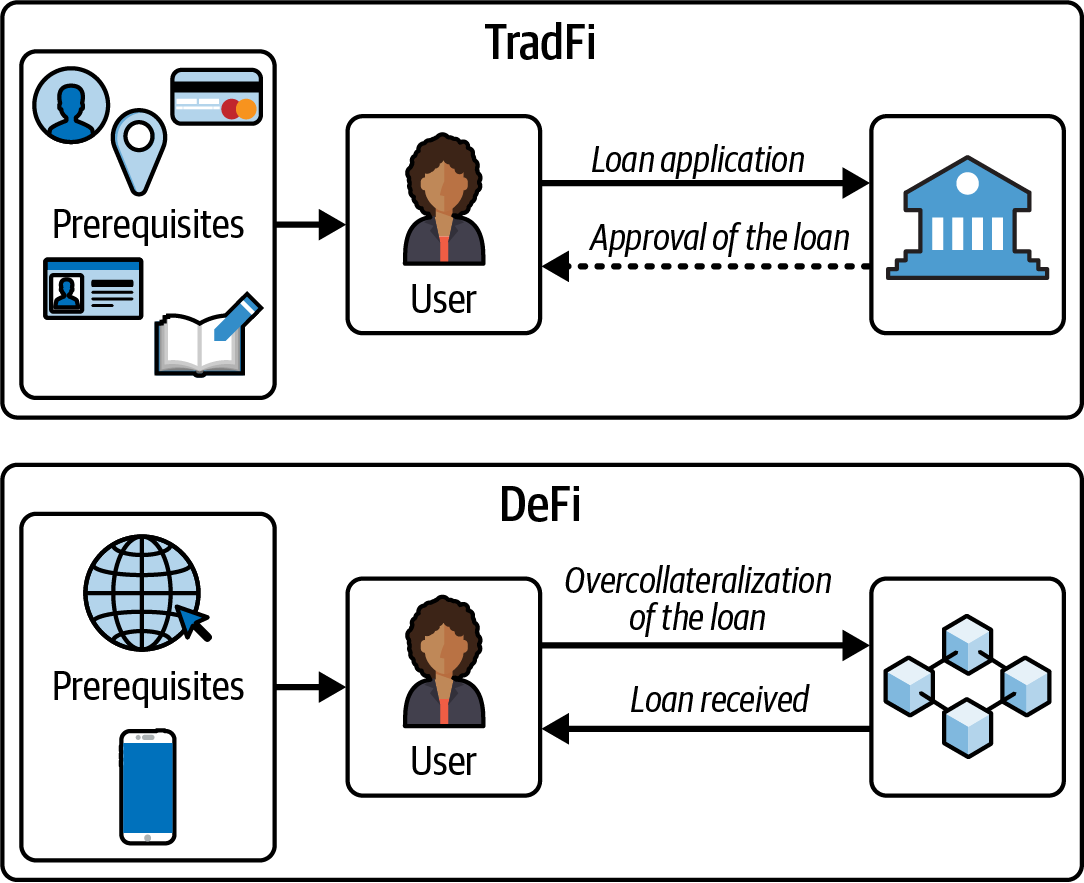
Figure 13-1. Traditional finance versus DeFi loan requirements
A regular user needs many prerequisites to open a loan application, such as an ID, a provable physical address, a Social Security number, a bank account, signed documents, and a good credit score. Even with all these, the request might still be denied, and if it is approved, that will probably take a long time to happen.
In DeFi, only three prerequisites are needed: a phone, an internet connection, and enough assets to overcollateralize the loan. Once these are in place, the loan is instant, decentralized, and permissionless.
DeFi, by design, is more accessible. Anyone with an internet connection can interact with DeFi protocols, which opens financial services to billions of people who are excluded from the traditional system. The high accessibility of DeFi makes it difficult or impossible to apply TradFi's mechanisms for assessing creditworthiness and resolving fraud, which some view as a drawback and others as an improvement.
Another fascinating aspect of DeFi is its ability to create new financial instruments that are impossible within the traditional financial system. For example, flash loans allow users to borrow funds without collateral as long as the loan is repaid within the same transaction. This capability, which is unique to DeFi, opens a range of possibilities for arbitrage, collateral swaps, and other complex financial maneuvers that simply cannot be replicated in TradFi.
DeFi Primitives
While cryptocurrencies like Bitcoin aim to improve and decentralize the concept of money, DeFi projects build on this foundation to decentralize and improve financial services. To fully grasp the financial services offered by DeFi, it is essential to understand several key concepts.
Acceptability of Tokens in DeFi
In Ethereum's DeFi ecosystem, each token operates as a distinct contract. This can cause confusion for beginners since there may be tokens with similar names and functions that are, in reality, entirely different forms of money.
Take, for instance, the Arbitrum rollup on Ethereum, where two tokens, USDC.e and USDC, appear almost identical but differ significantly in terms of risk and acceptability. Both USDC.e and USDC aim to maintain a value pegged to one dollar. However, USDC is natively issued on the Arbitrum chain, while USDC.e is a bridged version of USDC, representing tokens that have been transferred from another chain to Arbitrum.
The risk profiles of these two tokens are markedly different. USDC.e carries all the inherent risks of USDC but adds the additional risk associated with the bridging process, such as the potential for smart contract vulnerabilities. Acceptability, defined by how widely a coin or token is accepted across various DeFi financial services, also varies between the two. Some protocols may only support USDC.e, others may exclusively support USDC, and some may accept both.
Decentralized Exchanges
A decentralized exchange (DEX) is a platform where you can trade cryptocurrencies directly with other users without needing a central authority or intermediary. Instead of relying on a company to facilitate the trades, DEXs use smart contracts to manage transactions automatically. This allows you to maintain control of your funds.
The Evolution of DEXs
If you have ever traded on a centralized exchange, you are familiar with the order book model. In this model, buy and sell orders are listed with the prices users are willing to pay or accept. When a buy order matches a sell order, the trade is executed. The order book shows all pending orders, allowing traders to see market depth and liquidity.
On chain, this model never really caught on because blockchains are much slower and more expensive to use than traditional websites. The latency in trading on the order book and the need to pay for the transaction of every order made the user experience terrible. In 2017–2018, EtherDelta attempted to implement an on-chain order book, and a few other pure order book models were tried afterward, but they didn't gain much traction.
Bancor was the first to pioneer the automated market maker (AMM) model. Unlike the order book model, AMMs don't rely on buyers and sellers placing orders. Instead, they use liquidity pools, where users provide pairs of tokens.1 The prices are determined by a formula based on the ratio of tokens in the pool. This model allows for continuous liquidity and trading.
Uniswap significantly improved and popularized the AMM model with its simple yet effective x × y = k formula, where the product of the quantities of the two tokens remains constant. In this formula, x and y represent the quantities of the two tokens in the pool, and k is a constant value. When a trade is made, the quantities of the tokens change, but the product of the two quantities remains the same, ensuring that the pool always provides liquidity. This innovation made trading more accessible and efficient on decentralized exchanges.
The tokens might not always be in pairs because some liquidity pools can have three or more tokens, but the most common and simplest arrangement is in pairs.
A DEX enables anyone to become a market maker by providing liquidity and earning fees for their contributions. As long as there is sufficient liquidity, trades can occur quickly and without the need for permission from a central authority, as can be seen in Figure 13-2.2
From Figure 13-2, it may appear that BTC is natively exchangeable on DEXs. However, this is not the case. BTC on DEXs is often represented by derivative contracts like Wrapped Bitcoin (WBTC), which are assets pegged to the price of BTC but carrying significantly more risk than native BTC on the BTC blockchain. Native assets are typically only available on their respective native chains. In this example, the BTC used in the pool is not native BTC but a derivative, similar to how stablecoins represent fiat money.

Figure 13-2. Decentralized exchange liquidity pool
Impermanent Loss
Providing liquidity on a DEX is not risk free. Beyond smart contract hacks, there's a more subtle risk called impermanent loss. To understand impermanent loss, we first need to grasp the basic Uniswap V2 pool model.
Many popular DEXs, like Uniswap V2, use the constant product formula x × y = k, where x and y are the quantities of two tokens in a liquidity pool and k is a constant. The price of a token is determined by the ratio of the tokens in the pool. For example, if a pool contains 100 USDC and 10 ETH, the price of 1 ETH is 100 ÷ 10 = 10 USDC. If the pool changes to 200 USDC and 10 ETH (due to trades), the price of 1 ETH becomes 200 ÷ 10 = 20 USDC.
This formula is a simplified way to understand how pools work. By providing liquidity, you act as a market maker. When users buy ETH from the pool, you sell ETH and receive USDC; when they sell ETH, you buy ETH and give USDC. In return, you earn trading fees. However, this process exposes you to impermanent loss, which occurs when the price of the tokens in the pool changes compared to when you deposited them. If the price of ETH rises or falls significantly, the value of your pool holdings may be less than if you had simply held the original tokens, even though you collect fees.
This openness also presents a significant challenge for DEXs. Since anyone can create a blockchain and launch a DEX, there are now more than one hundred DEXs (likely many more) across various blockchains. This abundance fragments liquidity, making swaps—where users exchange one cryptocurrency for another—less efficient than they would be on platforms with consolidated liquidity. This fragmentation can lead to higher slippage, which is the difference between the expected price of a trade and the actual price at which the trade is executed. High slippage occurs when there is insufficient liquidity, causing trades to be executed at less favorable prices than anticipated.
Why the Constant Product Formula Works
The elegance of the x × y = k formula lies in its mathematical shape: a hyperbola. This isn't just a coincidence—it's a deliberate design choice that protects liquidity pools from being completely drained.
The Problem with Linear Pricing
Imagine if a DEX used a simple linear (constant) pricing formula instead, where swapping 1 ETH always gives you exactly 2 USDC regardless of how much liquidity remains. This creates a very bad trading environment: whenever that fixed rate differs from the price on the rest of the market, arbitrageurs have an incentive to trade against the pool until one side of the reserves is exhausted:
- If the pool underprices ETH relative to the market (as in our 2 USDC per ETH example when ETH trades far higher elsewhere), anyone can keep swapping USDC for ETH until the pool’s ETH is effectively gone.
- If instead the pool overprices ETH, traders sell ETH into the pool and drain USDC the same way.
- The pool does not rebalance itself from trade flow alone: reserves stay skewed toward one token until one asset is depleted, because the quoted price never adjusts to remaining liquidity.
This is why fixed-price or linear curves are fundamentally unsuitable for AMMs—they allow complete pool drainage.
The Hyperbola Solution
The constant product formula x × y = k produces a hyperbolic curve that has a critical property: it never touches either axis. As you try to buy more and more of one token, the price increases exponentially, making it mathematically impossible to drain either token to zero.
Token Y (e.g., USDC)
    │
200 ┤·
    │ ·
    │  ·
150 ┤   ·
    │    ·
    │     ·
100 ┤       ·    ← x × y = k (hyperbola)
    │         ·
    │           ··
 50 ┤              ···
    │                  ······
    │                          ·················
  0 ┼────────────────────────────────────────────→ Token X (e.g., ETH)
    0        50       100       150       200
Consider a pool with 100 ETH and 200 USDC (k = 20,000):
- Swapping 1 ETH for USDC: You receive approximately 1.98 USDC (close to the 1:2 ratio)
- Swapping 50 ETH for USDC: You receive only 66.67 USDC (not 100 as a linear model would suggest)
- Trying to get all 200 USDC: You would need to provide infinite ETH
The formula for calculating output is:
Δy = (y × Δx) / (x + Δx)
Where Δx is the input amount and Δy is the output amount. As Δx approaches infinity, Δy approaches y (the total reserve) but never reaches it.
This asymptotic behavior is what makes AMMs secure. The larger the trade relative to the pool size, the worse the exchange rate becomes. This creates slippage—the difference between the expected price and the actual execution price—which naturally discourages trades that would significantly deplete the pool.
The hyperbolic curve ensures that liquidity pools are self-protecting: the scarcer a token becomes, the more expensive it gets, creating an economic barrier that prevents complete drainage. This elegant mathematical property is what made Uniswap's simple formula revolutionary in enabling trustless, permissionless trading.
Note
Uniswap, which is arguably one of the most significant projects in the current DeFi landscape, was inspired by a 2016 Reddit post by Vitalik Buterin. Hayden Adams, who reportedly had no prior coding experience, took a year to develop Uniswap V1 using the Vyper programming language.
Lending Markets
A lending market or money market is a decentralized platform that facilitates the lending and borrowing of cryptocurrencies, using smart contracts to automate and secure the entire process. Unlike traditional financial systems, lending markets operate without intermediaries like banks, providing a more transparent and efficient way to handle loans.
In a lending market, users who want to earn interest on their crypto assets can deposit their funds into a lending pool. These deposits contribute to the overall liquidity of the platform. Lenders earn interest on their deposits, with rates often determined algorithmically based on the supply and demand within the pool. The more demand there is for borrowing, the higher the interest rates are, incentivizing more lenders to contribute their assets to the pool.
Borrowers, on the other hand, can access these funds by providing collateral, which is typically worth more than the amount they wish to borrow. This overcollateralization is critical in lending to mitigate the risk of default, primarily because most crypto assets are very volatile and could leave the lending market with bad debt3 if the loan were not overcollateralized. The collateral is locked in a smart contract, ensuring that if the borrower fails to repay the loan, the collateral can be liquidated to cover the outstanding amount.
Bad debt occurs when a borrower defaults on a loan and the remaining collateral is insufficient to cover the owed amount. This can happen because of sudden market volatility or improper collateral valuation. Unlike liquidation, where collateral is sold to cover the debt, bad debt remains uncollectible, causing a loss to the lending protocol and its users.
This system protects lenders and ensures that the lending pool remains solvent. A simplified version of this can be seen in Figure 13-3: the lender provides liquidity and collects annual interest paid by the borrower, who withdraws the provided liquidity.

Figure 13-3. Lending market basic flow
The interest rates in lending markets are dynamic, fluctuating based on market conditions. The platform's algorithms continuously adjust rates to balance the supply of available funds and the demand for loans. This creates an efficient and responsive financial ecosystem where both lenders and borrowers can benefit from fair market-driven rates.
Collateralization ratios are another important aspect of lending markets. These ratios determine the amount of collateral needed to secure a loan. For instance, a common collateralization ratio might be 150%, meaning that to borrow $100 worth of cryptocurrency, a borrower would need to deposit at least $150 worth of collateral, as shown in Figure 13-4. This ensures that there is a buffer to absorb potential losses from price volatility.
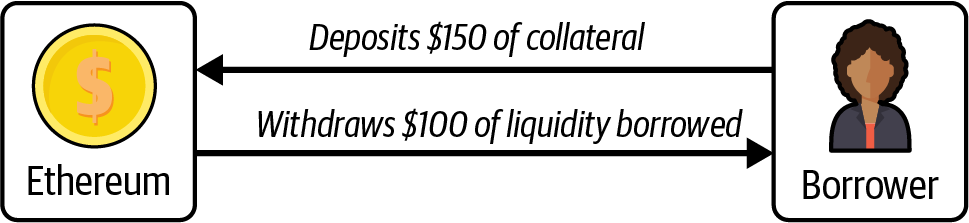
Figure 13-4. Lending market collateralization
If the value of the collateral falls below a certain threshold, the platform's smart contracts initiate a liquidation process. This involves selling the collateral to repay the loan, thus protecting the lenders from potential losses. Liquidation mechanisms are essential for maintaining the stability and solvency of the lending pool.
Incentives in DeFi
Most aspects of DeFi are open and rely heavily on proper incentives to function effectively. For instance, the liquidation process in most lending markets depends on users continuously monitoring for loans that can be liquidated. When they identify such loans, they proceed to liquidate them. To motivate users to perform these tasks, they receive a portion of the liquidated amount as a reward.
This concept of incentivization is a fundamental part of blockchain and DeFi. Many mechanisms within these systems are designed around game theory principles to ensure that participants act in ways that maintain and improve the network's functionality and security. Incentives align user actions with the overall goals of the protocol, creating a self-sustaining ecosystem.
As with most things in DeFi, composability is key. On their own, lending markets may not seem particularly impressive, especially since most require overcollateralization to request a loan. However, when you combine the ability to request a loan with other DeFi primitives, you unlock a powerful aggregation that can achieve a variety of outcomes.
For example, you can re-create a financial instrument called shorting by combining a lending market with a DEX. Shorting is a strategy used when you expect the price of an asset to drop. Essentially, you borrow the asset and sell it at the current price, hoping to buy it back later at a lower price, return the borrowed asset, and pocket the difference.
Here's how you can achieve a short in DeFi:
-
Collateralize Asset A: deposit Asset A as collateral in a lending market.
-
Take a loan for Asset B: borrow Asset B, which you want to short.
-
Sell Asset B on a DEX: sell the borrowed Asset B on a decentralized exchange.
By doing this, you effectively short Asset B with a leverage of 1x.4 If the price of Asset B drops, you can buy it back at the lower price, repay the loan, and keep the difference, as shown in Figure 13-5. This demonstrates how the composability of DeFi protocols can re-create traditional financial strategies in a decentralized environment.
The short position's size is directly related to the borrowed amount.
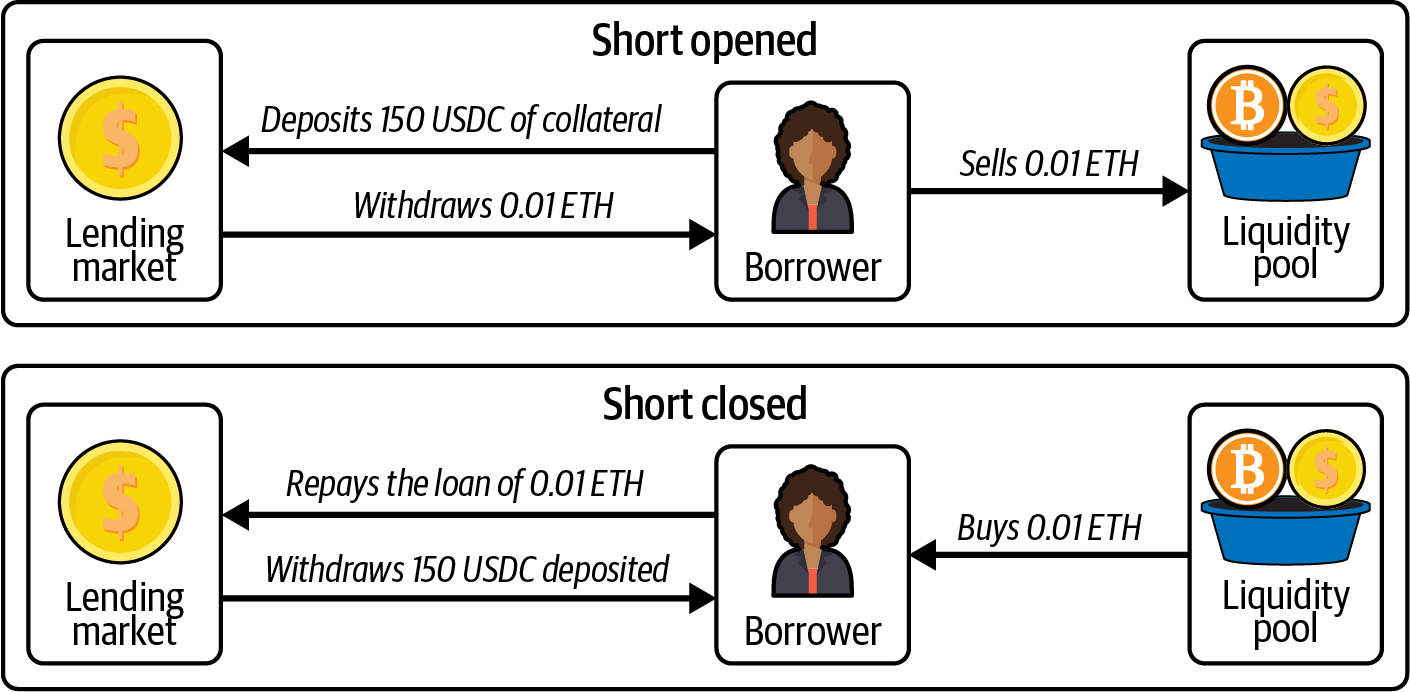
Figure 13-5. Shorting strategy using DeFi
The applications for a lending market are extensive and may not be immediately apparent. You may wonder: why take an overcollateralized loan when you have the money? Why not just use your own funds? In some scenarios, that would be true. However, lending markets combined with DEXs can re-create financial instruments and even allow for "longing" an asset instead of shorting it. Another benefit of lending markets is the ability to avoid taxable events. In many jurisdictions, borrowing an asset is not considered a taxable event, whereas selling an asset is.
The potential uses of lending markets are vast and go beyond the scope of this book. However, lending markets improve capital efficiency and, when combined with other protocols, provide users with significant flexibility. There are also lending markets that do not require overcollateralization, although they currently lack significant traction.
Oracles
An oracle for Ethereum, which we discussed in detail in Chapter 11, is a service that brings real-world data onto the blockchain, allowing smart contracts to interact with external information. For example, it can provide price data for cryptocurrencies, weather conditions, or sports scores, enabling smart contracts to execute based on this external data.
Oracles are essential for many aspects of DeFi, including the security of lending markets. In these markets, the price of a token can be sourced from DEXs. However, relying solely on these exchanges can make the lending market vulnerable to flash-loan attacks. In such an attack, an attacker borrows a large sum of money, manipulates the price of a coin or token on a DEX, and exploits this price change for profit.
Another vital function of oracles is their ability to bring pseudorandom numbers on chain. Since Ethereum is deterministic, every computation must produce the same result every time, enabling nodes to validate every block and transaction consistently. However, this deterministic nature means that true randomness cannot exist within Ethereum's components. For instance, if you were building a casino platform, generating random numbers would be essential. Using block timestamps, hashes, or transaction counts to create pseudorandom numbers is one method, but this approach is vulnerable to attacks since block proposers could predict or manipulate these properties in advance to exploit the casino.
Oracles let the Ethereum blockchain use external data, opening up a lot more possibilities for different applications.
Tip
From this description, it may seem that oracles are a central entity, making DeFi, which is supposed to be decentralized, dependent on them. However, while some aspects of DeFi do rely on oracles, the oracles themselves are often highly decentralized and do not have a single point of failure.
Stablecoins
Stablecoins are a type of cryptocurrency designed to maintain a stable value, typically pegged to a reserve asset like the US dollar, the euro, or a basket of goods. They aim to combine the benefits of cryptocurrencies, such as security and decentralization, with the stability of traditional fiat currencies.
Stablecoins achieve their stability via different mechanisms. Fiat-collateralized stablecoins are backed by reserves of fiat currency held in banks or other trusted custodians. For instance, each USDC or USDT token is usually backed by an equivalent amount in US dollars (USD).
Cryptocollateralized stablecoins take a different approach by being backed by other cryptocurrencies. Given the volatile nature of crypto assets, these stablecoins are often overcollateralized to ensure that they can maintain their peg. A well-known example is MakerDAO's DAI,5 where users lock up Ethereum or other cryptocurrencies as collateral to mint DAI. The overcollateralization provides a buffer against the volatility of the underlying assets.
MakerDAO is now Sky, and DAI is now USDS.
Then there are algorithmic stablecoins, which do not rely on collateral but instead use algorithms and smart contracts to manage the supply of the stablecoin to keep its value stable. These stablecoins adjust the supply based on market demand, expanding or contracting to maintain the target price. TerraUSD (UST) was a notable example of an algorithmic stablecoin, although it faced significant issues, which led to its collapse.
There has not been a successful and well-capitalized algorithmic stablecoin; every attempt at building one either failed catastrophically or did not find product-market fit.
Stablecoins also contribute significantly to liquidity in DEXs. By providing a stable and predictable asset, they facilitate smoother trading and better market efficiency. Traders can easily move in and out of positions without worrying about price fluctuations, which is important for efficient market operations.
Limitations of Fiat-Collateralized Stablecoins
An interesting concept is that stablecoins like USDC or USDT, which can be redeemed for dollars on platforms like Coinbase and Bitfinex, respectively, have a limited potential for growth in terms of market cap size. Market cap, or market capitalization, is the total value of all the coins in circulation, calculated by multiplying the current price of the coin by the total supply.
The reason for this limitation is that if the total value of the stablecoin on a particular blockchain exceeds the cost of attacking that blockchain, it creates significant incentives for malicious actors to attempt an attack. This is because the potential rewards of compromising the blockchain could outweigh the costs, making it a real and quantifiable risk.
Fortunately, attacking a robust and secure blockchain like Ethereum is neither easy nor cheap. The high cost and the complexity of such an attack provide strong deterrents. However, it's important to always keep this concept in mind when considering the scalability and security of stablecoins on any blockchain.
Liquid Staking
Liquid staking is a mechanism that allows users to stake their cryptocurrency assets in a PoS network while retaining the liquidity of those assets. Typically, when tokens are staked, they are locked up and cannot be accessed or traded until the staking period is over. Liquid staking solves this problem by issuing a derivative token that represents the staked assets. This derivative token can be traded, transferred, or used in other DeFi protocols, enabling users to maintain liquidity while still earning staking rewards.
For example, if you stake ETH on a liquid staking platform, you might receive a derivative token like stETH. While your ETH remains staked and continues to earn rewards, the stETH token can be freely traded or used in other DeFi activities, providing the benefits of staking without losing access to your funds.
Note
A new type of derivative is emerging that is similar to liquid staking, known as liquid restaking. With protocols like EigenLayer, tokens are not only staked for the Ethereum chain but are also used to secure other services in a process called restaking. This new development has raised concerns about potentially overloading the Ethereum consensus mechanism.
The token received, such as stETH issued by Lido, acts like a stablecoin pegged to the price of ETH. This means it carries not only the typical risks associated with stablecoins, such as those pegged to the dollar, but additional risks related to slashing. Liquid staking protocols take the ETH deposited by users, create validator nodes, and earn staking rewards, which are then redistributed to the holders of the derivative token. This process introduces the risk of slashing, where part of the staked ETH could be lost if the validator nodes fail to operate correctly.
Beyond these risks, liquid staking might create systemic risks for the blockchain itself. For example, at the time of writing, Lido has 29% of all staked ETH. If this percentage increases to 33% or higher, that could pose significant problems.6 In June 2022, there was a vote in the Lido DAO to limit Lido's staking power and prevent it from surpassing the 33% mark to avoid potential systemic risk for Ethereum. Unfortunately, the vote did not pass.
If any staker has more than 33% of the staked ETH, they could in theory attack the chain and stop the finalization process.
Note
There was also controversy surrounding the vote since most of the opposition came from just a few wallets.
Real-World Assets
In the context of DeFi, real-world assets (RWAs) refer to tangible or traditional financial assets that are tokenized and brought onto the blockchain. These can include anything from real estate and commodities to stocks, bonds, and even fine art. The tokenization of these assets involves converting their value into digital tokens that can be traded, lent, or borrowed on blockchain platforms.
RWAs are somewhat controversial because they often require a custodian, which contradicts the trustless principle of blockchains. This sector is one of the last in DeFi to truly emerge, and so far, there haven't been any major issues with RWA protocols. Despite going against the core ethos of crypto, RWAs unlock numerous new possibilities.
One significant application of RWAs has been bringing bonds on chain, allowing users to access the relative risk-free rate. This has enabled non-US citizens to access the 5% interest rates that were available in the United States in 2023–2024. Another valuable use for RWAs is the fractionalization of tokenized assets, such as owning a fraction of real estate.
Given that this sector is still in its infancy, we have yet to uncover all its potential. However, the risks associated with custodianship are real and concerning.
Bridges and Omnichain Protocols
As the blockchain ecosystem evolves, a wide variety of networks with unique features and benefits has developed. However, these networks often operate in isolation, which limits the seamless transfer of assets and data between them. Bridges and omnichain protocols aim to solve this problem by facilitating cross-chain interactions, ultimately creating a more interconnected blockchain ecosystem.
Note
Bridges are often very centralized because most blockchains are agnostic about the state of other chains. When transferring funds from chain A to chain B, there is typically a central authority that approves the bridging operation and unlocks the liquidity on chain B. This centralization is one of the reasons why bridges are among the most frequently hacked protocols in DeFi.
Bridges are specialized protocols that facilitate the transfer of assets and data between different blockchains, as shown in Figure 13-6. They act as connectors, allowing tokens and other digital assets to move from one chain to another. For instance, if you want to transfer your tokens from Ethereum to Binance Smart Chain (BSC), you would use a bridge.

Figure 13-6. Bridge connecting two blockchains
There are many different models for bridging tokens from one chain to another. Every bridge uses a specific model. The most common are as follows:
Wrapped-token bridges (lock and mint)
In this model, a bridge receives tokens on chain A, locks them in a smart contract, and mints a wrapped (or "proprietary") token on chain B. The wrapped token acts as a receipt representing the locked tokens. To retrieve the original tokens, the wrapped token is burned on chain B, unlocking the tokens on chain A.
For example, suppose you use the "Mastering Bridge" to transfer ETH from Ethereum to BSC. You send ETH to the bridge's smart contract on Ethereum, and the bridge mints a wrapped token, such as "MasteringETH," on BSC. To return to Ethereum, you burn MasteringETH on BSC, and the bridge releases the original ETH. These wrapped tokens often need to be swapped on a DEX to obtain the native token on chain B.
Mint and burn
This model is commonly used by projects that control their token's minting and burning functions. Instead of locking tokens, the bridge burns tokens on chain A (reducing the supply) and mints an equivalent amount on chain B. This requires the project to have authority over the token's smart contract. For example, a project could burn ETH-based tokens on Ethereum and mint the same token on BSC, maintaining the total supply across chains.
Liquidity bridges
The most common type, liquidity bridges rely on pools of tokens on multiple chains. When you bridge a token, the bridge uses its liquidity to send you the equivalent token on the destination chain, typically for a fee. Unlike wrapped-token bridges, no new tokens are minted; the bridge already holds tokens on both chains.
Following the earlier example, if you bridge ETH from Ethereum to BSC, you send ETH to the bridge on Ethereum. The bridge then releases ETH from its liquidity pool on BSC. If the bridge doesn't control minting, it must maintain sufficient liquidity on BSC to facilitate transfers. This model is popular because of its simplicity but depends on the bridge's ability to manage liquidity securely.
Omnichain protocols, discussed in Chapter 11 as cross-chain messaging protocols, extend the concept of cross-chain interactions by enabling seamless communication and interoperability across multiple blockchains simultaneously. These protocols aim to create a unified layer where different blockchains can interact without friction, allowing the transfer of assets, data, and even smart contract functionalities across chains. Figure 13-7 demonstrates a simple omnichain messaging protocol that allows users to initiate a swap on Ethereum and complete the swap, receiving the funds, on BSC.

Figure 13-7. Omnichain protocol example
(De)centralized Finance
Decentralization is always difficult to define, and more often than not, it's more of a way to express a desired outcome than to describe a reality. Most DeFi protocols are not truly decentralized; they often rely on addresses with significant privileges or decisions made by a core development team, creating a centralization of power within a supposedly decentralized system.
DeFi is still in its early stages, and it's up to early adopters to shape its future and steer it in the right direction. While decentralization is the objective, it's important to recognize that it is not always the current reality. Emerging markets like DeFi can benefit from some degree of centralization to make decisions and implement changes quickly. This centralized decision making can provide the agility needed to adapt and grow in a rapidly evolving environment.
As DeFi continues to mature, the objective should be to progressively reduce centralization and shift toward a more decentralized model. Early adopters are very significant in this transition, balancing the current need for efficiency and rapid decision making with the ultimate vision of decentralization. By understanding and addressing the inherent trade-offs, the DeFi community can guide the system's evolution to better align with its foundational principles of openness, transparency, and inclusivity.
Risks and Challenges in DeFi
DeFi comes with its own set of risks and challenges, which are often misunderstood by users, including experts. Every DeFi protocol carries specific economic risks and general smart contract risks. Additionally, depending on the degree of decentralization, there can be custodian risks or centralization problems.
Smart contract risks are easier to generalize: smart contracts can be hacked, and custodians can act maliciously or make mistakes. Economic risks are more complex and specific to each DeFi primitive or protocol. For example, the risk in a lending market is liquidation, which can sometimes occur wrongfully if the market does not use a proper oracle. The risk in providing liquidity to a DEX is impermanent loss. For stablecoins or liquid staking, the primary risk is the loss of the peg.
Understanding all the risks involved with a DeFi protocol before using it is crucial. Beyond risks, DeFi faces significant challenges. Many protocols are forks of existing ones, attempting to "vampire attack" incumbents without offering real innovation. This not only fragments liquidity and users but also dilutes the overall effectiveness of the ecosystem.
Liquidity is essential for most protocols. While they may function well in a booming market, they often degrade significantly during downturns. Most DeFi protocols are not self-sufficient and tend to work only when usage is incentivized, either because users are not genuinely interested in the product or because the costs outweigh the gains.
While DeFi shows some product-market fit, its future remains uncertain. It could evolve into a compelling piece of global infrastructure, which is the most likely outcome, or remain a niche market for a select group of users.
One significant challenge for DeFi is regulation. The regulatory environment varies greatly across countries and regulatory bodies, with most regulators opposing a fully decentralized system. While regulators cannot directly stop such systems—if a smart contract is immutable and deployed on chain, regulators cannot intervene directly—they can target developers and users, making it difficult for them to use these smart contracts.
A case in point is Tornado Cash, whose developer, Alexey Pertsev, was jailed for 64 months in the Netherlands. He was arrested in August 2022 on charges of money laundering, following the US Department of the Treasury's blocklisting of Tornado Cash for its alleged use by the North Korean hacking group Lazarus to launder illicit funds. The Tornado Cash protocol remains available, but its liquidity has significantly decreased, leading to a poorer user experience. Additionally, addresses using Tornado Cash are flagged on centralized exchanges, complicating its use.
Similar situations are occurring in other ecosystems. For example, developers of the Samourai Wallet have also faced legal actions. This pattern illustrates that while regulators cannot attack the blockchain itself, they can target its users and developers.
Note
Although the authors of this book may not have the legal expertise to fully understand the cases involving Samourai Wallet or Tornado Cash and other similar instances, we do not support legal actions taken against individuals for writing decentralized code. Code should remain free, and the creator of a tool should not be punished for its misuse by others. Hopefully, no more developers will have to face such unjust consequences.
Conclusion
DeFi enables users to be more flexible with their money, creating new opportunities and innovative financial primitives, such as flash loans. As an emerging market within the crypto space, DeFi is rapidly developing but has yet to find a proper market fit beyond token exchanges, stablecoins, and derivative creation.
Chapter 14. The Ethereum Virtual Machine
At the heart of the Ethereum protocol and operation is the Ethereum Virtual Machine, or the EVM for short. As you might guess from the name, it is a computation engine, not hugely dissimilar to the virtual machines of Microsoft's .NET framework or interpreters of other bytecode-compiled programming languages, such as Java. In this chapter, we take a detailed look at the EVM, including its instruction set, structure, and operation, within the context of Ethereum state updates.
What Is the EVM?
The EVM is the part of Ethereum that handles smart contract deployment and execution. Simple value-transfer transactions from one EOA to another don't need to involve it, practically speaking, but everything else will involve a state update computed by the EVM. At a high level, the EVM running on the Ethereum blockchain can be thought of as a global decentralized computer containing millions of executable objects, each with its own permanent data store.
The EVM is a quasi-Turing-complete state machine: "quasi" because all execution processes are limited to a finite number of computational steps by the amount of gas available for any given smart contract execution. As such, the halting problem is "solved" (all program executions will halt), and the situation where execution might (accidentally or maliciously) run forever, thus bringing the Ethereum platform to a halt in its entirety, is avoided. We'll explore the halting problem in more detail in later sections.
The EVM has a stack-based architecture, storing all in-memory values on a stack. It works with a word size of 256 bits, mainly to facilitate native hashing and elliptic curve operations, and it has several addressable data components:
- An immutable program code ROM, loaded with the bytecode of the smart contract to be executed
- A volatile memory, with every location explicitly initialized to zero
- A transient storage that lasts only for the duration of a single transaction (and is not part of the Ethereum state)
- A permanent storage that is part of the Ethereum state, also zero initialized
There is also a set of environment variables and data that is available during execution. We will go through these in more detail later in this chapter.
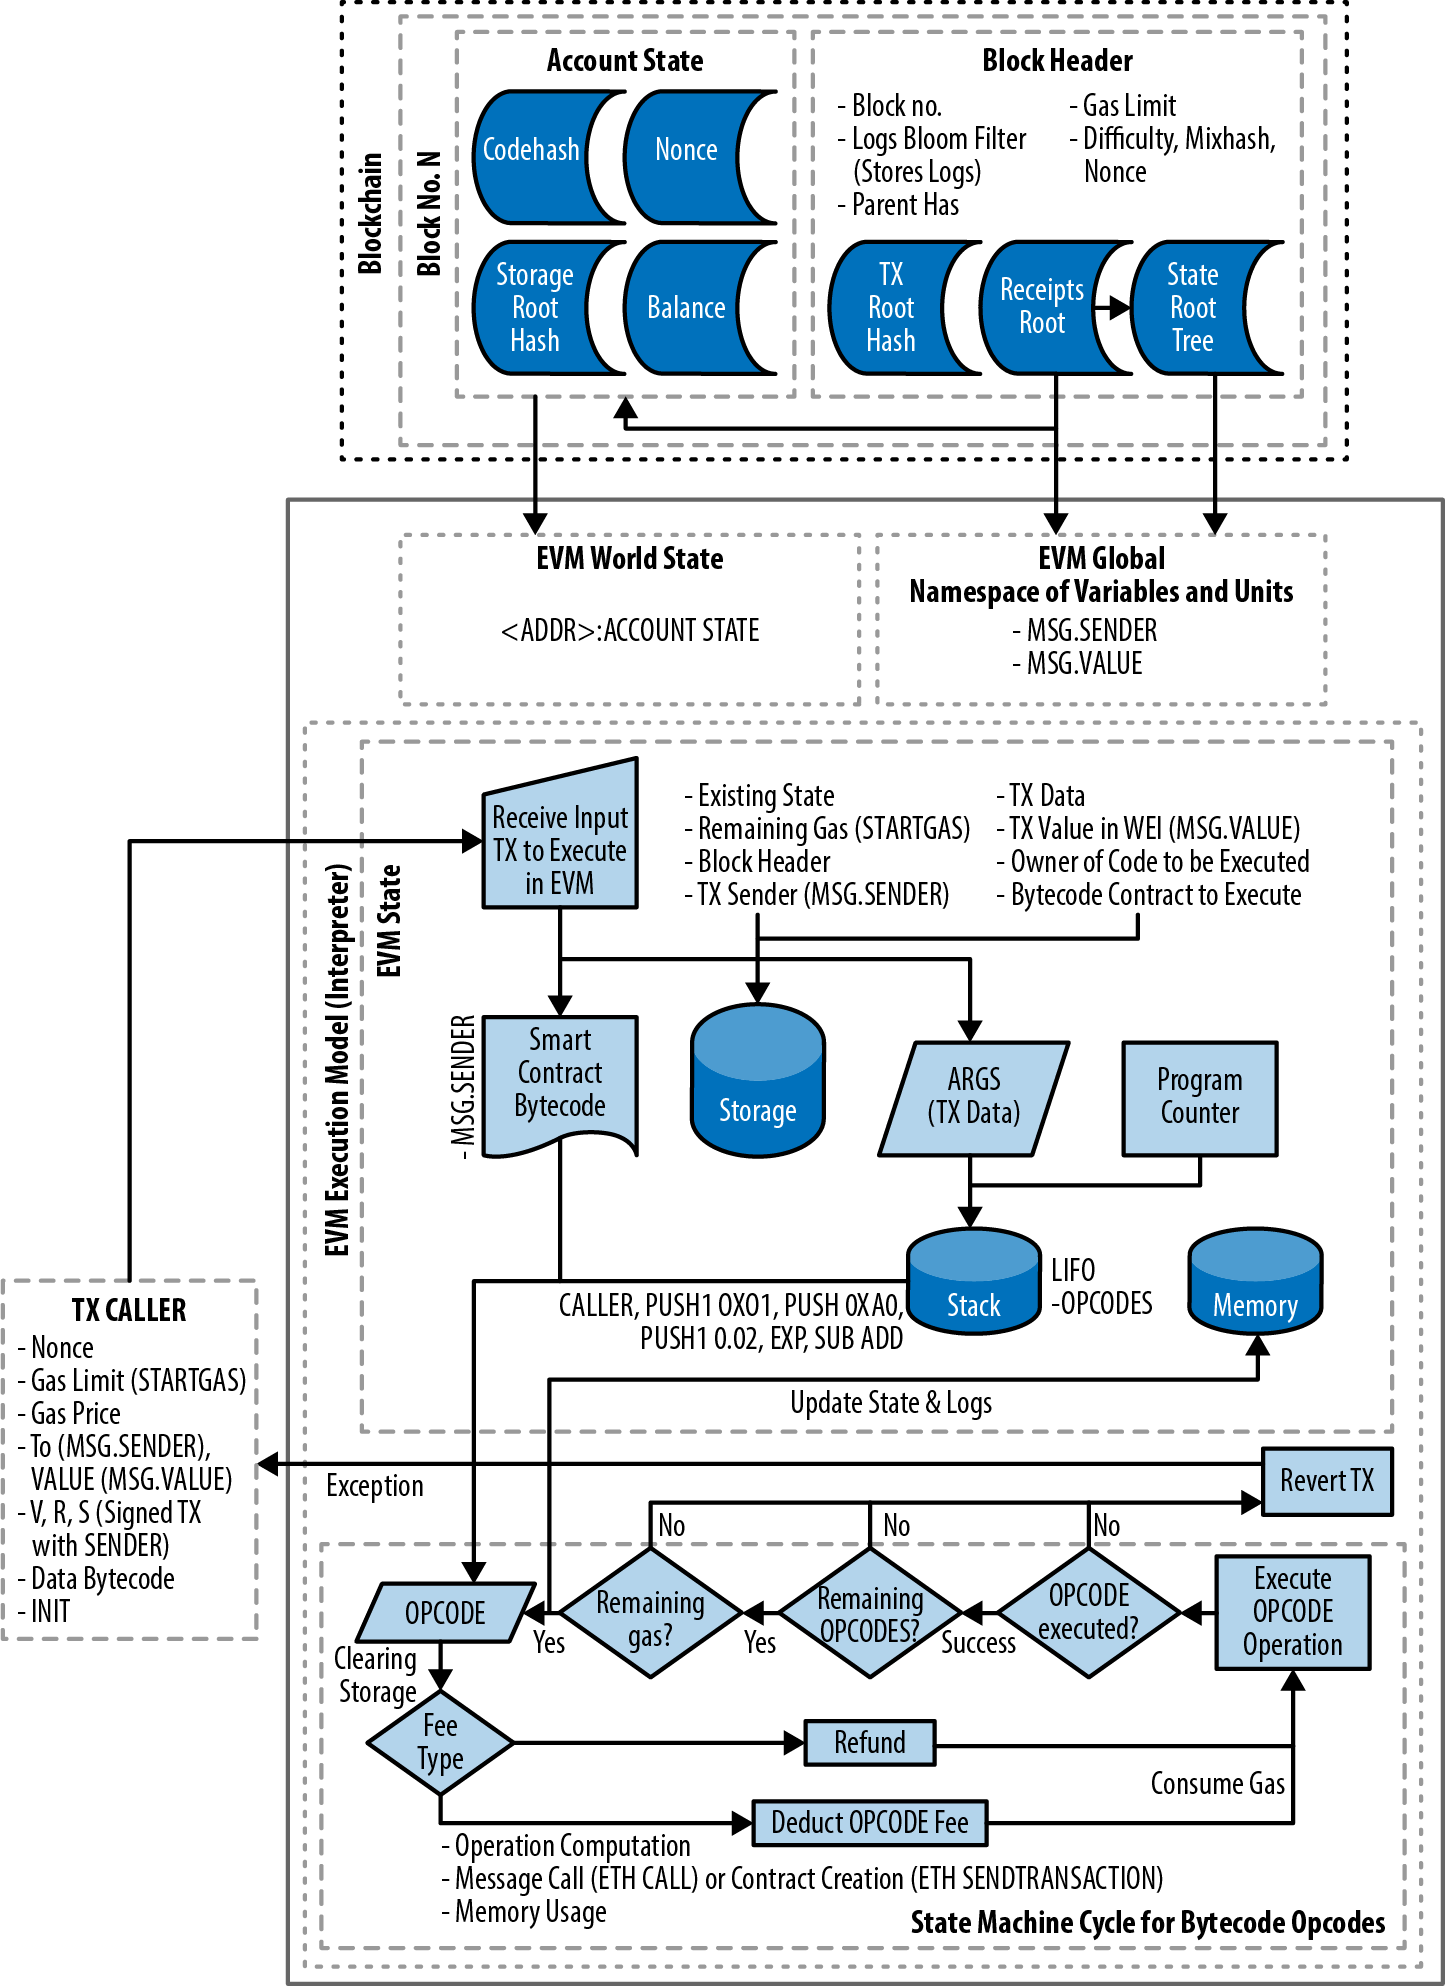
Figure 14-1. EVM architecture and execution context
Comparison with Existing Technology
The term virtual machine is often applied to the virtualization of a real computer, typically by a hypervisor such as VirtualBox or QEMU, or of an entire operating system instance, such as Linux's KVM. These must provide a software abstraction, respectively, of actual hardware and of system calls and other kernel functionality.
The EVM operates in a much more limited domain: it is just a computation engine and as such, provides an abstraction of just computation and storage, similar to the Java virtual machine (JVM) specification, for example. From a high-level viewpoint, the JVM is designed to provide a runtime environment that is agnostic of the underlying host OS or hardware, enabling compatibility across a wide variety of systems. High-level programming languages such as Java or Scala (which use the JVM) or C# (which uses .NET) are compiled into the bytecode instruction set of their respective virtual machines. In the same way, the EVM executes its own bytecode instruction set (described in the next section), which higher-level smart contract programming languages such as Solidity, Vyper, and Yul are compiled into.
The EVM, therefore, has no scheduling capability because execution ordering is organized externally to it: Ethereum clients run through verified block transactions to determine which smart contracts need executing and in which order. In this sense, the Ethereum world computer is single threaded, like JavaScript. Neither does the EVM have any "system interface" handling or "hardware support"—there is no physical machine to interface with. The Ethereum world computer is completely virtual.
What Are Other Blockchains Doing?
The EVM is definitely the most widely used virtual machine in the cryptocurrency space. Most alternative L1 and L2 blockchains use the EVM to maintain compatibility with all the existing tools and frameworks and to attract projects and developers directly from the Ethereum community.
Nevertheless, a bunch of different virtual machines have emerged in recent years: Solana VM, Wasm VM, Cairo VM, and Move VM are probably the most famous and interesting ones, each with its own advantages and disadvantages. They take different approaches to smart contract development:
Custom languages
Some platforms, like Cairo and Move, have created specialized programming languages specifically for writing smart contracts. This is similar to how Ethereum uses Solidity and Vyper for its virtual machine, the EVM.
Standard languages
Others, such as Solana and those using WebAssembly (Wasm), allow developers to write smart contracts with widely used programming languages. For example, these platforms often support Rust for smart contract development.
Another area where these alternative virtual machines differ from the EVM is the parallelization of transactions. We've already said that the EVM processes transactions sequentially, without any kind of parallelization. Some projects took this downside and tried to improve it. For example, both Solana VM and Move VM can handle parallel execution of transactions, even though it's not always possible—that is, when two transactions modify the same piece of storage by interacting with the same contracts, they cannot be executed in parallel.
We must say that these efforts to improve the virtual machine's performance are not being made only outside of Ethereum. In fact, lots of teams are working on breaking the current limits of the EVM by trying to add parallelization and other cool features such as ahead-of-time (AOT) or just-in-time (JIT) compilation from EVM bytecode to native machine code.
The EVM Instruction Set (Bytecode Operations)
The EVM instruction set offers most of the operations you might expect, including:
- Arithmetic and bitwise logic operations
- Execution context inquiries
- Stack, memory, and storage access
- Control flow operations
- Logging, calling, and other operators
In addition to the typical bytecode operations, the EVM has access to account information (e.g., address and balance) and block information (e.g., block number and current gas price).
Let's start our exploration of the EVM in more detail by looking at the available opcodes and what they do. As you might expect, all operands are taken from the stack, and the result (where applicable) is often put back on the top of the stack.
The available opcodes can be divided into the following categories:
Arithmetic operations
The arithmetic opcode instructions include:
ADD        //Add the top two stack items
MUL        //Multiply the top two stack items
SUB        //Subtract the top two stack items
DIV        //Integer division
SDIV       //Signed integer division
MOD        //Modulo (remainder) operation
SMOD       //Signed modulo operation
ADDMOD     //Addition modulo any number
MULMOD     //Multiplication modulo any number
EXP        //Exponential operation
SIGNEXTEND //Extend the length of a two's complement signed integer
SHA3       //Compute the Keccak-256 hash of a block of memory
Note that all arithmetic is performed modulo 2^256 (unless otherwise noted) and that the zeroth power of zero, 0^0, is taken to be 1.
Stack operations
Stack, memory, and storage management instructions include:
POP     //Remove the top item from the stack
MLOAD   //Load a word from memory
MSTORE  //Save a word to memory
MSTORE8 //Save a byte to memory
SLOAD   //Load a word from storage
SSTORE  //Save a word to storage
TLOAD   //Load a word from transient storage
TSTORE  //Save a word to transient storage
MSIZE   //Get the size of the active memory in bytes
PUSH0   //Place value 0 on the stack
PUSHx   //Place x byte item on the stack, where x can be any integer from
        // 1 to 32 (full word) inclusive
DUPx    //Duplicate the x-th stack item, where x can be any integer from
        // 1 to 16 inclusive
SWAPx   //Exchange 1st and (x+1)-th stack items, where x can be any
        // integer from 1 to 16 inclusive
Process-flow operations
Instructions for control flow include:
STOP      //Halt execution
JUMP      //Set the program counter to any value
JUMPI     //Conditionally alter the program counter
PC        //Get the value of the program counter (prior to the increment
          //corresponding to this instruction)
JUMPDEST  //Mark a valid destination for jumps
System operations
Opcodes for the system executing the program include:
LOGx          //Append a log record with x topics, where x is any integer
              //from 0 to 4 inclusive
CREATE        //Create a new account with associated code
CALL          //Message-call into another account, i.e., run another
              //account's code
CALLCODE      //Message-call into this account with another
              //account's code
RETURN        //Halt execution and return output data
DELEGATECALL  //Message-call into this account with an alternative
              //account's code, but persisting the current values for
              //sender and value
STATICCALL    //Static message-call into an account, i.e., it cannot change
              //the state of any account
REVERT        //Halt execution, reverting state changes but returning
              //data and remaining gas
INVALID       //The designated invalid instruction
SELFDESTRUCT  //Halt execution and, if executed in the same transaction a
              //contract was created, register account for deletion. Note
              //that its usage is highly discouraged and the opcode is
              //considered deprecated
Logic operations
Opcodes for comparisons and bitwise logic include:
LT     //Less-than comparison
GT     //Greater-than comparison
SLT    //Signed less-than comparison
SGT    //Signed greater-than comparison
EQ     //Equality comparison
ISZERO //Simple NOT operator
AND    //Bitwise AND operation
OR     //Bitwise OR operation
XOR    //Bitwise XOR operation
NOT    //Bitwise NOT operation
BYTE   //Retrieve a single byte from a full-width 256-bit word
Environmental operations
Opcodes dealing with execution environment information include:
GAS            //Get the amount of available gas (after the reduction for
               //this instruction)
ADDRESS        //Get the address of the currently executing account
BALANCE        //Get the account balance of any given account
ORIGIN         //Get the address of the EOA that initiated this EVM
               //execution
CALLER         //Get the address of the caller immediately responsible
               //for this execution
CALLVALUE      //Get the ether amount deposited by the caller responsible
               //for this execution
CALLDATALOAD   //Get the input data sent by the caller responsible for
               //this execution
CALLDATASIZE   //Get the size of the input data
CALLDATACOPY   //Copy the input data to memory
CODESIZE       //Get the size of code running in the current environment
CODECOPY       //Copy the code running in the current environment to
               //memory
GASPRICE       //Get the gas price specified by the originating
               //transaction
EXTCODESIZE    //Get the size of an account's code
EXTCODECOPY    //Copy an account's code to memory
RETURNDATASIZE //Get the size of the output data from the previous call
               //in the current environment
RETURNDATACOPY //Copy data output from the previous call to memory
Block operations
Opcodes for accessing information on the current block include:
BLOCKHASH  //Get the hash of one of the 256 most recently completed
           //blocks
COINBASE   //Get the block's beneficiary address for the block reward
TIMESTAMP  //Get the block's timestamp
NUMBER     //Get the block's number
PREVRANDAO //Get the previous block's RANDAO mix. This opcode replaces the
           //DIFFICULTY one since The Merge hard fork.
GASLIMIT   //Get the block's gas limit
Ethereum State
The job of the EVM is to update the Ethereum state by computing valid state transitions as a result of smart contract code execution, as defined by the Ethereum protocol. This aspect leads to the description of Ethereum as a transaction-based state machine, which reflects the fact that external actors (i.e., account holders and validators) initiate state transitions by creating, accepting, and ordering transactions. It is useful at this point to consider what constitutes the Ethereum state.
At the top level, we have the Ethereum world state. The world state is a mapping of Ethereum addresses (160-bit values) to accounts. At the lower level, each Ethereum address represents an account comprising an ether balance (stored as the number of wei owned by the account), a nonce (representing the number of transactions successfully sent from this account if it is an EOA or the number of contracts created by it if it is a contract account), the account's storage (which is a permanent data store used only by smart contracts), and the account's program code (again, only if the account is a smart contract account). Traditionally, an EOA would always have no code and an empty storage. However, EIP-7702 (activated in the Pectra upgrade in May 2025) changes this assumption by allowing EOAs to delegate code execution to smart contracts. When an EOA opts into delegation, its code field is set to a 23-byte delegation designation with the format 0xef0100 || address, where address is the 20-byte address of the target contract. The 0xef byte is a banned opcode per EIP-3541, ensuring this designation cannot be confused with deployable contract code. When the EVM encounters a call to a delegated EOA, it loads and executes the code from the target address in the context of the EOA. This means EXTCODESIZE on a delegated EOA returns 23 (the size of the delegation designation), while CODESIZE executed within the delegated code returns the size of the target contract's code. The EOA can also use storage when executing delegated code, though the protocol recommends using ERC-7201 namespaced storage layouts to prevent collisions when migrating between delegate contracts. Importantly, delegated EOAs can still originate transactions—they remain EOAs that can sign and send transactions, but now with smart contract capabilities. The delegation can be cleared by delegating to the zero address (0x0000000000000000000000000000000000000000).
When a transaction results in smart contract code execution, an EVM is instantiated with all the information required in relation to the current block being created and the specific transaction being processed. In particular, the EVM's program code ROM is loaded with the code of the contract account being called, the program counter is set to zero, the storage is loaded from the contract account's storage, the memory is set to all zeros, and all the block and environment variables are set. A key variable is the gas supply for this execution, which is set to the amount of gas paid for by the sender at the start of the transaction (see "Gas Accounting During Execution" for more details). As code execution progresses, the gas supply is reduced according to the gas cost of the executed operations. If at any point the gas supply is less than zero, we get an out-of-gas (OOG) exception: execution immediately halts, and the transaction is abandoned. No changes to the Ethereum state are applied, except for the sender's nonce being incremented and their ether balance going down to pay the block's beneficiary for the resources used to execute the code to the halting point. At this point, you can think of the EVM as running on a sandboxed copy of the Ethereum world state, with this sandboxed version being discarded completely if execution cannot complete for whatever reason. However, if execution does complete successfully, then the real-world state is updated to match the sandboxed version, including any changes to the called contract's storage data, any new contracts created, and any ether balance transfers that were initiated.
Code execution is a recursive process. A contract can call other contracts, with each call resulting in another EVM being instantiated around the new target of the call. Each instantiation has its sandbox world state initialized from the sandbox of the EVM at the level above. Each instantiation (context) is also given a specified amount of gas for its gas supply (not exceeding the amount of gas remaining in the level above, of course) and so may itself halt with an exception due to being given too little gas to complete its execution. Again, in such cases, the sandbox state is discarded, and execution returns to the EVM at the level above.
Ethereum Stateless
Even though at the time of writing (June 2025), all Ethereum nodes have to compute and maintain the last state—that is, what we previously called the world state—in order to be able to check the correctness of every new block by reexecuting all the transactions it contains, there are plans to get rid of that, at least partially.
The idea is to have a restricted set of actors, such as searchers and builders, that still need to get access to the state to create and publish new blocks, while all other nodes can cryptographically verify those blocks without it. This is called statelessness.
Statelessness is still far in the future of the Ethereum roadmap because it needs some modifications to the core protocol:
Enshrined proposer-builder separation (ePBS)
Separating the work of creating a block by filling it with transactions from the work of proposing it to the P2P network. The first is done by heavily specialized entities called searchers and builders that are able to create super-optimized blocks, while the second is done by Ethereum validator nodes. This is already a reality on mainnet, even though it's still not enshrined in the protocol. In fact, the majority of Ethereum blocks are already being built by a very small set of big builders.
Verkle trees
A replacement of the data structure that Ethereum currently uses to store the state: the Merkle-Patricia trie. This reduces by a lot the size of the cryptographical proof needed to verify the correctness of the state and makes verifying it faster than the legacy Merkle-Patricia trie.
Note
Other hash-based binary trees are being tested to possibly replace Verkle trees. The core idea is just to have a data structure for the state that makes it possible to create small proofs that are quick and easy to verify.
The combination of these two upgrades can lead to a scenario where only the big entities with more powerful hardware that want to create blocks need to store and access the full state. Together with new blocks, they will create a cryptographic witness: the minimal set of data that proves the new state has been computed correctly based on the transactions they included into the blocks.
All other nodes (including validator nodes) store only the state root, which is the hash of the entire state. When they receive a new block, they use the related witness to verify its correctness.
This makes running an Ethereum node very lightweight since you don't have to store the full state and you don't even need to reexecute all the transactions (inside the EVM), but you are still able to verify that everything is correct so that you don't need to trust third parties. You could even run a node on your smartphone…
Even though research advances quickly, we are probably still a few years away from having statelessness on mainnet.
Merkle-Patricia Trie
Right now, the Ethereum state is stored using a very peculiar data structure called a modified Merkle-Patricia trie. We briefly mentioned the Merkle-Patricia tree (we'll call it MPT) in the previous section, but it's very important to understand how it works and why as well as how it's used by Ethereum as the way to store the state (and not only that…) because the same reasoning applies to Verkle tries. Before diving into MPTs, you need to know about Merkle trees because they represent the foundation on which MPTs are built.
Merkle trees
Merkle trees are a very old data structure, invented by Ralph Merkle in 1988 in an attempt to construct better digital signatures. They are very efficient when you need to be able to verify that some data exists in a database and it has not been tampered with without needing to send the entire database to prove it.
It's quite easy to create a Merkle tree starting from a collection of data. You need to separate the data into several chunks; then, you hash those chunks together and repeat this last step in a recursive way until you get only one final chunk. That chunk represents the Merkle root: a sort of digital fingerprint of all the data used to create the tree.
Let's create a binary Merkle tree—the simplest form of a Merkle tree—from scratch so that you can familiarize yourself with it a bit more. We start with eight chunks of data—you could think of them as different words in the English language. We hash each chunk using a specific hash function—Ethereum uses the Keccak-256 hash function, as already mentioned in Chapter 4—obtaining the leaves of the Merkle tree, represented in Figure 14-2 as hash_1, hash_2, and so on. Then, we concatenate each couple of leaves and hash them again, creating hash_12, hash_34, and so on. We repeat this process of concatenating and hashing another two times until we get to a single, final result, which represents our Merkle root: hash_12345678.
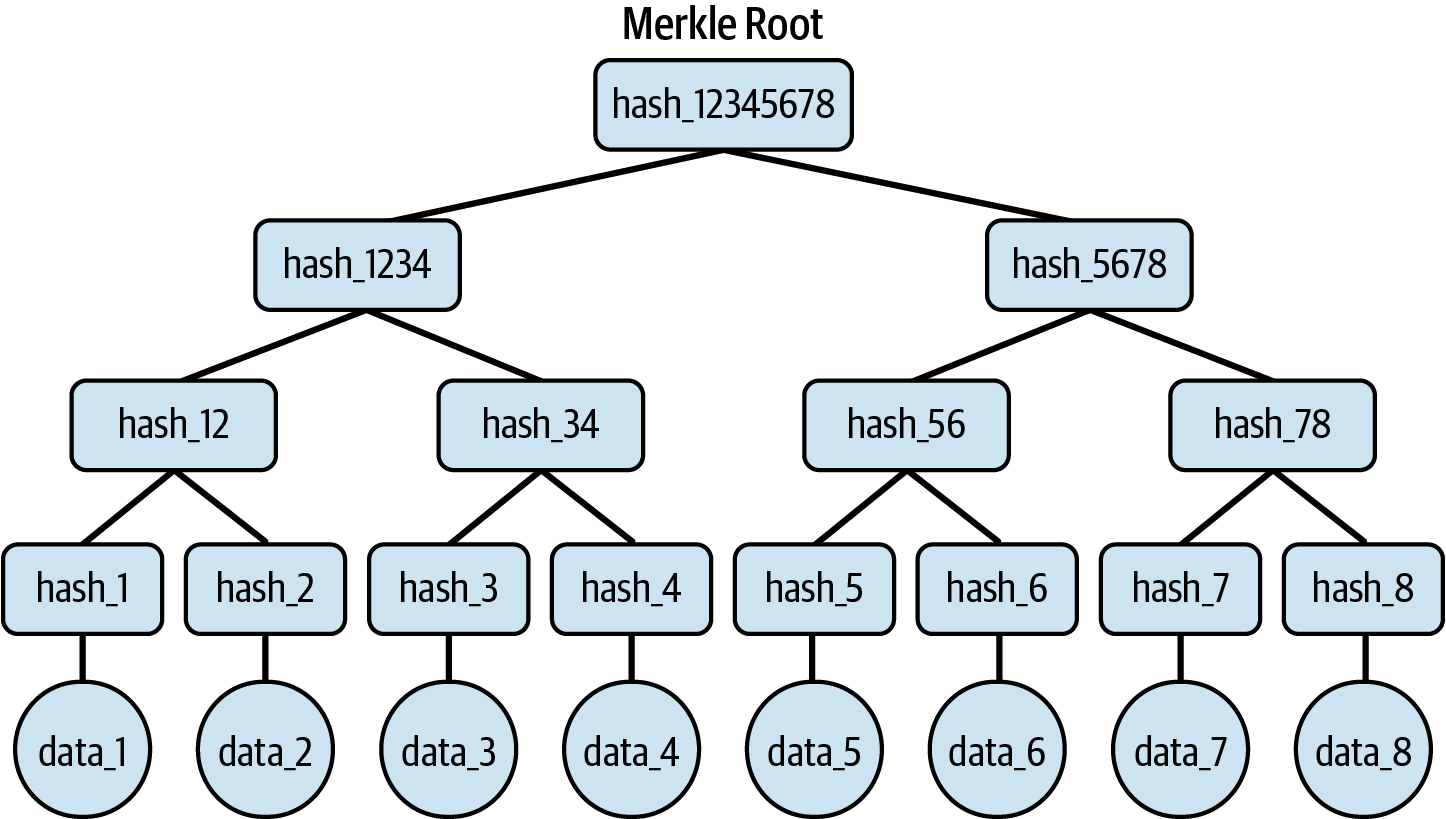
Figure 14-2. A binary merkle tree
Now, you may be asking why we need a Merkle tree to store the data. Isn't it more complicated than just storing each chunk in a classical database?
The answer is yes, it's much more complex than storing every chunk in a key-value or SQL database. The only reason we use these kinds of data structures is because they are really efficient at providing a cheap cryptographic proof that any one of the chunks is present in the entire collection of data and has not been manipulated. In fact, if we were using a normal database to store data, and we were asked to provide a proof that we have a specific chunk, we would need to publish our entire dataset so that the reader could be sure we're not lying.
Let's use our previous example to see this in practice. Let's say we want to prove that data_1 is included in the dataset. The naive approach is to provide the entire dataset, starting from data_1 up to data_8: eight items in total. With a Merkle tree, we need to provide only hash_2, hash_34, and hash_5678. Then, anyone can compute on their own the Merkle root and compare it with the one we calculated initially (which is shared publicly). If they match, you can be completely sure that data_1 is part of the initial dataset, as you can see in Figure 14-3.
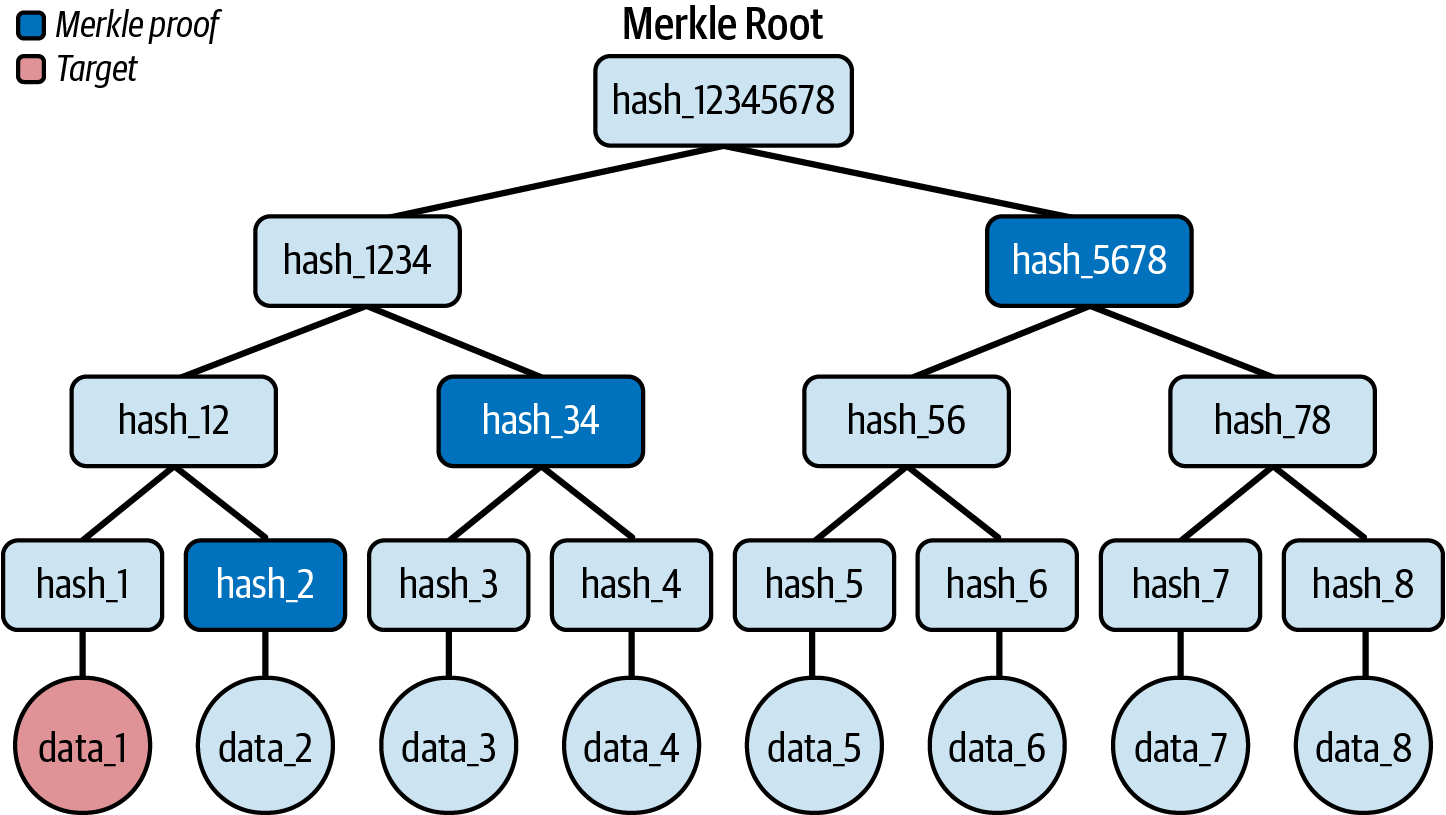
Figure 14-3. The Merkle proof to verify that data_1 is contained in the tree
Tip
To reconstruct the Merkle tree, you can follow these steps:
- Hash data_1 and get hash_1.
- Concatenate hash_1 with the provided hash_2, hash it, and get hash_12.
- Concatenate hash_12 with the provided hash_34, hash it, and get hash_1234.
- Concatenate hash_1234 with the provided hash_5678, hash it, and get the final Merkle root.
Note that we're using only three items, versus the eight items we would need to use with the naive approach without the Merkle tree. And this is just a toy example—when you have lots of data, the savings are much bigger.
Speaking in mathematical terms, Merkle trees offer O(log(n)) complexity versus linear O(n) of the naive approach, as shown in Figure 14-4.
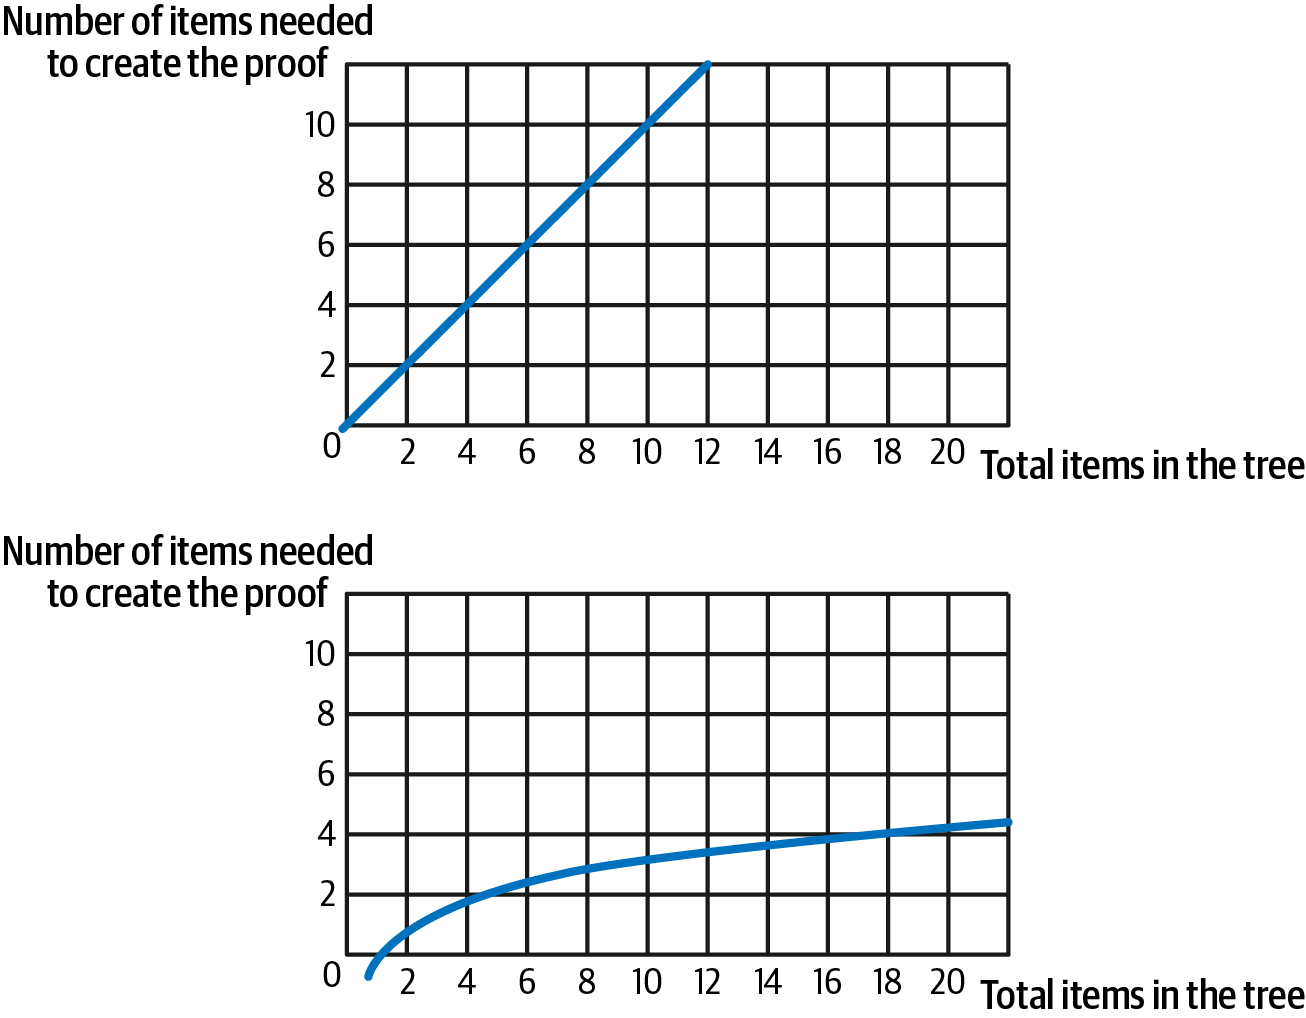
Figure 14-4. O(n) linear complexity (on the top) versus O(log(n)) complexity (on the bottom)
In the Ethereum world, this means that it's cheaper and easier to provide proofs regarding the balance of an address, the result of a transaction, or the bytecode of a specific smart contract.
Merkle trees in Bitcoin
Bitcoin pioneered the use of Merkle trees in blockchain technology. In fact, every Bitcoin block contains the Merkle root of all transactions included in the same block so that none of them can be modified without modifying the entire block header (compromising the PoW, too).
Merkle-Patricia trie in Ethereum
Ethereum took the same concept and applied it to itself, with some modifications for its specific needs. Merkle trees are perfectly suited for permanent data that never changes, such as Bitcoin transactions. The Ethereum state changes constantly, though, so we need to tweak Merkle trees to still maintain their useful properties while letting us change the data underneath frequently.
This is where the Merkle-Patricia trie enters the scene. The name comes from the union between Merkle trees, Patricia (Practical Algorithm to Retrieve Information Coded in Alphanumeric), and the word trie that originates from retrieval, reminding us what they are optimized for.
Essentially, Merkle-Patricia tries are modified Merkle trees with 16 children for each node. They are well suited for data like the Ethereum state where you have lots of key-value items (where keys are the addresses and values the account information for each address, such as the balance, the nonce, and the code, if any) because the key itself is encoded in the path you have to follow to reach the correct position in the tree.
Let's say we have the following key-value item we want to store:
car → Schumacher
Car is hex encoded as (0x) 6 3 6 1 7 2, so you would need to take the sixth child starting from the Merkle root, then again down to the third child, repeating this process until you get to the final value where you can read the value associated with that key—Schumacher in this example—as shown in Figure 14-5.
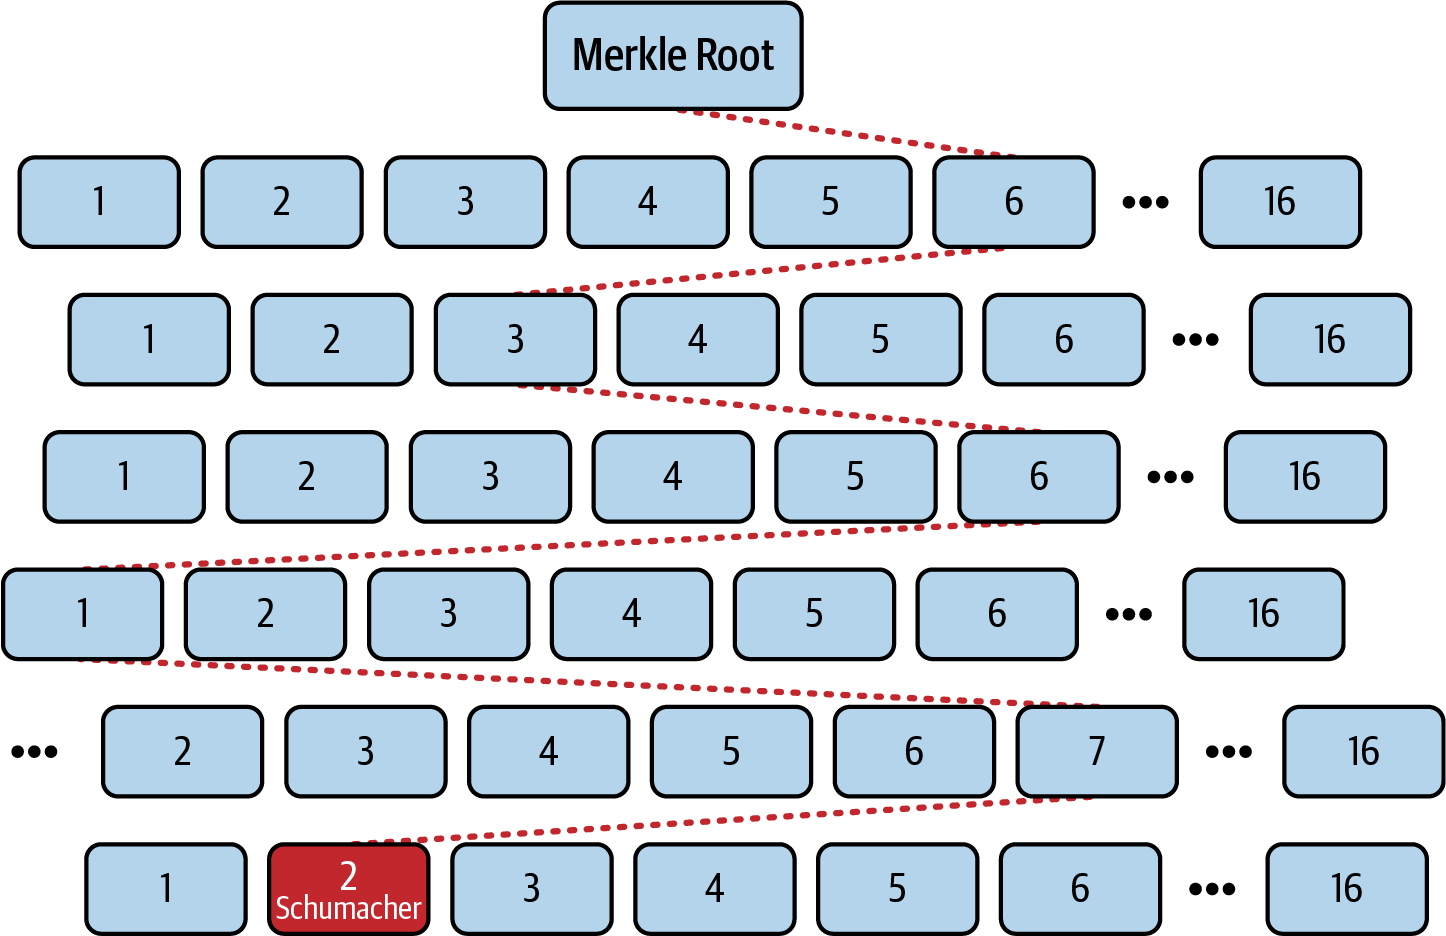
Figure 14-5. Encoding of the key-value item car --> Schumacher into a Merkle-Patricia trie
In particular, Ethereum uses four Merkle-Patricia tries:
State trie
To store the entire state
Transaction trie
To store all transactions included into a block
Receipt trie
To store the results of all the transactions included into a block
Storage trie
To store smart contract data
Every Ethereum block header contains the state, transaction, and receipt trie Merkle root, while every account (contained in the state trie) stores its own storage trie Merkle root.
A Deep Dive into the Components of the EVM
In this section, we'll take a closer look at how each component of the EVM works. Finally, we'll examine a real-world example to see everything in action.
Stack
The stack is a very simple data structure that follows a last in, first out (LIFO) order to perform operations, where every item is a 32-byte object. It can host up to 1,024 items at the same time.
The EVM can push and pop items into and from the stack through different kinds of opcodes, and it can manipulate the order of its elements, as you can see in Figure 14-6.

Figure 14-6. The EVM stack follows a LIFO order of operations
Memory
The EVM memory is a byte-addressable data structure: essentially a very long array of bytes. In fact, every byte in the memory is accessible using a 32-byte (256-bit) key, which means it can contain up to 2^256 bytes. It's volatile—that is, it's deleted after the execution ends—and it's always initialized to 0.
Even though it's possible to read and write single bytes to and from the memory, most operations require reading or writing bigger chunks of data, usually 32-byte chunks, as shown in Figure 14-7.
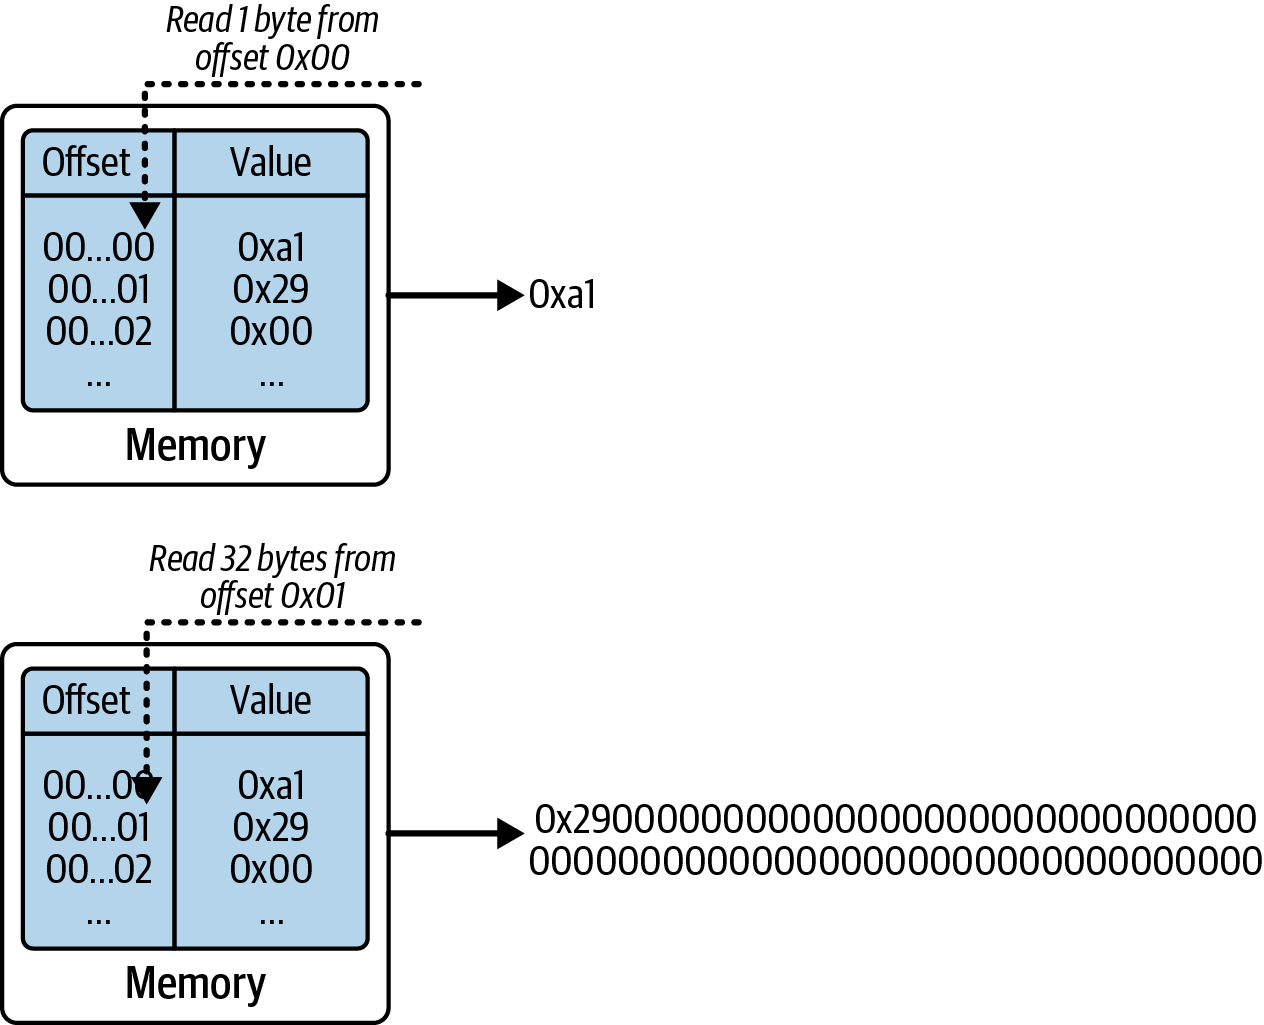
Figure 14-7. EVM memory is a volatile, byte-addressable data structure
Note
Technically, you cannot read a single byte from the EVM. You can only read an entire 32-byte word. To achieve the same result as reading a single byte, the EVM needs to load the entire word that contains that byte and then "cut" it in order to return only the selected byte.
Storage
The EVM storage is a key-value data structure where keys (most often called slots) and values are each 32 bytes long. This is the persistent memory of every smart contract: all values saved on it are kept indefinitely across different transactions and blocks. Each smart contract can only access and modify its own storage, and if you try to access a slot that doesn't contain any values, it will always return the value 0 without throwing any errors. Figure 14-8 shows a very basic representation of two contracts' storage.
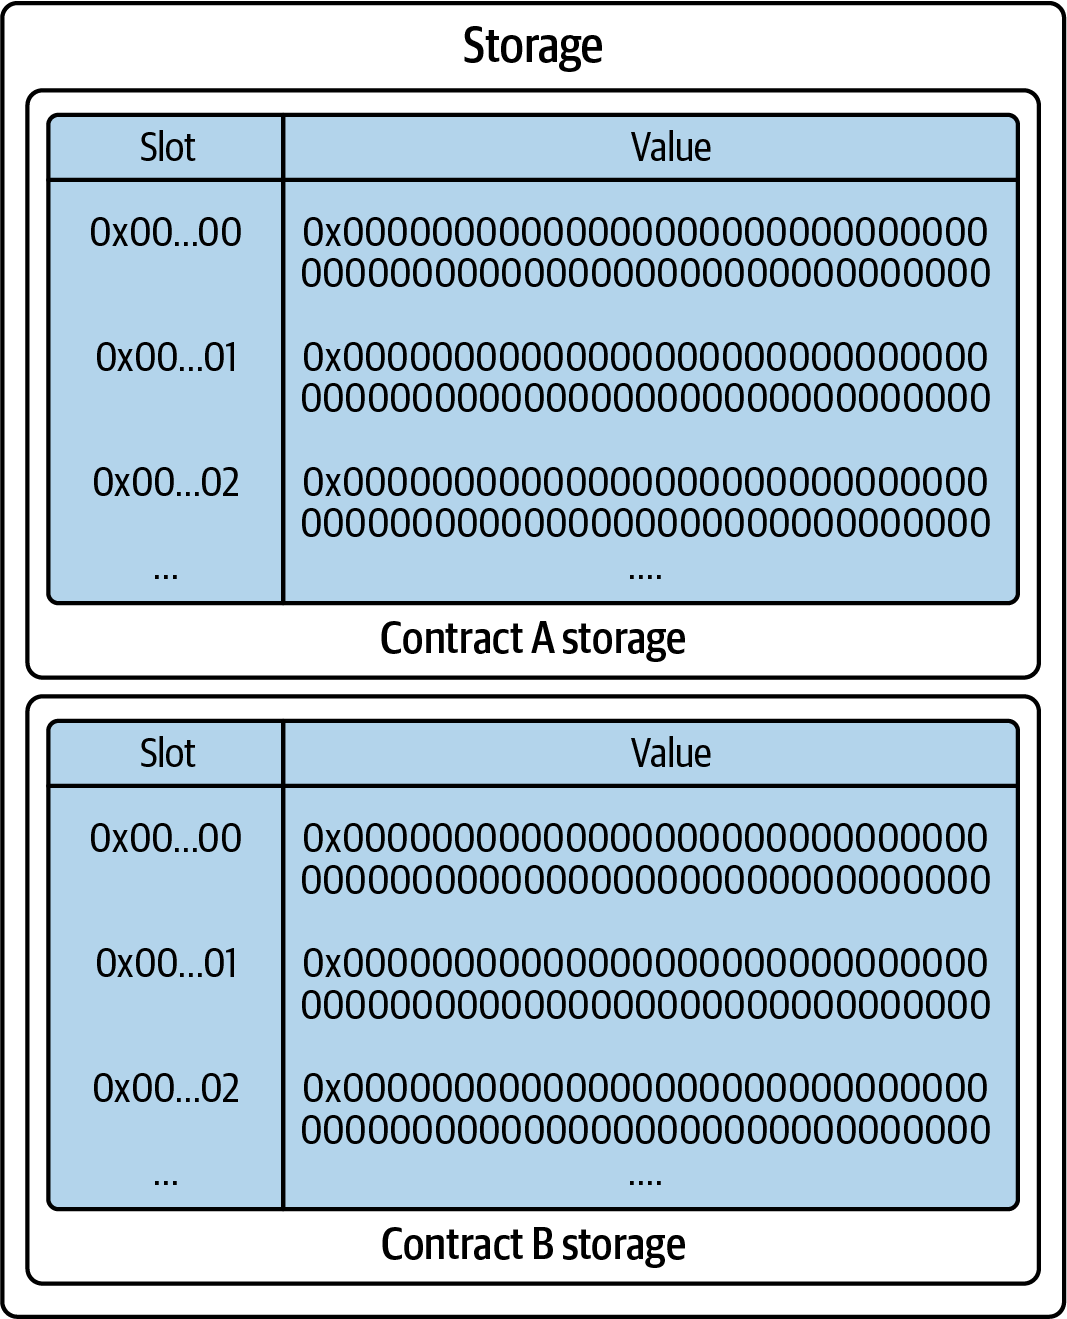
Figure 14-8. The EVM storage is a permanent memory with a key-value data structure
There is also the transient storage, added with EIP-1153, which behaves in the same way as the normal storage, with the only difference being that it's completely discarded after the execution of the transaction. For this reason, it's much cheaper to use than normal storage.
Calldata
Calldata is an immutable data structure that always contains the bytes sent as input to the next call frame (i.e., a sandbox EVM environment). For example, in a contract-creation transaction, the calldata contains the bytecode of the contract that is going to be deployed. It can also be empty, such as in simple ETH transfers.
Let's Put Everything Together with a Concrete Example
You are executing a transaction that works on contract A, and you have the following EVM bytecode: 60425F525F3560AB145F515500.
You also have an initial calldata:
00000000000000000000000000000000000000000000000000000000000000ab
Let's represent the EVM bytecode in a human-readable format:
[00]            PUSH1            42
[02]            PUSH0
[03]            MSTORE
[04]            PUSH0
[05]            CALLDATALOAD
[06]            PUSH1            AB
[08]            EQ
[09]            PUSH0
[0a]            MLOAD
[0b]            SSTORE
[0c]            STOP
Note
Each EVM opcode is identified by a unique 1-byte value (ranging from 0x00 to 0xFF). For example, 0x60 is the PUSH1 opcode, 0x5F the PUSH0, and so on. For a comprehensive list of all opcodes and their hexadecimal representations, refer to EVM codes.
Let's see how the EVM executes these opcodes and how the stack, the memory, and the storage are manipulated. Figure 14-9 shows the initial state of the EVM.
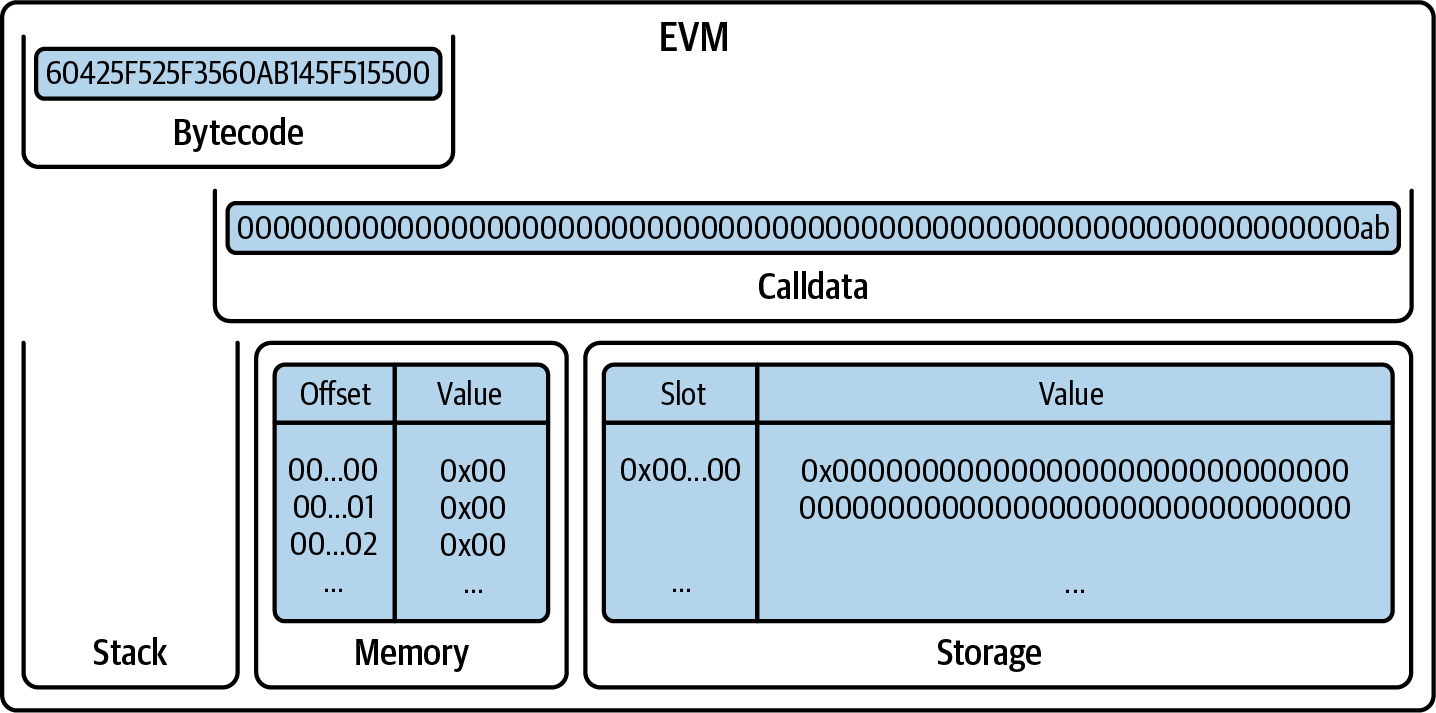
Figure 14-9. Initial EVM state
The first opcode pushes 0x42 onto the stack (Figure 14-10). Note that all push opcodes take their data (to be pushed) from the next available bytes in the bytecode itself.

Figure 14-10. EVM after PUSH1 0x42
Next, PUSH0 pushes 0x00 onto the stack (Figure 14-11).
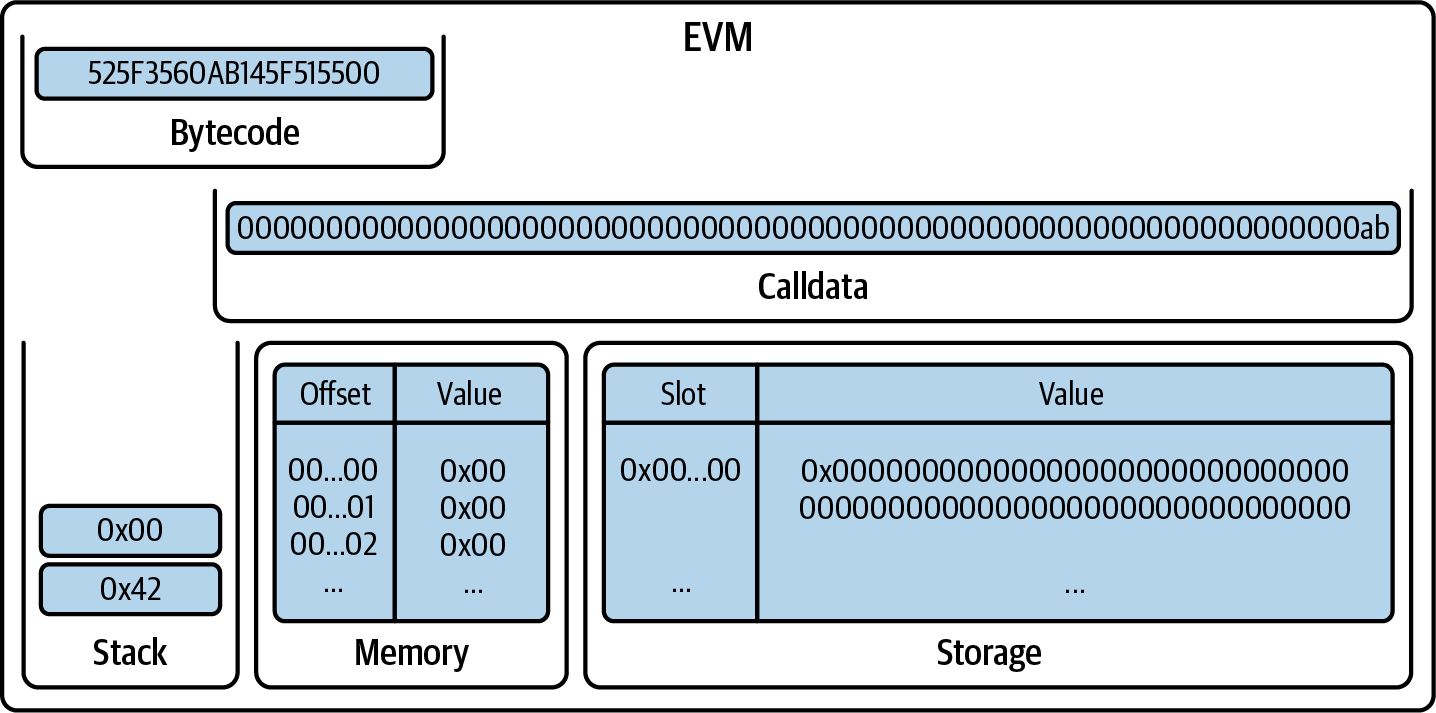
Figure 14-11. EVM after PUSH0
MSTORE pops two items from the stack, interpreting the first one as the offset (in bytes) and the second one as the value to write in the memory, starting at that offset. Note that there are lots of leading zeros in the memory (31 bytes, equal to zero) before the byte 0x42. This is correct because every value in the stack is a 32-byte value. Most of the time, we can ignore leading zeros while writing (in Figure 14-12, you can see the item 0x42), but you should always remember that they are 32-byte values.
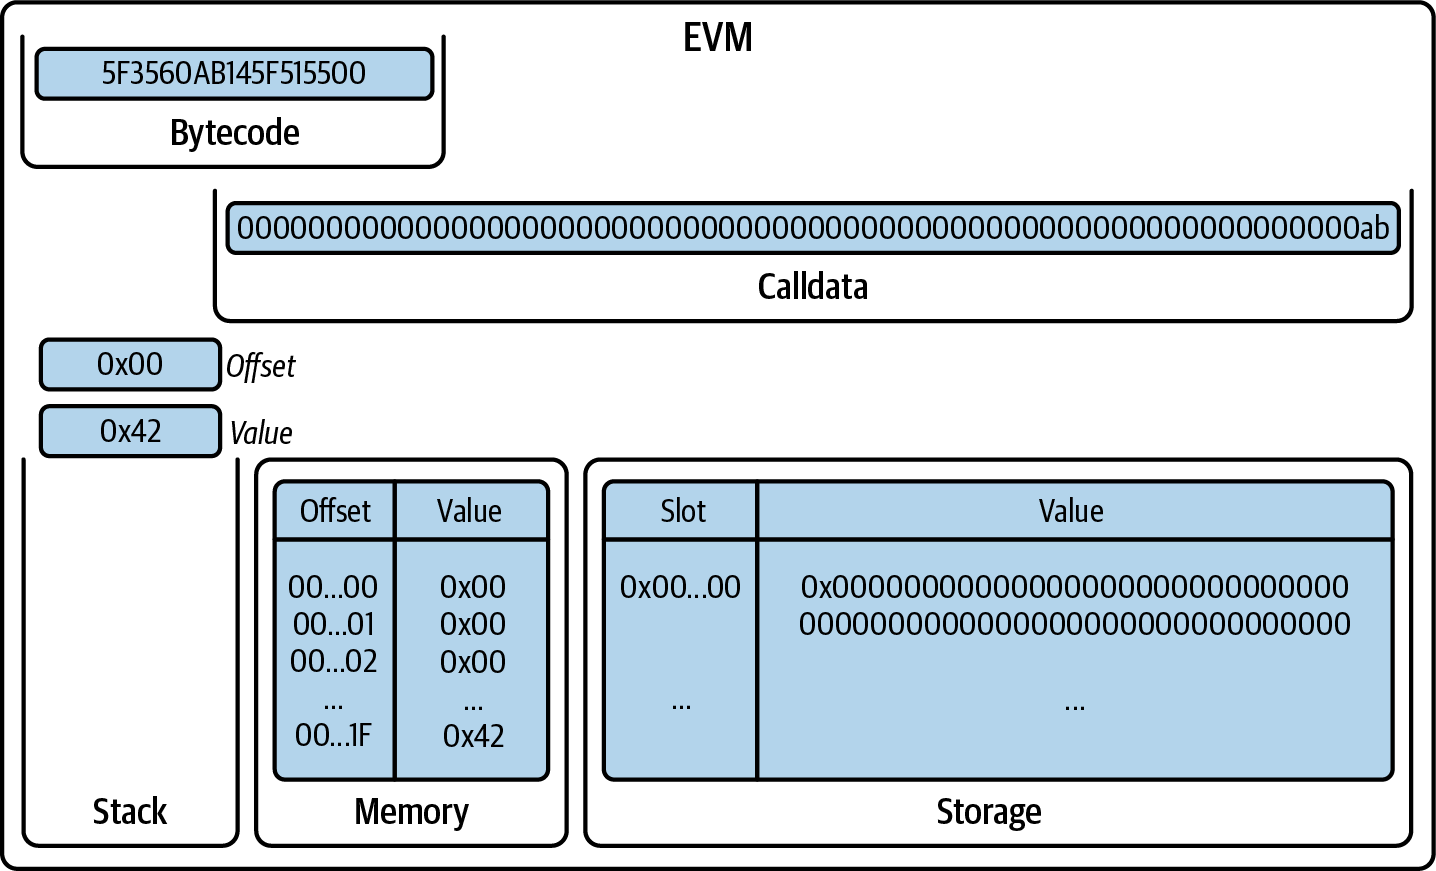
Figure 14-12. EVM after MSTORE
Then, we again have a PUSH0 that pushes 0x00 onto the stack (Figure 14-13).

Figure 14-13. EVM after PUSH0
CALLDATALOAD takes one element from the stack, interpreted as an offset, and returns the 32-byte value in the calldata starting at that offset, then pushes it onto the stack. Here, it's returning 0xab (note that we can ignore all the leading zeros as they are not significant), as shown in Figure 14-14.
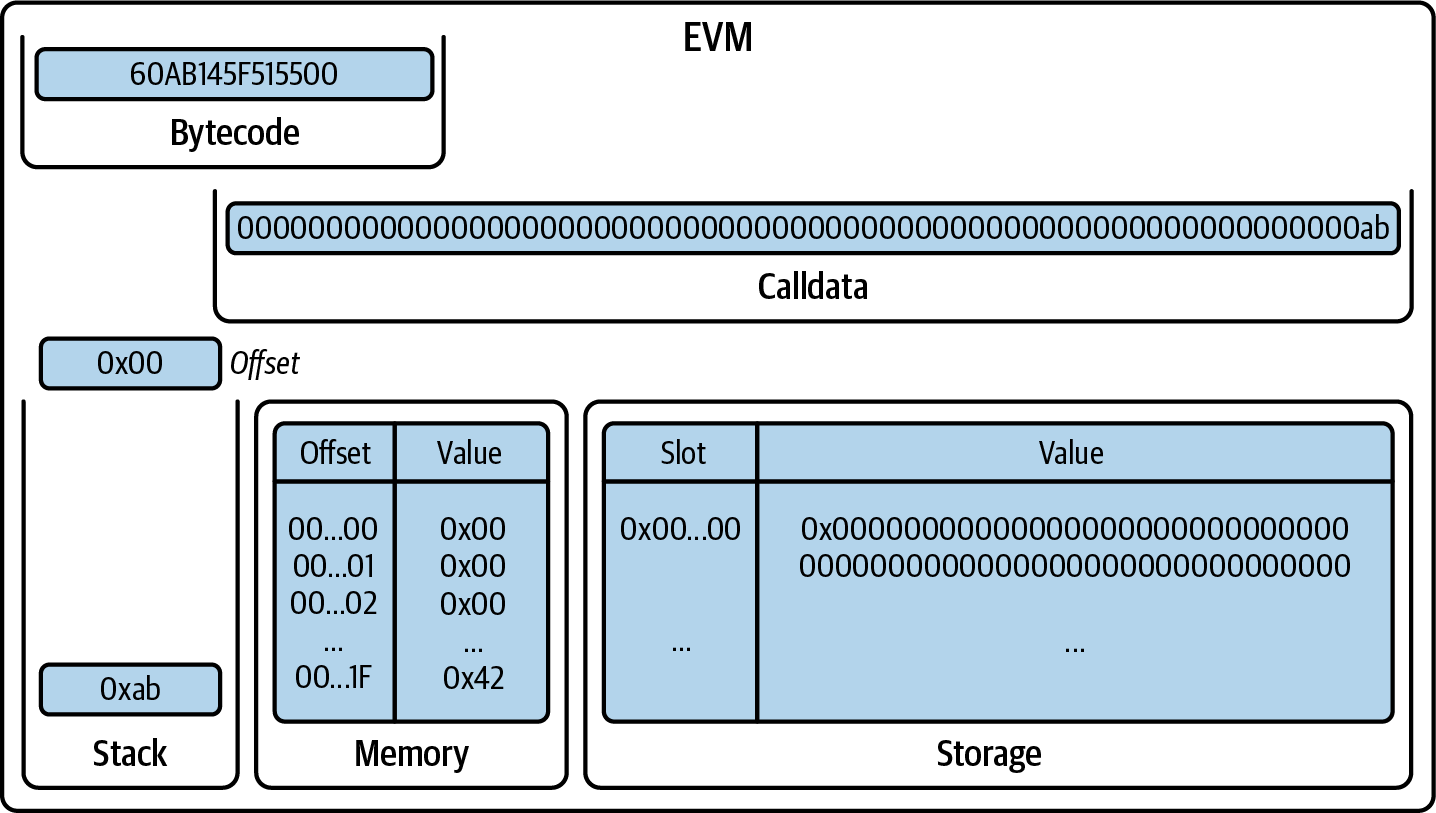
Figure 14-14. EVM after CALLDATALOAD
PUSH1 pushes 0xab onto the stack (Figure 14-15).

Figure 14-15. EVM after PUSH1 0xab
EQ pops two items from the stack, compares them, and returns 1 if they are equal, 0 otherwise. In this example, it returns 0x01 since the two values are equal, as shown in Figure 14-16.
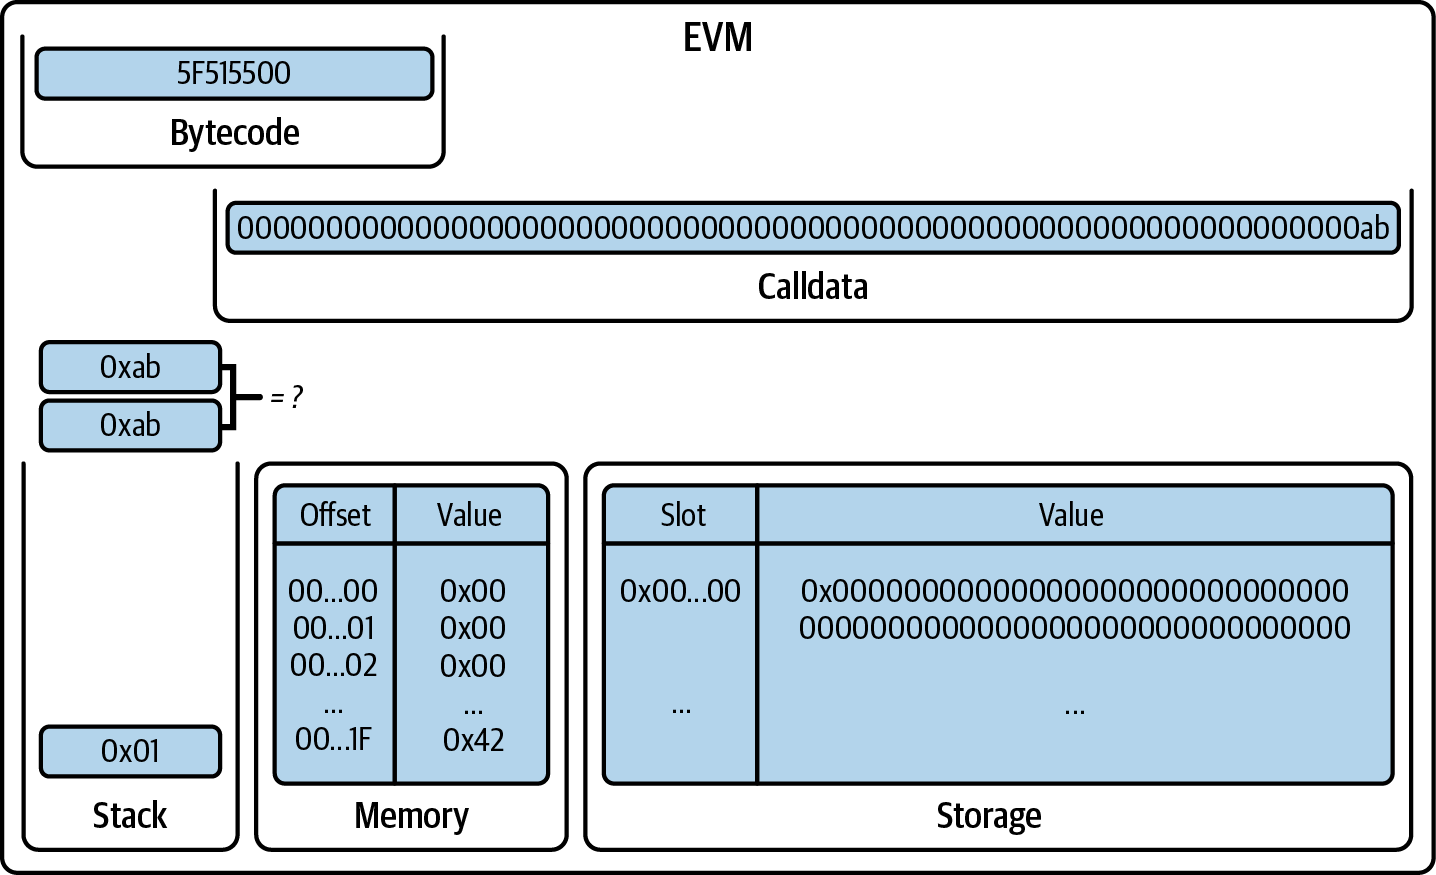
Figure 14-16. EVM after EQ
Again, a PUSH0 pushes 0x00 onto the stack (Figure 14-17).
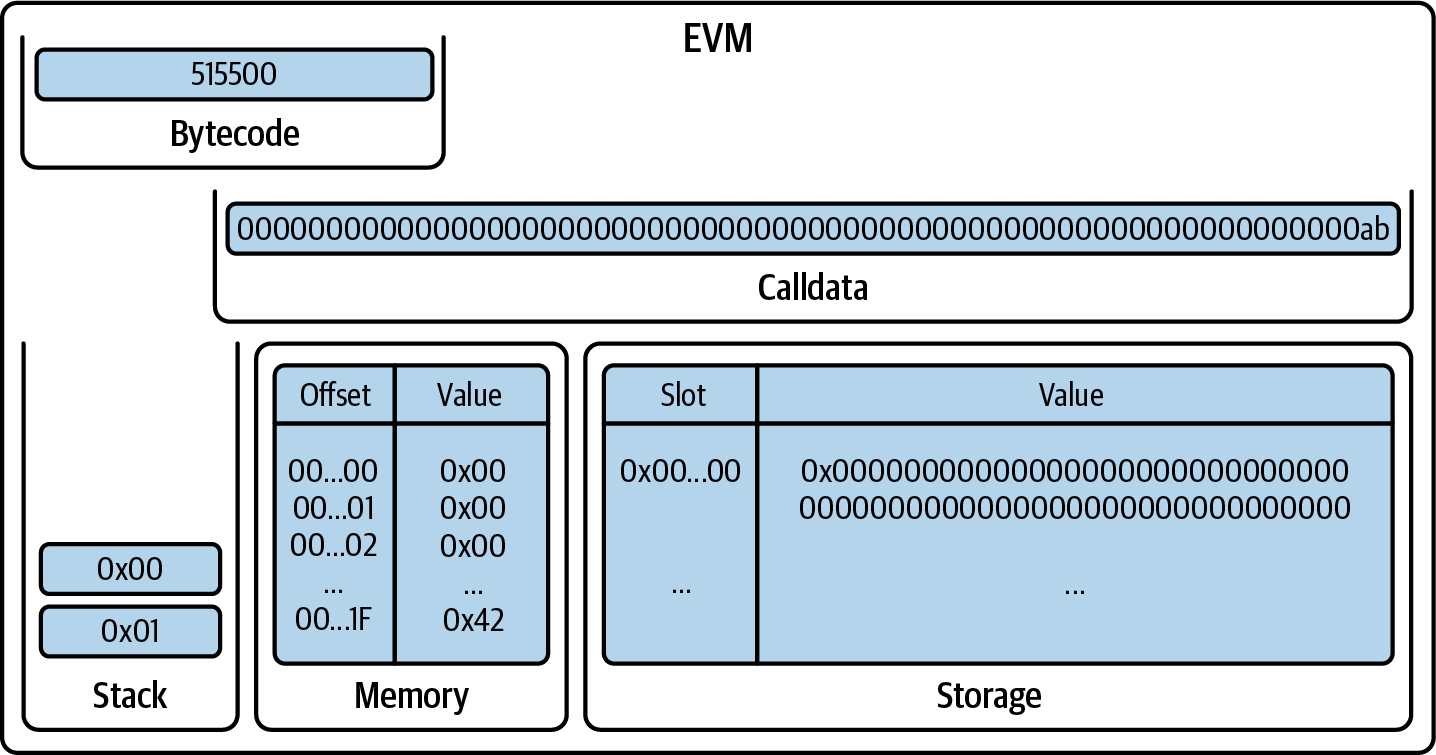
Figure 14-17. EVM after PUSH0
MLOAD takes one element from the stack, interpreting it as the offset, and reads 32 bytes in the memory, starting at that offset, then pushes the result onto the stack (Figure 14-18).
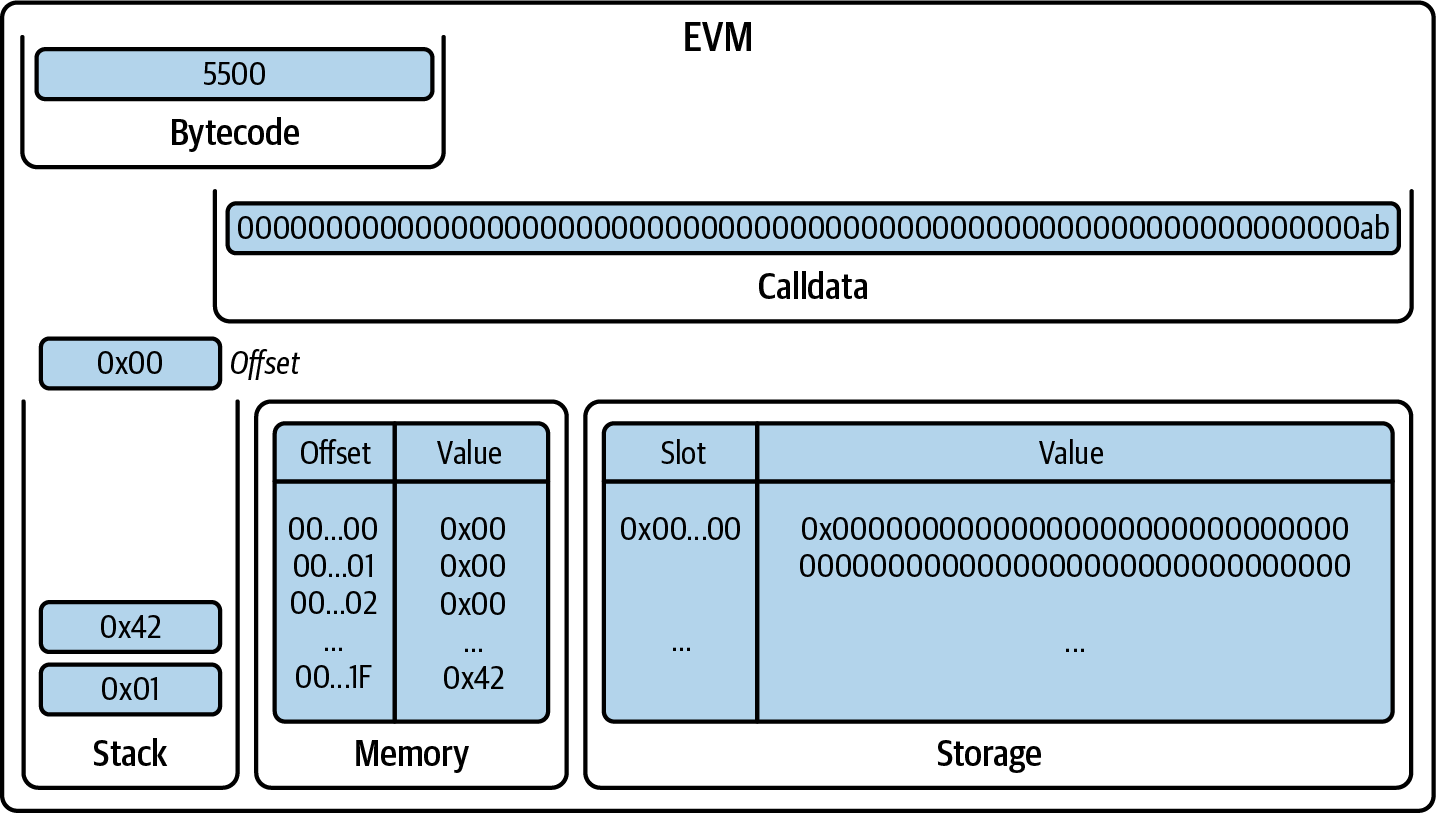
Figure 14-18. EVM after MLOAD
Now, the SSTORE pops two items from the stack, interpreting the first one as the slot and the second one as the value to be saved in the contract's storage at that slot number, as shown in Figure 14-19.
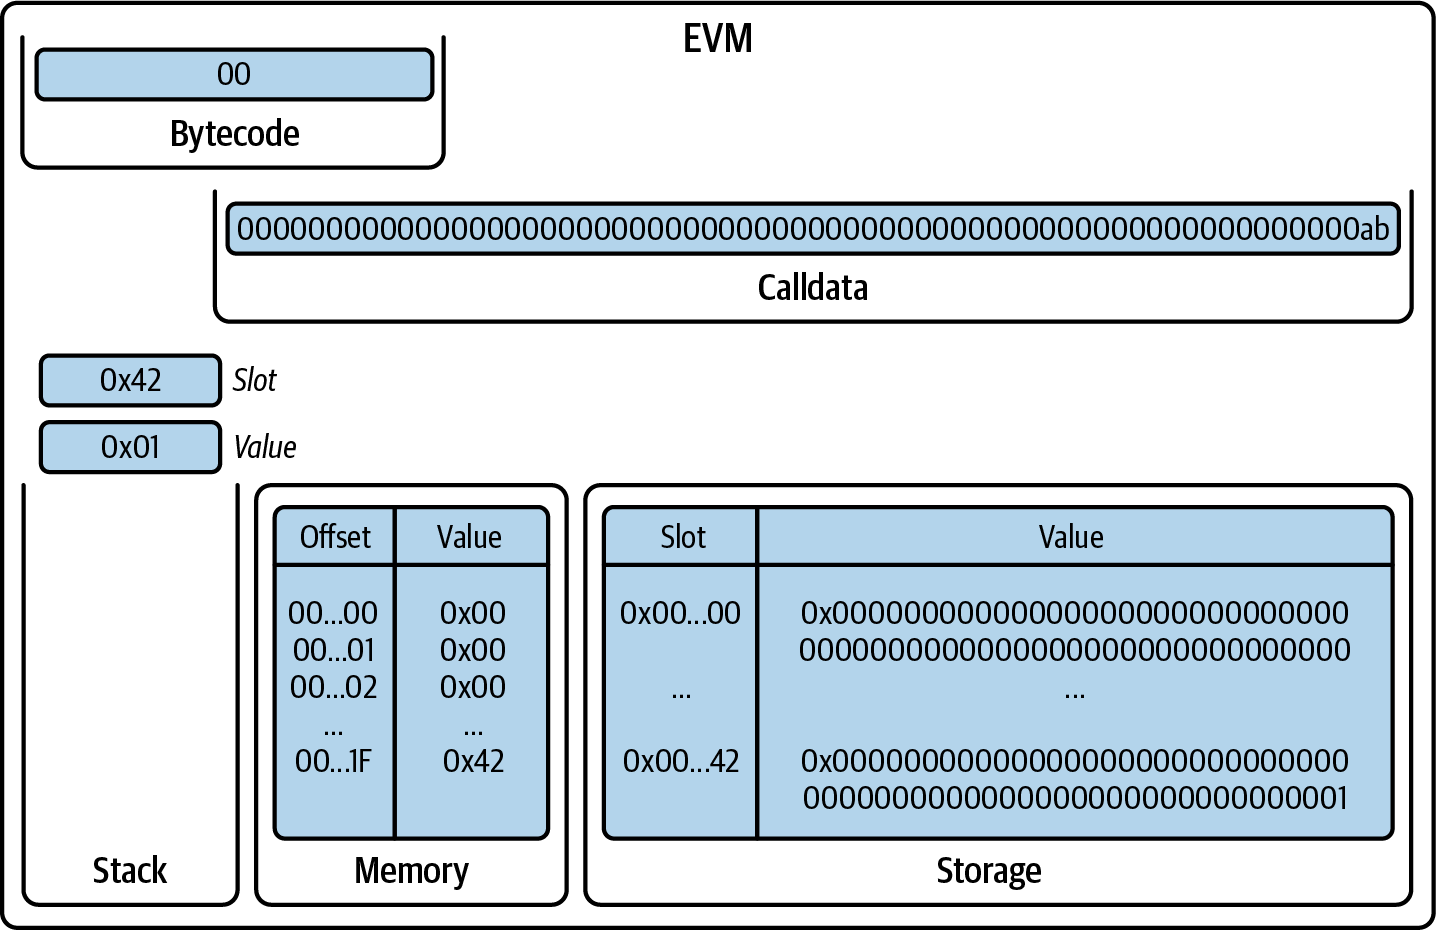
Figure 14-19. EVM after SSTORE
Finally, we have the STOP opcode that halts the execution, and the EVM returns successfully, as you can see in Figure 14-20.
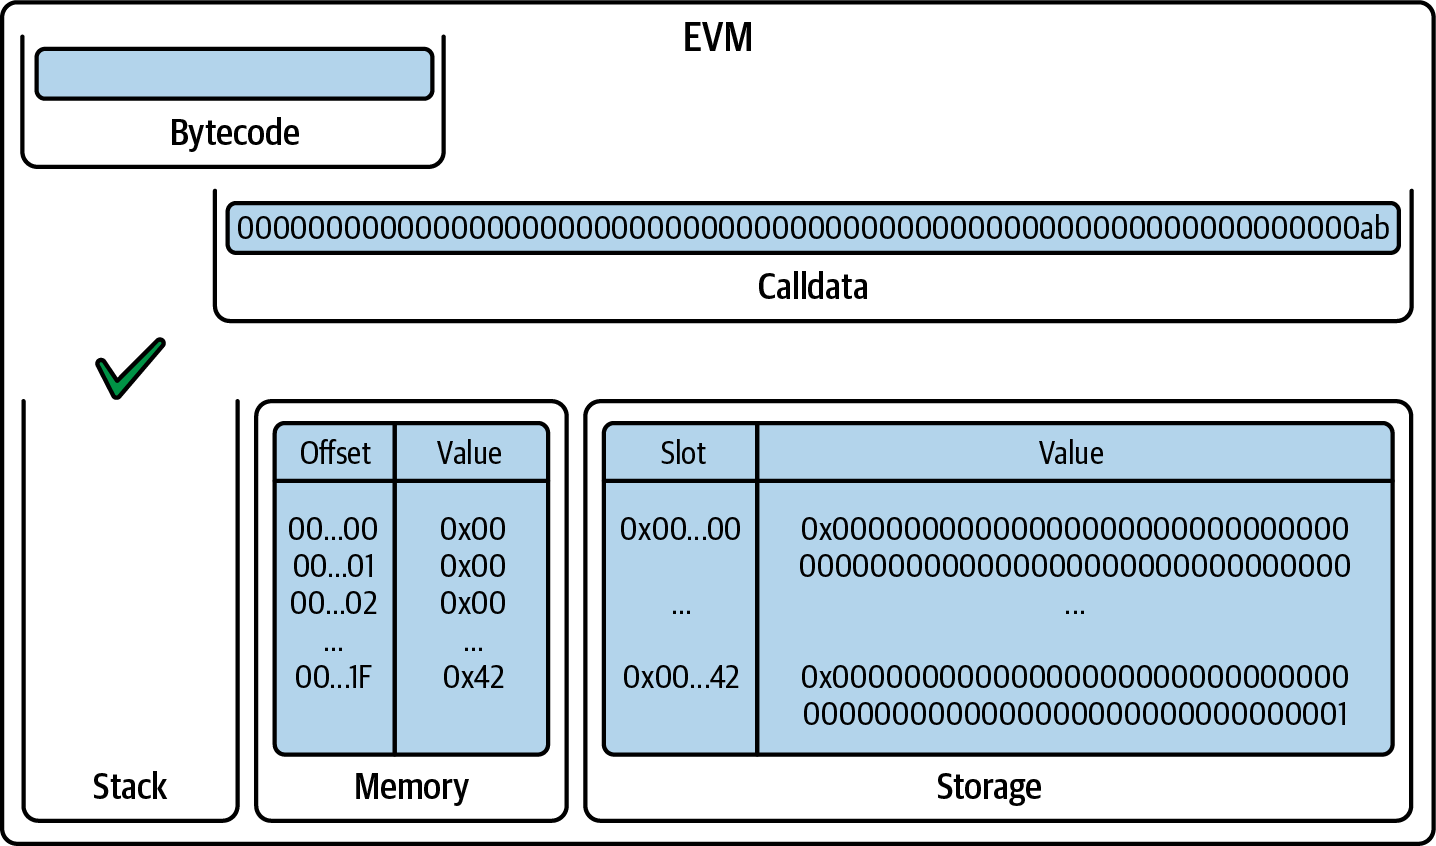
Figure 14-20. EVM after STOP
Tip
In the previous example, we used the opcode PUSH0. It's important to say that not all EVM-compatible blockchains have integrated this opcode, so be aware of that when deploying a cross-chain contract. EVM Diff is a very cool website that shows all these subtle differences for EVM-compatible chains.
Compiling Solidity to EVM Bytecode
We've already explored Solidity in Chapter 7. Now, we're going to see how it's compiled down into EVM bytecode that can be interpreted by the EVM.
Compiling a Solidity source file to EVM bytecode can be accomplished via several methods. In Chapter 2, we used the online Remix compiler. In this chapter, we will use the solc executable at the command line. To install Solidity on your computer, follow the steps.
For a list of options, run the following command:
$ solc --help
Generating the raw opcode stream of a Solidity source file is easily achieved with the --opcodes command-line option. This opcode stream leaves out some information (the --asm option produces the full information), but it is sufficient for this discussion. For example, compiling an example Solidity file, Example.sol, and sending the opcode output into a directory named BytecodeDir is accomplished with the following command:
$ solc -o BytecodeDir --opcodes Example.sol
You can also use --asm to produce a more human-readable output:
$ solc -o BytecodeDir --asm Example.sol
The following command will produce the bytecode binary for our example program:
$ solc -o BytecodeDir --bin Example.sol
The output opcode files generated will depend on the specific contracts contained within the Solidity source file. Our simple Solidity file Example.sol has only one contract, named Example:
// SPDX-License-Identifier: GPL-3.0
pragma solidity 0.8.27;

contract Example {
  address contractOwner;

  function test() public {
    contractOwner = msg.sender;
  }
}
As you can see, all this contract does is hold one persistent state variable, which is set as the address of the last account to run this contract.
If you look in the BytecodeDir directory, you will see the opcode file Example.opcode, which contains the EVM opcode instructions of the example contract. Opening the Example.opcode file in a text editor will show the following:
PUSH1 0x80 PUSH1 0x40 MSTORE CALLVALUE DUP1 ISZERO PUSH1 0xE JUMPI PUSH0 PUSH0 REVERT JUMPDEST POP PUSH1 0xA9 DUP1 PUSH1 0x1A PUSH0 CODECOPY PUSH0 RETURN INVALID PUSH1 0x80 PUSH1 0x40 MSTORE CALLVALUE DUP1 ISZERO PUSH1 0xE JUMPI PUSH0 PUSH0 REVERT JUMPDEST POP PUSH1 0x4 CALLDATASIZE LT PUSH1 0x26 JUMPI PUSH0 CALLDATALOAD PUSH1 0xE0 SHR DUP1 PUSH4 0xF8A8FD6D EQ PUSH1 0x2A JUMPI JUMPDEST PUSH0 PUSH0 REVERT JUMPDEST PUSH1 0x30 PUSH1 0x32 JUMP JUMPDEST STOP JUMPDEST CALLER PUSH0 PUSH0 PUSH2 0x100 EXP DUP2 SLOAD DUP2 PUSH20 0xFFFFFFFFFFFFFFFFFFFFFFFFFFFFFFFFFFFFFFFF MUL NOT AND SWAP1 DUP4 PUSH200xFFFFFFFFFFFFFFFFFFFFFFFFFFFFFFFFFFFFFFFF AND MUL OR SWAP1 SSTORE POP JUMP INVALID LOG2 PUSH5 0x6970667358 0x22 SLT KECCAK256 JUMPI 0xBB RETURNDATACOPY SWAP15 CALLVALUE 0xB3 0xB1 SMOD BLOBHASH STATICCALL MCOPY PUSH10 0x856E7132D8FEED4D83B6 0xB2 0xBE PUSH30 0x8B43532C818BFD64736F6C634300081B0033000000000000000000000000
Compiling the example with the --asm option produces a file named Example.evm in our BytecodeDir directory. This contains a slightly higher-level description of the EVM bytecode instructions, together with some helpful annotations:
/* "Example.sol":61:171  contract Example {... */
  mstore(0x40, 0x80)
  callvalue
  dup1
  iszero
  tag_1
  jumpi
  revert(0x00, 0x00)
tag_1:
  pop
  dataSize(sub_0)
  dup1
  dataOffset(sub_0)
  0x00
  codecopy
  0x00
  return
stop

sub_0: assembly {
        /* "Example.sol":61:171  contract Example {... */
      mstore(0x40, 0x80)
      callvalue
      dup1
      iszero
      tag_1
      jumpi
      revert(0x00, 0x00)
    tag_1:
      pop
      jumpi(tag_2, lt(calldatasize, 0x04))
      shr(0xe0, calldataload(0x00))
      dup1
      0xf8a8fd6d
      eq
      tag_3
      jumpi
    tag_2:
      revert(0x00, 0x00)
        /* "Example.sol":109:169  function test() public {... */
    tag_3:
      tag_4
      tag_5
      jump    // in
    tag_4:
      stop
    tag_5:
        /* "Example.sol":154:164  msg.sender */
      caller
        /* "Example.sol":138:151  contractOwner */
      0x00
      0x00
        /* "Example.sol":138:164  contractOwner = msg.sender */
      0x0100
      exp
      dup2
      sload
      dup2
      0xffffffffffffffffffffffffffffffffffffffff
      mul
      not
      and
      swap1
      dup4
      0xffffffffffffffffffffffffffffffffffffffff
      and
      mul
      or
      swap1
      sstore
      pop
        /* "Example.sol":109:169  function test() public {... */
      jump    // out
    auxdata: 0xa264697066735822122057bb3e9e34b3b10749fa5e69856e7132d8feed4d83b6b2be7d8b43532c818bfd64736f6c634300081b0033
}
The --bin option produces the machine-readable hexadecimal bytecode:
6080604052348015600e575f5ffd5b5060a980601a5f395ff3fe6080604052348015600e575f5ffd5b50600436106026575f3560e01c8063f8a8fd6d14602a575b5f5ffd5b60306032565b005b335f5f6101000a81548173ffffffffffffffffffffffffffffffffffffffff021916908373ffffffffffffffffffffffffffffffffffffffff16021790555056fea264697066735822122057bb3e9e34b3b10749fa5e69856e7132d8feed4d83b6b2be7d8b43532c818bfd64736f6c634300081b0033
You can investigate what's going on here in detail using the opcode list given in "The EVM Instruction Set (Bytecode Operations)". However, that's quite a task, so let's start by just examining the first four instructions:
PUSH1 0x80 PUSH1 0x40 MSTORE CALLVALUE
Here, we have PUSH1 followed by a raw byte of value 0x80. This EVM instruction takes the single byte following the opcode in the program code (as a literal value) and pushes it onto the stack. It is possible to push values of size up to 32 bytes onto the stack, as in:
PUSH32 0x436f6e67726174756c6174696f6e732120536f6f6e20746f206d617374657221
The second PUSH1 opcode from example.opcode stores 0x40 onto the top of the stack (pushing the 0x80 already present there down one slot).
Next is MSTORE, which is a memory store operation that saves a value to the EVM's memory. It takes two arguments and, like most EVM operations, obtains them from the stack. For each argument, the stack is "popped"—that is, the top value on the stack is taken off, and all the other values on the stack are shifted up one position. The first argument for MSTORE is the address of the word in memory where the value to be saved will be put. For this program, we have 0x40 at the top of the stack, so that is removed from the stack and used as the memory address. The second argument is the value to be saved, which is 0x80 here. After the MSTORE operation is executed, our stack is empty again, but we have the value 0x80 (128 in decimal) at the memory location 0x40.
The next opcode is CALLVALUE, which is an environmental opcode that pushes onto the top of the stack the amount of ether (measured in wei) sent with the message call that initiated this execution.
We could continue to step through this program in this way until we had a full understanding of the low-level state changes that this code effects, but it wouldn't help us at this stage. We'll come back to it later in the chapter.
Contract Deployment Code
There is an important but subtle difference between the code used when creating and deploying a new contract on the Ethereum platform and the code of the contract itself. To create a new contract, a special transaction is needed that has an empty to field (null) and its data field set to the contract's initiation code. When such a contract-creation transaction is processed, the code for the new contract account is not the code in the data field of the transaction. Instead, an EVM is instantiated with the code in the data field of the transaction loaded into its program code ROM, and then the output of the execution of that deployment code is taken as the code for the new contract account. This is so that new contracts can be programmatically initialized using the Ethereum world state at the time of deployment, setting values in the contract's storage and even sending ether or creating further new contracts.
When compiling a contract offline—for example, using solc on the command line—you can get either the deployment bytecode or the runtime bytecode. The deployment bytecode is used for every aspect of the initialization of a new contract account, including the bytecode that will actually end up being executed when transactions call this new contract (i.e., the runtime bytecode) and the code to initialize everything based on the contract's constructor. The runtime bytecode, on the other hand, is exactly the bytecode that ends up being executed when the new contract is called and nothing more; it does not include the bytecode needed to initialize the contract during deployment.
Let's take the simple Faucet.sol contract we created in previous chapters as an example:
// SPDX-License-Identifier: GPL-3.0
pragma solidity 0.8.27;

contract Faucet {
  // Give out ether to anyone who asks
  function withdraw(uint256 _withdrawAmount, address payable _to) public {
    // Limit withdrawal amount
    require(_withdrawAmount <= 1000000000000);
    // Send the amount to the address that requested it
    _to.transfer(_withdrawAmount);
  }

  // Function to receive Ether. msg.data must be empty
  receive() external payable {}

  // Fallback function is called when msg.data is not empty
  fallback() external payable {}
}
To get the deployment bytecode, we would run solc --bin Faucet.sol. If we instead wanted just the runtime bytecode, we would run solc --bin-runtime Faucet.sol. If you compare the output of these commands, you will see that the runtime bytecode is a subset of the deployment bytecode. In other words, the runtime bytecode is entirely contained within the deployment bytecode.
CREATE Versus CREATE2 to Deploy Contracts on Chain
CREATE and CREATE2 are the only two opcodes that let you deploy a new contract on chain. The main difference between them is related to the resulting address of the newly created contract. With CREATE the destination address is calculated as follows:
address = keccak256[rlp(sender_address ++ sender_nonce)][12:]
It's the rightmost 20 bytes of the Keccak-256 hash of the RLP encoding of the sender address followed by its nonce.
CREATE2 was added during the Constantinople hard fork in 2019 to let developers create new contracts where the resulting address isn't dependent on the state (i.e., the nonce) of the sender. In fact, it behaves in the exact same way as the CREATE opcode, but the destination address is calculated like this:
address = keccak256(0xff ++ sender_address ++ salt ++ keccak256(init_code))[12:]
where:
init_codeis the deployment bytecode of the new contract.saltis a 32-byte value (taken from the stack)
Disassembling the Bytecode
Disassembling EVM bytecode is a great way to understand how high-level Solidity acts in the EVM. There are a few disassemblers you can use to do this:
- Ethersplay is an EVM plug-in for Binary Ninja, a disassembler. By the way, to use plug-ins, you need to buy the complete app of Binary Ninja.
- Heimdall is an advanced EVM smart contract toolkit specializing in bytecode analysis and extracting information from unverified contracts.
In this section, we will be using Heimdall to produce Figure 14-21. After getting the runtime bytecode of Faucet.sol, we can feed it to Heimdall to see what the EVM instructions look like.
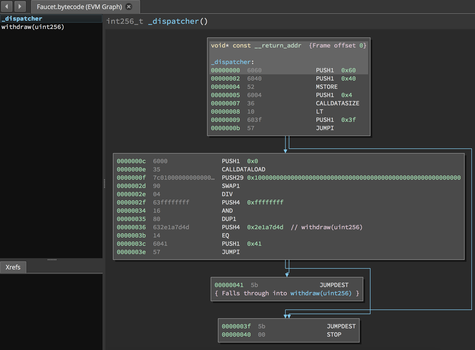
Figure 14-21. Disassembling the Faucet runtime bytecode
Installing Heimdall
First, you need to ensure that Rust is installed on your computer. If it's not, run the following command:
$ curl https://sh.rustup.rs -sSf | sh
Then, run these two commands, one after the other:
$ curl -L http://get.heimdall.rs | bash
$ bifrost
Now, you should have Heimdall correctly installed. You can verify that by running:
$ heimdall --version
You should see something like this:
$ heimdall --version
heimdall 0.8.4
Note
For the latest information on how to install Heimdall, please refer to the official documentation you can find on the GitHub repository.
Disassembling the bytecode with Heimdall
Now that we have correctly installed Heimdall, we are ready to generate the same graph you saw in Figure 14-21. Starting with the runtime bytecode of our Faucet.sol contract, you can run the following command:
$ heimdall cfg <insert the runtime bytecode here>
Here is an example of what this command should look like:
$ heimdall cfg 608060405260043610610…
Now, you should see a new folder called output. Enter it and again enter the generated folder called local. Here, you should find the file cfg.dot:
$ cd output
$ cd local
$ ls # now you should see the file
Since it's a .dot file, we need a special program to open it correctly. In this example, we're going to use a website that lets us paste the contents of the .dot file and then generates the graph for us.
First, you need to copy the contents of the .dot file:
$ cat cfg.dot
This command prints to screen the entire contents of the file; copy it, open a control flow graph (CFG) online generator, and paste it on the left side of the web page, as shown in Figure 14-22.
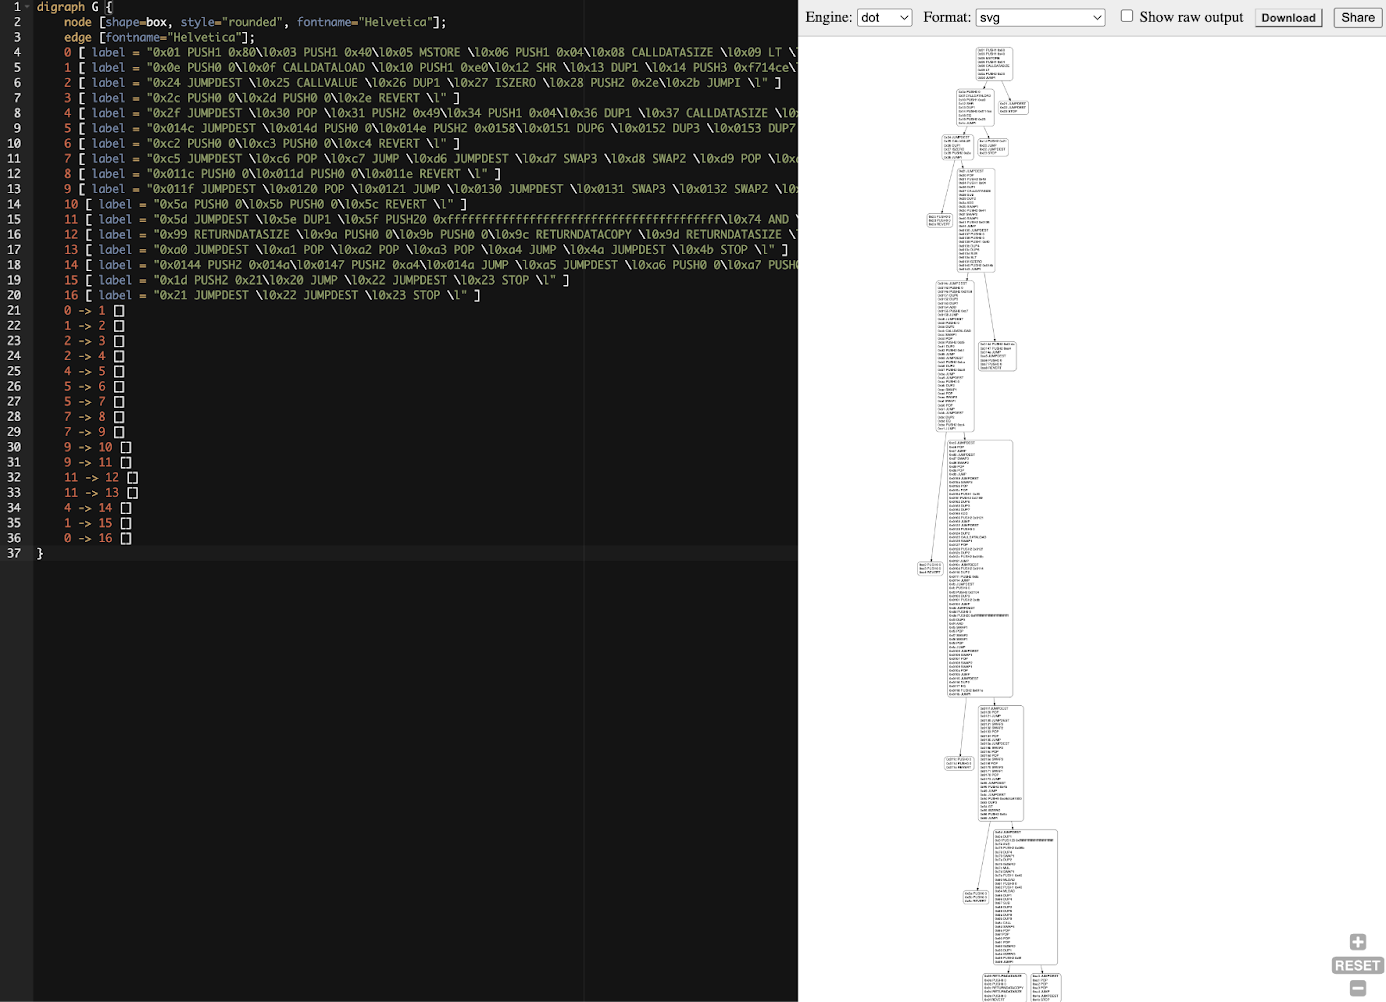
Figure 14-22. The control flow graph (CFG) of the Faucet.sol contract
Figure 14-23 shows the initial bytecode of the Faucet.sol contract. As you can see, it starts with the same pattern as the previous Example.sol contract: PUSH1 0x80 PUSH1 0x40 MSTORE.
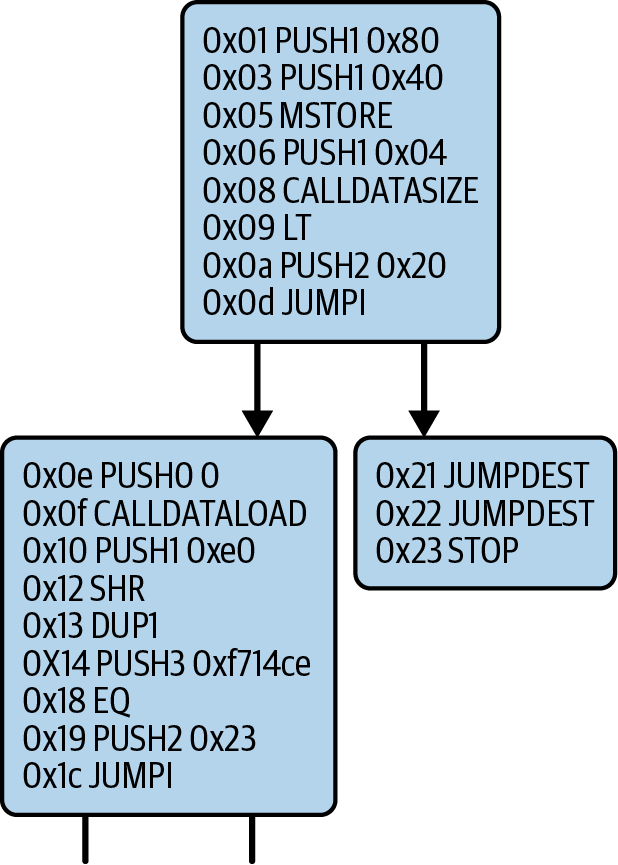
Figure 14-23. A zoom-in into the first part of the CFG graph
When you send a transaction to an ABI-compatible smart contract (which you can assume all contracts are), the transaction first interacts with that smart contract's dispatcher. The dispatcher reads in the data field of the transaction and sends the relevant part to the appropriate function. We can see an example of a dispatcher at the beginning of our disassembled Faucet.sol runtime bytecode. After the familiar MSTORE instruction, we see the following instructions:
PUSH1 0x04
CALLDATASIZE
LT
PUSH2 0x0020
JUMPI
As we have seen, PUSH1 0x04 places 0x04 onto the top of the stack, which is otherwise empty. CALLDATASIZE gets the size in bytes of the data sent with the transaction (known as the calldata) and pushes that number onto the stack. After these operations have been executed, the stack looks like this:
Stack
<length of calldata from tx>
0x4
This next instruction is LT, short for "less than." The LT instruction checks whether the top item on the stack is less than the next item on the stack. In our case, it checks to see if the result of CALLDATASIZE is less than 4 bytes.
Why does the EVM check to see that the calldata of the transaction is at least 4 bytes? Because of how function identifiers work. Each Solidity function is identified by the first 4 bytes of its Keccak-256 hash. By placing the function's name and all the arguments it takes into a keccak256 hash function, we can deduce its function identifier. In our case, we have:
keccak256("withdraw(uint256,address)") = 0x00f714ce...
Thus, the function identifier for the withdraw(uint256,address) function is 0x00f714ce, since these are the first 4 bytes of the resulting hash. A function identifier is always 4 bytes long, so if the entire data field of the transaction sent to the contract is less than 4 bytes, then there's no function with which the transaction could possibly be communicating, unless a fallback function is defined. Because we implemented such a fallback function in Faucet.sol, the EVM jumps to this function when the calldata's length is less than 4 bytes.
LT pops the top two values off the stack and, if the transaction's data field is less than 4 bytes, pushes 1 onto it. Otherwise, it pushes 0. In our example, let's assume the data field of the transaction sent to our contract was less than 4 bytes.
The PUSH2 0x0020 instruction pushes the bytes 0x0020 onto the stack. After this instruction, the stack looks like this:
Stack
0x0020
0x1
The next instruction is JUMPI, which stands for "jump if." It works like so:
jumpi(label, cond) // Jump to "label" if "cond" is true
In our case, label is 0x0020, which is where our fallback function lives in our smart contract. The cond argument is 1, which was the result of the LT instruction earlier. To put this entire sequence into words, the contract jumps to the fallback function if the transaction data is less than 4 bytes.
At 0x20, after two JUMPDEST instructions, only a STOP instruction follows because, although we declared a fallback function, we kept it empty. As you can see in Figure 14-24, had we not implemented a fallback function, the contract would throw an exception instead.
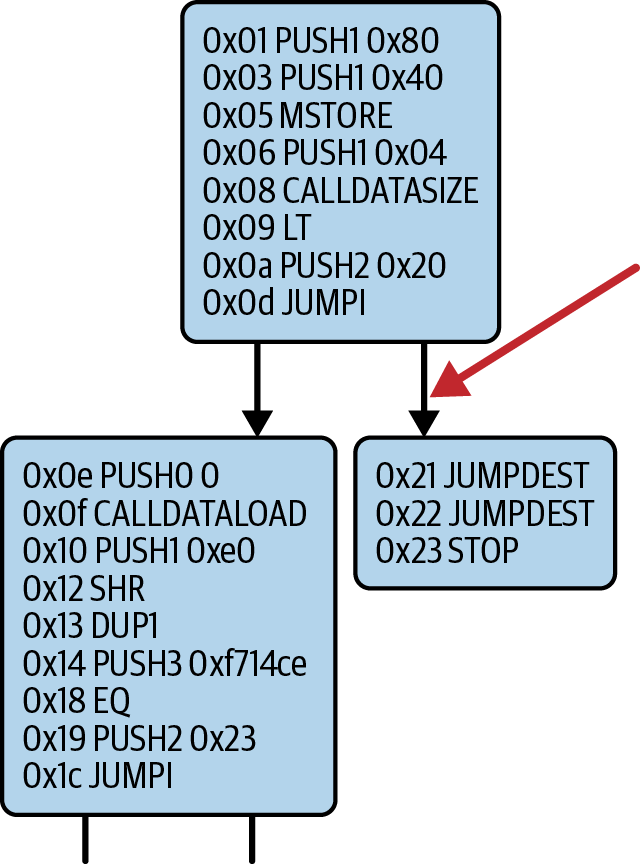
Figure 14-24. JUMPI instruction leading to fallback function
Note
Heimdall represents the bytecode starting with offset equal to 0x01, even though the EVM actually interprets it as starting with offset 0x00. In the previous example, the JUMPI instruction tells the EVM to go to offset 0x20 if the condition is true, but in the graph, offset 0x20 is here represented as 0x21. As a rule of thumb, you just need to add one to every offset of the EVM to find it on the graph.
Let's examine the central block of the dispatcher. Assuming we received calldata that was greater than 4 bytes in length, the JUMPI instruction would not jump to the fallback function. Instead, code execution would proceed to the following instructions:
PUSH0 0x0
CALLDATALOAD
PUSH1 0xe0
SHR
DUP1
PUSH3 0xf714ce
EQ
PUSH2 0X23
JUMPI
PUSH0 pushes 0 onto the stack, which is now otherwise empty again. CALLDATALOAD accepts as an argument an index within the calldata sent to the smart contract and reads 32 bytes from that index, like so:
calldataload(p) //load 32 bytes of calldata starting from byte position p
Since 0 was the index passed to it from the PUSH0 command, CALLDATALOAD reads 32 bytes of calldata starting at byte 0 and then pushes it to the top of the stack (after popping the original 0x0). After the PUSH1 0xe0 instruction, the stack is then:
Stack
0xe0
<32 bytes of calldata starting at byte 0>
SHR performs a logical right shift of 0xe0 bits (224 bits, 28 bytes) to the 32-byte value element on the stack. By shifting the calldata to the right by 28 bytes, it isolates the first 4 bytes of the calldata. In fact, when shifting to the right, all the bits move before the first one are discarded, while the new bits are set to 0. Remember that the first 4 bytes of the calldata represent the function identifier of the function we want to trigger.
Logical Bit Shift Example
You can better understand this with an example. Let's say the stack is:
Stack
0x1234567890 // a 5 bytes element
We want to get only the first two bytes (i.e., 0x1234). To achieve this using only EVM opcodes, we can do:
PUSH1 0x18 // this represents the number 24 in hex, 24 bits = 3 bytes
SHR
In fact, by shifting the stack of items 3 bytes to the right (remember that each byte is represented here as 2 hex digits), we obtain the following item:
0x0000001234 | 4567890
The 4567890 part is discarded, and all that remains is:
Stack
0x1234
All the leading zeros can be ignored as they are not significant.
The new stack is:
Stack
<function identifier sent in data>
The next instruction is DUP1, which duplicates the first item in the stack. The stack is now:
Stack
<function identifier sent in data>
<function identifier sent in data>
Now there is a PUSH3 instruction, followed by the push data 0xf714ce. This opcode simply pushes the (push) data onto the stack. After this opcode, the stack looks like this:
Stack
0xf714ce
<function identifier sent in data>
<function identifier sent in data>
Now, does the 0xf714ce look familiar to you? Do you remember what the function identifier of our withdraw(uint256,address) function is? It's 0x00f714ce… Note that they are the same number as leading zeros can be ignored.
The next instruction, EQ, pops off the top two items of the stack and compares them. This is where the dispatcher does its main job: it compares whether the function identifier sent in the msg.data field of the transaction matches that of withdraw(uint256,address). If they're equal, EQ pushes 1 onto the stack, which will ultimately be used to jump to the withdraw function. Otherwise, EQ pushes 0 onto the stack.
Assuming the transaction sent to our contract indeed began with the function identifier for withdraw(uint256,address), our stack has become:
Stack
1
<function identifier sent in data> (now known to be 0x00f714ce)
Next, we have PUSH2 0x23, which is the address at which the withdraw(uint256,address) function lives in the contract. After this instruction, the stack looks like this:
Stack
0x23
1
<function identifier sent in msg.data>
The JUMPI instruction is next, and it once again accepts the top two elements on the stack as arguments. In this case, we have JUMPI(0x23, 1), which tells the EVM to execute the jump to the location of the withdraw(uint256,address) function, and the execution of that function's code can proceed.
Turing Completeness and Gas
As we have already touched on, in simple terms a system or programming language is Turing complete if it can run any program. This capability, however, comes with a very important caveat: some programs take forever to run. An important aspect of this is that we can't tell just by looking at a program whether it will take forever or not to execute. We have to actually go through with the execution of the program and wait for it to finish to find out. Of course, if it is going to take forever to execute, we will have to wait forever to find out. This is called the halting problem and would be a huge problem for Ethereum if it were not addressed.
Because of the halting problem, the Ethereum world computer is at risk of being asked to execute a program that never stops. This could be by accident or malice. We have described how Ethereum acts like a single-threaded machine, without any scheduler, and so if it became stuck in an infinite loop, that would mean that Ethereum would become unusable.
With gas, there is a solution, though: if after a prespecified maximum amount of computation has been performed, the execution hasn't ended, the execution of the program is halted by the EVM. This makes the EVM a quasi-Turing-complete machine: it can run any program you feed into it but only if the program terminates within a particular amount of computation. That limit isn't fixed in Ethereum—you can pay to increase it up to a maximum (called the block gas limit), and everyone can agree to increase that maximum over time. Nevertheless, at any one time, there is a limit in place, and transactions that consume too much gas while executing are halted.
In the following sections, we will look at gas and examine how it works in detail.
What Is Gas?
Gas is Ethereum's unit for measuring the computational and storage resources required to perform actions on the Ethereum blockchain. In contrast to Bitcoin, whose transaction fees take into account only the size of a transaction in kilobytes, Ethereum must account for every computational step performed by transactions and smart contract code execution.
Each operation performed by a transaction or contract costs a fixed amount of gas. Some examples from the Ethereum "Yellow Paper" include:
- Adding two numbers costs 3 gas
- Calculating a Keccak-256 hash costs 30 gas + 6 gas for each 256 bits of data being hashed
- Sending a transaction costs 21,000 gas
Gas is a crucial component of Ethereum and serves a dual role: as a buffer between the (volatile) price of ether and the reward to validators for the work they do and as a defense against DoS attacks. To prevent accidental or malicious infinite loops or other computational wastage in the network, the initiator of each transaction is required to set a limit to the amount of computation they are willing to pay for. The gas system thereby disincentivizes attackers from sending "spam" transactions since they must pay proportionately for the computational, bandwidth, and storage resources that they consume.
Gas Accounting During Execution
When an EVM is needed to complete a transaction, in the first instance it is given a gas supply equal to the amount specified by the gas limit in the transaction. Every opcode that is executed has a cost in gas, and so the EVM's gas supply is reduced as the EVM steps through the program. Before each operation, the EVM checks that there is enough gas to pay for the operation's execution. If there isn't enough gas, execution is halted and the transaction is reverted.
If the EVM reaches the end of execution successfully without running out of gas, the gas cost used is paid to the validator as a transaction fee, converted to ether based on the gas price specified in the transaction:
validator fee = gas cost × gas price
The gas remaining in the gas supply is refunded to the sender, again converted to ether based on the gas price specified in the transaction:
remaining gas = gas limit – gas cost
refunded ether = remaining gas × gas price
If the transaction "runs out of gas" during execution, the operation is immediately terminated, raising an OOG exception. The transaction is reverted, and all changes to the state are rolled back. Although the transaction was unsuccessful, the sender will be charged a transaction fee because validators have already performed the computational work up to that point and must be compensated for doing so.
Gas accounting considerations
The relative gas costs of the various operations that can be performed by the EVM have been carefully chosen to best protect the Ethereum blockchain from attack. More computationally intensive operations cost more gas. For example, executing the SHA3 function is 10 times more expensive (30 gas) than the ADD operation (3 gas). More important, some operations, such as EXP, require an additional payment based on the size of the operand. There is also a gas cost to using EVM memory and for storing data in a contract's on-chain storage.
The importance of matching gas cost to the real-world cost of resources was demonstrated in 2016 when an attacker found and exploited a mismatch in costs. The attack generated transactions that were very computationally expensive and made the Ethereum mainnet almost grind to a halt. This mismatch was resolved by a hard fork (codenamed "Tangerine Whistle") that tweaked the relative gas costs.
Gas accounting in the future of Ethereum
Gas metering was and remains an extremely important part of how Ethereum handles the entire load of transactions in the network. It's very important to understand that gas costs are a key incentive for certain kinds of behaviors. In the future, there may be some changes in how much gas different opcodes consume.
For example, before the Cancun upgrade that introduced EIP-4844 blob transactions, all L2s were posting their data on Ethereum as part of the calldata of a transaction. That data is forever stored on all of Ethereum's nodes. Now that L2s have a better way to post their data on Ethereum through blob transactions, it's possible that in the future, calldata will become even more expensive than it is now to encourage rollups to use blob transactions and to lessen the burden for nodes of storing all that data forever.
Gas cost versus gas price
While the gas cost is a measure of computation and storage used by a transaction in the EVM, the gas itself also has a price measured in ether. When performing a transaction, the sender specifies the gas price they are willing to pay (in ether) for each unit of gas, allowing the market to decide the relationship between the price of ether and the cost of computing operations (as measured in gas):
transaction fee = total gas used × gas price paid (in ether)
When constructing a new block, validators on the Ethereum network can choose among pending transactions by selecting those that offer to pay a higher gas price. Offering a higher gas price will therefore incentivize validators to include your transaction and get it confirmed faster.
In practice, the sender of a transaction will set a gas limit that is higher than or equal to the amount of gas expected to be used. If the gas limit is set higher than the amount of gas consumed, the sender will receive a refund of the excess amount since validators are compensated only for the work they actually perform.
It is important to be clear about the distinction between the gas cost and the gas price. To recap:
- Gas cost is the number of units of gas required to perform a particular operation.
- Gas price is the amount of ether you are willing to pay per unit of gas when you send your transaction to the Ethereum network.
Tip
Although gas has a price, it cannot be "owned" or "spent." Gas exists only inside the EVM, as a count of how much computational work is being performed. The sender is charged a transaction fee in ether, which is converted to gas for EVM accounting and then back to ether as a transaction fee paid to the validators.
Negative gas costs
Ethereum encourages the deletion of used storage variables by refunding some of the gas used during contract execution. There is only operation in the EVM with negative gas costs: changing a storage address from a nonzero value to zero (SSTORE[x] = 0) is worth a refund. The amount of refunded gas isn't fixed and depends on the values of the storage slot before and after this operation. To avoid exploitation of the refund mechanism, the maximum refund for a transaction is set to one fifth of the total amount of gas cost (rounded down).
In the past, there was another operation with a negative gas cost: SELFDESTRUCT. Deleting a contract (through SELFDESTRUCT) was worth a refund of 24,000 gas. Right now, the SELFDESTRUCT opcode is deprecated, and not using it anymore is recommended.
Tip
Gas refunds are applied at the end of the transaction. So if a transaction doesn't have sufficient gas to reach the end of the execution, it fails, and no refunds are given.
Block Gas Limit
The block gas limit is the maximum amount of gas that may be consumed by all the transactions in a block. It constrains how many transactions can fit into a block.
For example, let's say we have five transactions whose gas limits have been set to 30,000, 30,000, 40,000, 50,000, and 50,000. If the block gas limit is 180,000, then any four of those transactions can fit in a block, while the fifth will have to wait for a future block. As previously discussed, validators decide which transactions to include into a block. Different validators are likely to select different combinations, mainly because they receive transactions from the network in a different order.
If a validator tries to include a transaction that requires more gas than the current block gas limit, the block will be rejected by the network. Most Ethereum clients will stop you from issuing such a transaction by giving a warning along the lines of "transaction exceeds block gas limit." According to Etherscan, the block gas limit on the Ethereum mainnet is 36 million gas at the time of writing (June 2025), meaning that around 1,428 basic—that is, ETH transfer—transactions (each consuming 21,000 gas) could fit into a block.
Who chooses the block gas limit?
Before the introduction of EIP-1559 on August 5, 2021, miners (Ethereum was using a PoW-based consensus algorithm at that time) had a built-in mechanism where they could vote on the block gas limit, so capacity could be increased or decreased in subsequent blocks. The miner of a block could vote to adjust the block gas limit by a factor of 1/1024 (0.0976%) in either direction. The result of this was an adjustable block size based on the needs of the network, following miners' hashpower.
Now, validators vote on the gas target—that is, how much gas a block should consume on average—and the gas limit is defined to be twice the target. The 1/1024 adjusting factor that each validator must comply with is maintained the same as before.
Why doesn't the block gas limit rise?
You may be wondering, if validators can vote on the gas target, which directly translates to the gas limit, why doesn't the block gas limit rise to one billion instead of being almost fixed at 30 million? A bigger block gas limit would mean that more transactions could fit into a block, so transactions would become cheaper for end users.
The answer is that raising the gas limit has some cons related to the decentralization of the network. In fact, while bigger blocks can include more transactions, that also means that blocks become harder to verify on time, and that could lead to the death of Ethereum nodes made with common hardware, leaving only powerful servers to validate full blocks. Not only that, but bigger blocks also mean a bigger state growth. The final outcome is the same as before: big servers would be the only ones able to fully run a node.
Historically, the block gas limit has been raised all at once during upgrades of the protocol, as you can see in Figure 14-25. And its value is generally set to a level suggested by core developers where we are sure all clients are able to handle the load of transactions and process blocks on time.
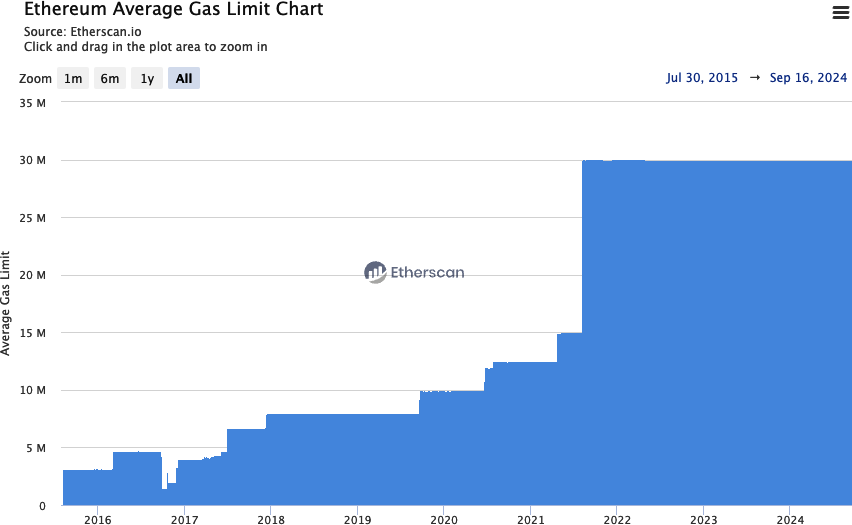
Figure 14-25. Ethereum average gas limit chart
Why Not Raise the Block Gas Limit?
Even though the block gas limit looks like it has been "fixed" at 30 million for more than three years, with PBS (see "Ethereum Stateless"), where actors with sophisticated hardware build the blocks—builders—and send them to proposers—validators—to publish them on the P2P network, there is an incentive to raise the block gas limit indefinitely while maintaining the actual gas used almost as a constant.
In fact, following EIP-1559, if the block gas target is much higher than the actual gas used, the base fee keeps decreasing, to the point where almost all of the gas fee goes to the validators instead of being burned (the base fee is burned, removing those ETH from the supply).
So the advantages for validators are twofold:
- They can keep the gas fees for themselves, instead of burning them and reducing the ETH supply.
- When necessary, they can create larger blocks that capture a lot of MEV activity, resulting in even more fees for them.
If you are curious about this, read more in James Prestwich's article.
Concrete Implementations
Every Ethereum node has a concrete implementation of the EVM described in this chapter. Here is a list of the most famous and used ones:
Go-ethereum EVM
Geth is the most adopted and oldest execution client. It contains a full implementation of the EVM written in Go.
Execution-spec EVM
The Ethereum Foundation maintains a Python repository on GitHub containing the specification related to the Ethereum execution client. It has a full EVM implementation written in Python.
Revm
Revm is one of the most used EVM implementations outside of normal Ethereum clients, thanks to its great customizability and adaptability.
Evmone
Evmone is probably the fastest EVM implementation. It is written in C++ and maintained by the Ipsilon team at the Ethereum Foundation.
Besu EVM
Besu is an execution client maintained by Consensys. It has a full implementation of the EVM written in Java.
Nethermind EVM
Nethermind EVM is an execution client written in C# that maintains a full implementation of the EVM.
The Biggest EVM Upgrade: EVM Object Format
EVM Object Format (EOF) is the biggest upgrade to the EVM since its birth in 2015. In fact, even though there have been modifications to the EVM in the past, which were mainly focused on the gas-metering aspect or on the introduction of new opcodes, the EVM is almost identical to how it was first created by Gavin Wood.
The EVM is still great. All activities happening today on Ethereum (and all other EVM-compatible blockchains) are only possible thanks to it. It's not perfect either, and during recent years, smart contract developers have had to deal with different aspects of it and learn some tricks to overcome its constraints.
EOF is an extensible and versioned container format for the EVM with a once-off validation at deploy time. In this section, we'll explore all the major limitations of the EVM and how EOF intends to overcome them.
Note
As of the final revision of this book (June 2025), the EOF upgrade has been postponed indefinitely due to insufficient consensus within the Ethereum community. There is currently no clear timeline for its implementation, and it may ultimately never be adopted. Nevertheless, we believe this section remains valuable for understanding how EOF could affect the EVM and the broader Ethereum ecosystem.
Jumpdest Analysis
Legacy EVM doesn't validate the bytecode published on chain at creation time. On the one hand, this may look good because it lets you post whatever contract you want: you can deploy bytecode containing non-existent opcodes or add code that is never touched or truncated in the middle of a PUSH operation without giving the next immediate value that it must have in order to execute correctly. This actually adds lots of inefficiencies. In fact, the EVM has to check everything at runtime, which adds complexity and slows the overall performance. Here is an example of a non-existent opcode included inside an EVM bytecode:
600C600052602060000C
Here is the bytecode translated into human-readable opcodes:
[00] PUSH1 0C
[02] PUSH1 00
[04] MSTORE
[05] PUSH1 20
[07] PUSH1 00
[09] NOT-EXISTING
Opcode 0C doesn't exist, and when the EVM gets to that point, it will panic and early return. Notice how the second byte in the previous bytecode is also 0C, but the EVM doesn't fail there. The difference is that while the last 0C byte is interpreted as an opcode and fails because it's not valid, the other one is interpreted as push data since it's the immediate value of the first PUSH1 opcode.
One key part of this runtime check is the jumpdest analysis. Every client needs to do it at runtime every time a contract is executed. Let's spend some time understanding this jumpdest analysis and why it is needed in legacy EVM.
Tip
To not have to perform jumpdest analysis at runtime every time a contract is called, some Ethereum node implementations save a jumpdest map for every contract. This map is created at contract deployment and saved inside the node's database.
Legacy EVM has dynamic jumps (JUMP and JUMPI opcodes) only to manage the control flow of the bytecode. This is very handy because you can change the normal flow of operations with just two opcodes. The cons are that dynamic jumps are very expensive and require a deep validation at runtime, even though most of the time, there is no need for the jump to be dynamic. In fact, very often the value to jump to is pushed to the stack immediately before the JUMP opcode itself. Here is a small example:
…6009566006016101015b6001…
And translated into human-readable opcodes:
[00] PUSH1 09
[02] JUMP
[03] PUSH1 06
[05] ADD
[06] PUSH2 0101
[09] JUMPDEST
[0a] PUSH1 01
As you can see, the jump destination—that is, the offset 0x09 to jump to—is just pushed onto the stack through a PUSH1 opcode immediately before the JUMP opcode. The EVM pushes 0x09 onto the stack, then executes the JUMP opcode that takes as input the previously pushed 0x09 and moves the execution to the instruction at that offset. At 0x09, a JUMPDEST opcode is found, so it's considered a valid jump destination, and the execution can go on correctly.
Runtime validation is required in order to not jump to invalid destinations. Valid destinations are only JUMPDEST instructions that are not part of push data. This is very important to understand: legacy EVM doesn't have a proper separation between code and data. So whenever you meet the byte 0x5b—the JUMPDEST opcode—in some bytecode, you cannot be completely sure if that's a real JUMPDEST opcode or it's part of push data without analyzing the contract as a whole.
Take a look at the following example showing this subtle difference:
…6009566006016101015b6001…
…6009566006016201015b6001…
These two bytecodes look almost identical; in fact, they differ only by one bit. But that's enough to make a huge difference in the outcome. The first bytecode is the same as the one shown in the previous example. The second looks like this in human-readable format:
[00] PUSH1 09
[02] JUMP
[03] PUSH1 06
[05] ADD
[06] PUSH3 01015b
[0a] PUSH1 01
If you try to execute this second code, it will fail due to an invalid jump destination. It may look a bit weird because at offset 0x09, there's still the 0x5b byte, which represents the JUMPDEST opcode. The problem here relies on the fact that, in this case, the 0x5b byte is part of the push data, so it could not be considered a valid jump destination. This is why the execution fails at that point.
Jumpdest analysis is the process of analyzing a contract in order to know which jump destinations are valid and which are not so that when the EVM is executing the contract, it is able to detect an invalid jump destination and panic.
Let's say you're sending a transaction that interacts with Contract A. When the EVM loads it, it immediately performs jumpdest analysis to save the map of valid jump destinations and then starts with the real execution of the transaction:
…6009566006016101015b60016015566006016201015b6001…
Here it is in human-readable format:
[00] PUSH1 09
[02] JUMP
[03] PUSH1 06
[05] ADD
[06] PUSH2 0101
[09] JUMPDEST
[0a] PUSH1 01
[0c] PUSH1 15
[0e] JUMP
[0f] PUSH1 06
[11] ADD
[12] PUSH3 01015b
[16] PUSH1 01
The EVM skims through all the bytecode and creates a map where each 0x5b byte is marked as a valid or invalid jump destination, as you can see in Figure 14-26.
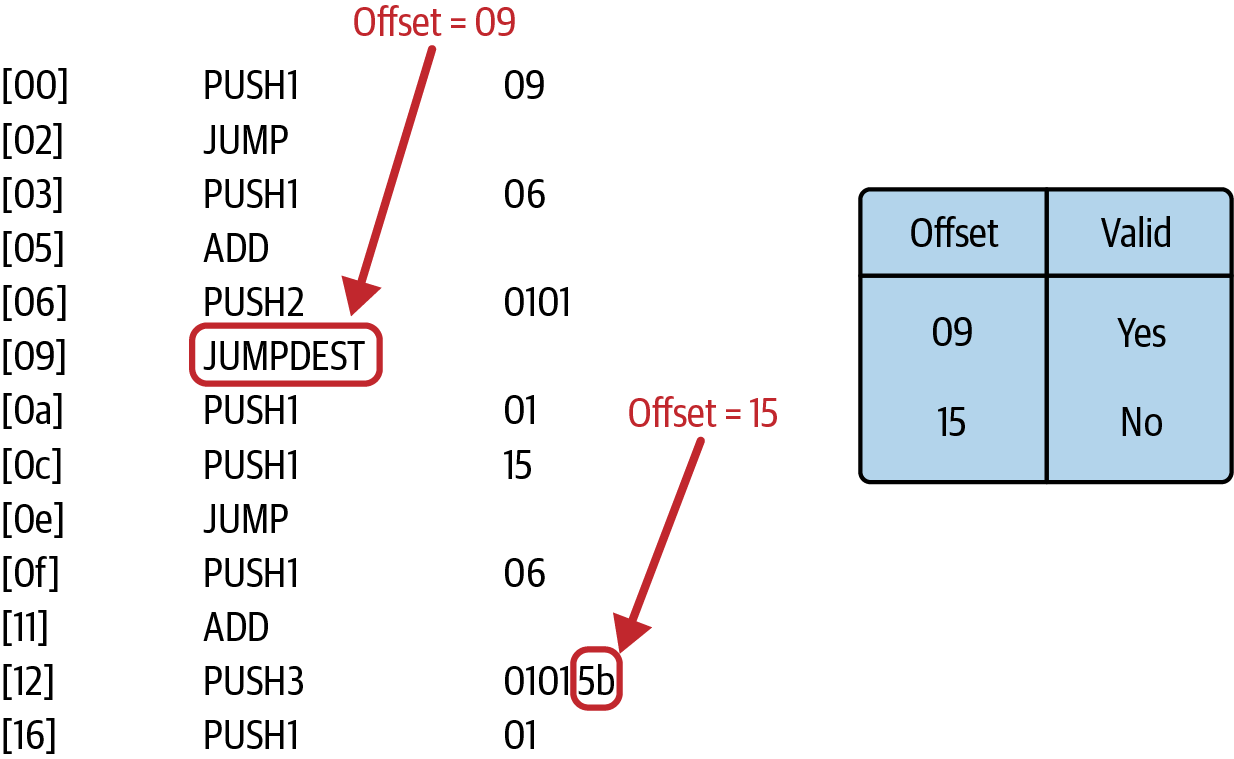
Figure 14-26. The client creates a jumpdest map to separate valid from invalid jump destinations
Adding and Deprecating Features
Adding or deprecating an opcode or a specific feature is not as easy as it may seem. While it is true that different opcodes have been added, such as BLOBHASH, BLOBBASEFEE, BASEFEE, and so on, this is always complicated because of the unstructured and not validated EVM's bytecode.
Have a look at the following example, which contains an invalid opcode, specifically 0x0C. Suppose this is a real contract deployed on Ethereum mainnet:
600C600052602060000C
Here it is in human-readable format:
[00] PUSH1 0C
[02] PUSH1 00
[04] MSTORE
[05] PUSH1 20
[07] PUSH1 00
[09] NOT-EXISTING
If you try to execute this small bytecode inside an EVM, you will see that when the execution gets to the not-existing opcode, it fails.
Let's say a future upgrade adds a new opcode, the MAX opcode, that takes two items from the stack and returns the one containing the bigger value. The byte assigned to it is 0x0C. Consider again the previous bytecode (remember, we're assuming it's a real contract deployed on mainnet):
[00] PUSH1 0C
[02] PUSH1 00
[04] MSTORE
[05] PUSH1 20
[07] PUSH1 00
[09] MAX
Now this bytecode has a completely different outcome. In fact, it doesn't fail anymore and returns successfully. This could create problems if there were contracts relying on the assumption that this contract always failed due to a (previously) not-existing opcode.
Deprecating a feature is even harder since you cannot rely on a versioning system of the EVM. So if you remove an opcode or change how it works, old contracts that were using it could break, and there is nothing apart from manual intervention (by creating a new contract) that can fix it.
When EIP-2929 was introduced to change the gas metering of state-access opcodes, some contracts broke because they were hard-coding the amount of gas to use or to expect. The solution to make them work again was to introduce access lists, where you can preload some accounts and storage slots that you know will be touched by the transaction and lower gas costs.
Other important aspects of legacy EVM that make upgrades harder are code introspection and gas observability. Gas observability is possible thanks to opcodes such as GAS or even all the *CALL opcodes that take gas as input, while code introspection is achievable because of opcodes such as CODESIZE, CODECOPY, EXTCODESIZE, EXTCODECOPY, and EXTCODEHASH.
The problem lies in the fact that if the EVM is able to access the remaining gas at a certain point of the execution, the logic of a smart contract can be made dependent on that. And if in the future, there is a change regarding gas metering of some opcodes (which is something not so rare to observe), there could be problems for all smart contracts that were relying on the old gas metering. The same applies for code introspection.
Note
Without code introspection, it's possible for future versions of EOF to completely change the underlying virtual machine to something like Cairo VM or Wasm or any other by automatically transforming all contracts' code into the new VM's code with the same functionality.
Code and Data Separation
Legacy EVM doesn't impose a structure on bytecode that is published on chain. There's no distinction between real code and data that is used within that code. Everything is just bytes, and it's interpreted step-by-step by the EVM during execution.
It's impossible to say that a certain part of the bytecode is code or data without looking at the whole contract. Take a look at the following example:
…730102030405060708090a0b0c0d0e0f101112131431…
[00] PUSH20 0102030405060708090a0b0c0d0e0f1011121314
[15] BALANCE
Without diving into the code, you cannot immediately tell that 0102030405060708090a0b0c0d0e0f1011121314 is not to be interpreted as a series of opcodes—0x01: ADD, 0x02: MUL, and so on— but rather that it's push data representing a fixed address we want to query the balance of. This is bad for static analysis tools and formal verification, and it makes it more difficult for smart contracts to be able to correctly process executable code directly on chain.
Stack Too Deep
We're now going to take a look at one of the most hated limitations of the EVM: the "stack too deep" error. If you try to compile the following smart contract, you'll immediately get it:
// SPDX-License-Identifier: MIT
pragma solidity 0.8.27;
contract StackTooDeep {
function add(
uint256 a,uint256 b,uint256 c,uint256 d,uint256 e,uint256 f,uint256 g,uint256 h,uint256 i
) external pure returns(uint256) {
return a+b+c+d+e+f+g+h+i;
}
}
Here is the output when trying to compile the contract:
solc StackTooDeep.sol --bin
Error: Stack too deep. Try compiling with `--via-ir` (cli) or the equivalent `viaIR: true` (standard JSON) while enabling the optimizer. Otherwise, try removing local variables.
--> StackTooDeep.sol:8:16:
|
8 | return a+b+c+d+e+f+g+h+i;
| ^
This error is very subtle because it's a direct consequence of how the EVM works. In fact, even though the maximum number of items you can push onto the stack is 1,024, the EVM is only capable of easy access to the top 16 elements of that, through opcodes such as DUP1..16 and SWAP1..16.
In our StackTooDeep example, the add function takes nine different parameters, each required to be put onto the stack. Then, it performs eight additions to get the final result. The problem lies in these details. While the final operation can look like a big single addition, in reality, the compiler has to segment each one and create a temporary variable that holds the intermediate result that needs to be saved into the stack. So we end up with nine parameters plus eight intermediate results, with a total of 17 stack items needed. When the compiler tries to reference a variable that is at position 17 or more in the stack, it fails because it doesn't have any opcodes that are able to easily access it.
To even better visualize the problem, you can look at Figure 14-27, which shows the stack composition in detail for every step. You can easily see that variable i is at depth 17 at the end of execution. The compiler doesn't let a local variable or parameter to not be easily accessible in the function's scope, so it throws the "stack too deep" error.
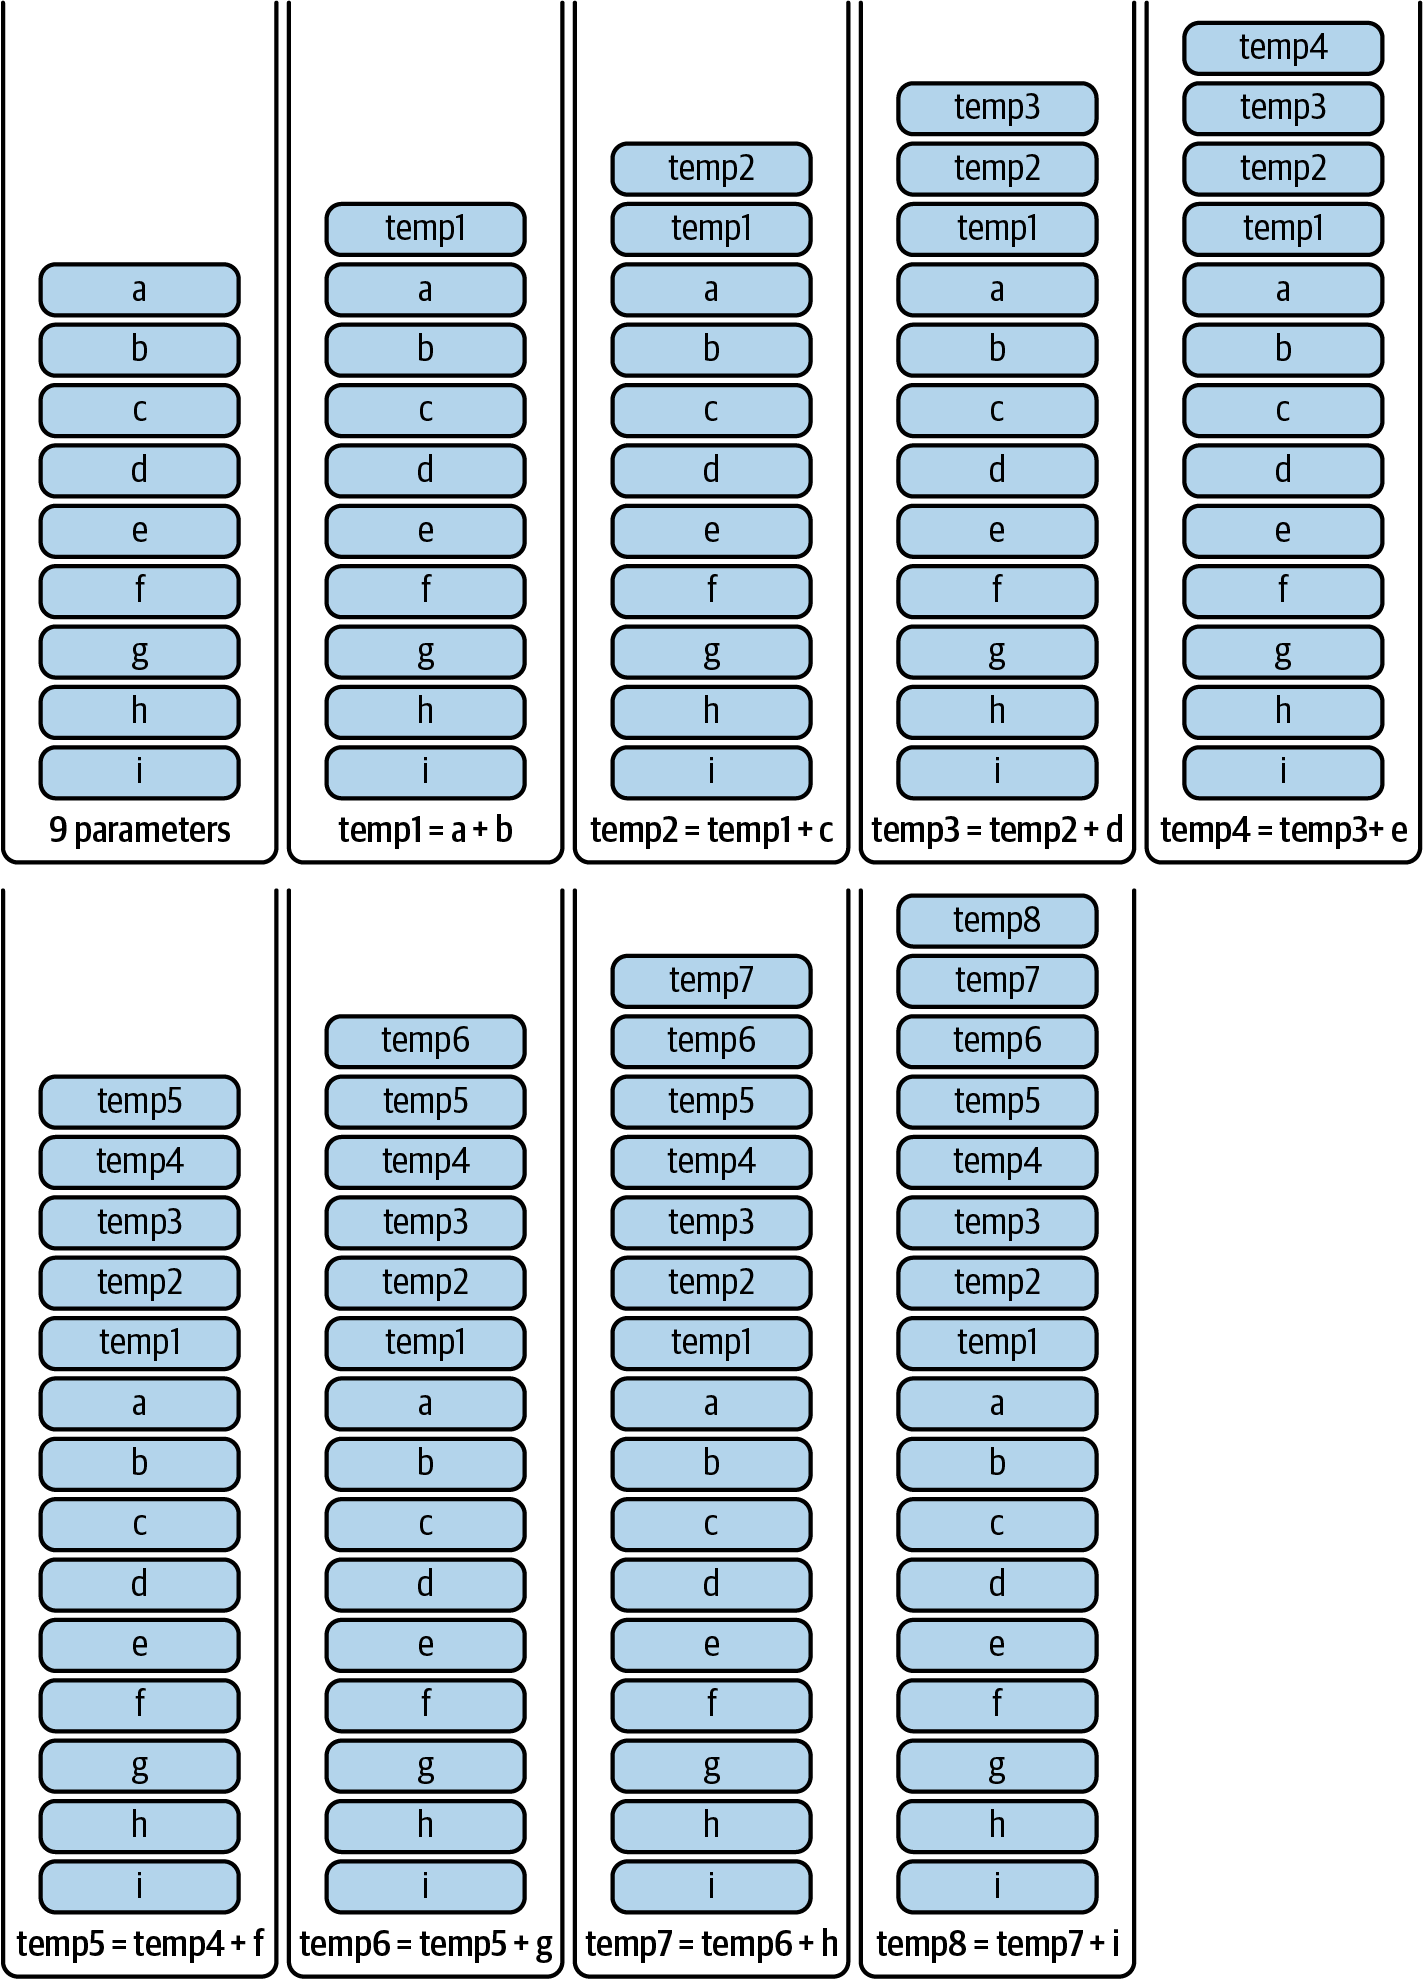
Figure 14-27. Stack composition for every step
This is just a very simple example that shows one of the problems smart contract developers have to overcome during their daily jobs. Even though compilers have become better and better at analyzing and managing these kinds of situations automatically, the EVM imposes some hard limitations based on how it currently works.
EOF
EOF addresses all of these issues by introducing a container format for EVM bytecode with validation at deploy time, a versioning system, and a full separation between code and data. Here is an example of EOF-valid bytecode:
EF00010100040200010008030001003004002000008000045F5FD1005FEC0000EF00010100040200010004030001001404000000008000025F5FEE00EF00010100040200010001040000000080000000000102030405060708090a0b0c0d0e0f10111213141516171819101a1b1c1d1e
Here it is translated into human-readable format:
Magic bytes EF00
EOF version 01
Stack validation data 01 0004
Code sections 02 0001 0008
Subcontainer section size 03 0001 0030
Data section size 04 0020
Header terminator 00
Stack: #ins, #outs, max stack 00 80 0004
Code 5F5FD1005FEC0000
Subcontainers EF00010100040200010004030001001404000000008000025F5FEE00
EF00010100040200010001040000000080000000
Data 000102030405060708090a0b0c0d0e0f10111213141516171819101
a1b1c1d1e
Just hold on for a moment—we'll explain everything in the following sections.
Improvements
Jumpdest analysis and all gas and code introspection opcodes are completely removed and are now considered undefined. All opcodes in the code section must be valid, immediate values (such as push data) must be present in the code, and there must not be unreachable instructions. Stack validation is performed at creation time, too. This makes stack underflow and overflow impossible during execution, removing the necessity of doing all those checks at runtime because the EVM can assume contracts already respect all the rules since they have been validated at deployment.
Tip
These validation guarantees improve the feasibility of AOT or JIT compilation of EVM bytecode into machine-native code.
Dynamic jumps are removed, too, and static relative jumps are introduced with three new opcodes: RJUMP, RJUMPI, and RJUMPV, which take immediate values, similar to PUSH opcodes. Notice how it's possible with EOF to add new instructions that take immediates because there is no jumpdest analysis anymore and everything is checked at creation time instead of at runtime.
As you can see from the EOF container in the previous section, EOF introduces the concept of functions (i.e., code sections), isolating the stack for each of them. Legacy EVM can only mimic this behavior by relying on dynamic jumps: Solidity or Vyper functions are only an internal representation.
Three opcodes—CALLF, RETF, and JUMPF—and a return stack (completely separated from the EVM's usual operand stack) are added for that reason. In particular, the return stack is needed in order to save execution information before jumping into a function so that it's possible to return to the caller without losing data. Figure 14-28 can help you better visualize how this works.
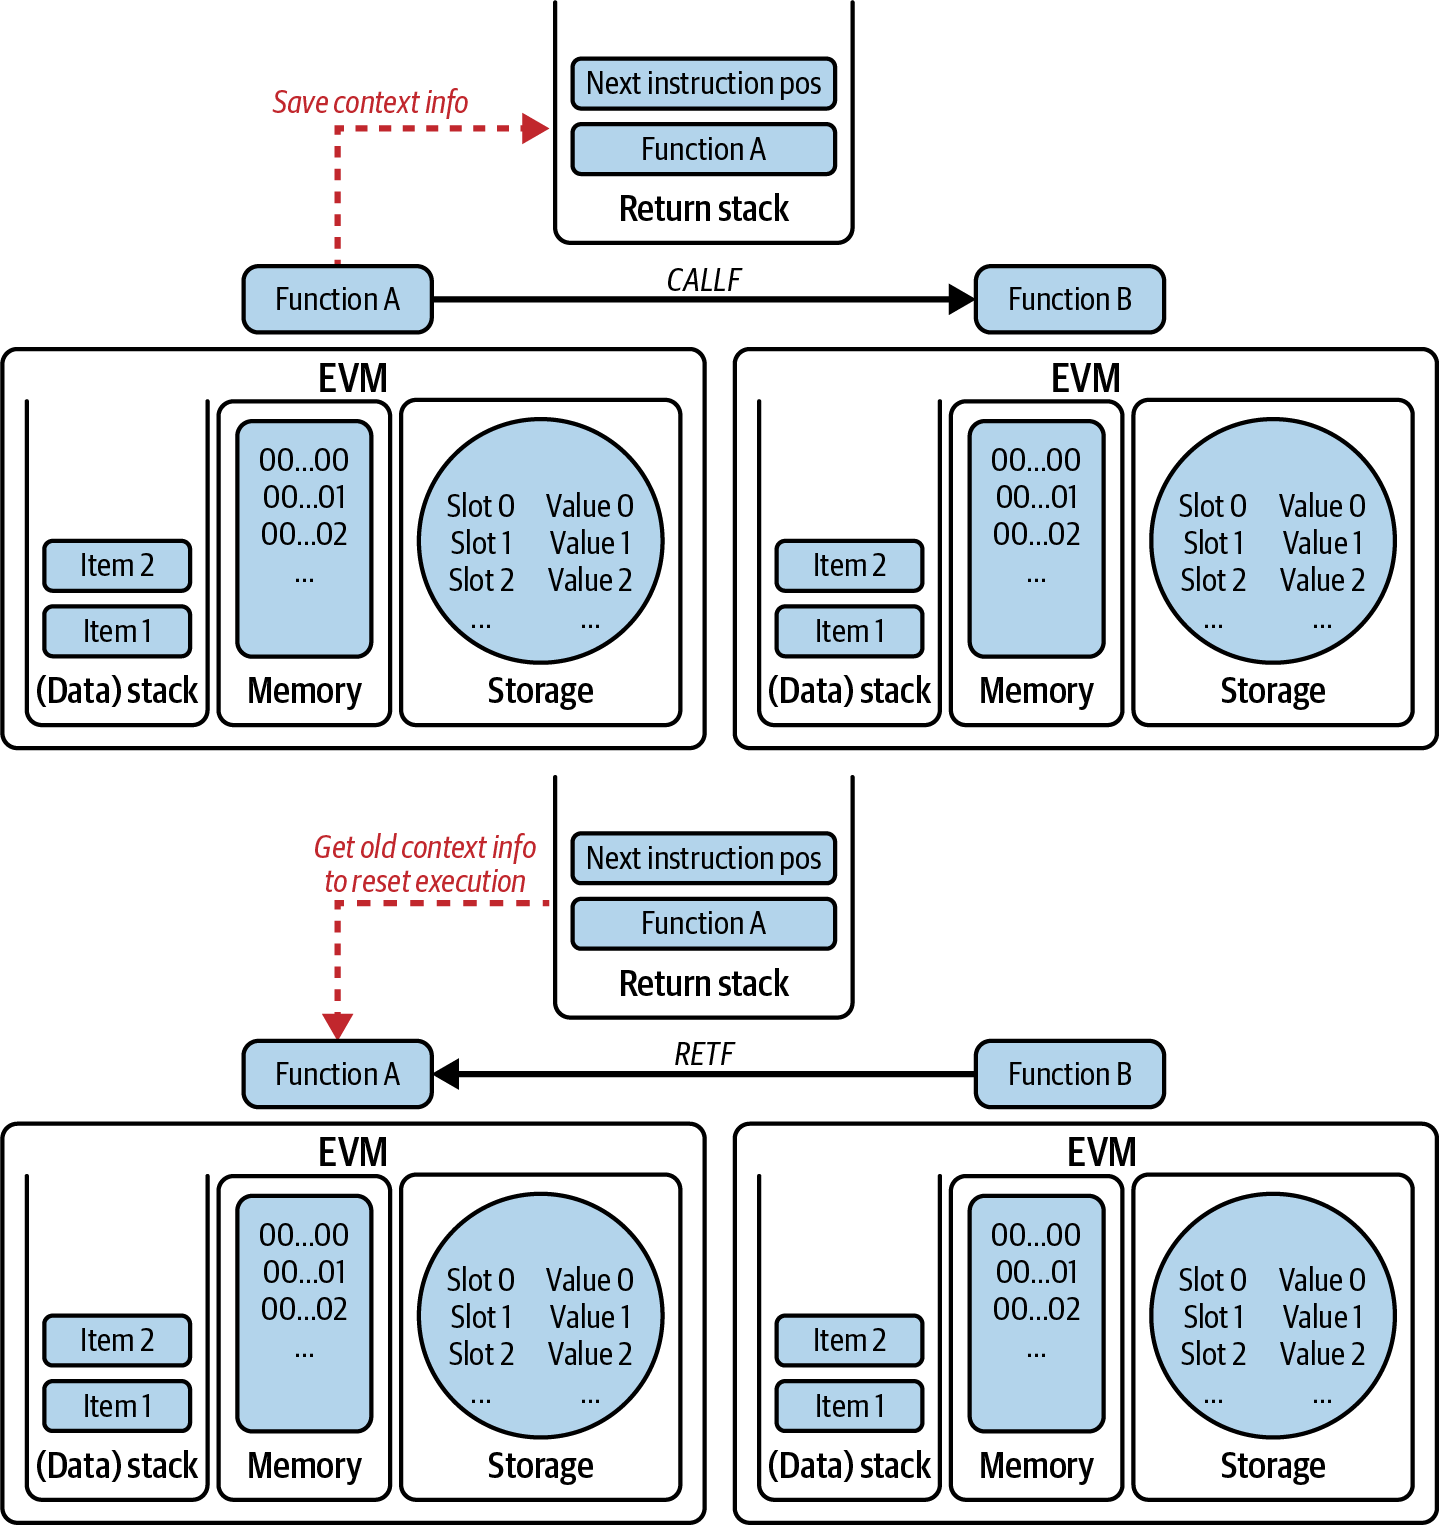
Figure 14-28. EOF introduces the concept of functions or code sections
The "stack too deep" problem is solved through the addition of three new opcodes: DUPN, SWAPN, and EXCHANGE. The first two instructions are analogous to the old DUP1..16 and SWAP1..16 with the only difference being that they take one immediate value representing the index of the item to duplicate or swap. That index can go up to 256, much more than the previous hard limit of 16.
The EXCHANGE opcode is a new opcode that lets you swap two different items in the stack (note that SWAPN always swaps the n item with the first one, while EXCHANGE can swap arbitrary items with one another). This is particularly useful for compilers implementing stack-scheduling algorithms, which try to minimize stack traffic given a set of variables and usage analysis.
CREATE and CREATE2 are made obsolete in EOF contracts. Instead, EOFCREATE and RETURNCONTRACT are introduced to provide a way to create new EOF contracts.
In the end, new CALL instructions are added to replace the old, removed ones: EXTCALL, EXTDELEGATECALL, EXTSTATICCALL, and RETURNDATALOAD. They don't allow specifying a gas limit (no gas observability) and don't require an output buffer where the EVM would save the return data of the subcall. RETURNDATALOAD is introduced for the specific reason to get the return data of the last executed subcall onto the stack of the caller.
EOF in action
Let's analyze the EOF contract shown at the beginning of this section:
EF00010100040200010008030001003004002000008000045F5FD1005FEC0000EF00010100040200010004030001001404000000008000025F5FEE00EF00010100040200010001040000000080000000000102030405060708090a0b0c0d0e0f10111213141516171819101a1b1c1d1e
First, we have the EOF header, made by:
Magic bytes EF00
Magic bytes are needed to distinguish EOF contracts from legacy ones (no other contract starts with EF00 in Ethereum mainnet thanks to EIP-3541).
Then, there is the EOF version, which can lead to future upgrades to the EOF format in a graceful way:
EOF version 01
Stack validation data always starts with the identifier 01, and it's followed by the size of the "Stack" part. In this example, we have a 4-byte-long "Stack" section:
Stack validation data 01 0004
Code sections start with the identifier 02, followed by the number of code sections (aka functions) and their related size. Here we have one code section, 8 bytes long:
Code sections 02 0001 0008
Subcontainer section size starts with the identifier 03, followed by the number of subcontainers and their related sizes. Here we have one subcontainer, 48 bytes long (remember, it's always hex format):
Subcontainer section size 03 0001 0030
Data section size starts with the identifier 04, followed by the size of the data section. Here we have 32 bytes in the data section:
Data section size 04 0020
Finally, there is the header terminator 00, which always marks the end of the EOF header:
Header terminator 00
The Stack section shows the number of inputs and outputs and the max stack height for each code section (only one in this example). We have zero inputs and a nonreturning function (80 is a special byte representing a nonreturning function), and the max height of the stack equals 4:
Stack: #ins, #outs, max stack 00 80 0004
Here are all the code sections containing EVM bytecode that is executed by the EVM:
Code 5F5FD1005FEC0000
We have only one function (code section), containing the following opcodes:
PUSH0 PUSH0 DATALOADN 0 PUSH0 EOFCREATE 0 STOP
This code first pushes 0-0 onto the stack thanks to the first two PUSH0 opcodes. Then, it reads 32 bytes of the data section, starting at offset zero (the next immediate value in the code) and pushes them onto the stack. Then, another 0 is pushed through the last PUSH0. Finally, EOFCREATE is called with 0 as the immediate argument, which calls the first code section of the first subcontainer:
Subcontainers EF00010100040200010004030001001404000000008000025F5FEE00EF0001
0100040200010001040000000080000000
The subcontainers section includes all of the EOF subcontainers included in the EOF bytecode. In this example, we have one subcontainer. Subcontainers are EOF-formatted bytecode: the idea is that you can nest EOF containers inside other EOF containers. This is useful for factory contracts.
In the end, there is the data section containing all the data the contract needs for execution. Here we have 32 bytes of data:
Data 000102030405060708090a0b0c0d0e0f10111213141516171819101a1b1c1d1e
This analysis could be recursively applied to the subcontainer of this EOF bytecode in order to completely understand what it's doing, but we leave that to the reader if you are interested in diving deeper into the rabbit hole of the EVM.
The Future of the EVM
The future of the EVM, besides EOF, is uncertain and will depend on how the EVM will be used by developers and different projects. There are some interesting areas where the EVM could expand, though, such as the zk-EVM that would provide zero-knowledge proofs attached to each block to prove its correct execution. Also, EVMMAX and SIMD would bring more power to the EVM, making it much faster to do lots of cryptographic processing, which would be particularly beneficial for cryptographic-dependent applications such as privacy protocols or L2s.
Conclusion
In this chapter, we explored the EVM, tracing the execution of various smart contracts and looking at how the EVM executes bytecode. We also looked at gas, the EVM's accounting mechanism, and saw how it solves the halting problem and protects Ethereum from DoS attacks. Furthermore, we analyzed EOF, looking at how it tries to fix different flows of legacy EVM.
Next, in Chapter 15, we will explore the mechanism used by Ethereum to achieve decentralized consensus.
Chapter 15. Consensus
Throughout this book we have talked about consensus rules—the rules that everyone must agree to for the system to operate in a decentralized yet deterministic manner. In computer science, the term consensus predates blockchains and is related to the broader problem of synchronizing state in distributed systems, such that different participants in a distributed system all (eventually) agree on a single system-wide state. This is called reaching consensus.
When it comes to the core functions of decentralized record keeping and verification, it can become problematic to rely on trust alone to ensure that information derived from state updates is correct. This rather general challenge is particularly pronounced in decentralized networks because there is no central entity to decide what is true. The lack of a central decision-making entity is one of the main attractions of blockchain platforms because of the resulting capacity to resist censorship and the lack of dependence on authority for permission to access information. However, these benefits come at a cost: without a trusted arbitrator, any disagreements, deceptions, or differences need to be reconciled using other means. Consensus algorithms are the mechanism used to reconcile security and decentralization.
In blockchains, consensus is a critical property of the system. Simply put, there is money at stake! So in the context of blockchains, consensus is about being able to arrive at a common state while maintaining decentralization. In other words, consensus is intended to produce a system of strict rules without rulers. There is no one person, organization, or group "in charge"; rather, power and control are diffused across a broad network of participants whose self-interest is served by following the rules and behaving honestly.
The ability to come to consensus across a distributed network, under adversarial conditions, without centralizing control is the core principle of all open, public blockchains. To address this challenge and maintain the valued property of decentralization, the community continues to experiment with different models of consensus. This chapter explores these consensus models and their expected impact on smart contract blockchains such as Ethereum.
Note
While consensus algorithms are an important part of how blockchains work, they operate at a foundational layer, far below the abstraction of smart contracts. In other words, most of the details of consensus are hidden from the writers of smart contracts. You don't need to know how they work to use Ethereum, any more than you need to know how routing works to use the internet.
Principles of Consensus
In blockchain technology, particularly within Ethereum, understanding the principles of consensus helps us make sense of how the network maintains its integrity and operates effectively. To get a clearer picture of how it all works, let's walk through the core ideas.
Safety
In the context of consensus mechanisms, safety is about ensuring that the network consistently agrees on the blockchain's current state without error. This means avoiding problems like double-spending and transaction conflicts, maintaining consistency across the network. In a safe system, every node has an identical view of the history of the chain, effectively behaving like a centralized implementation that executes operations atomically one at a time.
Finality
Finality is one of the most important safety features in Ethereum's consensus mechanism. It marks the point at which transactions are considered complete and irreversible, ensuring that once a transaction has been added to the blockchain, it cannot be altered or removed. This irreversible nature of transactions instills a high level of trust in the system, providing certainty to users that their transactions are permanently recorded.
Basically, finality puts the idea of safety into action, turning it from just a concept into something practical. It ensures that even though different parts of the network might have their own local views, there exists a point of irrevocable agreement that makes the chain's history fixed and unchangeable.
Liveness
While safety ensures that nothing bad happens on the network, liveness guarantees that something good always happens, eventually. In other words, the Ethereum network will continue to process transactions and add new blocks, come what may.
From another perspective, liveness can also be understood in terms of availability. In practical terms, this means that whenever we submit a valid transaction to a node that is acting honestly within the network, we can expect the transaction to be included in a forthcoming block that contributes to the extension of the blockchain. This expectation of transaction inclusion and processing is necessary to achieve user trust and the overall efficacy of the Ethereum platform.
Block Trees and Forking
Designing a consensus protocol that is both safe and live under all circumstances is not possible—you have to favor one of the two. While the Ethereum consensus protocol offers both safety and liveness under good network conditions, it prioritizes liveness when things get chaotic. It does so through the concept of forking.
In a blockchain, every block (except for the special Genesis block) builds on and points to a parent block. Thus, we end up with a chain of blocks: a blockchain. On chains implementing forking consensus protocols, this linear condition is often not the case in practice: in real-world conditions, we can end up with something more like a block tree—as you can see in Figure 15-1—than a blockchain, and the goal of the consensus protocol is for all nodes on the network to agree on the same linear sequence of blocks.
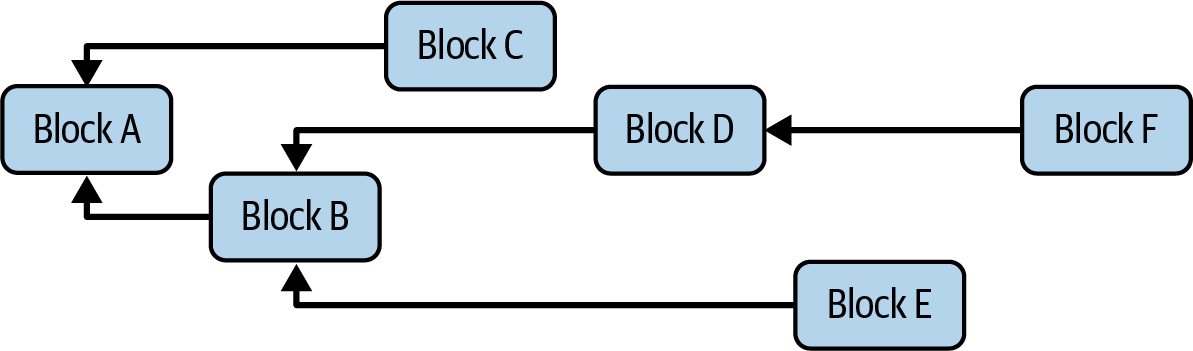
Figure 15-1. Block tree structure
The various branches in the block tree are called forks. Forks happen naturally as a consequence of network and processing delays or client faults and malicious client behavior.
If we were to consult nodes that are following different forks, they would give us different answers regarding the state of the system. Here lies the resilience of forking consensus protocols: instead of stopping entirely under unfavorable conditions, they fork. Eventually, we want every correct node on the network to agree on an identical linear view of history and hence a common view of the state of the system. It is the role of the protocol's fork choice rule to bring about this agreement: given a block tree and some decision criteria, the fork choice rule is designed to select, from all the available branches, the one that is most likely to eventually end up in the final linear, canonical chain. The downside of a forking protocol is that nodes following branches that don't end up in the canonical chain will eventually have to rewind their view of reality, reversing any recent transactions they have processed, in order to get onto the correct branch. This is called a reorg or reversion and is disruptive, so protocols aim to minimize it as much as possible.
Now we can understand the power of finality in Ethereum consensus protocol: forking is a powerful means to liveness, but for the network to be usable, this flexibility must be balanced by some safety guarantees.
Consensus via Proof of Work
The creator of the original blockchain, Bitcoin, invented a consensus algorithm based on proof of work (PoW). Arguably, PoW is the most important invention underpinning Bitcoin. The colloquial term for PoW is mining, which creates a misunderstanding about the primary purpose of consensus. Often, people assume that the purpose of mining is to create new currency since the purpose of real-world mining is to extract precious metals or other resources. Rather, the real purpose of mining (and all other consensus models) is to secure the blockchain while keeping control over the system decentralized and diffused across as many participants as possible. The reward of newly minted currency is an incentive to those who contribute to the security of the system: a means to an end. In that sense, the reward is the means, and decentralized security is the end.
In PoW consensus, there is also a corresponding "punishment," which is the cost of energy required to participate in mining. This significant energy consumption isn't a flaw; it's key to a deliberate security and incentive design. If participants do not follow the rules and earn the reward, they risk the funds they have already spent on electricity to mine. Thus, PoW consensus is a careful balance of risk and reward that drives participants to behave honestly out of self-interest.
Ethereum started as a PoW blockchain following Bitcoin's example, in that it used a PoW algorithm with the same basic incentive system for the same basic goal: securing the blockchain while decentralizing control. Ethereum's PoW algorithm was slightly different from Bitcoin's and was called Ethash.
Ethash: Ethereum's PoW Algorithm
Before Ethereum transitioned to PoS, it relied on a PoW algorithm called Ethash. It used an evolution of the Dagger-Hashimoto algorithm, which is a combination of Vitalik Buterin's Dagger algorithm and Thaddeus Dryja's Hashimoto algorithm. Ethash is dependent on the generation and analysis of a large dataset, known as a directed acyclic graph (or, more simply, "the DAG"). The DAG had an initial size of about 1 GB and continued to slowly and linearly grow, being updated once every epoch (30,000 blocks, or roughly 125 hours).
The purpose of the DAG was to make the Ethash PoW algorithm dependent on maintaining a large, frequently accessed data structure. This in turn was intended to make Ethash ASIC resistant, which means that it was more difficult to make application-specific integrated circuit (ASIC) mining equipment that is orders of magnitude faster than a fast GPU. Ethereum's founders wanted to avoid centralization in PoW mining, where those with access to specialized silicon-fabrication factories and big budgets could dominate the mining infrastructure and undermine the security of the consensus algorithm.
Using consumer-level GPUs to carry out the PoW on the Ethereum network meant that more people around the world could participate in the mining process. A larger number of independent miners meant that the mining power was more decentralized, which meant a situation like in Bitcoin, where much of the mining power is concentrated in the hands of a few large, industrial mining operations, could be avoided. The downside of the use of GPUs for mining was that it precipitated a worldwide shortage of GPUs in 2017, causing their price to skyrocket and an outcry from gamers. This led to purchase restrictions at retailers, limiting buyers to one or two GPUs per customer.
Until 2017, the threat of ASIC miners on the Ethereum network was largely non-existent. Using ASICs for Ethereum required the design, manufacture, and distribution of highly customized hardware. Producing them required a considerable investment of time and money. The Ethereum developers' long-expressed plans to move to a PoS consensus algorithm, now realized, likely kept ASIC suppliers from targeting the Ethereum network for a long time.
Consensus via Proof of Stake
Historically, PoW wasn't the first consensus algorithm to be proposed. Before it, many researchers explored ideas based on financial or reputational stake. Even earlier still, some of the first consensus models were permissioned: validators were selected through authority or identity, not open competition. Practical Byzantine fault tolerance (PBFT), for example, requires a fixed or curated set of validators, a model that still underlies many traditional distributed systems today.
One of the major breakthroughs of PoW-based consensus was that it made participation permissionless: anyone with the available computational power could contribute and get rewarded, without needing approval to join. That was a huge win for decentralization. In a sense, PoW was invented as a permissionless alternative to the more closed models.
Following Bitcoin's success, many blockchains adopted PoW. But the explosion of research into consensus reignited interest in PoS and led to major advances. From the beginning, Ethereum's founders hoped to eventually migrate to PoS. In fact, Ethereum's original PoW chain included a built-in handicap, the so-called difficulty bomb, which was designed to slowly make mining harder over time, forcing the system toward the eventual transition. Ethereum's version of PoS, while permissionless, has some conceptual roots in the earlier authority-based systems: here, identity and participation come from putting down stake. But since anyone with ETH can do so, it preserves the open-access spirit of Nakamoto's design.
In general, a PoS algorithm works as follows. The blockchain keeps track of a set of validators, and anyone who holds the blockchain's base cryptocurrency (ether, in Ethereum's case) can become a validator by sending a special type of transaction that locks up their ether into a deposit. Validators take turns proposing and voting on the next valid block, and the weight of each validator's vote depends on the size of their deposit (i.e., stake). Validators earn small rewards proportional to their stake when they participate correctly in the protocol. If they make mistakes, like publishing inaccurate or late attestations, they can incur small penalties, roughly on the same scale as the rewards. But there's a much more serious consequence called slashing, which happens only when a validator is provably malicious—for example, by publishing conflicting attestations or equivocating blocks. Thus, PoS forces validators to act honestly and follow the consensus rules via a system of reward and punishment. The major difference between PoS and PoW is that the punishment in PoS is intrinsic to the blockchain (e.g., loss of staked ether), whereas in PoW the punishment is extrinsic (e.g., loss of funds spent on electricity).
Since Ethereum was launched in 2015, there was the intention to transition to a PoS consensus protocol. The first concrete step in that direction came on December 1, 2020, with the launch of the Beacon Chain. Initially, the Beacon Chain was an empty blockchain that let everyone become a validator by depositing 32 ETH into a specific deposit contract and handled only its internal consensus of validators and their respective balances. At that time, the Ethereum blockchain was still using Ethash as its consensus protocol.
On September 15, 2022, the Merge hard fork occurred, and the Beacon Chain, with its own set of validators, extended its PoS-based consensus protocol to the Ethereum main blockchain, effectively ending the use of Ethash. However, some limitations remained, including the inability for validators to withdraw their capital and leave the validator set. These issues were fully resolved on April 12, 2023, with the Shapella update, which completed the work of transitioning Ethereum from a PoW to a PoS consensus protocol.
The PoS consensus protocol used by Ethereum is called Gasper. In the following sections, we will explore how it works, starting with basic terminology and progressing to the fork choice rule (LMD-GHOST) and finality gadget (Casper FFG). We will conclude with an example to clarify the theoretical concepts that we have discussed.
PoS Terminology
In this section, we'll focus on Ethereum PoS consensus components and terminology.
Nodes and Validators
Nodes form the backbone of the Ethereum network. They communicate with one another and are responsible for validating consensus adherence. Validators, which are responsible for proposing and voting on new blocks, are attached to these nodes, but despite what the name might imply, they don't actually validate the blocks themselves. Instead, it's the node software that checks whether blocks and transactions follow the protocol rules. A single node can host multiple validators, and validator duties are carried out by running both an execution client and a consensus client. We'll see exactly what those duties are in the next sections.
One peculiar property of PoS to keep in mind is that the set of active validators is known: this will be key to achieving finality since we can identify when we have reached a majority vote of participants.
Blocks and Attestations
Strict time management is an important property of Ethereum's PoS. The two key intervals in PoS are the slot, which is exactly 12 seconds, and the epoch, which spans 32 slots.
At every slot, exactly one validator is selected to propose a block. During every epoch, every validator gets to share its view of the world exactly once, in the form of an attestation. An attestation contains votes for the head of the chain that will be used by the LMD-GHOST protocol and votes for checkpoints that will be used by the Casper FFG protocol, where FFG stands for "Friendly Finality Gadget." Attestation sharing is bandwidth intensive, so it's distributed across each epoch instead of every block to spread the necessary workload and keep it manageable.
The protocol incentivizes block and attestation production and accuracy via a system of rewards and penalties for validators, but it tolerates empty slots and attestations, which can happen for both organic (e.g., a node went offline) and profit-driven reasons. We will expand on this in the later section "Timing Games".
LMD-GHOST
LMD-GHOST is the main part of the Ethereum consensus protocol: it's the fork choice rule algorithm. It selects the latest block a node should consider valid in its local view of the blockchain. This block is also called the head of the chain.
To fully understand how it works, you must know some basic concepts of the Ethereum PoS protocol. In a classic PoW-based consensus protocol, entities responsible for creating new blocks and adding them to the chain (i.e., miners) don't need to adhere to any special requirement. If they publish a block that satisfies the PoW, then it gets accepted by the whole network. In Ethereum's PoS-based consensus protocol, validators must stake a big amount of ETH as collateral—right now, at least 32 ETH—just to enter into the validators set.
As we have previously briefly mentioned, validators have two main duties:
Block proposing
Every slot, a validator is pseudorandomly selected to create and propose the next block for the chain.
Creating attestations
Every slot, a proportion of the validators is selected to publish their votes for the block that they think is the best head of the chain. This vote is then shared to every validator in the form of an attestation.
When a validator votes for a certain block inside an attestation, it's actually assigning it a score. This score is exactly equal to the amount of ETH the validator has staked at the moment they've published the attestation. But there's more: this vote is not only a vote for that block but also a vote for all ancestor blocks that live in the same fork of that selected block, as you can see in Figure 15-2.
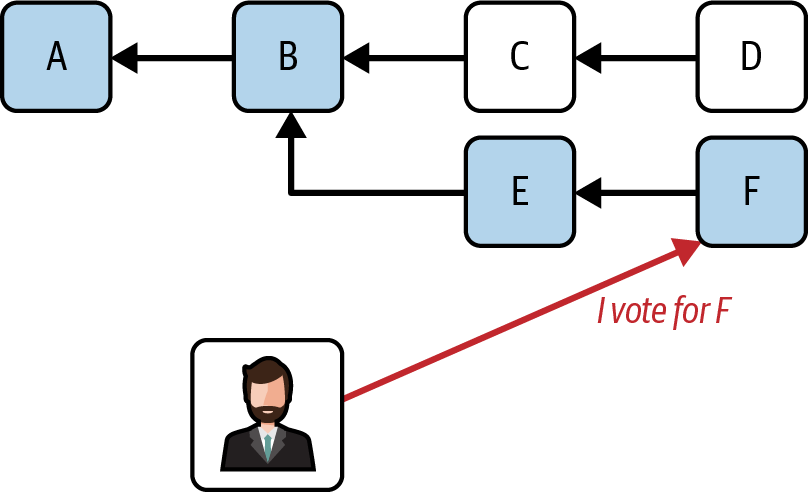
Figure 15-2. Vote propagation to ancestors
You could say that a vote for a block is propagated back to all its ancestors. To make this concept even clearer, we can assign a score to all branches. A branch is the link that connects a block with its parent, as shown in Figure 15-3.
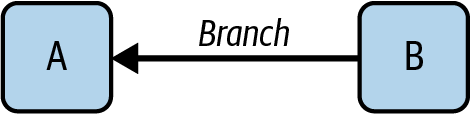
Figure 15-3. Branch definition
We define the score of a branch to be the sum of the score of the block that roots that branch (block B in Figure 15-3) plus the score of all its direct descendant branches.
Figure 15-4 shows a chain of blocks where each block has a score equal to 1. The branch connecting E to D has a score exactly equal to the score of block E because there are no descendant blocks. To compute the score of branch D→C, you need to add the score of block D to the score of all descendant branches. In this case, there's only one descendant branch: branch E→D. So it's 1 (score of block D) + 1 (score of branch E→D) = 2. Then we have branch C→B: its score is 1 (score of block C) + 2 (score of branch D→C) = 3. Here, we have a small fork with block C′; we need to assign a score to branch C′→B. Its score is just 1 (score of block C′) because block C′ has no direct descendant. Finally, we have branch B→A; to compute its score, we need to sum 1 (score of block B) + 1 (score of branch C′→B) + 3 (score of branch C→B) = 5.
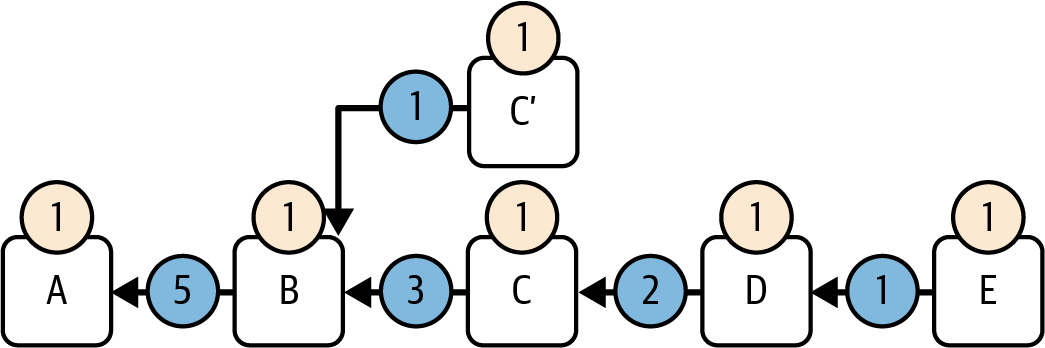
Figure 15-4. Branch score calculation example
Figure 15-5 contains a more complex scenario with several forks where each block has a different score. Look at it and make sure you understand how the score of each branch is computed.
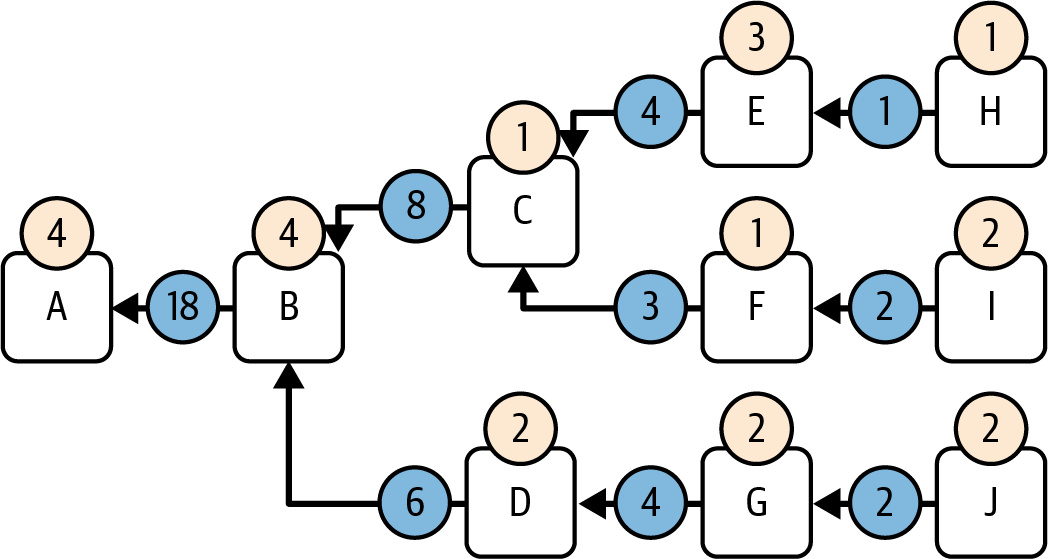
Figure 15-5. Complex branch scoring
After the last example, it should be clear that the score of a block not only influences that single block but also all its ancestors as it gets propagated back to all previous branches. The idea is that if a validator votes (in the form of an attestation) for a block to be the head of the chain, it's also considering all its ancestors valid and part of the correct chain.
Now, we can finally go into the details of how LMD-GHOST really works and how it selects the block to be considered the head of the chain. Let's start by analyzing its name. LMD-GHOST is made up of two acronyms: latest message driven and greediest heaviest observed subtree.
Latest Message Driven
To assign a score to each block and branch, you need to consider only the most recent attestation of each validator. That means that if you receive two attestations from a validator V, then you don't have to count them twice; you need to check which one is the most recent and discard the other one.
Figure 15-6 shows a validator that publishes an attestation on block B in which they share the fact that they think block B is the head of the chain. Then, at a later time during block F, the validator is selected again to post a new attestation in which they express their preference for block F as the new head of the chain. When that validator posts the new attestation at block F, other validators need to discard the old one (published during block B) and consider only the most recent.

Figure 15-6. Latest message driven example
Greediest Heaviest Observed Subtree
GHOST is the key aspect of the fork choice rule. The head block is the block with no further descendants that is part of the fork with the highest vote.
Let's see it in practice to better understand how LMD-GHOST works in a real scenario. Figure 15-7 represents the same scenario we used previously.
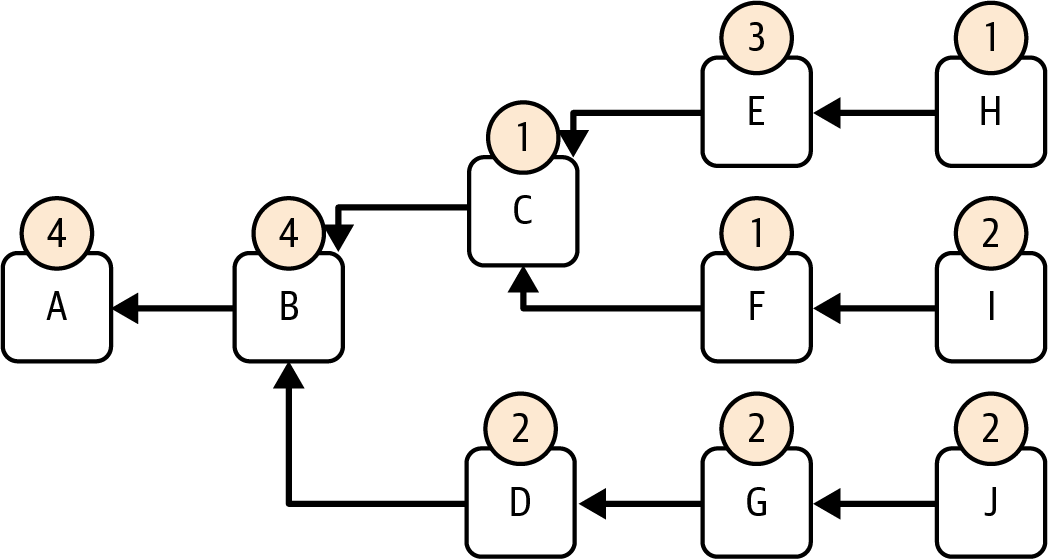
Figure 15-7. LMD-GHOST scenario
LMD-GHOST always starts from an initial block that is considered part of the finalized chain. Initially, that's the Genesis block, but with the full PoS-based Ethereum consensus protocol, it keeps getting updated with the last justified checkpoint block—that's terminology that we'll explore in "Casper FFG: The Finality Gadget". It's not crucial if you don't know what a justified checkpoint is yet; you just need to know that there's always a starting block.
In this example, block A is the initial block. Let's assume we're a validator who needs to cast an attestation or who is selected to propose the next block. We need to run LMD-GHOST to know which block is the head of the chain so that we can publish the attestation accordingly or we can build the next block on top of the correct previous head block. We've already collected other validators' attestations up to now, only considering the most recent one for every validator, following the LMD rule of the protocol. So we have the score of all blocks, made up as the sum of the score that each validator gave to each of them.
At this point LMD-GHOST works in two steps:
- It assigns a score to all branches, following the same methodology we explained before by propagating backward the score of each block to all previous branches. Figure 15-8 shows the final scores of all branches.

Figure 15-8. Branch scores computed
- Then, starting at the initial block, the GHOST part of the protocol greedily proceeds to select the branch with the highest score until it gets to a block with no descendants. That's the head block returned by the LMD-GHOST fork choice rule.
Let's see this running step-by-step in our example. LMD-GHOST starts at initial block A and immediately goes to block B by following branch B→A as there are no alternative branches to choose from, as shown in Figure 15-9.
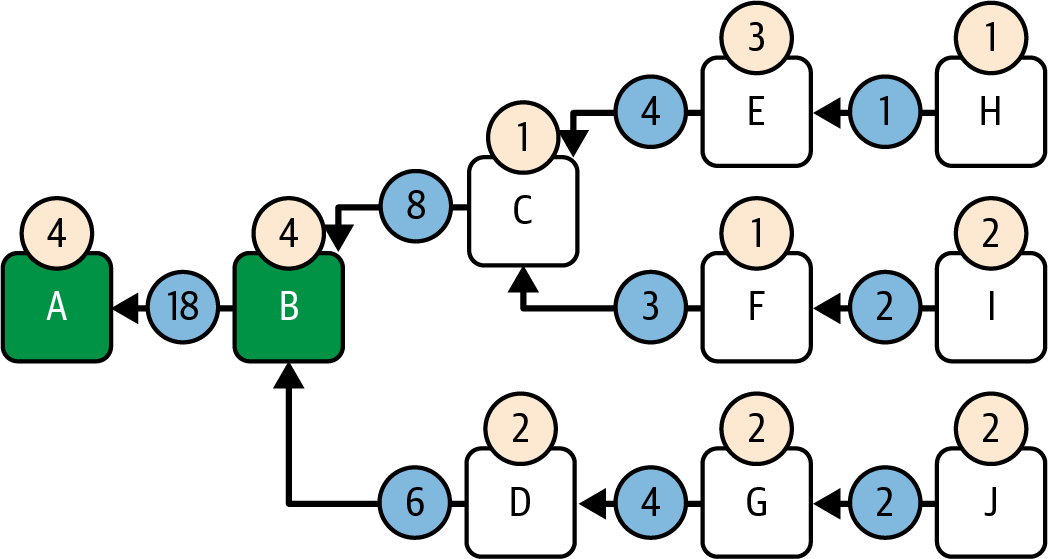
Figure 15-9. LMD-GHOST step 1
Now, there are two branches to choose from:
- Branch C→B with a score equal to 8
- Branch D→B with a score equal to 6
GHOST greedily selects branch C→B since it's the one with the highest score, as shown in Figure 15-10. Note that it doesn't matter that block D has a higher score than block C because LMD-GHOST doesn't consider the score of a single block but rather the score of the entire fork that block lives in.
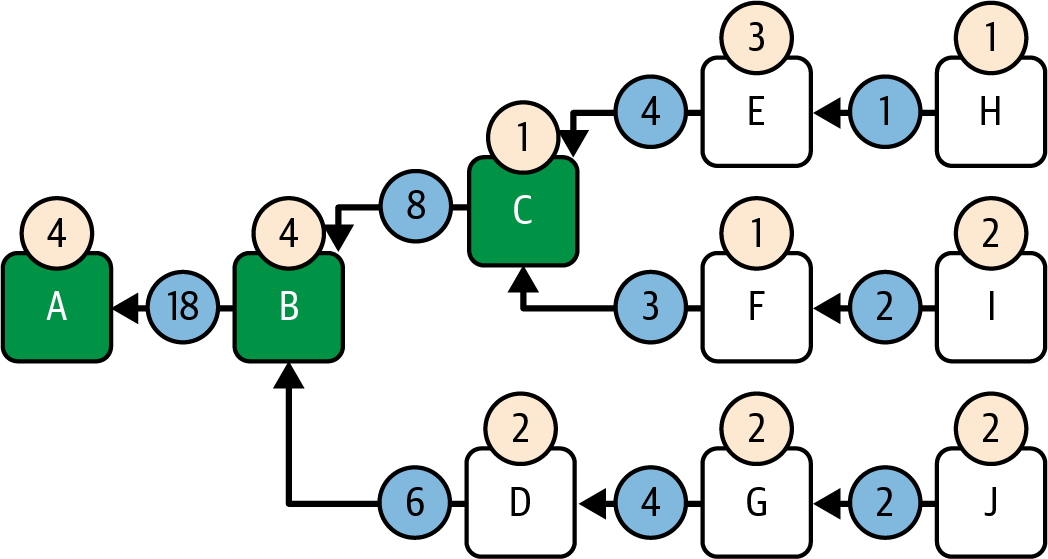
Figure 15-10. LMD-GHOST step 2
We now have two different branches to choose from:
- Branch E→C with a score equal to 4
- Branch F→C with a score equal to 3
GHOST selects branch E→C, as shown in Figure 15-11.
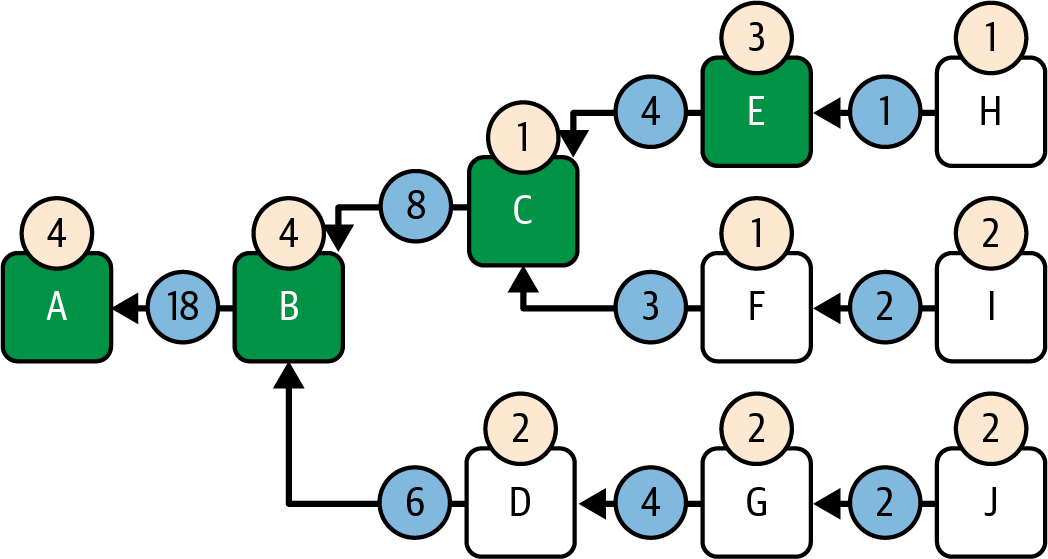
Figure 15-11. LMD-GHOST step 3
At this point, we have only one branch to choose from, branch H→E, so that's the one selected by GHOST, as shown in Figure 15-12.
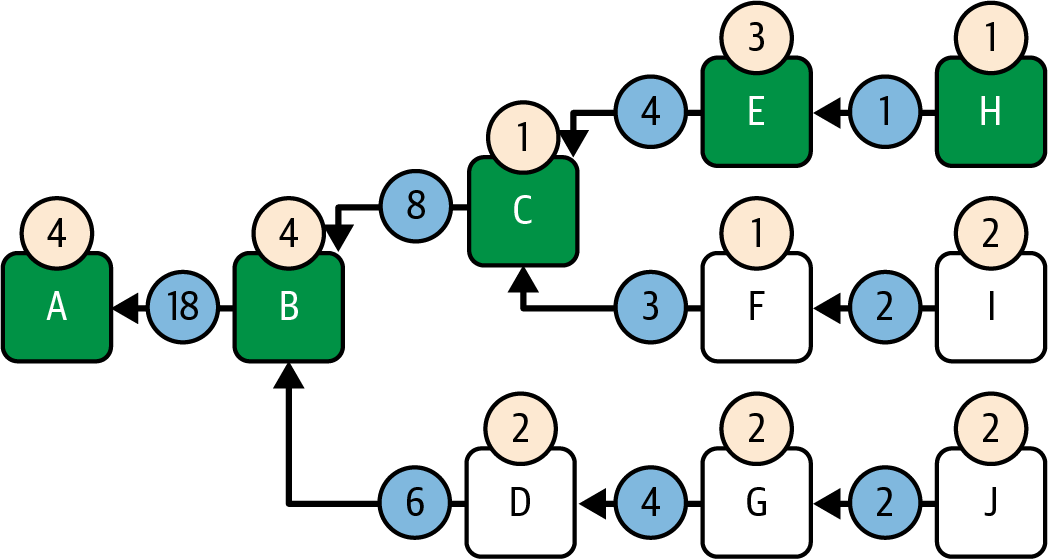
Figure 15-12. LMD-GHOST step 4
Block H has no descendants. LMD-GHOST stops and returns it as the new head block of the chain.
Incentives
LMD-GHOST offers a variety of explicit incentives for validators who strictly follow the rules, and punishments for those who act maliciously. In this section, we'll explore how it prevents malicious actors from breaking the rules and rewards benevolent ones.
Validators need to perform two different duties:
- Proposing blocks
- Creating attestations
For each of these, LMD-GHOST includes several ways to make sure everyone behaves according to the rules.
Proposing blocks
When a validator is selected to propose a new block to the chain, it must create only a single valid block. By doing that, the validator earns the sum of the priority fees of all transactions included into the block they have created, plus some newly minted ETH, as you can see in Figure 15-13.
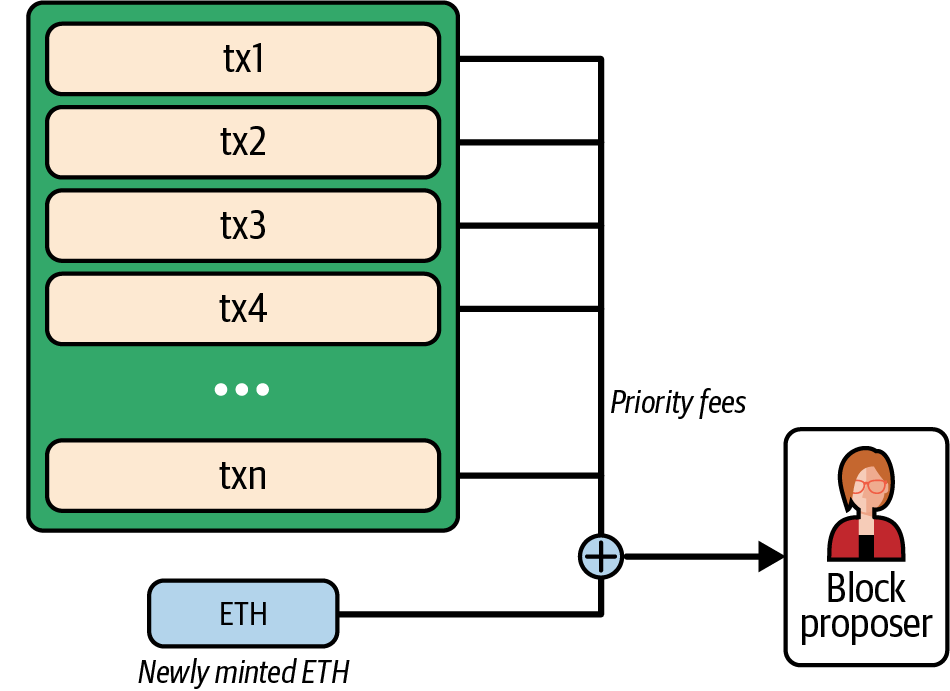
Figure 15-13. Block proposal reward
If the validator tries to cheat by creating more than one block, the protocol explicitly punishes them by slashing a proportion of their stake. In fact, to become part of the validator set, you must stake some ETH as collateral (at least 32 ETH). This stake is (also) necessary so that the protocol can punish you by slashing—that is, removing—some ETH from it, as shown in Figure 15-14.
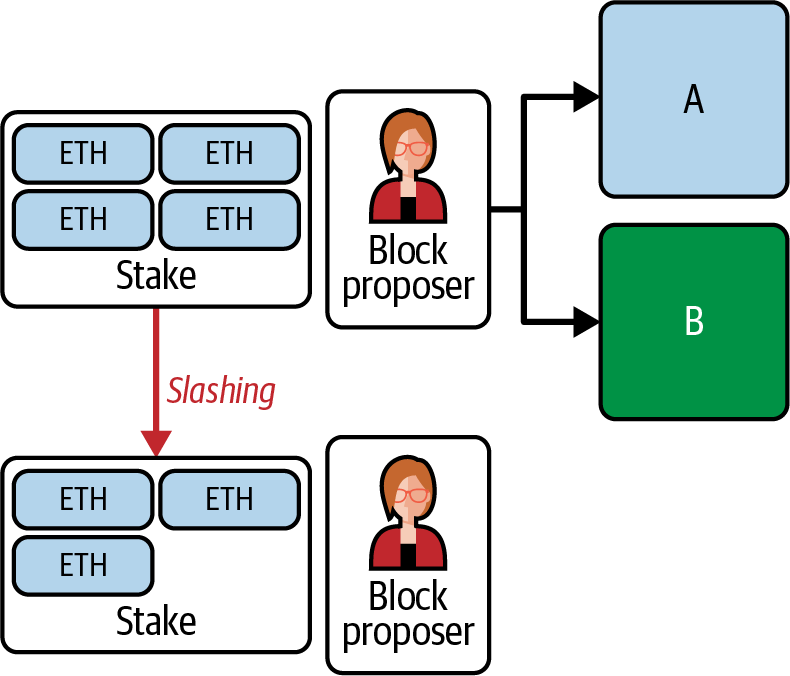
Figure 15-14. Block proposal slashing
Note
It's interesting to note here that the explicit punishment is a big difference between Ethereum's PoS consensus protocol and Bitcoin's PoW. Bitcoin miners get rewarded if their block becomes part of the heaviest chain. If they create more than one block for a single block number, there's no explicit punishment.
You may wonder why. It's because PoW-based systems require some work to be made to create a valid block (the PoW itself). If a miner creates more than one block, they are just wasting time and money because eventually only one block will end up in the heaviest chain, so they'll get rewarded for only one of them.
Ethereum PoS protocol doesn't require validators to perform a PoW to create a valid block. That means that creating more than a single block is almost free for validators. That's why we need explicit punishment for anyone who tries to cheat in this way.
Creating attestations
When a validator is selected to share their view of the network in the form of an attestation, they must publish only a single, valid one. By doing that, they earn a small fee (much smaller than the one earned by the block proposer), as you can see in Figure 15-15.
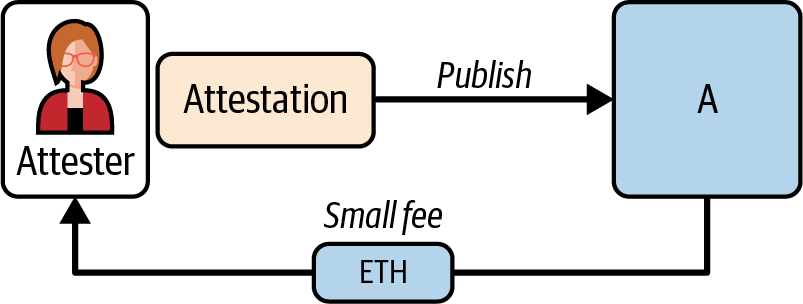
Figure 15-15. Attestation reward
If the validator tries to cheat by creating more than a single attestation or contradictory attestations, the protocol explicitly punishes them by slashing a proportion of their stake, as shown in Figure 15-16.
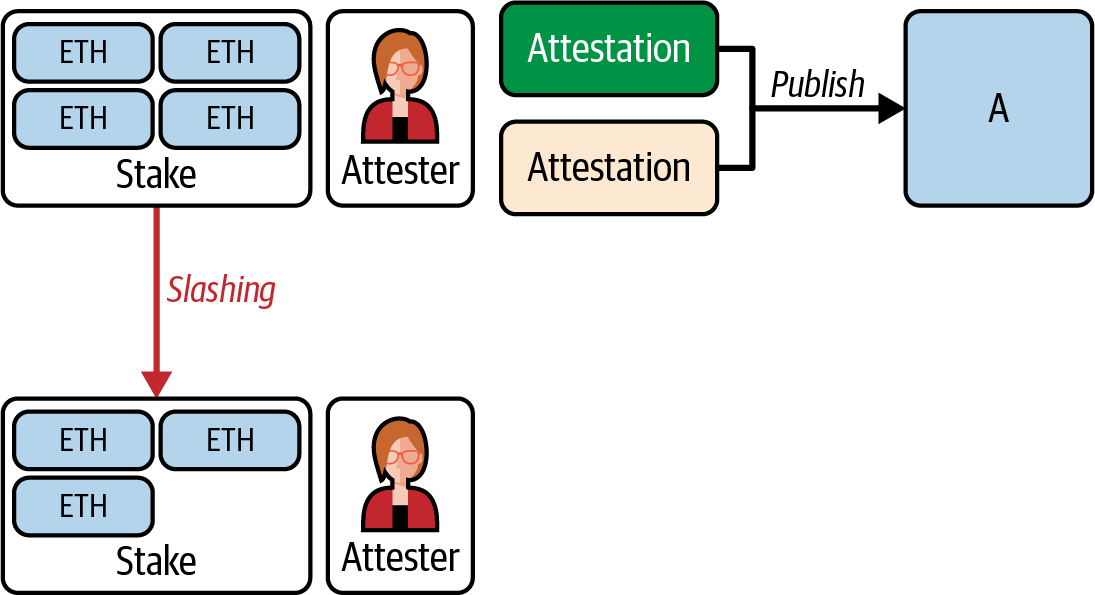
Figure 15-16. Attestation slashing
If the validator keeps behaving maliciously for quite a long time, the protocol has the power of force-ejecting them from the validator set.
Casper FFG: The Finality Gadget
Casper FFG is a kind of metaconsensus protocol. It is an overlay that can be run on top of an underlying consensus protocol in order to add finality to it.
In Ethereum's PoS consensus, the underlying protocol is LMD-GHOST, which does not provide finality. Finality ensures that once blocks are confirmed in the chain, they cannot be reversed: they will be part of the chain forever. So in essence, Casper FFG functions as a finality gadget, and we use it to add finality to LMD-GHOST.
Casper FFG takes advantage of the fact that, in a PoS protocol, we know who our participants are: the validators who manage the staked ether. This means that we can use vote counting to judge when we have seen a majority of the votes of honest validators, or more precisely, votes from validators who manage the majority of the stake. In everything that follows, every validator's vote is weighted by the value of the stake that they manage, but for simplicity, we won't spell this out every time.
Casper FFG, like all classic Byzantine fault tolerant (BFT) protocols, can ensure finality as long as fewer than a third of validators are faulty or adversarial. Once a majority of honest validators have declared a block final, all honest validators agree, making that block irreversible. By requiring that honest validators constitute more than two thirds of the total, the system ensures that the consensus accurately represents the honest majority's view. Notably, Casper FFG distinguishes itself from traditional BFT protocols by offering economic finality (you'll find more details in "Accountable Safety and Plausible Liveness") even if more than one-third of validators are compromised.
Epochs and Checkpoints
Casper FFG ensures consensus by requiring votes from more than two thirds of validators within an epoch, dividing voting across 32 slots to manage the large validator set efficiently, as shown in Figure 15-17. An epoch is divided into 32 slots, each of which usually contains a block. The first slot of an epoch is its checkpoint.
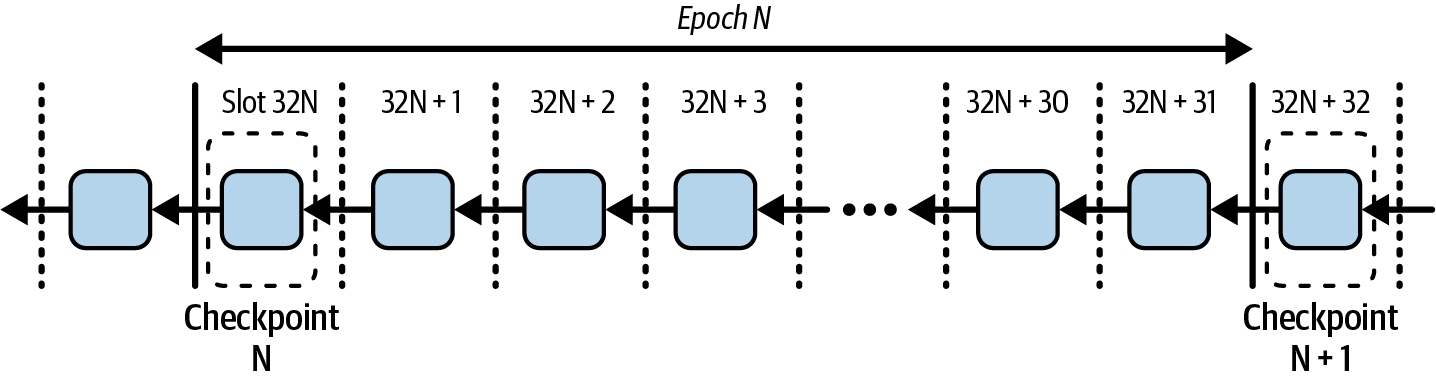
Figure 15-17. Epochs and checkpoints
Validators vote once per epoch on a checkpoint, the first slot, to maintain a unified voting focus. This process, which incorporates both Casper FFG and LMD-GHOST votes for efficiency, aims at finalizing checkpoints, in the context of Casper FFG, not entire epochs, clarifying that finality extends to the checkpoint and its preceding content.
Justification and Finalization
Casper FFG, like traditional BFT protocols, secures network agreement in two stages. Initially, validators broadcast and gather views on a proposed checkpoint. If a significant majority agrees, the checkpoint is justified, signaling a tentative agreement. In the subsequent round, if validators confirm widespread support for the justified checkpoint, it achieves finalization, meaning it's unanimously agreed upon and irreversible. This process underlines the collaborative effort to ensure network consistency and security, aiming for checkpoints to be justified and then finalized within specific time frames and improving the reliability of the consensus mechanism.
Sources and targets, links and conflicts
In Casper FFG, votes comprise source and target checkpoints, representing validators' commitments to the blockchain's state at different points. These votes are cast as a linked pair, indicating a validator's current and proposed points of consensus. The source vote reflects a validator's acknowledgment of widespread support for a checkpoint, while the target vote represents a conditional commitment to a new checkpoint, dependent on similar support from others. This dual-vote system facilitates a structured progression toward finalizing blocks, ensuring network integrity and continuity.
Supermajority links
In Casper FFG, a supermajority link between source and target checkpoints, s→t, is established when more than two thirds of validators, by stake weight, endorse the same link, with their votes included in the blockchain. This mechanism ensures consensus and security by validating the sequence of checkpoints through widespread validator agreement.
Justification
In Casper FFG, when a node observes a majority of validators agreeing on a transition from one checkpoint to another, it justifies the old checkpoint. This signifies that the node has seen evidence of consensus from a significant portion of the validator set, as shown in Figure 15-18, making a commitment not to revert to a previous state unless overwhelming consensus is shown for an alternative path.
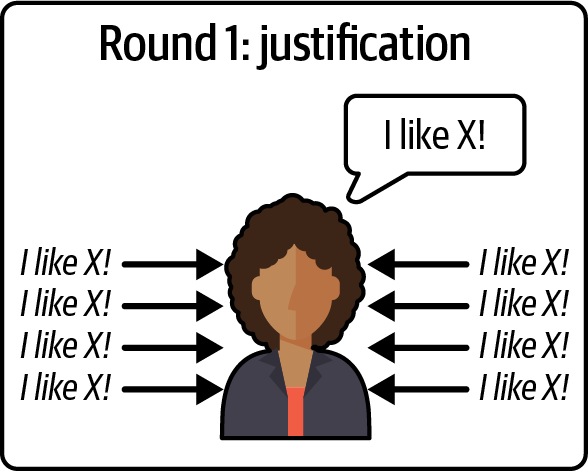
Figure 15-18. Justification process1
The node has seen a supermajority link CN → CN + 1, therefore marking CN + 1 as justified. Since CN + 1 is a direct child of CN in the checkpoint tree, it also marks CN as finalized. Finalized checkpoints are cross-hatched and marked with F.
Finalization
When a node observes a consensus (a supermajority link) from one justified checkpoint to its direct child, it finalizes the parent checkpoint, as shown in Figure 15-19. This indicates a network-wide commitment not to revert from this point, backed by a strong majority of validator support. Finalization ensures network stability and security by making the blockchain history immutable past that checkpoint, preventing reversals without significant consequences for validators.

Figure 15-19. Finalization process
Slashing
Casper FFG implements a slashing mechanism to penalize validators for breaches of protocol rules with the aim of securing network consensus. This enforcement discourages actions that could otherwise undermine the blockchain's integrity, such as finalizing conflicting checkpoints. Detection of these breaches, especially complex scenarios like surround votes (see "Fork Choice Rule"), may rely on specialized external services due to their technical challenges. Slashing consequences are proportional to the misconduct's severity and overall network health, with penalties scaling based on the collective behavior within a specific time frame, which ensures fairness and accountability in validators' actions.
Fork Choice Rule
Casper FFG modifies the traditional LMD-GHOST fork choice rule, mandating that nodes prioritize the chain with the highest justified checkpoint; this checkpoint then effectively becomes the starting block for the LMD-GHOST protocol. This adaptation, which is an evolution from the LMD-GHOST protocol's approach, ensures that the network achieves finality by committing to checkpoints that have been agreed upon by a supermajority of validators. It effectively guarantees that once a checkpoint is justified, the network cannot revert beyond it, reinforcing the security and stability of the blockchain. This rule is also designed to maintain network liveness, aligning with Casper's foundational goals.
The Casper Commandments
In Casper FFG, checkpoints are central to ensuring network consensus and security. They are marked by epoch numbers that increase with blockchain progression. Validators must adhere to strict voting rules: they cannot vote on different outcomes for the same checkpoint, so no double-voting, as shown in Figure 15-20. If this voting rule were not in place, a reorg would be much more likely, rendering the chain highly unstable.
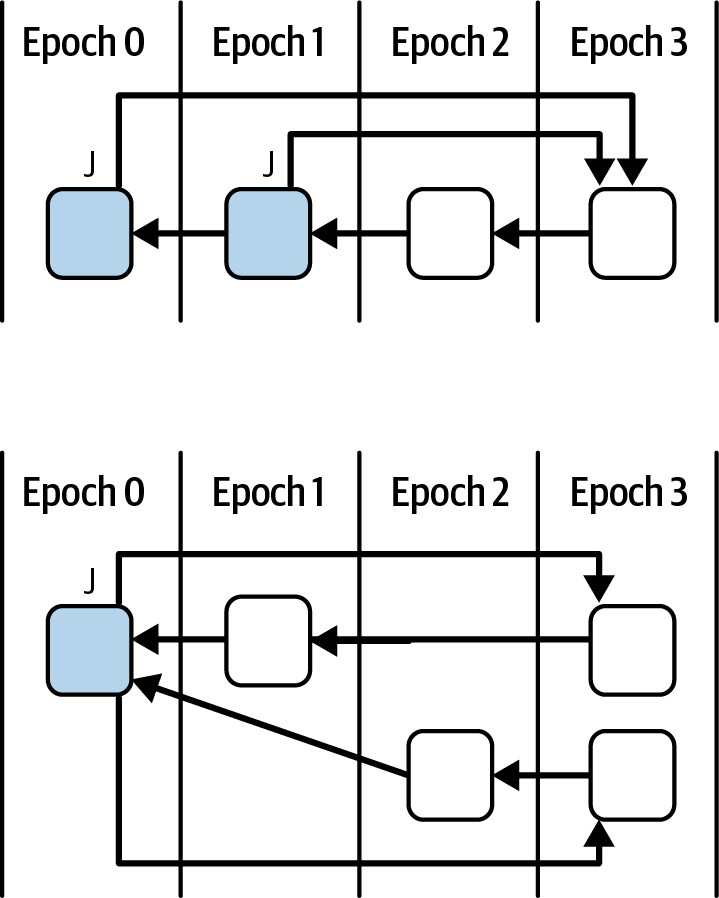
Figure 15-20. No double-voting rule
Validators must also avoid creating votes that could be interpreted as contradicting previous commitments (no surround vote). Violating these principles leads to slashing, a penalty designed to maintain the integrity and accountability of the consensus mechanism, as shown in Figure 15-21.
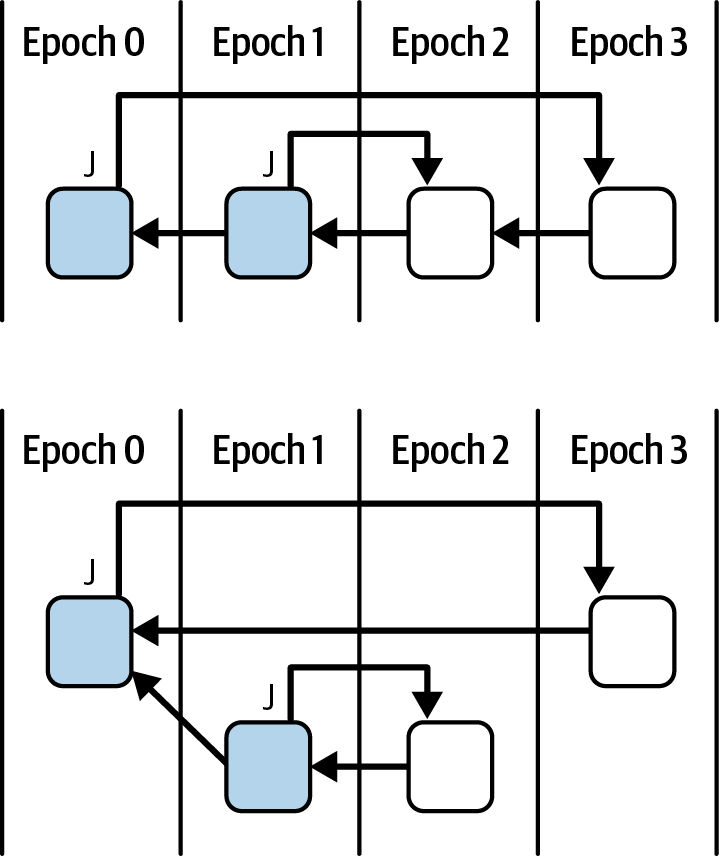
Figure 15-21. No surround vote rule
Accountable Safety and Plausible Liveness
The Casper FFG consensus protocol makes two guarantees that are analogous to, but different from, the concepts of safety and liveness in classical consensus: accountable safety and plausible liveness.
Accountable safety and economic finality
Casper FFG's proof of accountable safety demonstrates that conflicting checkpoints cannot be finalized unless more than one-third of validators violate protocol rules. This system ensures that checkpoints finalized with fewer than one-third adversarial validators remain irreversible, enforcing both network security and economic penalties for dishonest behavior.
Economic finality in Casper FFG introduces a cost to potential attackers, enforcing security not just through protocol rules but also through economic disincentives. Validators who attempt to undermine the network by finalizing conflicting checkpoints face severe penalties, losing a significant portion of their stakes. This approach contrasts with traditional consensus mechanisms by adding a layer of economic consequences, ensuring that finalizing a block carries a substantial cost for malicious actors and thereby enhancing the blockchain's integrity and resilience against attacks.
Plausible liveness
Casper FFG ensures that the network remains active and can always reach consensus without any honest validators being penalized, embodying the concept of plausible liveness. This means that, provided a supermajority of validators are honest, the protocol can continue justifying and finalizing new checkpoints, avoiding any deadlock scenarios where progress is halted because of fear of slashing. This principle ensures the network's resilience and continuous operation, underlining Casper's adaptability to maintain consensus even under challenging conditions.
A Practical Example: The Life Cycle of a Checkpoint
Let's take a journey together through the life cycle of a checkpoint in Ethereum's Casper FFG mechanism.
The community of Ethereum validators can be overwhelmingly large, with potentially hundreds of thousands involved. It's not practical for all these votes to be processed at once. So how do we manage this?
Votes are spread out across what we call an epoch, which is divided into 32 slots, each lasting 12 seconds. This way, each validator votes exactly once per epoch, with about 1/32 of the validator set voting in each slot. Figure 15-22 shows a pool of such validators.

Figure 15-22. Validator pool
In this example, the number of validators is, of course, much more limited than on the real Ethereum network, but we do have 64 nodes that are divided into 32 groups. Each of the groups will vote for one slot in the epoch, as shown in Figure 15-23.
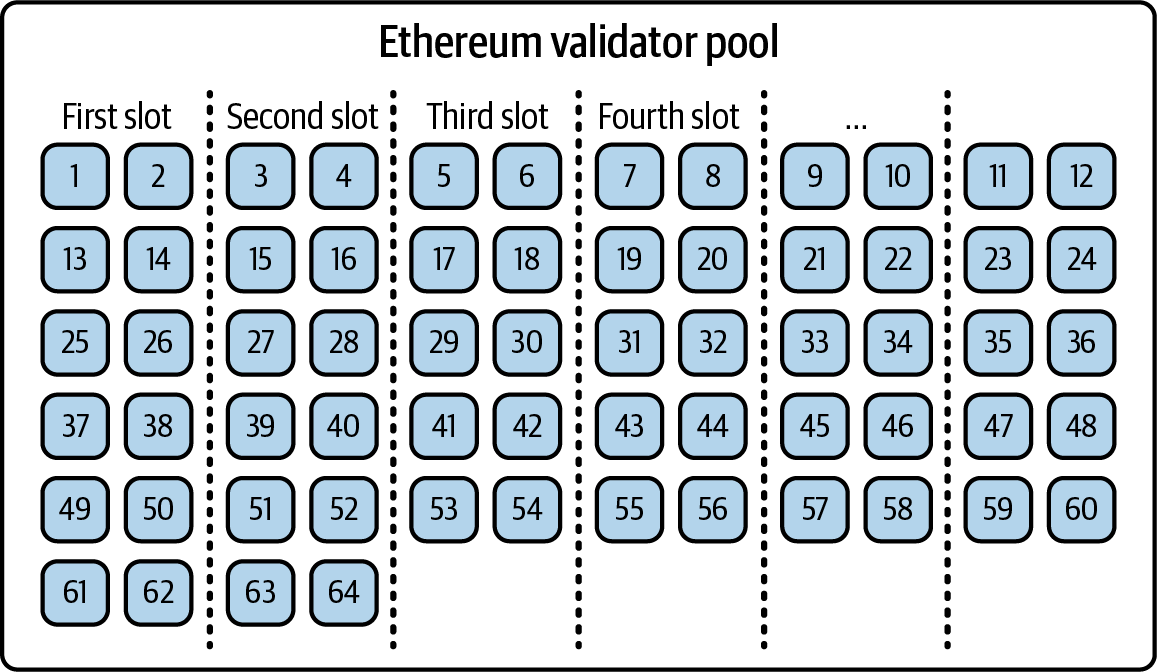
Figure 15-23. Validators divided into groups
Now, what are they voting on? They vote on a checkpoint: specifically, the very first slot of an epoch.2 This checkpoint acts as a common goal for validators voting at different times.
A checkpoint is always the very first slot of an epoch, but its block hash may be from an earlier block if the checkpoint's own block is missing.
Note
It's important to clarify something here: although we often talk about finalizing epochs, in technical terms we're actually finalizing checkpoints, which are these first slots. Once a checkpoint is finalized, everything up to and including that slot is set in stone, secure and unchangeable.
A representation of an epoch—in this case, epoch N—is shown in Figure 15-24. The checkpoint N is the slot 32N; once that checkpoint is finalized, slot 32N-1 and every other slot before that will be considered finalized.

Figure 15-24. Epoch representation
The process to achieve this security is rigorous and resembles traditional BFT consensus mechanisms. In the next sections, we'll describe how it works.
First Round: Justification
Validators each broadcast their own views of the current epoch's checkpoint to the network. Then, they listen to see if a supermajority of the network agrees with their perspectives. If they do, this checkpoint is "justified." At this stage, validators believe that the majority of the network supports this checkpoint for finalization, although they are not entirely certain that everyone agrees just yet.
The key issue is that validators can't yet be sure that malicious actors on the network aren't feeding them false information about the network's state—saying one thing to them and something else to others. This is a very important point that's often overlooked. If all participants were always honest, justification would imply finalization, and the entire two-round process could be avoided.
When a validator justifies a checkpoint, they have received approval from two thirds of the network for that specific checkpoint, as shown in Figure 15-25, but this first round of approval is only local to the validator itself. It's possible, especially under adversarial conditions, that not enough validators have reached a consensus. Traditional PBFT-style consensus mechanisms—like those used in Algorand, Dfinity, and Cosmos—would halt at this stage and lose liveness. Ethereum, on the other hand, keeps going. If it can't justify a checkpoint, no problem—it simply moves on and tries to justify the next one. This works because Ethereum relies on LMD-GHOST for liveness, while Casper FFG is just an overlay—a "nice to have." So if finality stalls temporarily, that's not a critical issue.

Figure 15-25. Justification round
Second Round: Finalization
Validators announce that they have heard from a supermajority that they also support this checkpoint. They check again to see if the rest of the network confirms that this supermajority indeed exists. If so, the validators can "finalize" the checkpoint, as shown in Figure 15-26. Finalization is a powerful step—it means that no honest validator will ever revert this checkpoint. They may not have marked it as finalized in their local view yet, but at least they've marked it as justified, and it cannot be reversed without punishable actions.

Figure 15-26. Finalization round
In practice, each round ideally spans one epoch, meaning it takes one epoch to justify a checkpoint and another to finalize it. That totals about 12.8 minutes. However, thanks to the pipelined design of Casper FFG, we can finalize a checkpoint every 6.4 minutes, once per epoch.
Note
It's also worth noting that from an external viewpoint, we might see signs that a checkpoint will likely be finalized before the 12.8 minutes are up since votes are accumulated gradually as the epoch progresses, assuming there's no significant chain reorganization. However, the official in-protocol actions of justification and finalization occur only at the end of an epoch.
There are a lot of things that can go wrong during the justification and finalization of checkpoints. Let's analyze two important cases and how they are handled by this friendly finality gadget.
Conflicting Justification
It's insightful to think about why we need both "justified" and "finalized" statuses for checkpoints. Why isn't it sufficient to immediately finalize a checkpoint once a supermajority of two thirds has voted in favor of it?
Here's the distinction: justification is about local agreement, whereas finality is about global consensus.
Justifying a checkpoint means that I, as a validator, have received confirmation from two thirds of the validators that they approve the checkpoint. This approval, however, represents only my local perspective. It's possible that other validators have different information; I can't be sure. Despite this uncertainty, as an honest validator, I commit to never reversing any checkpoint that I've justified based on my local data.
Finalizing a checkpoint, on the other hand, takes this a step further. It occurs when I've received assurances from two thirds of the validators that they, too, have heard from two thirds of their peers confirming the checkpoint's validity. This means that a supermajority of the network—not just my local view—acknowledges and commits to this checkpoint. It's this broad consensus that protects the checkpoint from being reversed globally. Therefore, a finalized checkpoint is not just locally recognized; it's globally secured.
Let's explore an extreme scenario to understand the consensus process better. Suppose we have four validators, A, B, C, and D, as shown in Figure 15-27. All of them are honest, but the network they operate in can experience indefinite delays. For the sake of this example, imagine that there's a checkpoint at every block height.
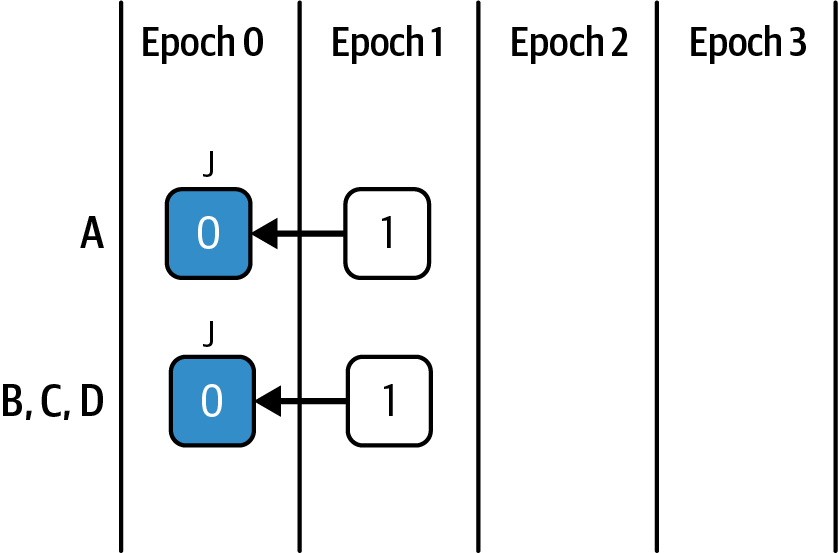
Figure 15-27. Four validators scenario
Every validator in the scenario has the block 0 and can therefore justify the checkpoint 0; so 0, the source, is justified locally for all four validators, and 1 is the target (see "Sources and targets, links and conflicts").
Now let's imagine that A is severely delayed in the network connection and that it's also chosen to propose a block. A proposes a block in epoch 2. This block contains all four votes to justify checkpoint 1, but since its network connection is severely delayed, the other validators never see it.
A has a supermajority link (see "Supermajority links") between the source 0 and the target 1, so it will finalize checkpoint 0 and justify checkpoint 1. Meanwhile, B, C, and D saw no votes in the current epoch, so they still have only justified checkpoint 0. They will also vote for an empty checkpoint in this epoch, which is checkpoint X, as shown in Figure 15-28.
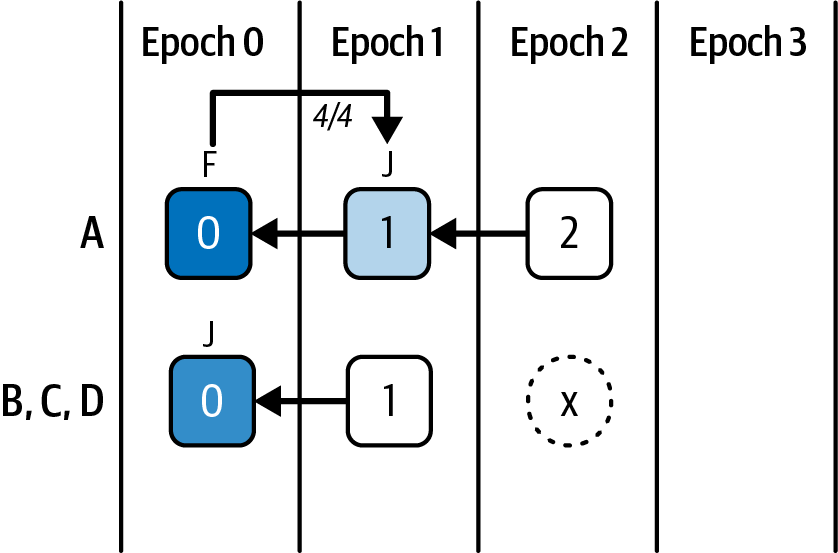
Figure 15-28. Network delay scenario step 1
In epoch 3, one validator among B, C, and D is chosen to propose a block.
This block contains three votes with the source as checkpoint 0 and the target as checkpoint X; therefore, there is a supermajority link between 0 and X that allows the validators B, C, and D to have checkpoint 0 as finalized and checkpoint X as justified, as shown in Figure 15-29. A, on the other hand, considers this block to be invalid, because in its local view, 1 is justified and cannot be reverted. The only solution for validator A's chain to continue is to delete its memory and resync with the rest of the network.
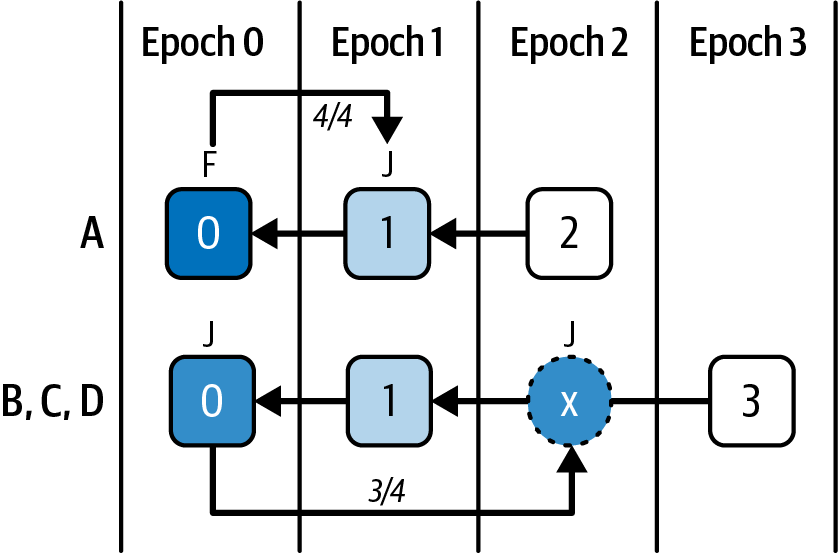
Figure 15-29. Network delay scenario step 2
Note
It is important to remember that in this example, validators B, C, and D never saw the block proposed by A. Since they did not observe block 2—the block that would have justified checkpoint 1—they cannot agree on block 1 and are therefore unable to justify checkpoint 1. As a result, they vote on an empty checkpoint instead.
This example demonstrates that even simple network delays can cause nodes to have differing views of justification and finalization. However, this alone doesn't justify the need for two separate phases: justification followed by finalization. The reasoning behind the two phases is very straightforward: if we didn't have a justification step, A would have finalized checkpoint 1, which would have been considered invalid by the rest of the validators, as shown in Figure 15-30.
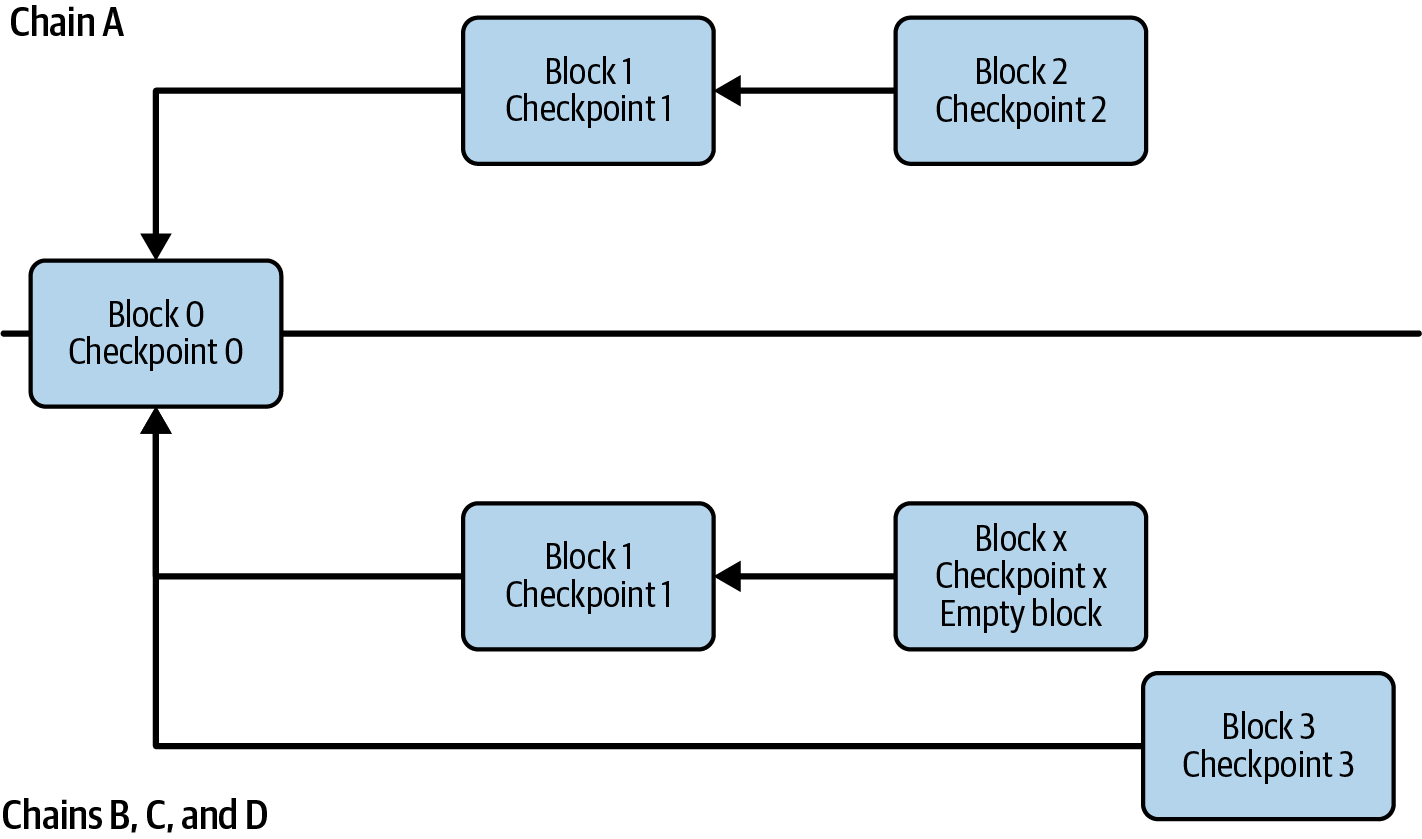
Figure 15-30. Without justification step
In the previous example, A had to delete its memory and resync with the rest of the network. This is because justification, as we said before, is similar to a local step and can be reverted. However, this would not have been possible if A had directly finalized checkpoint 1. Without the two phases, A would have had a finalized block reverted and B, C, and D would have been able to orphan block 1 without being slashed. The only way to guarantee safety is with a two-way commit: justification and finalization.
Gasper: A Real Example
So far, we have seen how Casper FFG and LMD-GHOST work on their own. Let's see now how they are combined into Gasper and used inside the Ethereum PoS consensus protocol.
The best way to fully understand how Gasper works is to follow a real example of a blockchain using it to gain consensus over the history of blocks. We won't use Ethereum mainnet for our example. Instead, we'll create a mock-up network with three validators in order to better describe what is happening during each phase of the consensus protocol, as you will see in Figure 15-31.
Figure 15-31. Gasper mock network
The three validators have the same number of ETH in stake, so their voting power—that is, their contribution to the score of every block in which they vote—is the same. Also, every validator publishes an attestation every block, instead of once in an epoch as in the Ethereum mainnet.
Our goal is to see the life of a block from being published to first being justified and then finalized.
In our simplified network, every epoch is made of three slots, shown in Figure 15-32.
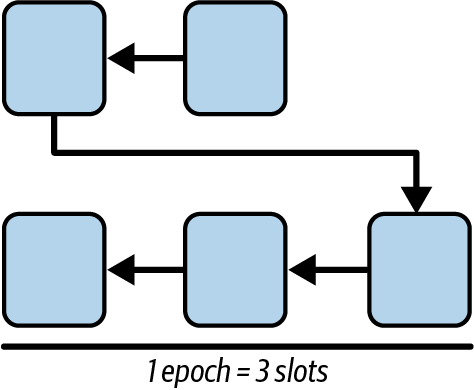
Figure 15-32. Simplified epoch structure
Let's start our example at epoch number 1. This is not the real first epoch; we just call it "epoch 1" for simplicity. Validator A is the one selected to propose the first block. We can call the block that they are to propose block 1, as shown in Figure 15-33.
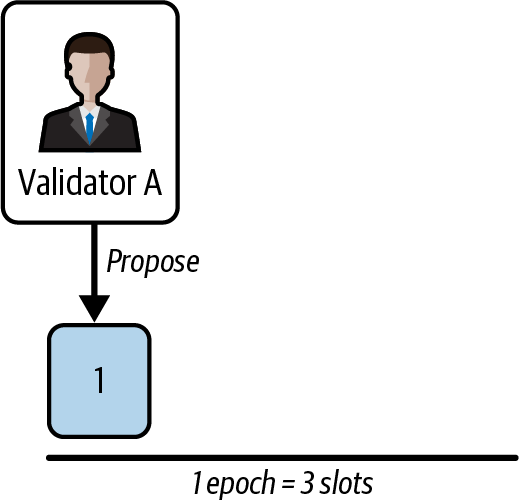
Figure 15-33. Block 1 proposal
Validator A publishes block 1, and immediately, that block starts propagating in the network. Shortly after the publication, validators B and C receive it and save it into their view of the network.
Then, all the validators make an attestation by voting what they think is the last head block of the chain. To do that, they have to run LMD-GHOST on their local views. The result is block 1. These attestations are published and shared with all validators.
Now, validator B is selected to propose the block at the next slot—slot 2—as you'll see in Figure 15-34. To do that, the validator still has to run LMD-GHOST on their local view of the network to get the last head block to build on top of.
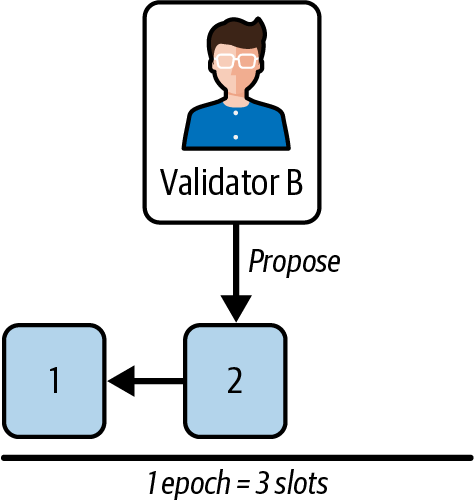
Figure 15-34. Block 2 proposal
Here is validator B's view of the network:
- Validator A attestation: head block: block 1
- Validator B attestation: head block: block 1
- Validator C attestation: head block: block 1
So the result of LMD-GHOST for validator B is block 1. They can now publish block 2 on top of block 1. Inside block 2, validator B saves also all the attestations they have seen that were not included in a previous block. So they save the three attestations that contain a vote for block 1.
Block 2 propagates in the network and, shortly after its publication, validators A and C receive it. Remember that while LMD-GHOST uses both votes shared via P2P and included in blocks, Casper FFG takes into consideration only votes included into blocks. So while including LMD-GHOST votes into the block doesn't affect LMD-GHOST results if validators are already sharing them through the P2P network, it's fundamental for Casper FFG since that's the only way validators get to know them.
Again, all validators make an attestation by voting what they think is the last head block of the chain. Since they all have block 2 in their local views, they all vote for it to be the head of the chain. Then, they publish these attestations so that all validators can see them.
Now, validator C is selected to propose the next block at slot 3. They run LMD-GHOST on top of their local view to get the head block. Here is validator C's view of the network:
- Validator A attestation: head block: block 2
- Validator B attestation: head block: block 2
- Validator C attestation: head block: block 2
The result is block 2, so validator C publishes block 3 on top of it, shown in Figure 15-35.
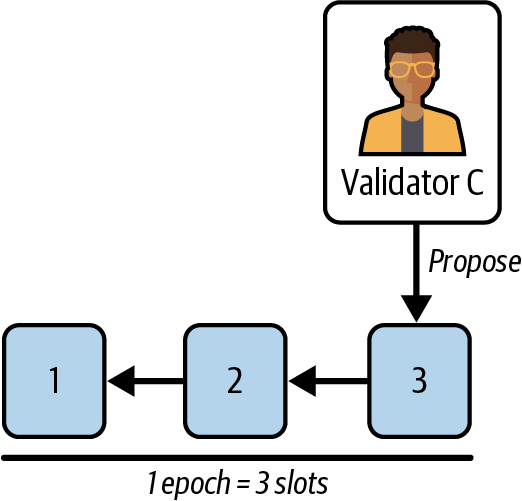
Figure 15-35. Block 3 proposal
Inside block 3, validator C saves the three attestations voting for block 2 because they were not included in previous blocks.
Block 3 propagates in the network and, shortly after its publication, validators A and B receive it. Then, the validators make an attestation voting for it.
Now, we go back to validator A. They have to propose the next block—slot 4—which is also the first block of the new epoch—epoch 2—as you'll see in Figure 15-36.
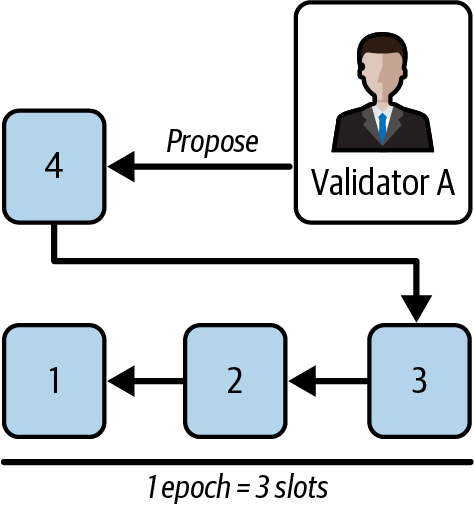
Figure 15-36. Block 4 proposal - new epoch
Validator A runs LMD-GHOST on their local view to get the head of the chain. Here is validator A's view of the network:
- Validator A attestation: head block: block 3
- Validator B attestation: head block: block 3
- Validator C attestation: head block: block 3
The result is block 3, so validator A publishes block 4 on top of it.
Inside block 4, validator A saves the three attestations voting for block 3 because they were not included in previous blocks.
Block 4 propagates in the network and, shortly after its publication, validators B and C receive it. The validators have to make a new attestation voting for it to be the head of the chain. But this time, something changes.
We are in a new epoch, so the validators have to update the Casper FFG part of the vote. In fact, we previously ignored that an attestation includes not only a vote for the last head block of the chain—the LMD-GHOST part of the consensus protocol—but also a vote for the Casper-FFG checkpoints. In particular, every attestation includes a source and a target vote. The source vote is the last justified checkpoint that the validator knows about, while the target vote represents what the validator thinks should become the next block to be justified.
So the attestation that validators A, B, and C make is as follows:
Attestation
- Head block: block 4
- Source block: block 1
- Target block: block 4
The target block is easy to select because it's just the first block of the epoch (there could be some edge cases where the target block is not the first one of an epoch, but we ignore them for simplicity's sake). The source block is calculated by looking at the attestations a validator has and seeing if there is a block voted to be the target block by more than two thirds of the validators. We didn't include source and target block in the previous attestations, but let's say that they all include block 1 as the target block. So right now, we have justified block 1 because there is a supermajority link from block 1 to block 4. See Figure 15-37.
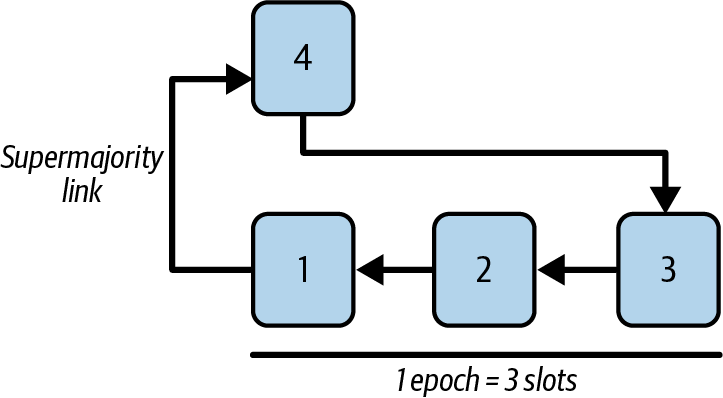
Figure 15-37. Block 1 justified
These attestations are then published and shared with all the validators and will be included in the next slots (usually in the very next slot). We can skip blocks 5 and 6 and go straight to block 7, the first block of the next epoch: epoch 3, shown in Figure 15-38.
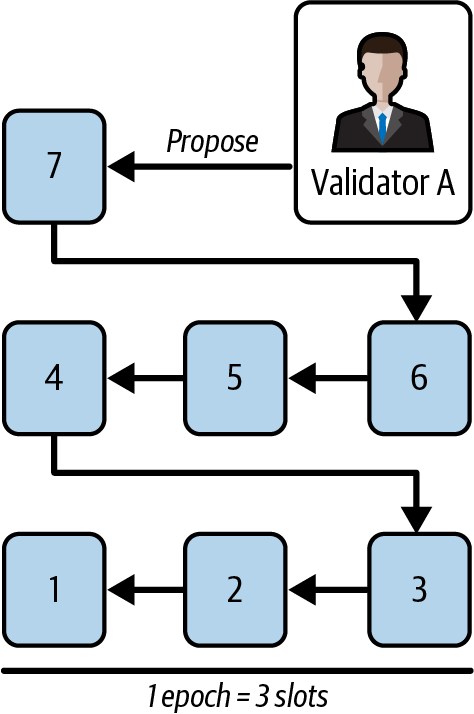
Figure 15-38. Block 7 proposal - epoch 3
Again, validator A is selected to propose the block. They run LMD-GHOST on their local view. Here is validator A's view of the network:
- Validator A attestation: head block: block 6, source block: 1, target block: 4
- Validator B attestation: head block: block 6, source block: 1, target block: 4
- Validator C attestation: head block: block 6, source block: 1, target block: 4
The result is block 6, so they publish block 7 on top of it.
Block 7 propagates in the network and, shortly after its publication, validators B and C receive it. The validators have to make a new attestation voting for it to be the head of the chain. And something changes again here.
We are in the next epoch—epoch 3—so the Casper-FFG part of the attestation changes again. In fact, the attestation that validators A, B, and C make is like this:
Attestation
- Head block: block 7
- Source block: block 4
- Target block: block 7
As you can see, the target block is now block 7, and the source block is block 4. This is true because validators A, B, and C all voted for a target block equal to block 4 in the previous attestation. We have now justified block 4 because we have a new supermajority link from block 4 to block 7, as shown in Figure 15-39.
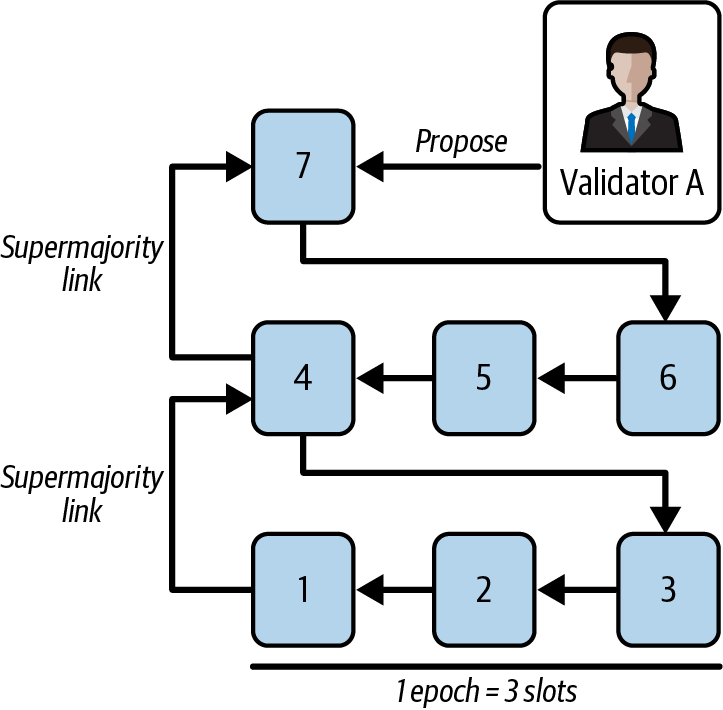
Figure 15-39. Block 4 justified, block 1 finalized
We have also finalized block 1 because it's a justified checkpoint whose direct child—block 4—is also justified. When a validator considers a block to be finalized, that means the validator has seen a confirmation from more than two thirds of the validators that they all have seen that that block is justified. In fact, if we take validator A—this applies to validators B and C, too—they have seen B and C's attestations where they voted for block 1 as the source block. Voting for block 1 as the source block means that B and C previously had seen a two-thirds majority of votes for block 1 as the target block. So we can be sure that, in order to revert block 1, at least one third of the validators must be slashed because they double-voted.
Controversy and Competition
At this point, you might be wondering why we need so many different consensus algorithms. Which one works better? The answer to this question is at the center of the most exciting area of research in distributed systems during the past decade. It all boils down to what you consider "better"—which, in the context of computer science, is about assumptions, goals, and the unavoidable trade-offs.
It is likely that no algorithm can optimize across all dimensions of the problem of decentralized consensus. When someone suggests that one consensus algorithm is "better" than the others, you should start asking questions that clarify, better at what: immutability? Finality? Decentralization? Cost? There is no clear answer, at least not yet. Furthermore, the design of consensus algorithms is at the center of a multibillion-dollar industry and generates enormous controversy and heated arguments. In the end, there might not be a "correct" answer, just as there might be different answers for different applications.
The entire blockchain industry is one giant experiment where these questions will be tested under adversarial conditions, with enormous monetary value at stake. In the end, history will answer the controversy.
The controversies in a consensus protocol can be many, and coordinating the network to solve them is challenging. Aligning incentives is crucial but not always possible. We will examine two current problems of the Ethereum consensus algorithm.
Timing Games
In Ethereum's protocol, time is structured into 12-second units called slots. Each slot assigns a validator the role of proposing a block right at the start (t = 0). A committee of attesters is then tasked with validating this block, aiming to do so by four seconds into the slot (t = 4), which is considered the attestation deadline.
Timing games are strategies where validators wait as long as possible before proposing a block to maximize their MEV rewards, as shown in Figure 15-40. This practice involves a delicate balance, requiring validators to delay their proposals to capture more value while ensuring that their block is supported by a sufficient portion of the attesting committee to remain on the canonical chain.
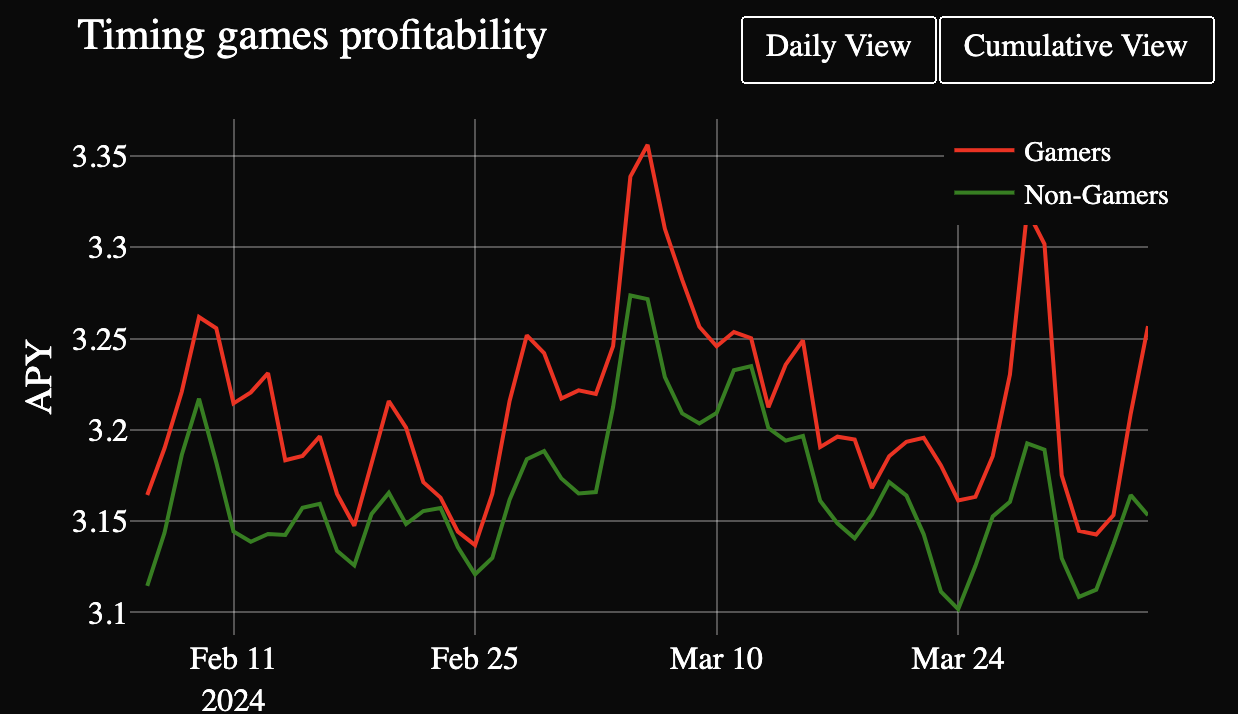
Figure 15-40. Timing game strategy
Timing games in Ethereum create a competitive landscape where gains from MEV for one validator may lead to disadvantages for others. This competition can disrupt consensus by increasing the number of missed slots and potential block reorganizations. Additionally, it motivates attesters to postpone their validations, adding layers of complexity to the process.
"Principles of Consensus" points out the importance of liveness for Ethereum's consensus process. However, timing games pose a threat to this critical feature by compromising the network's reliability.
What's a timing game? It's like waiting for the perfect moment to make a move, aiming to get the most out of it. This is what some of the people keeping the network up and running are trying to do. They're waiting for the right time to act to get the most rewards. But this waiting game can be risky. If their internet is slow or they're not too experienced, they may miss their chance to do their part. And missing too many chances could make the network less dependable.
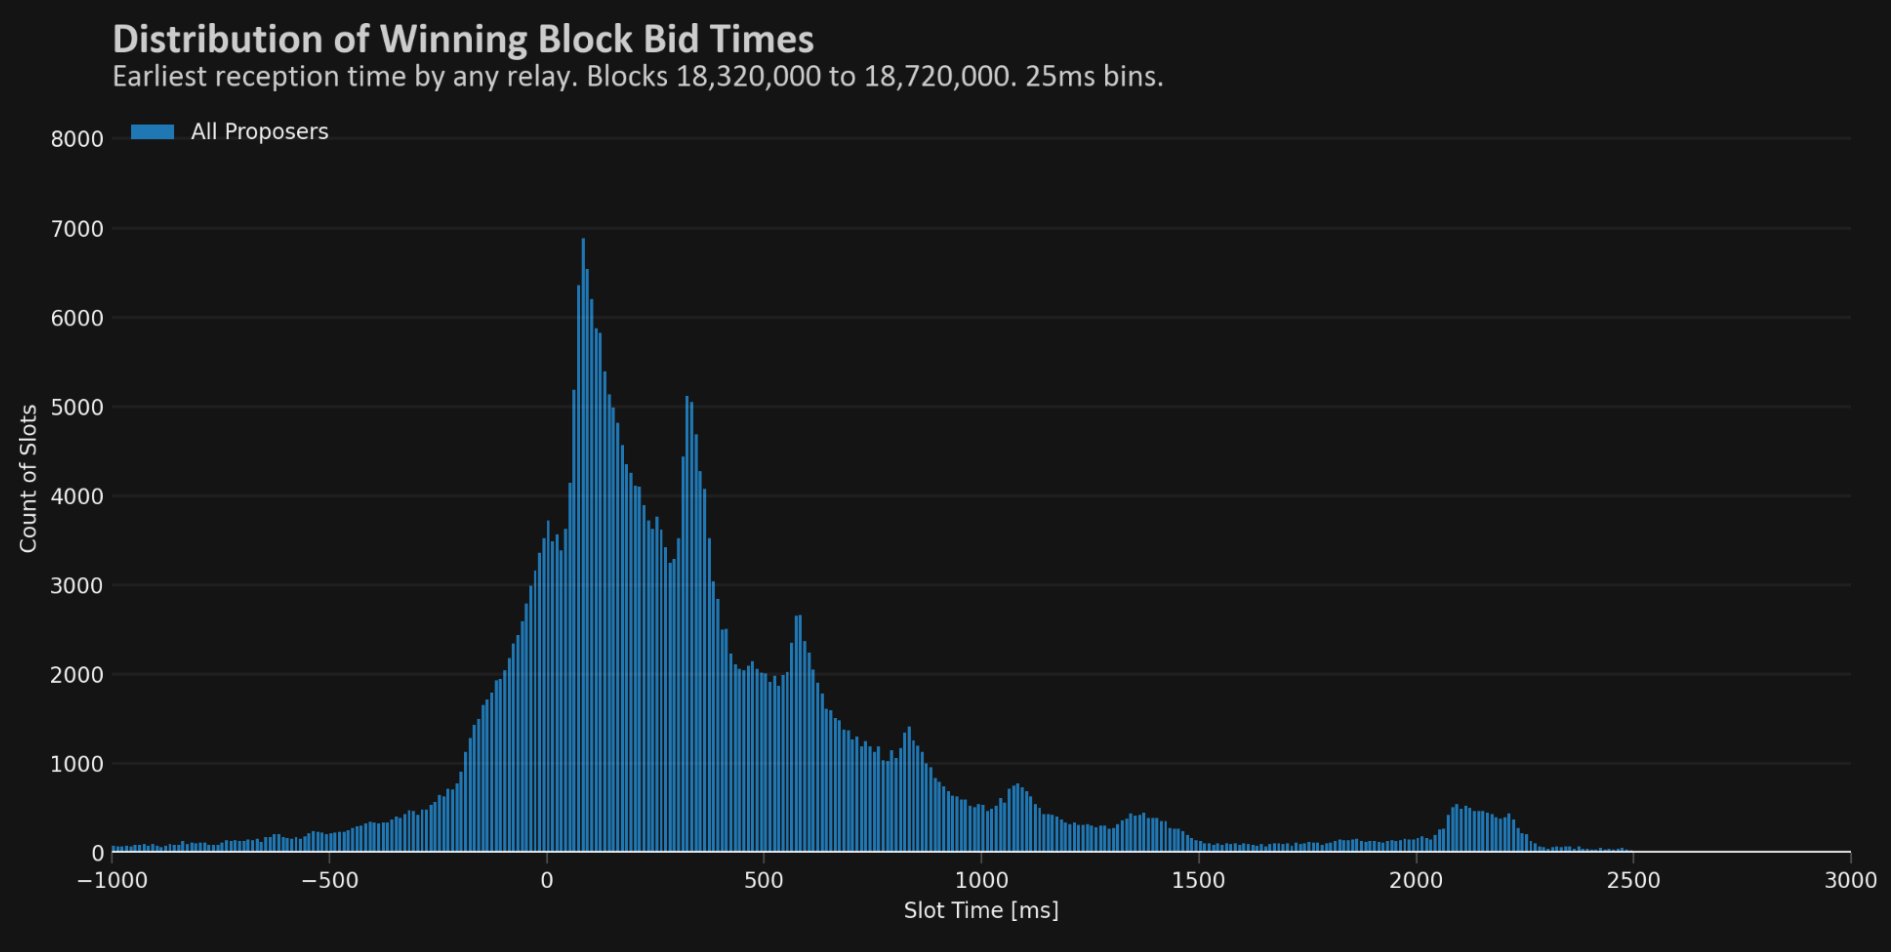
Figure 15-41. Timing game risk visualization
Right now, this isn't a big problem. Most of the entries working as validators aren't really getting into these timing games or aren't playing them at all, as shown in Figure 15-41.
Note
Since we wrote this chapter in 2024, things have changed a bit. Right now, a solution has been added in the Dencun hard fork called "proposer boost" that does punish late block proposers. The proposer boost adds weight to the attestations of the block proposer in the slot where the block is proposed.
Centralization of Supermajority
The concept of supermajority client risk in Ethereum is all about balancing the network's health and security. Ethereum decided to use multiple clients to prevent any single point of failure. This is because all software, including these clients, can have bugs. The real trouble starts when there's a consensus bug, which could lead to something serious, such as creating infinite ether out of thin air. If just one client ran the whole show and it got hit by such a bug, fixing it would be a nightmare. The network could keep running with the bug active long enough for an attacker to cause irreversible damage.
Let's analyze a quick example of what could happen if a majority client had a bug. Note that every block in Figure 15-42 is a checkpoint and not a block in the blockchain.
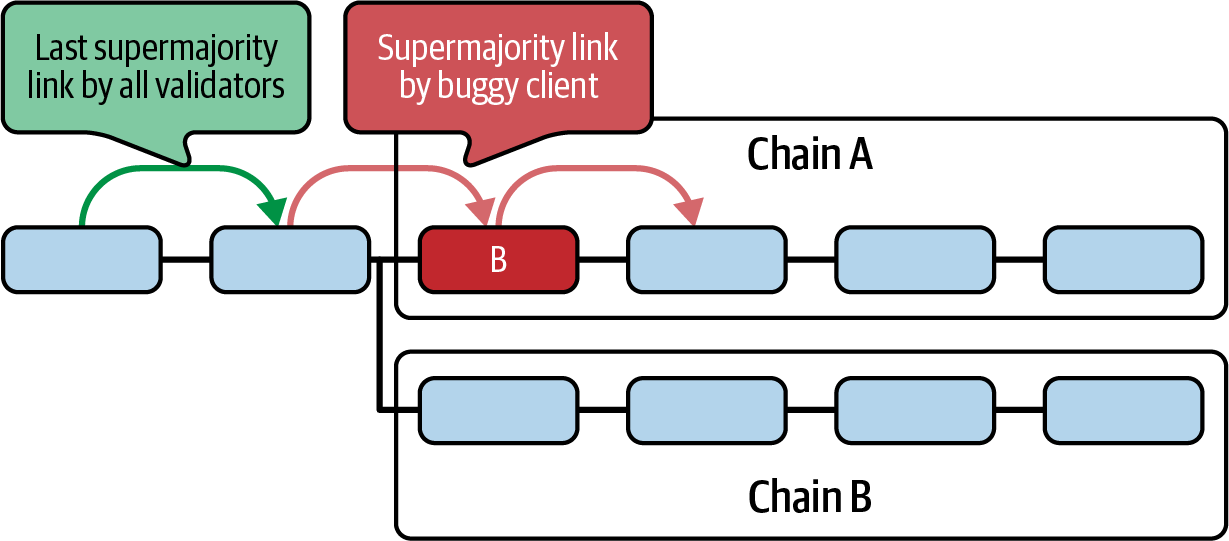
Figure 15-42. Majority client bug scenario
Functional clients disregard the epoch containing the invalid block (labeled "B"). The arrow pointing to block B serves to justify the invalid epoch, while the one coming from it finalizes it.
Assuming the bug is resolved and the validators who finalized the invalid epoch wish to switch back to the correct chain B, a preliminary action required is the justification of epoch X, as shown in Figure 15-43.
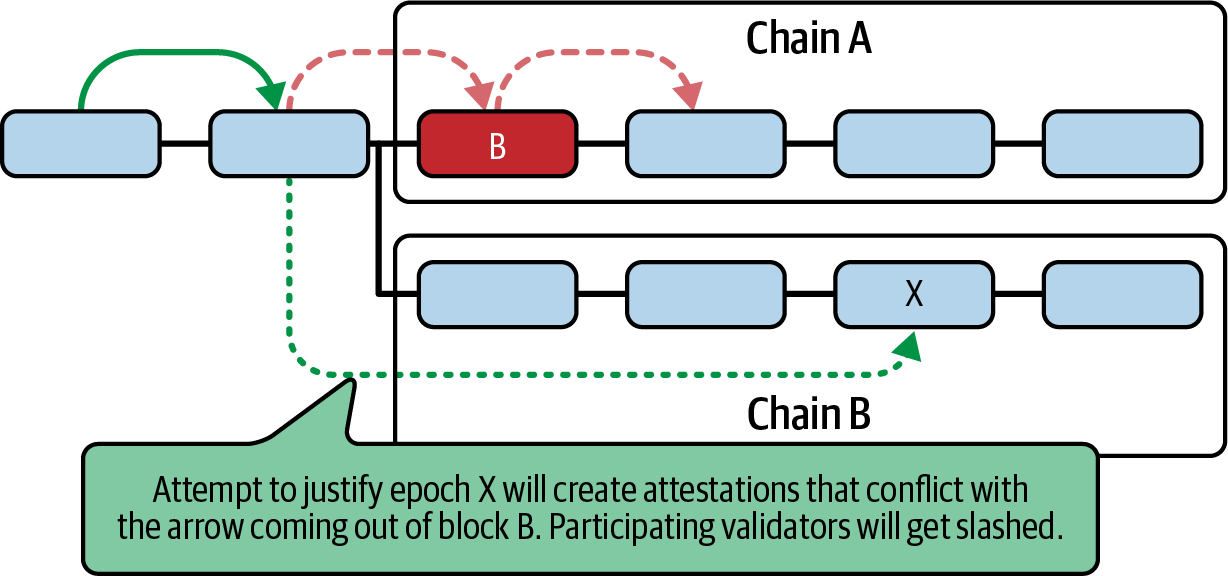
Figure 15-43. Recovery from bug requires justification
To engage in the justification of epoch X, requiring a supermajority link as shown by the dashed arrow, validators must bypass the arrow coming out of block B, which represents the finalization of the invalid epoch. Casting votes for both links could lead to penalties for these validators.
The multiclient approach offers a safety net. If a bug pops up in a client that less than half the network uses, the rest of the network, running other clients, simply ignores the buggy block. This keeps the network on track, minimizing disruption. But if a majority client—especially one used by more than two thirds of validators—introduces a bug, that could wrongly finalize the chain, leading to a potential split.
Ethereum encourages diversifying clients because if everyone used the same client and it failed, the whole network would be at risk. The penalties for running a client that goes against the grain are there to discourage putting all our eggs in one basket. This way, if a client does have a bug, the damage is contained, affecting fewer users. If a minority client causes trouble, it's less of an issue because the majority can correct the path and continue finalizing the chain.
The more we spread out our choices across different clients, the safer Ethereum becomes. It's not just about avoiding technical failures; it's about safeguarding Ethereum's future against any single point of failure. This diversity is our best defense against network-wide crises, ensuring that Ethereum remains robust and resilient no matter what comes its way.
When we first wrote this chapter, the percentage of usage for Geth was 63%, which was a problem, as we explained previously. Right now the situation is more healthy, but it will still need to improve in the future; as of now, 41% of the execution clients are using Geth and 38% are using Nethermind, as shown in Figure 15-44.
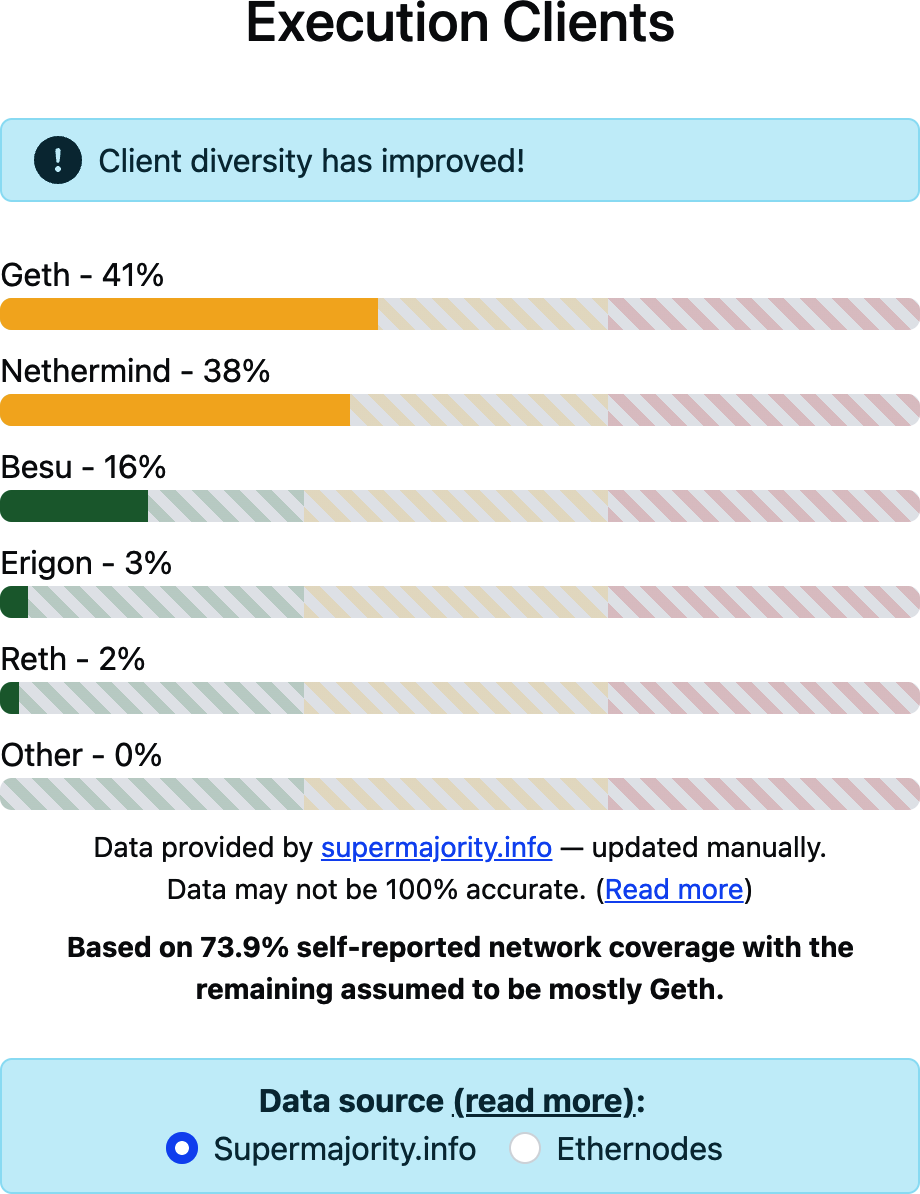
Figure 15-44. Current execution client distribution
This issue affects not only execution clients but also consensus clients, although the problem on the consensus side was quickly addressed, and the situation is now relatively healthy and stable, as shown in Figure 15-45.
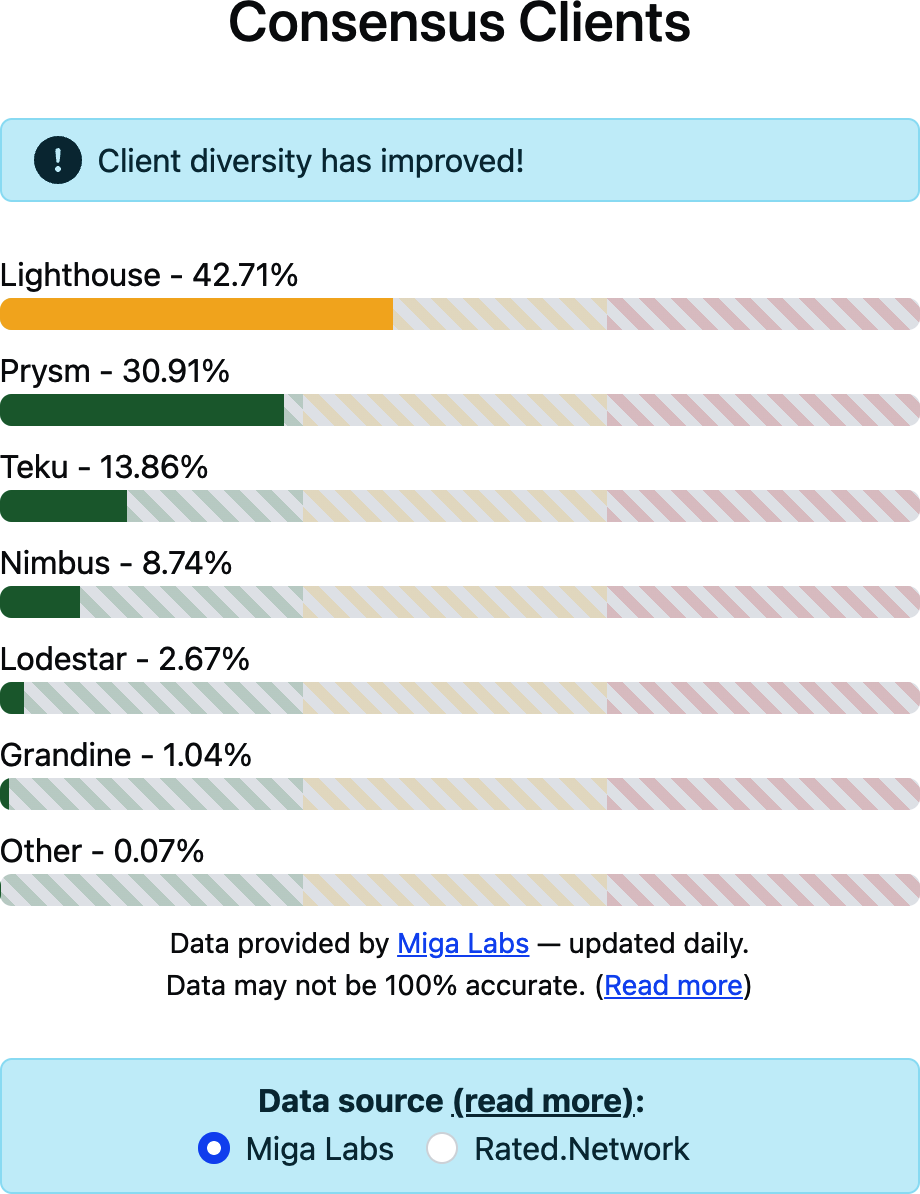
Figure 15-45. Current consensus client distribution
Conclusion
The consensus algorithm is one of the most complicated (and delicate) things in Ethereum. It represents a never-ending journey of innovation and improvement, with ongoing proposals to enhance its functionality and efficiency. Features such as single-slot finality and the ability to increase the max effective balance for validators illustrate the continuous efforts to refine and optimize the system.
Understanding the core principles of consensus provides a solid foundation for appreciating these advancements and their impact on the robustness and scalability of the Ethereum network. As Ethereum evolves, so too will its consensus mechanisms, driving forward the capabilities of this pioneering blockchain technology.
For further reading, we recommend:
- Gasper paper
- Upgrading Ethereum by Ben Edgington
- "Decentralization Is Good or Not? Defending Consensus in Ethereum 2.0"
Chapter 16. Scaling Ethereum
Ethereum is one of the most powerful and widely used blockchain platforms, but as we've seen time and again, success comes with growing pains. Ethereum has become so popular that its base layer is having trouble keeping up, gas fees often get so high that transactions become too expensive, and the system is becoming weighed down by all the data it has to handle. While Ethereum developers have been rolling out upgrades like EIP-1559 (described in Chapter 6), The Merge (the 2022 hard fork that changed the consensus protocol from PoW to PoS), and EIP-4844 (proto-danksharding, described later in this chapter), the fundamental constraints of L1 remain a bottleneck for mass adoption. These improvements help, but they don't eliminate the need for additional scaling solutions like L2 rollups.
Note
L2 rollups are scaling solutions that process transactions off chain and then post a summary (such as a proof or data batch) to Ethereum's Layer 1. This reduces congestion and fees while still relying on Ethereum for security. There are two main types: optimistic rollups (assume valid, challenge if wrong) and zero-knowledge rollups (prove correctness with cryptography). Ethereum essentially becomes a settlement layer, meaning its main role shifts toward verifying proofs, ensuring data availability, and providing ultimate security guarantees for L2 transactions. We will explore rollups in detail in the second part of this chapter.
The Problems of Ethereum's Layer 1
To fully understand Ethereum's scaling challenges, we need to break things down into four major issues: the scalability trilemma, gas costs and network congestion, state growth and storage, and block propagation and MEV. These issues aren't unique to Ethereum—other chains run into the same problems in different forms—but Ethereum's popularity amplifies them. Let's dig into each.
The Scalability Trilemma
Ethereum, like any permissionless blockchain, has three fundamental goals: decentralization, security, and scalability. But here's the problem: improving one of these often means compromising another. This is what Vitalik Buterin calls the scalability trilemma.
Let's break it down:
Decentralization
Decentralization is what makes Ethereum censorship resistant and trustless. Anyone can run a node, validate transactions, and participate in the network without needing permission from a central authority.
Security
Security ensures that Ethereum remains resilient against attacks. Transactions must be irreversible, smart contracts must be immutable, and bad actors should have no easy way to manipulate the system.
Scalability
Scalability is what allows the network to handle thousands or even millions of transactions per second (TPS), making it practical for global adoption.
The challenge is that traditional blockchains like Ethereum are designed to be fully decentralized and secure at the cost of scalability. Every transaction is processed by all nodes, ensuring correctness but also creating a bottleneck.
Why can't we just increase throughput? If we try to speed things up by making blocks larger (so they can hold more transactions), fewer people will be able to run full nodes because the hardware requirements will become too demanding. This could push Ethereum toward centralization, where only a handful of powerful entities control the network—exactly what we're trying to avoid.
Other blockchains, like Solana, have taken a different approach. They've optimized for speed and scalability but at the cost of decentralization, requiring more powerful hardware to run a node. Ethereum has refused to compromise on decentralization, making the challenge of scaling all the more difficult.
PoS, introduced with The Merge, replaced the energy-intensive PoW system. This not only cut Ethereum's energy use dramatically but also reduced the dominance of big players who could afford massive mining setups. While staking introduces new centralization risks, it's still a step toward a more accessible and efficient network. However, PoS brings new challenges, such as the centralization risk posed by large staking pools. Liquid staking solutions help keep staked ETH accessible, but they also concentrate control in the hands of a few platforms. Finding the right balance remains a work in progress.
Gas Costs and Network Congestion
One of the most frustrating experiences for Ethereum users is high gas fees, with transaction costs that fluctuate wildly depending on network demand. How does this happen, and why do fees get so expensive during peak times?
Ethereum transactions require gas, a unit that measures the computational effort needed to execute operations like transfers or smart contract interactions. The more complex the operation, the more gas it requires. Every block has a limited amount of gas it can include, meaning there's competition for block space. When demand is high, users bid against one another, driving fees up.
We've seen this play out in dramatic ways:
CryptoKitties craze (2017)
This was the first real test of Ethereum's limits. A simple game where users could breed and trade digital cats clogged the network so badly that transaction times slowed to a crawl and gas fees soared.
DeFi Summer (2020)
The explosion of DeFi apps like Uniswap and Compound brought massive activity to Ethereum. Traders rushed to make transactions, sometimes paying hundreds of dollars in gas fees to get priority in the mempool.
NFT boom (2021)
NFT drops became gas wars, with people paying thousands just to mint a new digital collectible before someone else did. Some transactions failed despite users spending exorbitant amounts on gas.
Ethereum's Layer 1 wasn't designed to handle this level of demand efficiently. However, the introduction of EIP-1559 in 2021 changed how fees work by introducing variable block sizes and a new gas-pricing mechanism, which reduced spikes in gas fees during periods of high network activity. The rising popularity of L2 solutions has allowed Ethereum to offload a significant portion of its computational burden, further reducing gas fees. More recently, EIP-4844 (proto-danksharding) was rolled out, significantly lowering fees, especially for L2 rollups, and making Ethereum transactions more affordable for users. Despite these improvements, Ethereum's transaction costs remain higher than those of most other blockchains (see Figure 16-1).

Figure 16-1. Gas cost comparison across blockchains
State Growth and Storage Issues
Ethereum isn't just used for transactions; it's a global state machine that continuously tracks account balances, smart contract data, DeFi positions, NFTs, and other on-chain activity. Unlike traditional databases, which can archive or delete old records, Ethereum is designed to retain its full history, ensuring transparency and verifiability. The problem? As Ethereum grows, it needs to store more data, and that storage burden keeps getting heavier.
Right now, the size of Ethereum's state—essentially, the set of all active accounts, contract balances, and storage slots—is growing at an alarming rate. Every new smart contract adds to this state, and every transaction modifies it. Full nodes, which play a crucial role in verifying the network's integrity, must store and constantly update this data. As the state grows, it becomes increasingly difficult for individuals to run full nodes without expensive hardware, leading to concerns about decentralization.
Archival nodes face an even bigger challenge. These nodes store not only the current state but also the entire historical record of Ethereum, including every past transaction and contract execution. The sheer volume of this data reaches into the terabytes, requiring significant storage capacity and bandwidth. The number of people capable of running these nodes is shrinking, raising questions about who will preserve Ethereum's long-term history.
Validators, who are responsible for proposing and attesting to blocks in Ethereum's PoS system, also feel the weight of state growth. To verify transactions efficiently, they need quick access to the latest blockchain state. But as the state expands, accessing and processing this information becomes slower and more expensive. If this trend continues unchecked, we risk creating an environment where only those with high-end hardware can participate in validation, pushing Ethereum toward centralization.
Ethereum developers have explored solutions to curb state bloat, including history expiry and state rent, which we will discuss in detail later in this chapter in "Scaling the L1".
Client diversity also helps. While Geth has historically been the dominant Ethereum client (see Figure 16-2), alternatives like Nethermind, Erigon, and Besu introduce optimizations that improve storage efficiency. Erigon, for example, specializes in handling historical data more efficiently, reducing the burden on full nodes.

Figure 16-2. Ethereum client distribution
Block Propagation and MEV
Even if Ethereum could handle a higher transaction throughput, there's another fundamental bottleneck: the time it takes for new blocks to propagate across the network. The moment a validator produces a new block, that block must be broadcast to thousands of other nodes worldwide. The larger the block, the longer it takes to propagate. And the longer it takes, the higher the chance of network disagreements, or even temporary forks, where different parts of the network momentarily diverge.
PoS has helped reduce these risks, but block-propagation delays still affect performance. Client teams have been working on network optimizations to speed things up, but it's a challenge we'll continue to refine as we scale Ethereum.
There's another issue that lurks beneath the surface: MEV. Even though Ethereum has transitioned to PoS, the name "miner extractable value" has stuck. Today, it's more accurate to call it maximal extractable value, meaning the profit that validators and searchers can make by strategically reordering, including, or excluding transactions in a block.
MEV arises because transactions don't always get processed in the order they're submitted. Instead, validators can prioritize transactions based on their own profit motives. This creates opportunities for sophisticated actors to extract value in ways that disadvantage regular users. High-frequency trading bots scan the mempool (Ethereum's waiting room for transactions yet to be included in a block), searching for profitable opportunities. For example, if someone submits a large trade on a decentralized exchange like Uniswap, bots can jump ahead of them, buying the asset first and selling it back at a higher price. This is known as a sandwich attack, which is a form of front-running, and it's one of the most notorious forms of MEV.
A mitigation that has been running for years is MEV-Boost, a protocol developed by Flashbots that makes MEV more democratic and transparent. However, the long-term fix is a more fundamental redesign: a native implementation of proposer-builder separation (PBS). We'll explore these solutions in more detail in the following section.
Note
MEV is largely absent from most L2 chains because they typically rely on centralized transaction sequencers. A single centralized sequencer usually processes transactions in the exact order they're received, eliminating opportunities for transaction reordering or front-running. While this centralized approach significantly reduces MEV, it does introduce potential trade-offs related to decentralization and censorship resistance. Future L2 developments aim to balance these trade-offs by introducing decentralized sequencing mechanisms.
Solutions
What's being done to overcome Ethereum's scaling challenges? While there's no single, simple fix, developers are actively working on various improvements to make the network faster, cheaper, and better equipped for mass adoption. Let's take a closer look at the main strategies they're exploring.
Scaling the L1
Scaling Ethereum's base layer, Layer 1, is one of the hardest challenges we've faced since day one. The reality is that no single fix will solve everything; scaling isn't a binary switch we can flip. Instead, it's a long-term process: a combination of optimizations that gradually make Ethereum more efficient without sacrificing decentralization or security. While L2 rollups are our best bet for handling the majority of transactions, improving Ethereum's base layer is still important. If we can increase throughput and efficiency at L1, rollups become even more powerful, gas fees drop, and Ethereum stays competitive without resorting to centralization. Let's walk through some of the core ways we're improving Ethereum's base layer.
Raising the gas limit
Ethereum's blocks aren't constrained by the number of transactions they can hold but by how much gas can fit inside each block. This is the gas limit. We can think of it like a budget. Every transaction consumes gas based on its complexity, and the available gas in a block is defined by the EIP-1559 mechanics. Raising the gas limit means we can fit more transactions in each block, effectively increasing Ethereum's throughput.
But it's not as simple as just cranking up the gas limit. Bigger blocks take longer to propagate across the network, making Ethereum more susceptible to chain splits. They also increase hardware requirements for full nodes, pushing us closer to centralization. So increases in gas limit happen gradually and carefully, balancing throughput improvements with network health (see Figure 16-3).
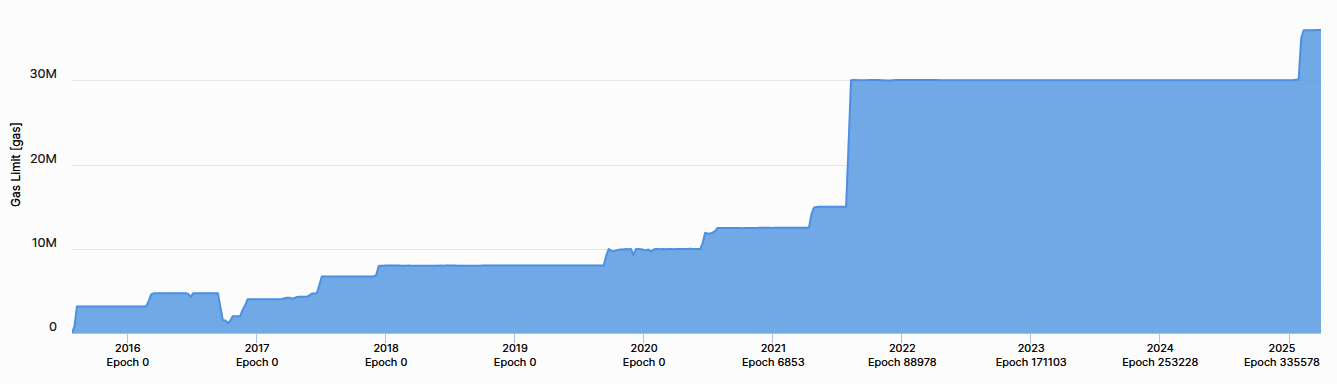
Figure 16-3. Historical gas limit changes
The future of parallel execution in Ethereum
Ethereum processes transactions sequentially because of its shared-state model. This ensures security and consistency but limits scalability since transactions cannot be executed in parallel. In contrast, some newer blockchains like Solana and Aptos have adopted parallel execution, but they rely on more centralized architectures and require validators to use high-performance hardware.
The challenge in Ethereum is that transactions often interact with the same state—for example, two DeFi trades modifying the same liquidity pool. Reordering them without a robust dependency-management system could break smart contract logic. Another complexity is that full nodes must verify all transactions, and introducing parallel execution would require careful synchronization across threads.
Ethereum researchers are actively exploring solutions to introduce partial parallel execution while maintaining decentralization. One approach is stateless execution, which reduces the reliance on full node storage, making transaction processing more efficient. Another is optimistic concurrency, where transactions are assumed to be independent and are rolled back only if conflicts arise. We'll explain these concepts in detail in the second part of this chapter.
Several experimental implementations of parallel EVM have emerged in EVM-compatible chains, including Monad, Polygon PoS, and Shardeum. Monad, for instance, implements an optimistic parallel execution model that achieves more than 10,000 TPS. Polygon PoS has achieved a 1.6x gas throughput increase with its Block-STM approach, allowing for partial parallelization of transactions. These advancements provide valuable insights, but Ethereum must implement parallelization while preserving decentralization, a balance that remains a key challenge. Recent studies suggest that about 64.85% of Ethereum transactions could be parallelized, highlighting significant potential for performance improvements. However, as of March 2025, there is no concrete plan for integrating parallel execution into Ethereum's mainnet. Discussions around parallelizing EVM through end-of-the-block virtual transactions are ongoing, but the complexity of Ethereum's execution model makes implementation challenging. The roadmap for Ethereum's scalability includes continued research into transaction-dependency resolution, alternative execution models, and gradual improvements to EVM efficiency.
State growth and expiry
Ethereum's state, comprising the collection of all account balances, smart contract storage, and other on-chain data, just keeps growing. Every new contract adds more data, and once something is written to Ethereum's state, it stays there forever. This is great for decentralization and verifiability but terrible for scalability. Full nodes must store and process all this data, and as the state gets larger, the cost of running a node increases.
Right now, the Ethereum state size is around 1.2 TB for full nodes, but archival nodes, which store the entire historical state and transaction data, need upward of 21 TB of storage. This massive data footprint makes it increasingly difficult for individuals to run archival nodes, concentrating this role in the hands of a few well-funded entities. It's worth mentioning that Erigon and Reth execution clients are optimized to require less storage, as both need around 2 TB for an archive node.
There's often confusion between state expiry and history expiry, but they address different problems. State expiry aims to reduce the size of Ethereum's actively maintained state by requiring smart contracts to periodically pay rent for the storage they consume. If a contract doesn't pay, it becomes inaccessible until someone explicitly pays to revive it. This would significantly slow state growth and make it easier for full nodes to operate.
History expiry, on the other hand, deals with the sheer size of past transaction data. Instead of forcing every node to store all historical transactions, Ethereum could prune older data, offloading it to external storage solutions. This wouldn't affect the live state but would make historical queries more reliant on third-party data providers. Both approaches have trade-offs, and research is ongoing to determine the best balance between efficiency and accessibility.
To explore this topic further, we recommend looking into EIP-4444, which covers history expiry. As for state expiry, it's still in the research phase, so there's no clear strategy yet, but you can find more information in the Ethereum roadmap.
Proposer-builder separation
MEV has been a persistent issue in Ethereum, even after the transition to PoS. Validators and specialized searchers engage in transaction reordering, front-running, and other strategies to extract profit at the expense of regular users. This isn't just an economic problem; it also affects network health, increasing congestion and making gas fees unpredictable.
PBS is one of the most promising solutions for mitigating MEV. Right now, validators both propose and build blocks, meaning they have full control over transaction ordering. PBS changes this by splitting these roles: validators still propose blocks, but the actual block construction is outsourced to specialized builders through a competitive auction. This removes the direct incentive for validators to engage in MEV extraction and makes transaction inclusion more transparent.
PBS has already been tested in the form of MEV-Boost, which allows validators to outsource block construction to the highest bidder. However, it's important to understand that MEV-Boost and PBS won't eliminate MEV; they will just make it more transparent and fairer. MEV will still exist because the underlying incentives that drive arbitrage, front-running, and sandwich attacks won't go away. What PBS does is ensure that instead of a few insiders benefiting from opaque MEV strategies, the process of capturing MEV is more open, fair, and competitive. In the long run, additional solutions like order-flow auctions, encrypted mempools, and other MEV-mitigation techniques will need to be integrated alongside PBS to further reduce its negative impact.
Rollups
Ethereum has faced persistent challenges with scalability, transaction throughput (measured in TPS), and high fees. To address these issues, the concept of rollups has emerged.
Rollups are mechanisms that execute transactions "off chain" on a dedicated L2, then post aggregated ("rolled up") data or proofs back to the L1 blockchain. Because the heavy lifting of computation and state updates occurs away from L1, the blockchain avoids its usual throughput bottlenecks, thereby increasing transaction speeds and lowering fees. In effect, the rollup's own execution environment handles signature checks, contract execution, and state transitions more efficiently, while L1 remains the authoritative "settlement layer."
Rollups aim to preserve as much of L1's security as possible. The security goals are ensuring data availability, verifying correct state transitions, and providing censorship resistance. Data availability requires all transaction and state information to be accessible so that in the event of a dispute, participants can independently verify the chain's state or safely withdraw funds by relying on data posted to (or guaranteed by) L1. State-transition integrity ensures that changes on L2 are valid according to the network rules, typically through validity proofs (such as zero-knowledge proofs) or fraud proofs. Finally, censorship resistance guarantees that no single entity or small group of participants can indefinitely block or withhold user transactions.
Note
Data availability and validity are essential components of secure rollup implementations, ensuring that malicious actors cannot forge transactions, steal funds, or artificially inflate balances. Data validity typically relies on one of two main approaches. The first approach uses zero-knowledge proofs, where each batch of the L2 transactions comes with a cryptographic proof attesting to correct execution. When this proof is submitted to L1, a smart contract verifies its correctness before accepting the new state root. The second approach uses fraud proofs under an optimistic assumption: the L2 operator posts new states to L1, and anyone can challenge those submissions by providing evidence of wrongdoing. If a fraud proof is upheld, the invalid batch is reversed, and the malicious actor faces penalties.
Beyond validity, data availability ensures that users can always reconstruct the chain if the L2 operator disappears or behaves dishonestly. Different methods exist to achieve this. Some systems store all transaction data directly on L1, often as Ethereum calldata, or more commonly nowadays, blobs, so it remains transparently recorded in blockchain logs. Other designs rely on off-chain data availability layers, specialized networks, or external storage solutions that offer cryptoeconomic incentives for maintaining and providing data. Hybrid approaches may combine both methods: critical information is placed on chain, while less essential data is stored off chain.
Rollups rely on a specialized smart contract deployed on L1 that maintains the canonical state of all L2 accounts. This contract stores a root (commonly a Merkle root) representing the current L2 state, accepts batches of new transactions submitted by designated actors (sometimes called sequencers, aggregators, or operators), and verifies the validity of those batches. Depending on the type of rollup, it may check zero-knowledge proofs or handle fraud proofs to ensure that the state updates are legitimate. In the event of a detected violation (e.g., a successful fraud proof), the contract can revert the invalid batch.
Anyone meeting the rollup's requirements, such as staking a bond, can submit a state update of L2 transactions to the smart contract. This isn't always the case. In fact, as of now, most rollups with the highest transaction volume and total value locked are centralized at the sequencer level. While some rollups have achieved decentralization, for the majority it remains an end goal. Each state update includes the previous state root (to show continuity), a newly proposed state root (reflecting the result of the submitted transactions), and either compressed transaction data or references to it. If the rollup's rules are satisfied (and no valid challenges arise, in the case of optimistic rollups), the contract updates its stored state root to the new one, making it the canonical L2 state.
Different rollups deal with fraud or invalid state updates in distinct ways. Optimistic rollups assume by default that new state updates are correct but provide a challenge window (often lasting several days) for anyone to submit a fraud proof. If a proof is verified, the invalid state update is rolled back, and the malicious submitter's stake is slashed. Meanwhile, zero-knowledge rollups require a zero-knowledge proof to accompany each new state root. Since this proof is verified on chain, the chain immediately knows whether the updates are valid; if the proof is correct, no lengthy challenge period is necessary.
Rollup stages
During their early phases, most rollups retain partial centralized controls, often called training wheels, which allow operators to swiftly intervene in the event of bugs or critical updates. Although this is practical for a new system, true decentralization demands that such training wheels be gradually removed.
To chart this transition, a framework has been proposed, building on Vitalik Buterin's initial milestones, that categorizes rollups into three maturity stages. Each stage indicates how much authority remains in centralized hands and how close the rollup is to inheriting Ethereum's base-layer security.
At stage 0, a rollup calls itself a rollup but is still heavily operator controlled. It posts state roots to L1 and provides data availability on L1, enabling reconstruction of the L2 state if something goes wrong. However, at this point the system's "proof mechanism" (fraud or validity proofs) may not be fully enforced by an on-chain smart contract; operator intervention is the main fallback if errors occur. Essentially, stage 0 ensures the rudiments of a rollup—on-chain data, state roots, and user-facing node software—are in place, but governance remains centralized.
Note
The requirements can change for this three-stage framework. For example, as of this writing (February 2025), Arbitrum is a stage 1 rollup, but with the new requirements, it might become a stage 0 rollup if it does not upgrade the network in time.
Stage 1 rollups need to have a proper proof system (fraud proofs for optimistic rollups or validity proofs for zero-knowledge rollups), and there must be at least five external actors who can submit these proofs. Users should also be able to withdraw or "exit" the system without needing operator cooperation, safeguarding them from censorship. Another criterion is a minimum seven-day exit window for users if they disagree with a proposed system upgrade, although a "Security Council" can still intervene more quickly if a critical bug emerges. This council must be formed via a multisig requiring at least 50% of eight or more signers,1 with half external to the rollup's main organization. While this council can fix bugs or revert malicious transactions, there is still a potential single point of failure.
This was recently modified, and the requirements changed a little bit. We will not analyze the changes in this chapter; see Luca Donno's Medium article for more.
Stage 2 signifies that the rollup is truly decentralized, relying on permissionless proofs and robust user protections.2 The fraud or validity proof system must be open to anyone—no allowlists. A user must have at least 30 days to exit if a governance proposal or an upgrade is introduced, ensuring that they are not coerced into changes. The Security Council's role is strictly limited to on-chain, soundness-related errors, such as contradictory proofs being submitted, rather than broad governance or discretionary power. Thus, at this final stage, human intervention is narrowly scoped, and the rollup is governed mostly by smart contracts and community consensus, closely mirroring Ethereum's ethos of minimal trust.
Stage 2 does not indicate a better UX or more adoption; it just indicates more decentralization.
We want to extend a thank you to everyone involved in developing and updating this framework and anyone involved in analyzing and making public the information about the stages of the rollup; your service is very much appreciated and needed.
Optimistic rollups
Optimistic rollups rely on fraud proofs. The operator posts state roots to the L1 under the assumption that they are valid. Observers, however, retain the option to challenge batches they believe are fraudulent. If the challenge proves correct, the invalid batch is reverted, and the operator is penalized. Since validity is not instantly confirmed, users must often wait through a challenge window, sometimes a week or more, before confidently withdrawing funds or achieving finality. This design results in longer withdrawal times but offers easy compatibility with the EVM and lower proof complexity. Operators do not need to construct zero-knowledge circuits, which simplifies some aspects of running the system. Nonetheless, the delayed withdrawal times can affect the user experience, and there is a possibility of economic attacks if the operator's bond is smaller than the total locked value. Examples of optimistic rollups include Arbitrum, Optimism, Base, and several other projects inspired by the "Optimistic Ethereum" model.
Zero-knowledge rollups
ZK rollups operate on a validity-proof basis. When a provider bundles transactions on L2, it generates cryptographic proofs (often SNARKs or STARKs) attesting to the correctness of state transitions. These proofs are verified on chain, offering near-instant finality because there is no need for an extended challenge window. Users benefit from fast withdrawals since no waiting period is needed to confirm legitimacy. The high security originates from the direct verification of proofs, reducing dependence on watchers or sizable operator stakes. Validating a proof on chain is typically more efficient than processing each transaction individually. However, implementing zero-knowledge proofs for general-purpose EVM computations is computationally expensive, potentially requiring specialized hardware.
The Risk of Zero-Knowledge Proofs
The reality is that bleeding-edge cryptography is risky. Let's take Zcash as an example. Zcash used part of the implementations presented in the paper "Succinct Non-Interactive Zero Knowledge for a von Neumann Architecture", which describes the zk-SNARK construction used in the original launch of Zcash.
In 2018, years after the release of this paper and dozens of peer reviews, Ariel Gabizon, a cryptographer employed by Zcash at the time, discovered a subtle cryptographic flaw that allowed for a counterfeiting vulnerability—essentially a double-spend attack. The vulnerability was fixed in the Zcash Sapling upgrade, and it seems that it was not exploited by anyone, but it had lain dormant in a very public and referenced paper for years before anyone noticed.
In this chapter, we refer to zero-knowledge proofs as being high security and trustworthy. This is generally true, but it's a dangerous assumption if it is never challenged.
Certain zero-knowledge systems also demand a trusted setup3 (common with SNARKs) to generate initial parameters, which carries its own security considerations. Leading ZK-rollup projects include ZKsync, Starknet, Scroll, and Aztec. The latter also incorporates privacy features under the label "ZK-ZK-rollup."
As discussed in Chapter 4.
ZK-rollups were originally well suited for simple tasks like token transfers or swaps but struggled with more complex functionalities. This changed with the emergence of zk-EVM, a development aiming to replicate the entire EVM off chain. By generating proofs for Turing-complete computations, including EVM bytecode execution, zk-EVM expands the scope of ZK rollups, allowing for a broad range of DApps to benefit from both scalability and zero-knowledge-level security.
Projects take different paths to achieve zk-EVM functionality. One method uses a transpiler, which converts Solidity (or other EVM high-level languages) into a circuit-friendly language such as Cairo (used by StarkWare). Another approach directly interprets standard EVM bytecode, opcode by opcode, building circuits that reflect each instruction. Hybrid or multitype solutions adjust parts of the EVM (such as data structures or hashing algorithms) to make them more proof friendly while trying to maintain near-full Ethereum compatibility. We will not further expand on zk-EVMs in this chapter; this will be done in Chapter 17.
Other Types of Scaling Solutions
Optimistic and ZK rollups are not the only kinds of scaling solutions; they are the two main ones that have been adopted for now, but this might change in the future. We will analyze other scaling solutions: briefly for the ones that are old and have less chance of becoming relevant now, and in more depth for the solutions that are upcoming and have a bright future.
Validiums
Validiums do not store transaction data on Ethereum. Instead, they post proofs to Ethereum that verify the state of the L2 chain, as shown in Figure 16-4. Essentially, a validium is a rollup that uses alternative data availability solutions, such as Celestia, Avail, or EigenLayer.
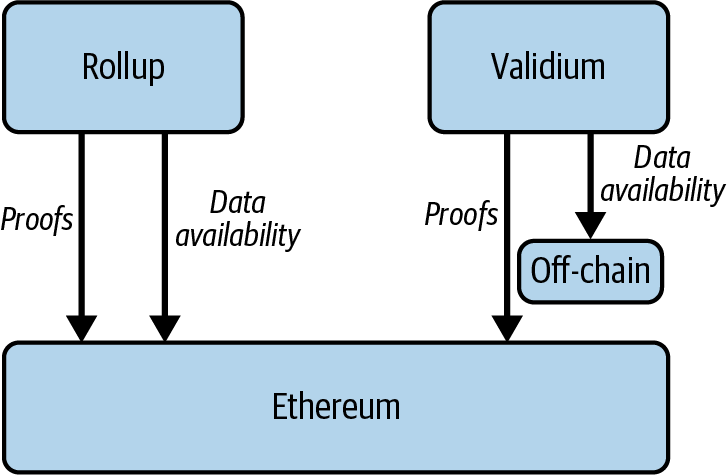
Figure 16-4. Validium architecture
As an L2, a validium does not pay high gas fees associated with storing data on Ethereum. This approach is more cost-effective than rollups, meaning gas fees are much lower for users. However, validiums are typically considered less secure than other rollups since they store transaction data off of Ethereum using solutions such as a data availability committee or alternative data availability solutions.
Sidechains
A sidechain is a blockchain network operating in parallel with another blockchain (called a main chain). Typically, a sidechain connects with the main chain via a two-way bridge that permits transferring of assets and possibly arbitrary data like contract state, Merkle proofs, and results of specific transactions between the two networks.
Most sidechains have their consensus mechanisms and validator sets separate from the main chain. This allows sidechains to settle and finalize transactions without relying on another blockchain. However, it also means that the security of funds bridged to the sidechain depends on the existence of strong cryptoeconomic incentives to discourage malicious behavior among validators.
Based Rollups
Based rollups rely on the native sequencing capabilities of an L1 blockchain. This design enables a seamless integration that leverages L1's decentralization, liveness, and security properties.
Based rollups use a simpler approach to sequencing compared to traditional rollups. While most rollups implement their own sequencers, based rollups tap into the sequencer of the underlying Layer 1. Essentially, the main difference is that the L1 validators are the sequencers for the rollup instead of having an external one, as with optimistic rollups.
The consensus, data availability, and settlement layers are all just Ethereum. The only component built into the rollup itself is the execution layer, which takes responsibility for executing transactions and updating their statuses. This design allows L1 block proposers to directly partner with L2 block builders and searchers to incorporate the next rollup block into the L1 block. Because based sequencing relies solely on the existing Ethereum validation approach, it does not depend on any external consensus.
Note
Based rollups are probably the most promising solution, and they might surpass optimistic rollups in usage. This is mainly because, since the finality is the same as Ethereum itself, there could be atomic transactions between based rollups without the challenge window. For example, DeFi liquidity could be aggregated between based rollups. Earlier, this was possible only on ZK rollups.
Booster Rollups
Booster rollups are rollups that process transactions as if they were directly executed on L1, granting them full access to the L1 state. At the same time, they maintain their own separate storage. In this way, both execution and storage scale at the L2 level, while the L1 framework serves as a shared base. Another way to see this is that each L2 reflects the L1, effectively adding new block space for all L1-deployed apps by sharding transaction execution and storage.
If Ethereum's future demands the use of hundreds or even thousands of rollups to handle the high scalability demands, having each rollup function as an isolated chain, complete with its own rule set and contracts, may not be ideal. Developers would find themselves duplicating code onto each rollup.
Booster rollups, instead, directly add extra block space to any DApp running on L1. Rolling out a booster rollup can be thought of as adding additional CPU cores or more hard drive space to a computer. Whenever an application knows how to leverage multithreading (multirollup, in a blockchain sense), it can automatically make use of that expanded capacity. Developers simply have to consider how best to utilize that extra environment.
Native Rollups
The native rollup proposal introduces the EXECUTE precompile, designed to serve as a verifier for rollup state transitions; this significantly simplifies development of EVM-equivalent rollups by removing the need for complex infrastructure, such as fraud-proof games, SNARK circuits, and security councils. With EXECUTE, you can deploy minimal native and based rollups in just a few lines of Solidity code.
Because this new precompile closely parallels the "EVM in EVM" idea, it will be upgraded through Ethereum's normal hard-fork process, governed by social consensus. This alignment guarantees that updates to the EVM also apply to the precompile, so rollups inherit Ethereum's validation rules without requiring governance structures like security councils or multisigs, ultimately making them more secure for end users.
The EXECUTE precompile validates EVM state transitions, allowing rollups to leverage Ethereum's native infrastructure at the application layer. It checks EVM state transitions using inputs such as pre_state_root, post_state_root, trace, and gas_used while employing an EIP-1559-like mechanism for gas pricing. To enforce correctness, validators may rely on reexecution or SNARK proofs, depending on how each rollup balances scale and complexity. This design, combined with a based rollup approach, where both sequencing and proof systems operate directly under Ethereum, simplifies the creation of "trustless rollups."
Danksharding
Danksharding is Ethereum's latest approach to sharding, offering notable simplifications over earlier designs.
Note
Since we are mentioning sharding for the first time, it makes sense to introduce the concept briefly. Keep in mind that this is a topic that can be researched much more. It is out of the scope for this book, but it's an interesting topic nonetheless.
The base concept of sharding is to split the network into different parts so that each shard can process a subset of transactions and improve performance and costs.
This has already been implemented by other chains in different forms. In Ethereum, we will never actually reach the first, pure idea of sharding that was conceptualized years ago because it's not necessary anymore. The roadmap has gone toward the direction of scaling the L1 in a L2-centric way.
A key difference between Ethereum's recent sharding proposals (both danksharding and proto-danksharding) and most other sharding solutions lies in Ethereum's rollup-centric strategy. Rather than expanding transaction capacity directly, Ethereum sharding focuses on providing more space for large "blobs" of data that the core protocol does not interpret. (As for these blobs, we will explore them in more detail in a later section.) An important requirement for verifying these blobs of data is to check that they remain accessible—that is, they can be retrieved from the network. L2 rollup protocols will then use these data blobs to enable high-throughput transactions, as shown in Figure 16-5.
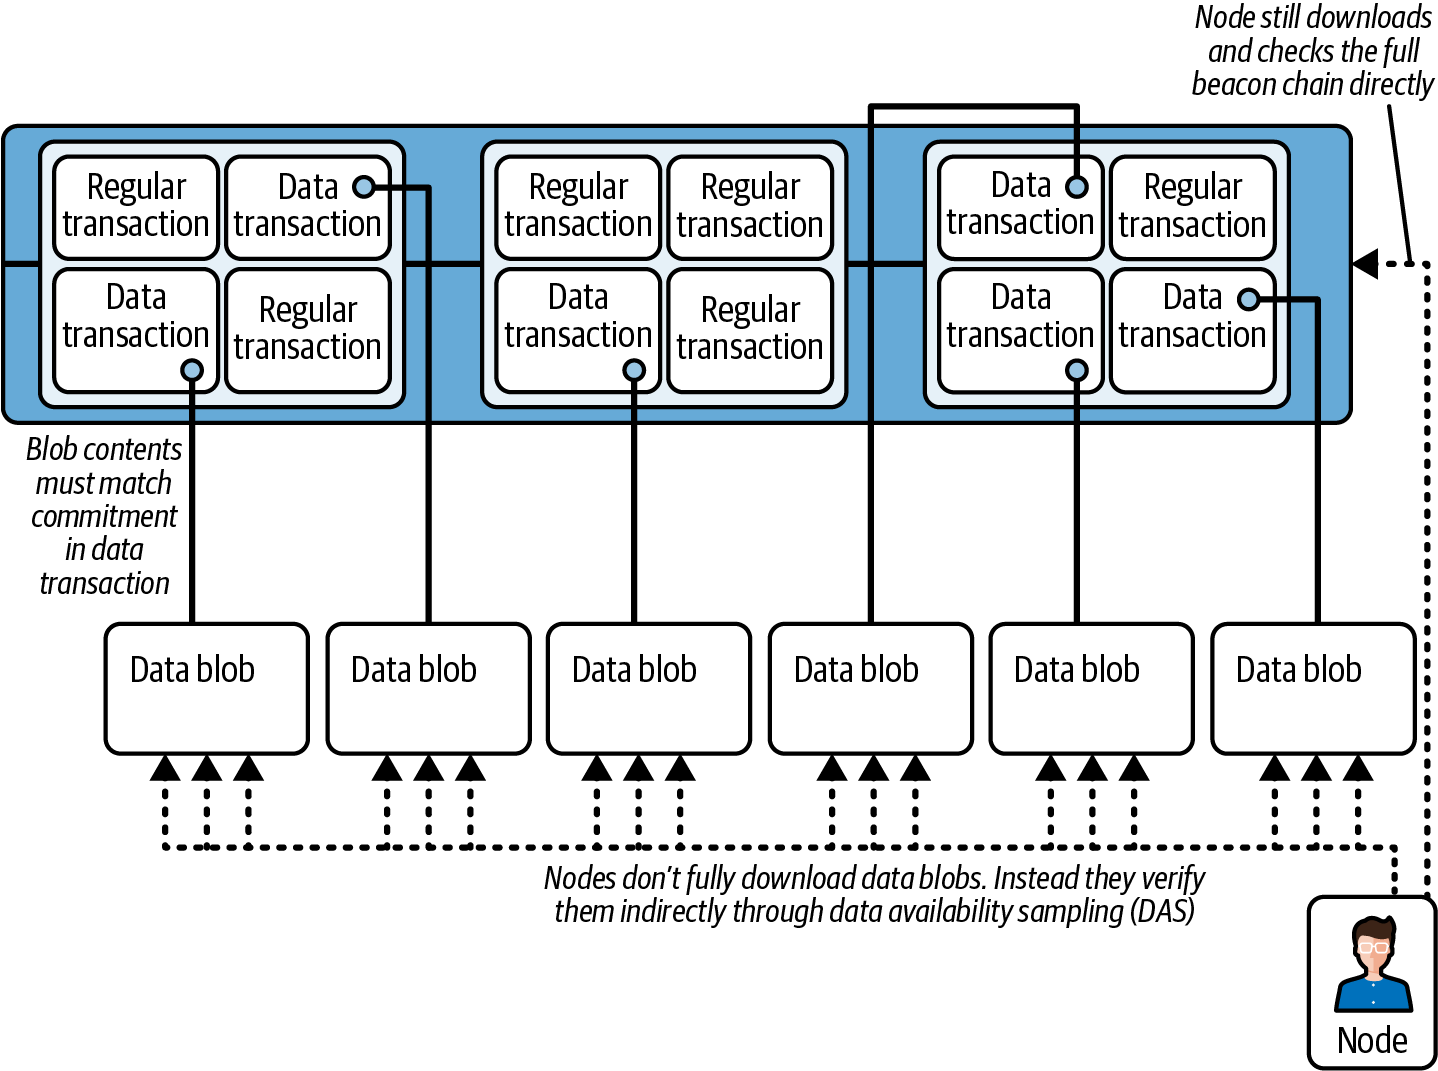
Figure 16-5. Danksharding architecture
Rollups store executed transactions in data blobs and generate a cryptographic "commitment"4 for verification. To create this commitment, they encode the data using a polynomial function. This polynomial can then be evaluated at specific points.
A polynomial commitment is like a short, secure "summary" of a polynomial (a mathematical expression such as f(x) = 2x − 1) that allows you to prove specific values in it without revealing the entire polynomial. Imagine writing down a secret formula and placing it in a locked safe. Later, someone can ask, "What's the result if we set x = 10?" Without opening the safe or showing them your full formula, you can quickly and easily provide proof that the correct answer is a certain number. Polynomial commitments do exactly this but mathematically: they let you securely and efficiently prove the accuracy of specific points (such as x = 10) within a larger mathematical dataset, without exposing all the details. You'll find a more detailed explanation of polynomial commitments in Chapter 4.
For example, consider a simple polynomial function such as f(x) = 2x − 1. Evaluating this function at points x = 1, 2, 3 gives the values 1, 3, 5. A prover independently applies the same polynomial to the original data and checks its values at these points. If the underlying data changes even slightly, the polynomial—and thus, its evaluated values—will no longer match, alerting participants to inconsistencies.
When a rollup posts data in a blob, it also provides a commitment published on chain. This commitment is created by fitting a polynomial to the data and evaluating that polynomial at specific points determined by random numbers produced during the KZG ceremony (discussed in Chapter 4). Provers independently evaluate the polynomial at these same points. If their evaluation matches the commitment values, the data is confirmed to be accurate. In practice, these commitments and their proofs are more complex since they are secured using cryptographic methods to ensure integrity.
Danksharding's main advancement is the introduction of a merged fee market, which is intended to be a combination of the gas fee market and the blob fee market. Rather than having multiple shards, each with its own block and proposer, danksharding designates a single proposer to select all transactions and data for each slot.
To prevent this approach from imposing high hardware requirements on validators, PBS is used. In PBS, specialized "block builders" compete by bidding for the right to assemble the slot's contents, while the proposer merely picks the valid header with the highest bid. Only block builders must handle the full block, and even this step can be decentralized further through specialized oracle protocols. Meanwhile, validators and users can rely on DAS to verify the block—remember, a large portion of the block is just data.
Note
The terms danksharding and proto-danksharding carry the names of the two main figures of the Ethereum Foundation who helped shape this kind of sharding. Dank stands for Dankrad Feist and proto for Protolambda, aka Diederik Loerakker. Both are researchers: Feist works for the Ethereum Foundation, and Loerakker works for OP Labs at the time of writing.
Proto-Danksharding
Proto-danksharding (also known as EIP-4844) proposes implementing most of the foundational logic and infrastructure required for full danksharding, such as transaction formats and verification rules, but without actual DAS.5 Under proto-danksharding, validators and users still directly verify the complete availability of all data blobs.
Data availability sampling is a mechanism for verifying data availability without having to download all the data for a block.
The primary innovation introduced by proto-danksharding is a new transaction type, known as a blob-carrying transaction. These transactions (which we already analyzed in Chapter 6) function similarly to regular transactions but include an extra data component called a blob. Blobs are relatively large (approximately 125 KB) and can be significantly cheaper than an equivalent amount of calldata.6 However, blob data isn't directly accessible by the EVM; the EVM can only access a cryptographic commitment to the blob. The data in these blobs is also automatically deleted after a fixed time period (set to 4,096 epochs at the time of writing, or about 18 days).
Raw data used for storing function arguments passed during external calls in the EVM.
Because validators and clients must still download the complete contents of each blob, proto-danksharding limits data bandwidth to around 1 MB per slot. Despite this restriction, proto-danksharding still offers substantial scalability benefits since blob data does not compete directly with the gas costs of standard Ethereum transactions.
A few questions might arise after you read this.
Why is it OK to delete blobs data after 18 days? How would users access older blobs?
Rollups publish cryptographic commitments to their transaction data on chain and simultaneously make the underlying transaction data available through data blobs. This arrangement allows independent provers to verify the accuracy of commitments or challenge incorrect data if necessary. At the network level, consensus clients temporarily store these data blobs and attest that the data has been propagated and made available across the Ethereum network. To prevent nodes from becoming excessively large and resource intensive over time, this data is automatically pruned after 18 days. The attestations provided by consensus clients guarantee that provers had adequate time and access to verify or challenge data during this period. After pruning, the actual data can continue to be stored off chain by rollup operators, users, or other third parties.
There are several practical methods for storing and making historical data easily accessible in the long term. For instance, application-specific protocols (such as individual rollups) can require their own nodes to retain the historical data relevant specifically to their applications. Since historical data loss poses no risk to Ethereum itself, only to individual applications, it makes sense for each application to independently manage its data storage. Other potential solutions include using decentralized systems like BitTorrent—for instance, to regularly generate and distribute daily snapshots of blob data—or leveraging Ethereum's Portal Network, which can be expanded to support historical data storage. Additionally, services such as block explorers, API providers, or third-party indexing platforms like The Graph are likely to maintain comprehensive archives. Finally, individual researchers, hobbyists, or academic institutions conducting data analysis could also keep complete historical records locally, benefiting from the convenience and performance gains of direct access to the data.
Wouldn't it be better to reduce the costs in the normal transaction's calldata instead of having 1 MB bandwidth per slot dedicated to blobs?
The issue here relates to the difference between the average load on the Ethereum network and its worst-case (peak) load. Currently, Ethereum blocks average about 90 KB, although the theoretical maximum block size, achieved if all 36 million gas in a block were used entirely for calldata,7 is approximately 2 MB. Ethereum has occasionally processed blocks nearing this maximum size without major issues. However, if we simply lowered the gas cost of calldata tenfold while the average block size remained manageable, the potential worst-case block size would surge to around 20 MB, overwhelming the Ethereum network.
Calldata refers to the portion of a transaction containing data that isn't executed directly but is posted on chain primarily for record-keeping and verification purposes.
Ethereum's current gas-pricing model makes it difficult to separately manage average-load and worst-case scenarios because the ratio between these two depends on how users distribute their gas expenditure across calldata and other resources. As a result, Ethereum must price gas based on worst-case scenarios, artificially limiting average load below what the network can comfortably support. By introducing a multidimensional fee market, where gas pricing explicitly distinguishes between different resource types, we can better align average network usage with its actual capacity, safely accommodating more data per block. Proto-danksharding and EIP-4488 are two proposals designed specifically to address this issue by improving Ethereum's gas-pricing model.
Warning
EIP-4488 should not be confused with EIP-4844 (thanks for the not-at-all confusing numbers in these EIPs). EIP-4488 is an earlier, simpler attempt to solve the same problem of average-case/worst-case load mismatch. It is currently stagnant, so it will probably never be implemented. EIP-4844, on the other hand, is already live.
An ulterior motive is that the end goal is to allow nodes to not download all the blobs of data. This is possible with blobs but can't be done with calldata.
Tip
You may have many more questions. For answers, see the full listing of further readings at the end of this chapter.
Stateless Ethereum
The ability to run Ethereum nodes on modest hardware is crucial for achieving genuine decentralization. This is because operating a node enables users to independently verify blockchain information through cryptographic checks rather than relying on third parties. Running a node also allows users to submit transactions directly to Ethereum's P2P network without intermediaries. If these benefits are limited only to users with expensive equipment, true decentralization cannot be achieved. Therefore, Ethereum nodes must have minimal processing and memory requirements, ideally capable of running on everyday hardware like mobile phones, microcomputers, or inconspicuously on home computers.
Today, high disk space requirements are the primary obstacle preventing widespread access to Ethereum node operation. The main reason for this is the need to store Ethereum's extensive state data, which is important for correctly processing new blocks and transactions.
While cheaper hard drives can store older data, they are typically too slow to manage incoming blocks efficiently. Merely making storage cheaper or more efficient offers only temporary relief because Ethereum's state data growth is effectively unbounded; storage needs will continuously increase, forcing technological improvements to constantly keep pace. A more sustainable approach involves developing new client methods for verifying blocks and transactions that don't rely on retrieving data from local storage.
The term statelessness can be somewhat misleading since it doesn't actually eliminate the concept of state entirely. Rather, it changes how Ethereum nodes manage state data. There are two main types of statelessness: weak and strong. Weak statelessness allows most nodes to operate without storing state data by shifting that responsibility to a limited number of specialized nodes. In contrast, strong statelessness removes the requirement for any node to store the complete state data altogether.
Tip
In the following subsections, we will explain weak statelessness and strong statelessness. It is also worth mentioning that these are not the only ways to reach a "stateless Ethereum," as we just said; statelessness here basically means changing how Ethereum nodes manage state data. Another way to do it is with light clients like Helios. Helios converts an untrusted, centralized RPC endpoint into a safe, nonmanipulable, local RPC for its users. It is light enough to be run on mobile devices and requires very little storage.
Weak Statelessness
Weak statelessness, briefly mentioned in Chapter 14, involves changes to how Ethereum nodes verify state updates but does not entirely eliminate the necessity for state storage across the network. Instead, it places the responsibility of storing the complete state data onto specialized nodes known as block proposers or builders. All other nodes on the network can then verify blocks without needing to maintain the full state data locally. Under weak statelessness, creating (proposing) new blocks requires full access to Ethereum's state data, whereas verifying these blocks can be done without storing any state data at all.
Implementing weak statelessness depends on Ethereum clients adopting a new data structure known as Verkle trees (covered in greater detail in the next section). Verkle trees replace Ethereum's current state storage structures and enable the creation of small, fixed-size witnesses8 that nodes exchange to verify blocks without referencing local databases. Additionally, PBS is necessary since it allows block builders—specialized nodes with stronger hardware—to handle the intensive task of maintaining full state data, while regular nodes operate statelessly.
Verifying a block means reexecuting its transactions, updating Ethereum's state, and confirming that the computed state root matches the one provided by the block proposer. Ethereum clients currently require the entire state trie, stored locally, to verify blocks. A witness includes only the necessary parts of the state data required to execute a block's transactions. However, using traditional Merkle trees, these witnesses become too large, making it difficult for nodes to download and process them quickly within Ethereum's 12-second slot time. This limitation favors nodes with fast internet connections, leading to centralization. Verkle trees solve this by significantly reducing witness sizes, enabling stateless verification without requiring local storage of the state.
Verkle Trees
The term Verkle tree combines "vector commitment" and "Merkle tree" (which we explained in Chapter 14). Verkle trees are essential for enabling stateless Ethereum clients, which verify blocks without storing the entire Ethereum state locally. Instead, these clients rely on witnesses,9 accompanied by cryptographic proofs confirming their validity. Small witness sizes are critical because witnesses must be efficiently distributed and processed by nodes within Ethereum's 12-second slots. The current Merkle-based state data structure produces overly large witnesses, making it unsuitable for stateless verification. Verkle trees address this issue by significantly reducing witness sizes.
Witnesses are compact collections of state data necessary to execute a block's transactions.
Just as the name indicates, Verkle trees use vector commitments: namely, KZG polynomial commitments, which are cryptographic commitments allowing efficient proof of data values at specific positions within a large dataset without revealing the whole dataset. They scale much better and have a faster computation than hashes that are currently used in Merkle trees, as shown in Figure 16-6. In Merkle trees, we have only the Merkle root (hash), while in Verkle trees, we also have the vector commitment.

Figure 16-6. Merkle tree versus Verkle tree
With only the hash, we are unable to prove that a certain element is present in a specific location in a certain vector of values; you need to pass the whole vector. But with a vector commitment and an opening—a small portion of the whole vector of values—it is possible to prove that a certain element exists in that specific location.
Merkle trees allow Ethereum nodes to verify small parts of data without downloading the entire blockchain. However, when Merkle trees become very large, the size of the proof (the information needed to verify data) also grows significantly. These large proofs slow the network and make it difficult to maintain efficiency as Ethereum continues to scale, as shown in Figure 16-7.
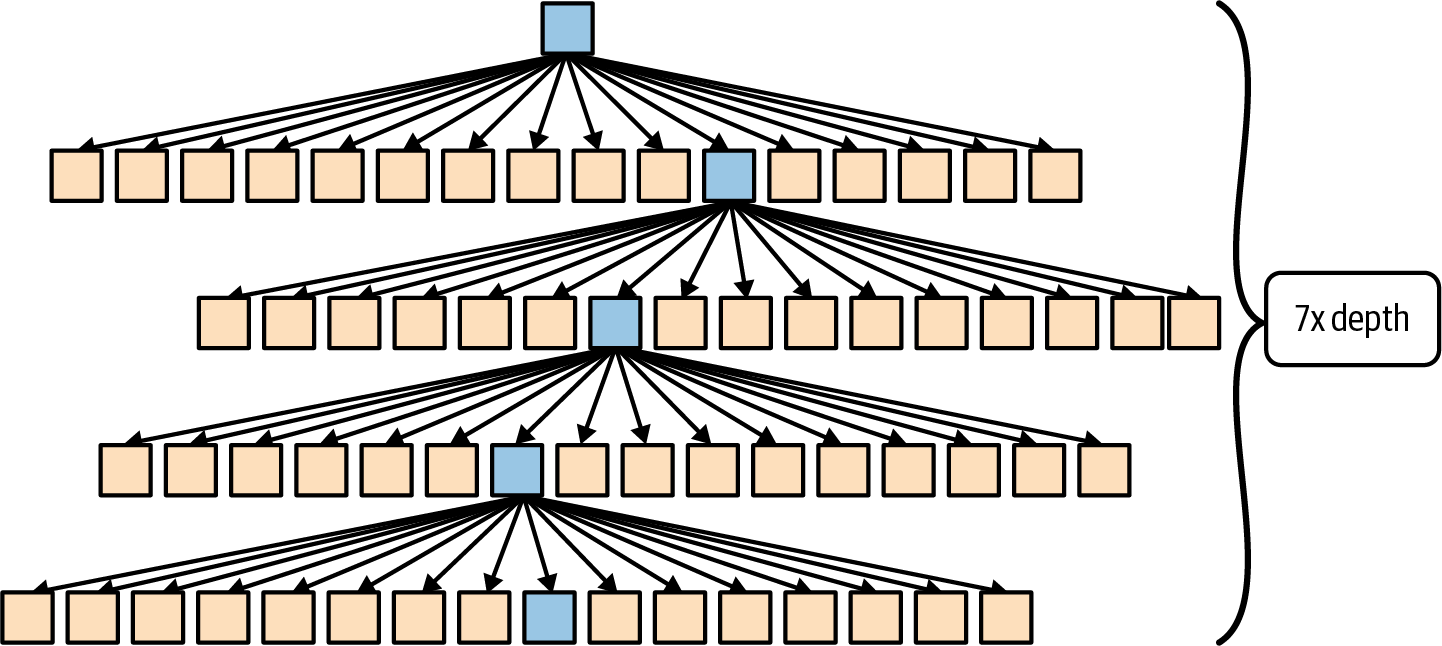
Figure 16-7. Merkle tree proof size
To prove that a specific leaf X is present in this Merkle tree, it is mandatory to pass all the siblings of a given node along the path; this is because the hash would not make sense without this piece of data.
Verkle trees address this issue by significantly reducing the size of these proofs. Instead of having proofs that get larger as the amount of data increases, Verkle trees use a cryptographic method called vector commitments. Vector commitments allow you to prove large amounts of data with very short, compact proofs. This means that even if Ethereum's blockchain gets bigger, the proofs stay small and efficient, as shown in Figure 16-8.
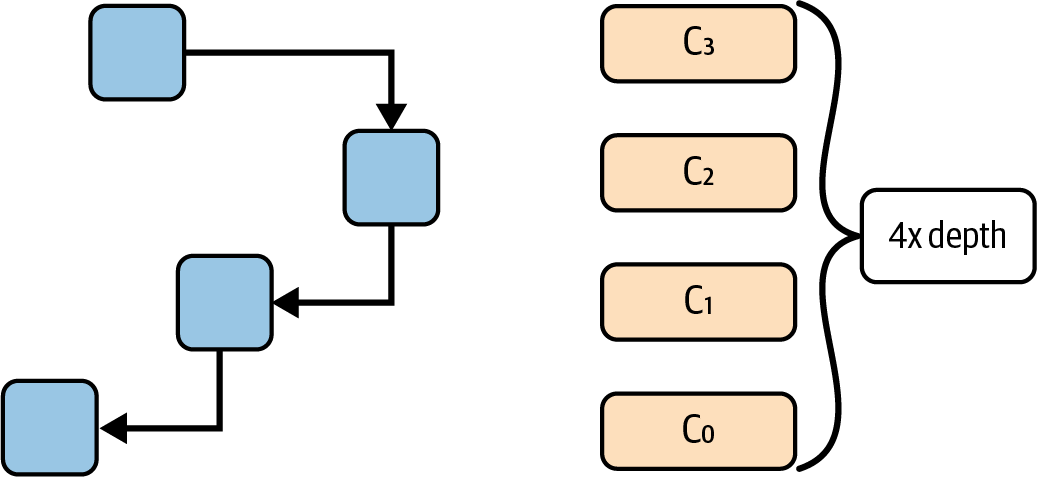
Figure 16-8. Verkle tree proof size
By utilizing the vector commitments analyzed before, we can avoid unnecessary data and reduce the proof size for the Verkle tree significantly.
The proof size for a Merkle tree is as follows (note that the proof sizes are calculated based on Figures 16-5 and 16-6):
- Leaf data plus 15 siblings (unnecessary data sent for every level of depth, 32 bytes for each sibling) multiplied by the seven levels of depth = 3.58 MB for one thousand leaves
The proof size for a Verkle tree is much smaller:
- Leaf data plus a commitment (32 bytes) plus a value (32 bytes) plus an index (1 byte) multiplied by the four levels of depth plus some small constant-size data = 150 KB for one thousand leaves
One small question that might arise after this explanation is: why did we account for seven levels of depth for the Merkle tree and only four for the Verkle tree? The answer is very simple: Merkle trees' nodes have only 15 siblings, while Verkle trees' nodes have 255. Since the width for each level is much larger with the same depth, we can store much more data in the Verkle trees.
A Verkle tree organizes data into (key, value) pairs, where each key is 32 bytes consisting of a 31-byte "stem" and a single-byte "suffix," as shown in Figure 16-9. The key scheme is designed this way so that storage locations that are close have the same stem and a different suffix, making it cheaper to access "neighboring" storage positions.
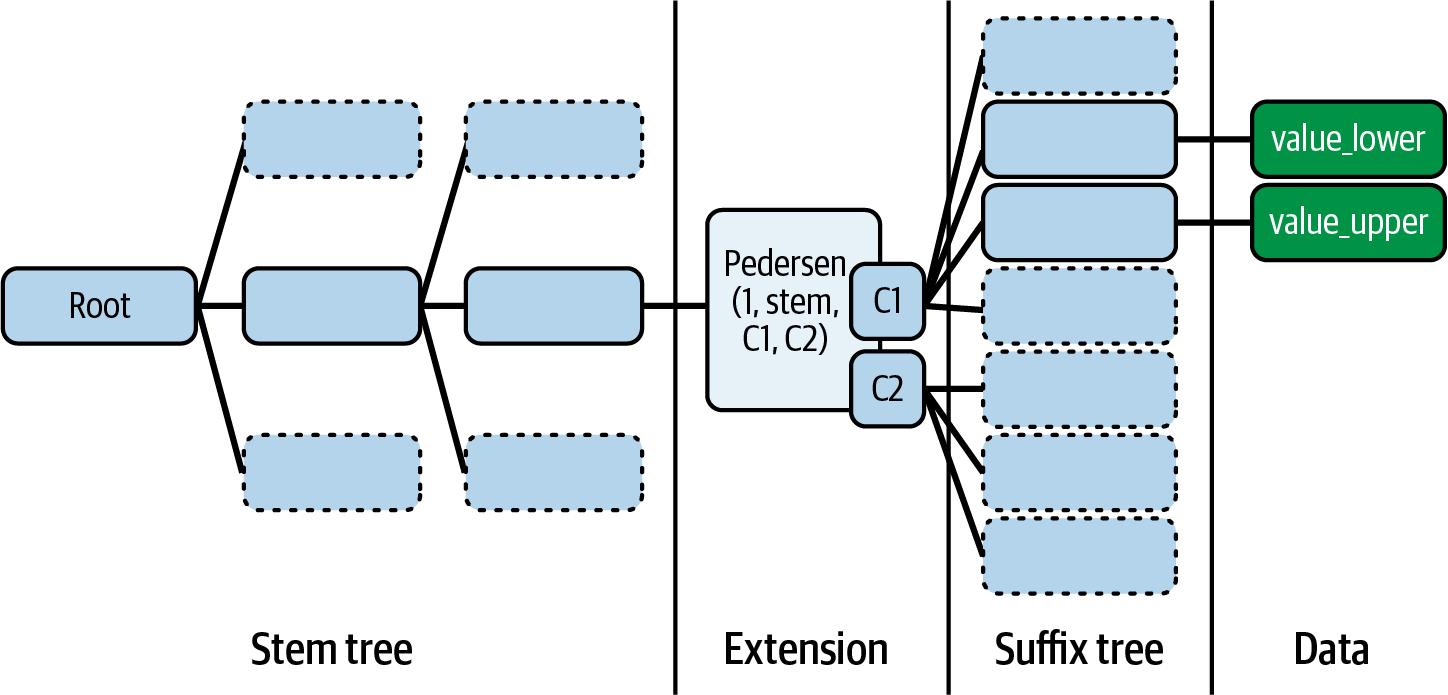
Figure 16-9. Verkle tree key structure
These keys are structured into three types of nodes:
- Extension (or leaf) nodes representing one stem with up to 256 different suffixes
- Inner nodes containing up to 256 child nodes, potentially including other extension nodes
- Empty nodes
To build a complete Verkle tree, you start from the leaf nodes and compute the polynomial commitments progressively upward (bottom-up) until you reach the top-level or root commitment. This root commitment succinctly represents the entire tree's data, allowing nodes to verify blockchain data quickly by only referencing this single root commitment. When a node needs to verify specific blockchain data, such as a user's account balance or transaction validity, it obtains this known root commitment along with a very small cryptographic proof, typically just a few hundred bytes.
Strong Statelessness
Strong statelessness eliminates the requirement for nodes to store any state data whatsoever. In this model, transactions include small witnesses that can be aggregated by block producers. These producers then need to store only the minimal amount of state necessary to generate witnesses for frequently accessed accounts. This shifts most of the responsibility for state management to the users themselves since users must provide these witnesses and specify precisely which accounts and storage keys their transactions interact with through access lists. While this approach would enable nodes to become extremely lightweight, it introduces certain trade-offs, notably increasing complexity and difficulty when interacting with smart contracts.
Strong statelessness has been explored in research, but it is currently not planned for Ethereum's immediate roadmap. Ethereum is more likely to pursue weak statelessness since it appears sufficient to meet the network's scaling objectives for the foreseeable future.
Conclusion
Ethereum's approach to scaling isn't just about making things faster; it's about upgrading the whole system without sacrificing what makes it trustworthy: decentralization and security. Instead of quick fixes, Ethereum is using rollups and danksharding, and it is aiming for statelessness to build a layered system while continuing to improve the Layer 1. In this setup, L2 networks handle most of the execution work but still rely on Ethereum's base layer for security and final settlement. It's a thoughtful, modular path forward that keeps core values intact while laying the groundwork for long-term growth and innovation.
For more, please see the following readings:
- Danksharding proposal
- Proto-danksharding proposal
- EIP-4844
- Danksharding (easily comprehensible for anyone)
- EIP-4488
- Verkle trees for statelessness
- Verkle proofs
- Verkle tree EIP
- Verkle tree structure
- Pairing-based cryptography report to better understand the BLS12-318 curve
- BLS12-318 explained "simply"
Chapter 17. Zero-Knowledge Proofs
In this chapter, we'll explore the fascinating world of zero-knowledge cryptography and see how it perfectly applies to the Ethereum roadmap, making it possible to really scale and accommodate mass-adoption demand for block space. Zero-knowledge technology is a very complex topic and relies on lots of mathematical rules that we won't be able to explain in detail. The goal of this chapter is to make sure you can understand why zero-knowledge cryptography offers a unique opportunity for Ethereum and fits well into the scaling roadmap. By the end of the chapter, you'll know how zero-knowledge cryptography works on a high level, what its useful properties are, and how Ethereum is going to use it to improve the protocol.
History
Zero-knowledge proofs were introduced in the paper "The Knowledge Complexity of Interactive Proof-Systems" by Shafi Goldwasser, Silvio Micali, and Charles Rackoff in 1985, where they describe a zero-knowledge proof as a way to prove to another party that you know something is true without revealing any information besides the fact that your statement is actually true. Even though zero-knowledge proofs were discovered in the 1980s, their practical use cases were very limited. Everything changed in 2011 with the arrival of the BIT+11 paper that introduced SNARKs (succinct noninteractive arguments of knowledge) as a theoretical framework for creating zero-knowledge proofs for arbitrary computations. Two years later, in 2013, the Pinocchio PGHR13 paper provided the first practical implementation of a general-purpose SNARK, making SNARKs feasible for real-world applications. For the first time, it was possible to prove that a generic program had been executed correctly without having to reexecute it and without revealing the actual computation details.
The revolution had started. From that moment on, the field of zero-knowledge proofs evolved at an impressively rapid pace. In 2016, the Groth16 algorithm significantly improved the efficiency of zk-SNARKs by reducing proof size and verification time. Because of its exceptional succinctness, Groth16 remains widely used today, despite the availability of newer systems. For example, Tornado Cash, a decentralized mixer application, uses it to implement zero-knowledge proofs on chain.
In 2017, Bulletproofs introduced a groundbreaking advancement by eliminating the need for a trusted setup (in later sections, we'll do a deep dive into what a trusted setup actually is), though at the cost of larger proof sizes. This was followed in 2018 by zk-STARKs, which not only removed the requirement for trusted setups but also provided postquantum security—meaning their cryptographic foundations are resistant to attacks from quantum computers. The former is used nowadays in the cryptocurrency project Monero to obfuscate transaction amounts, while the latter forms the cryptographic basis of Starknet, an Ethereum L2.
In 2019, PLONK and Sonic made significant contributions by introducing universal and updatable trusted setups, which made SNARKs more flexible and practical for general-purpose applications. These innovations continue to influence modern zero-knowledge systems.
Zero-knowledge proofs remain in active development, with recent advances bringing improvements in proving time, recursion efficiency, and practical applications like zk-EVMs and modern zk-VMs. New constructions and optimizations continue to emerge regularly, pushing the boundaries of what's possible with zero-knowledge technology.
That's a reality mostly thanks to the money brought by the cryptocurrency space. The Ethereum Foundation itself has contributed (and still contributes) by providing multiple grants and having dedicated teams research the topic.
Definition and Properties
Now, let's be more specific and define what a zero-knowledge proof is and which properties it must have. We've already said that a zero-knowledge proof is a protocol that lets a party—usually called the prover, P—prove to another party—usually called the verifier, V—that a statement is true without revealing anything apart from the fact that that specific statement is true.
Let's formalize some important definitions:
Statement
The claim being proven. The statement is public and verifiable by anyone, and it doesn't include private information.
Witness
The secret information that proves the statement is true. The witness is known only by the prover.
Proof
The cryptographic object that convinces a verifier that the statement is true without revealing the witness.
All zero-knowledge proof systems must adhere to the following three properties:
Completeness
If the prover P holds a true statement, then it must be able to compute a valid zero-knowledge proof by following the protocol rules. There cannot be a case where a prover is not able to produce a valid proof if it's following all the rules correctly.
Soundness
It must be infeasible for any malicious prover to forge a valid proof for a false statement. If a zero-knowledge proof is accepted by a verifier, the only way the prover must have created it is by following all the protocol rules accordingly, starting with a true statement.
Zero knowledge
As the name suggests, a verifier shouldn't get to know anything other than the validity of the initial statement while following the protocol.
How Ethereum Uses Zero-Knowledge Proofs
You may wonder why this very new piece of cryptography is important for the future development and roadmap of Ethereum. The answer is actually pretty straightforward.
The real power of zero-knowledge proof systems, in the context of Ethereum, is that they enable the possibility of verifying the validity of a statement without having to perform all the computations needed to get to that final statement. First, a prover computes a certain statement and attaches a zero-knowledge proof to it; then, all verifiers can simply use the zero-knowledge protocol and trustlessly take that statement as true, without needing to do the same computation that the prover did.
A careful reader may have already spotted where this perfectly applies to Ethereum: block execution and state updates—in other words, the EVM state transition function. Every new block updates the current state by processing all transactions included into it. Figure 17-1 shows a good representation of this.
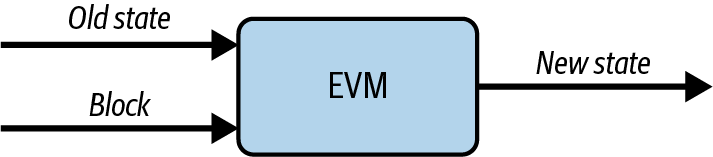
Figure 17-1. EVM state transition function
You can think of the EVM as a black box that takes in as input the current state of the blockchain and the new received block full of transactions, and then returns the new, updated state of the chain. Right now, when an Ethereum full node receives a new block, it reexecutes all the transactions contained in that block so that it can trustlessly update the state without having to rely on any trusted third party. The main issue with this approach is that block execution becomes a potential bottleneck because it's very load intensive. You end up having to balance the hardware requirements that a full node must adhere to in order to work fine and be up to date with the tip of the chain with the level of decentralization that you want to have in the network. The more you want to scale by pushing the requirements of a full node higher, the more you compromise decentralization because less sophisticated actors cannot economically sustain running a full node anymore. And vice versa: the lower you keep hardware requirements so that anyone can run a node, the more you're limited in terms of maximal throughput that your blockchain can handle. Ethereum has always preferred the decentralization branch of this trade-off, keeping hardware requirements low enough to allow for solo stakers and full node runners to exist.
Here is where zero-knowledge proof systems come into play. What if there is a way for a full node to trustlessly update its state without having to execute any transaction—basically not having to perform the heavy computation of the EVM state transition function? This idea can be summarized in the following example:
- Some actors perform the actual EVM computation by executing all transactions included into a new block and producing the updated state of the chain.
- These actors create a zero-knowledge proof that attests to the validity of the state and share it, together with the new updated state, to all full nodes.
- When all other full nodes receive the new state of the chain and the zero-knowledge proof, they just verify the validity of the proof, and if it's valid, they can trustlessly update their own states of the chain with the new state they have just received.
This way, you still need to have nodes—probably maintained by heavily financed companies—that do need to execute all transactions, but all other nodes can be cheap since they only need to verify a proof. You can bump hardware requirements really high for the first type of nodes so that you can handle a much bigger throughput and still have a high level of decentralization thanks to the "magic" of zero-knowledge proofs.
As of now, we have always assumed that generating a zero-knowledge proof and verifying it is fast and straightforward. In fact, the previous steps only make sense if verifying a zero-knowledge proof is faster than reexecuting all of the transactions contained in an average Ethereum block. And it turns out that today, it's quite hard to achieve such a property. But that's an optimization problem: it's just a matter of when, not if. We'll soon reach the point where it will be feasible to generate and verify a zero-knowledge proof for an Ethereum block in real time. Ethproofs is a very cool website to follow if you're interested in the development of this topic.
L2s Also Benefit from ZK
The Ethereum mainnet is not the only thing that benefits from zero-knowledge proof technology. In fact, as you may have already read in Chapter 16, there is a category of rollups called ZK rollups. As the name suggests, they use zero-knowledge proof systems to prove the EVM execution so that they can post state updates of their chains, attached with a zero-knowledge proof that ensures that the new state has been computed correctly.
You may wonder how ZK rollups are able to use zero-knowledge technology if, as we previously said, it's currently not possible to achieve real-time proving for average Ethereum blocks. The answer is that they don't; they don't even need to do real-time proving for each block of the L2. Usually, they post an aggregate zero-knowledge proof once every hour or so that proves that all the state updates that happened between the last one and the most recent one have been executed correctly.
The time elapsed between every zero-knowledge proof only affects the time to finality of the rollup itself. If a proof is posted once every hour, that means that on average, you need to wait 30 minutes to be able to consider your transaction really finalized (on the L1).
A Small Example
To become more familiar with how zero-knowledge proof systems work, let's start with a simple and small example: the partition problem. This is a well-known problem that consists of the task of "deciding whether a given multiset S of positive integers can be partitioned into two subsets S1 and S2 such that the sum of the numbers in S1 equals the sum of the numbers in S2."
Note
The partition problem is a decision problem, whereas Ethereum relies on zero-knowledge proofs to verify computation traces. Although Ethereum's primary use case for zero-knowledge proofs is execution-trace verification, working through the partition problem is still an excellent way to build your intuition about how zero-knowledge proof systems work.
If we have S = [1, 1, 5, 7], we can satisfy the problem by partitioning it into S1 = [1, 1, 5] and S2 = [7]. But it's not always possible to generate a correct solution to this problem; in fact, if S = [1, 1, 5, 8], then it's impossible to partition it into two subsets that sum up to the same number.
The partition problem is NP-complete, meaning that an algorithm doesn't exist that can solve it in polynomial time—that is, providing a solution if there is one or proving the solution doesn't exist in a small amount of time.
Let's Prove It
The structure of the partition problem perfectly applies to the properties of zero-knowledge proof systems we have seen so far. In fact, since it's hard to find a solution, it could be interesting to delegate the computational power of finding it to a rich prover, equipped with a supercomputer, and then use zero-knowledge technology to prove that it found a valid solution without having everyone else perform the same heavy computation but also without actually revealing that solution.
To make the partition problem suitable for zero-knowledge proof systems, we need to tweak it a little bit. Suppose we have a list s of positive integers. We'll say that another list a is a satisfying assignment if:
len(s) == len(a)- All elements of
aare 1 or –1 - The dot product between
sandais 0
Note that this construction is completely analogous to the partition problem. If we take our previous initial list S = [1, 1, 5, 7], then the satisfying assignment a is equal to:
a = [1, 1, 1, –1]
You can manually check that all three conditions are true:
len(s) = 4 == len(a) = 4- All elements of
aare 1 or –1 - Dot product: 1 × 1 + 1 × 1 + 1 × 5 + (–1) × 7 = 1 + 1 + 5 – 7 = 0
The dot product between two lists of equal length is computed by multiplying each member of the first list with the corresponding element of the second one and then summing all the results. More technically, if we have lists s = [s0, s1, s2, sn] and a = [a0, a1, a2, an] of equal length n, the dot product is calculated as follows:
Of course, we could immediately provide a to the verifier, and they could easily check that it is a valid solution, but that would violate the zero-knowledge assumption of not revealing the solution.
Let's start generating a different list w by creating the partial-sum list—that is, w[i] is equal to the partial dot product between s and a up to i. In the context of zero-knowledge proof systems, w is also called the witness. Following our example, we can compute w:
w = [1, 2, 7, 0]
Note that if a is a valid satisfying assignment, then w always ends with a 0.
To make the proof system work better, let's apply a small modification to the proof p we have built so far. In particular, we'll put the last item of the list w in the first position, so our previous w now becomes:
w = [0, 1, 2, 7]
Sweet! This list w has a very cool property:
|s[i]| = |w[i + 1] – w[i]|
You can check the validity of this statement yourself:
|s[0]| = |w[0 + 1] – w[0]| = |w[1] – w[0]| = |1 – 0| = |1| = 1
|s[1]| = |w[1 + 1] – w[1]| = |w[2] – w[1]| = |2 – 1| = |1| = 1
|s[2]| = |w[2 + 1] – w[2]| = |w[3] – w[2]| = |7 – 2| = |5| = 5
|s[3]| = |w[3 + 1] – w[3]| = |w[4] – w[3]| = |w[0] – w[3]| = |0 – 7| = |–7| = 7
Note that to compute s[3], we would need to access w[4], which does not exist since w has only four items (and we start indexing from zero). Still, there is a very easy solution: you just need to go back to the first element of w as if w were cyclical.
A verifier could ask for two consecutive elements of w and check that the previous relation holds. Remember that the verifier has access to s because that is publicly available; it represents the input of this problem but has no access to a, the satisfying assignment, which represents the solution. If the equation holds, it means the prover knows a satisfying assignment a for this problem.
Issues
What we have built so far is a very naive proof system. In fact, there are three big issues with it:
- Previously, we said that once the verifier has asked for two consecutive elements of
wand the equation holds true, then they have verified that the prover knows a solution to this problem. This is not true. With only one query, the verifier cannot be completely sure; they have to make several queries of consecutive elements ofwbefore being sure of it with a really high probability. - While it's true that the verifier can indeed verify that the prover has a solution to the problem, this proof system relies on the integrity of the prover. What if the prover is malevolent and lies? When the verifier asks for two consecutive elements of
w, the prover could provide two random numbers that still satisfy the equation. - Furthermore, this proof system is not zero knowledge. In fact, by asking for consecutive elements of
w, the verifier gets to know a lot about the satisfying assignmenta. The verifier knows howwhas been constructed, so the more they know aboutw, the more they know about the solutiona.
Let's address these issues now and try to build a better proof system.
Zero Knowledge
Let's add zero knowledge to the system. The main issue with the protocol we've built so far is that we send the real values of w to the verifier, and that lets the verifier understand a lot of information about a. To see this in practice, let's do two simple steps of interaction between prover and verifier.
The verifier asks for w[1] and w[2] and checks that |w[2] – w[1]| = |s[1]|, so the prover provides w[1] = 1 and w[2] = 2, and the verifier can confirm that the equation holds true:
Then, the verifier asks for another query: w[2] and w[3]. The prover provides w[2] = 2 and w[3] = 7, and the verifier checks the equation:
With these two interactions, the verifier gets to know three elements of w:
Since the verifier already knows s = [1, 1, 5, 7] and knows how w has been computed, they can derive that the initial part of the solution a is equal to [1, 1, 1] because that's the only way to get w[3] = 7, w[2] = 2, and w[1] = 1.
We need to find a way to mask the real values of w but still manage to satisfy the relation between the new w and the input list s. To achieve that, we need to add some level of randomness in a very specific way.
First, instead of a, we flip a coin, and if it's heads, we leave it as it is; otherwise, we change the signs for all elements, so all 1s becomes –1s, and vice versa. Note that this change doesn't break the three main properties of the satisfying assignment a for the problem.
Then, we get a new random integer value r. We calculate w in the same way as before, but we add r to every element of it. Even this change doesn't break the key relation between s and w.
Every time the verifier asks for a new query, we have to flip a coin and compute a different random value r. This way, while the verifier is still able to verify the validity of the equation, they are not able to understand anything about a because all w values will look random to them.
Let's do a small demonstration. Remember, the prover (us, in this example) starts with both s and a:
Now, the verifier asks for w[1] and w[2] to check that |w[2] – w[1]| = |s[1]|.
First, we need to flip a coin to eventually change all values of a. It's tails, so we need to flip all signs, and a becomes:
Then, we compute a random value r = 4. We calculate w and add r to each element:
And we provide and .
The verifier can still confirm the validity of the equation:
Now, the verifier runs another query, asking for w[2] and w[3]. Again, we need to flip a coin to eventually change all values of a. This time, it's heads, so we don't change signs:
Then, we compute a random value r = 1. We calculate w and add r to each element:
And we provide and . The verifier can still confirm the validity of the equation:
But now, the verifier cannot understand much about the satisfying assignment a. In fact, they now have the following information:
The w values on the different queries look random to them, and they are not able to reconstruct the assignment a.
Nice! We managed to add zero knowledge to the proof system. Let's now address a malevolent prover.
Prover Commitment
The problem we need to address is that the prover can lie to the verifier, providing completely made-up numbers instead of the real values of the computed witness w. This is really bad because the prover would be able to provide a valid proof of a false statement—that is, even though the prover doesn't actually have a satisfying assignment a, they are able to potentially trick the verifier into believing that they do.
We need to find a way to make sure the prover cannot lie without being caught. Essentially, we need the prover to do a commitment of all w values before providing them to the verifier.
This is where Merkle trees help us again. We introduced them in Chapter 14, so we won't go into much detail on how they work here.
Let's do a new example to see the new construction in practice. We (the prover) have:
We flip a coin, and it's heads, so we don't need to change all the signs of the assignment a. We then compute w as the dot product between a and s (with a swap between the first and last elements):
We compute a random value r = 8 and we add it to each element of w:
Now we need to commit to all values of w′ and send the commitment to the verifier so that we ensure that if we ever cheat by providing fake values of w′, then it's trivial to spot it. Figure 17-2 shows the Merkle tree built using all w′ values as leaves.
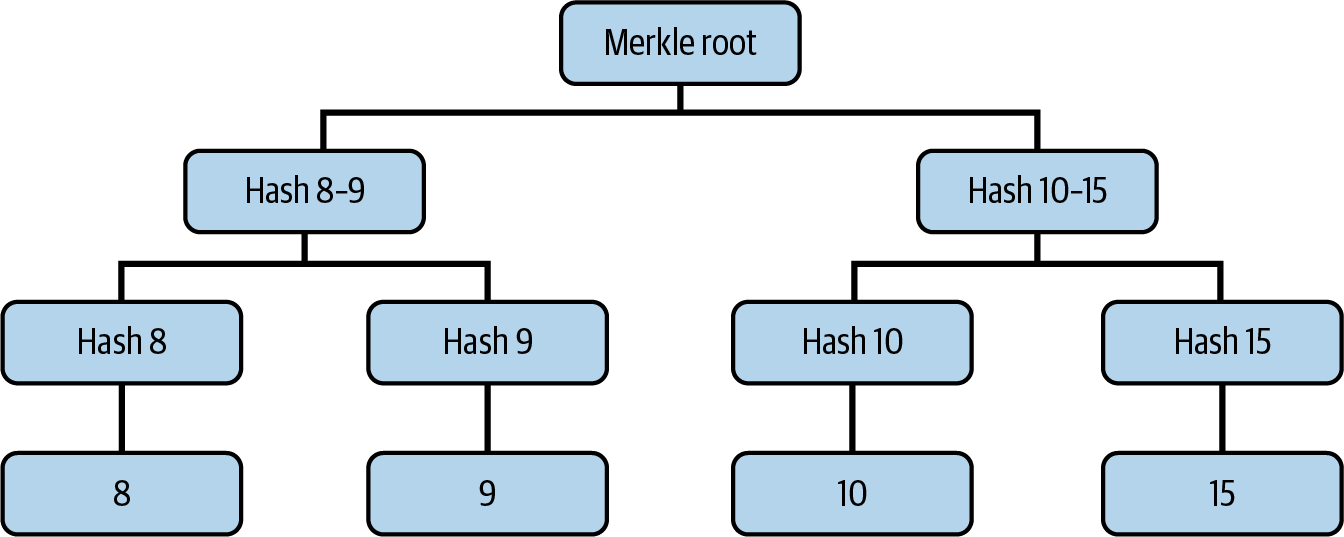
Figure 17-2. Merkle tree built using w′ values
The Merkle root is the final commitment that is sent to the verifier.
At this point, the verifier starts asking for the first query: and . We can provide and to the verifier, and they can check:
Now, the verifier needs to make sure that we didn't cheat, so they also ask the prover for the verification path, which contains all the data they need to re-create the Merkle tree on its own in order to check that the Merkle root is the same as the commitment we sent. If that's the case, then they are sure we didn't cheat; otherwise, they immediately know we did cheat.
Specifically, the verification path for this query contains:
- Hash 8
- Hash 15
This way, the verifier can re-create the Merkle tree up to the root and verify the commitment. So, we send hash 8 and hash 15 to the verifier, the verifier checks the validity of the commitment, and finally, this query is over.
You may have spotted a new issue, though. In fact, due to the verification-path requirement, we ended up sending some additional data about w′: hash 8 and hash 15. While it's true that it should be computationally infeasible to revert a hash function—that is, to get the actual values 8 and 15 from their hashes—a malevolent verifier could try a brute-force attack and may succeed in finding out a part of the Merkle tree that we didn't intend to reveal. Luckily for us, there is a simple and nice tweak that solves this problem.
Adding Randomness to the Commitment
The idea is analogous to what we have previously done to add the zero-knowledge property to our proof system. This time, we need to add randomness to the commitment so that we don't reveal any information about w (or w′) in the verification path.
When we create the Merkle tree, instead of using only the hash of the exact value of each element of w′ for the leaves of the tree, we add a random string that we won't provide to the verifier. Figure 17-3 shows the new Merkle tree built with this new methodology.
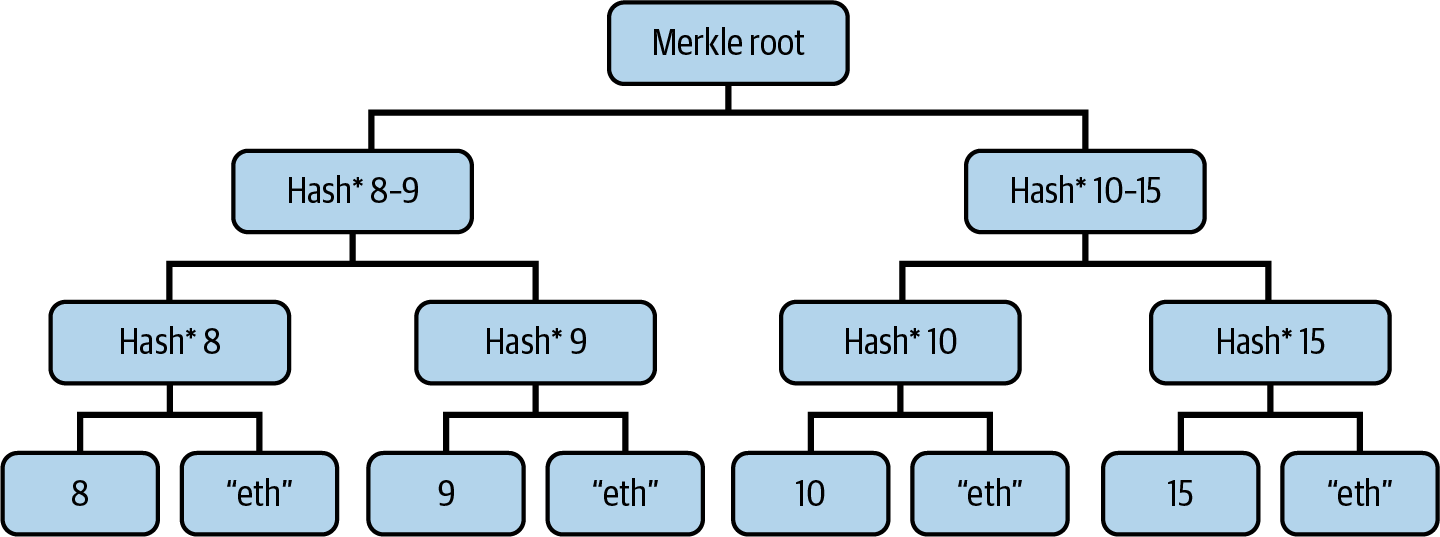
Figure 17-3. Merkle tree with added randomness for zero-knowledge property
For this example, we used the string "eth" to mask each item of the witness w′. Note that if you don't have this secret string, it's impossible to decode the actual values. Now, when we send hash* 8 and hash* 15 to the verifier in the verification path, they really have no clue about the concrete w′ values behind the hash. Even if they try to brute-force attack, they don't know the secret string we used to hide the w′ items even further.
Conclusion? Or Not…
We did it! We managed to create a (very naive and basic) zero-knowledge proof system for our initial partition problem!
You may still think: "That's a great proof system, but it still requires a lot of interaction between the prover and the verifier. They need to be online at the same time to make sure the protocol succeeds. Is there a way to fix it and transform this interactive zero-knowledge proof system into a noninteractive zero-knowledge proof system?"
And you would be so right. It's true that our system requires interaction between prover and verifier to work correctly, and that's really annoying for most use cases. We are lucky again (so much luck here, eh?). There is a scientific paper that could help us.
Fiat-Shamir Heuristic
In 1986, two well-known cryptographers, Amos Fiat and Adi Shamir, published the paper "How to Prove Yourself: Practical Solutions to Identification and Signature Problems", in which they invented the transformation protocol that is still widely used today and has their name: the Fiat-Shamir heuristic or transformation.
Note
Adi Shamir is a real legend in cryptography: he's the S in the RSA algorithm, one of the first and most widely used public key cryptosystems. Amos Fiat was his colleague at the Weizmann Institute of Science in Israel.
The Fiat-Shamir heuristic is a protocol that can transform an interactive zero-knowledge proof system into a noninteractive one by replacing the verifier's random challenges with a cryptographic hash function.
If you think about what the verifier has to do in the system we have built so far, you will notice that it's essentially giving the prover some random numbers—the queries—that the prover has to use to generate the correspondent proof.
Remember, we used to say, "Now the verifier asks for w[1] and w[2]." This can be translated into the verifier giving the prover the numbers 1 and 2 to create the proof for w[1] and w[2].
We can summarize the original interactive protocol in the following way, skipping the part where the prover creates the witness w and tweaks it into w′:
- The prover generates a commitment to
w′and sends it to the verifier. - The verifier sends a random challenge—a query.
- The prover sends a response to the challenge—a proof.
- The verifier verifies the validity of the proof. This process is repeated for every different query the verifier asks. And it all works fine because the prover doesn't know in advance which queries the verifier is going to ask—they're random to the prover. So if we find a way to make the prover itself generate all the queries in a random but predictable way, we are able to transform the entire process into a noninteractive protocol.
In their 1986 paper, Fiat and Shamir propose using a hash function to act as a "random oracle" that simulates the verifier's random challenges. Let's do a quick example with only two rounds of the protocol.
In the first round:
-
The prover generates a commitment.
-
The prover takes the commitment and the public inputs of the problem, and concatenates and hashes them. The result is going to be the first challenge:
challenge = hash(commitment || public inputs) -
The prover computes a response to the challenge—a proof.
In the second round:
-
The prover generates a new commitment.
-
The prover takes the new commitment and everything computed so far in the protocol (the old commitment, the proof, and the public inputs), and concatenates and hashes them. The result is going to be the new challenge:
new challenge = hash(commitment || proof || new_commitment || public inputs) -
The prover computes a response to the new challenge—a new proof.
At this point, the prover can send the entire transcript of the protocol to the verifier. The verifier needs to:
- Make sure that all challenges have been computed correctly by using the hash function and all valid inputs. This is to ensure that the prover didn't try to cheat with made-up challenges.
- Verify the validity of all the proofs in the same way they did before in the interactive protocol. This is to ensure that the prover actually knows a solution to the initial problem.
Figure 17-4 shows the process of the verifier making sure that the challenge has been computed correctly before verifying the validity of the zero-knowledge proof.
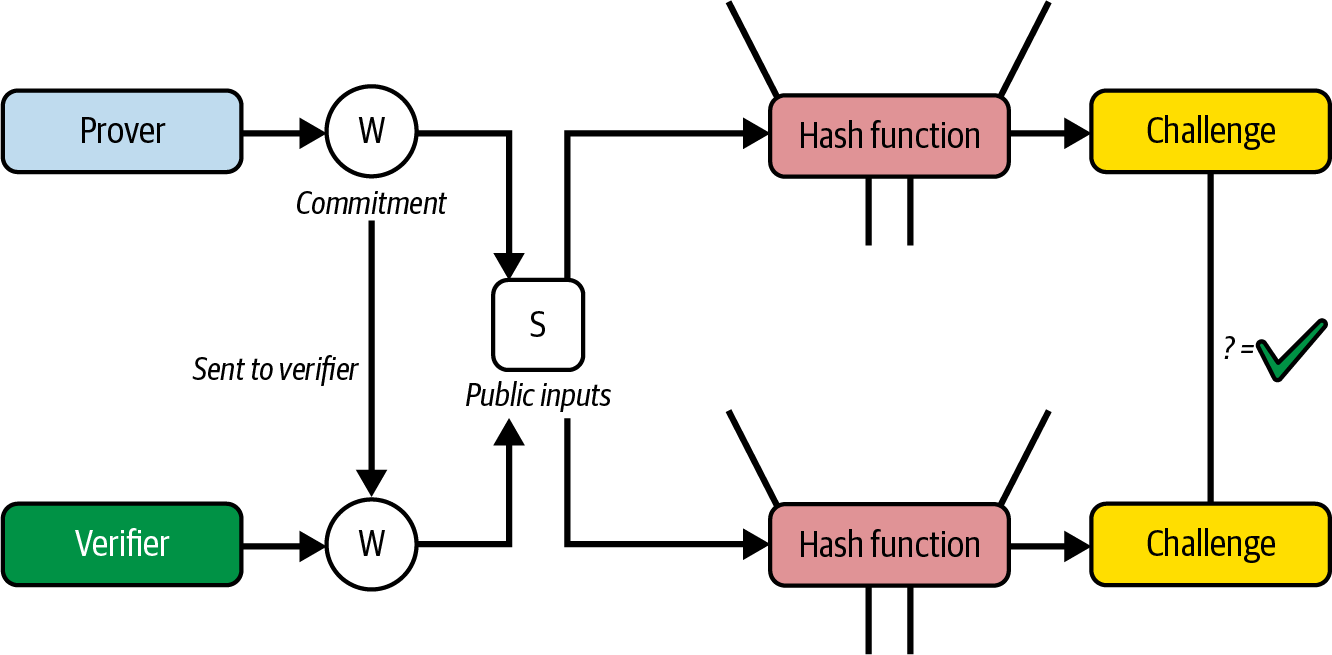
Figure 17-4. Fiat-Shamir heuristic makes the protocol noninteractive
And that's it! Thanks to the Fiat-Shamir heuristic, we now have a noninteractive zero-knowledge proof system. The cool feature that comes for free is that a prover is now able to generate a valid proof that anyone can verify. So we need only one honest party that verifies the proof to detect if the prover is trying to cheat or not.
Conclusion?
In this section, we built our first noninteractive zero-knowledge proof system for the partition problem. Modern zero-knowledge architectures are much more complex, and this book is definitely not going to explain all of that (even though you can find some very good papers at the end of the chapter for further reading). Still, what we've discussed thus far is the basis of all new zero-knowledge technology. If you understand that, you can fall into the zero-knowledge rabbit hole and start exploring all the nitty-gritty details behind it.
In the next section, we'll look at two of the most widely used real frameworks for building a zero-knowledge proof system: SNARK and STARK.
SNARK Versus STARK
Previously, we were able to create a zero-knowledge proof system for our initial partition problem. That's a good start. Now, what if we want to create a zero-knowledge proof system for a completely different computation? Can we reuse the same architecture that we built before for the partition problem?
It turns out that we can't: the commitment w and its properties—for example, |s[i]| = |w[i+1] – w[i]|—are too specific to the partition problem to be applied to other problems. However, this isn't a big drawback: we can use what we learned from building this zero-knowledge proof system to develop a more general approach.
And here's where SNARK comes onto the scene. As we already discussed in "History", SNARK was introduced in 2011 in the BIT+11 paper as a general framework for building zero-knowledge proofs for arbitrary computations. Only two years later, the Pinocchio paper created the first implementation that was usable in real-world applications.
SNARK systems rely on a cryptographic secret called trusted setup to work in a noninteractive way. You can see it as a common knowledge base shared with all the participants of a cryptographic protocol: a sort of initialization phase where you need to generate some secrets and use them to compute some other values—proving and verification keys—that are going to be needed for the correct execution of the SNARK protocol.
Usually, the trusted setup is obtained through the use of multiparty computation: lots of actors each generate a different secret (also called toxic waste), compute the proving and verification keys, and delete their initial secrets. Then, those keys are added together to obtain two final keys that will be used in the SNARK protocol. The main benefit of this is that you need only a single benevolent entity to delete its toxic waste to be sure that anyone cannot cheat and the trusted setup has been generated in a tamper-proof way. In Chapter 4, we covered this in the discussion on KZG commitments.
Even though SNARK protocols work perfectly fine, the 1-of-N trust assumption of the trusted setup, together with the difficulty of creating a very resilient initial ceremony to generate the final public keys, has always created lots of discussion and brought several researchers and companies to look into trustless zero-knowledge proof systems that could work completely without it. Furthermore, SNARK systems rely on elliptic curve cryptography that is not quantum resistant, another critical aspect that people pointed out.
In 2018, a paper written by Eli Ben-Sasson, Iddo Bentov, Yinon Horesh, and Michael Riabzev called "Scalable, Transparent, and Post-Quantum Secure Computational Integrity" introduced a new trustless framework for building general zero-knowledge proof systems: zk-STARK. STARK stands for "scalable transparent argument of knowledge." In particular, transparent refers to the groundbreaking property of not needing a trusted setup. It also relies on collision-resistant hash functions instead of elliptic curve cryptography, making it even quantum resistant.
These advantages explain why most people now consider STARK to be the most modern zero-knowledge proof system. However, SNARKs are not an obsolete technology. They do have some advantages in certain contexts, mostly in the proof size, which can be fundamental in bandwidth-constrained environments such as blockchains. Moreover, several mixed approaches have been developed that try to take the best from both worlds.
Zk-EVM and zk-VM
Now that we've done a technical deep dive into how zero-knowledge proof systems work, we can finally go back to Ethereum and see how the tech has evolved in recent years.
We've already explained how we can use zero-knowledge proof systems to improve Ethereum—that is, prove the EVM execution of a block so that full nodes don't have to reexecute all transactions included into that block to trustlessly update their states. Instead, they can just verify a zero-knowledge proof, and if it's valid, they know the new state has been computed correctly. We also saw a basic example of how to create a zero-knowledge proof system for a very specific computation—the partition problem—and then we introduced SNARK and STARK frameworks, which let us generalize the architecture and apply it to any arbitrary computation. So we can immediately wonder: can we use a SNARK or STARK zero-knowledge proof system to correctly prove the EVM block execution? Yes, we definitely can, but there are a couple of choices we have to make.
In the partition-problem example, we had to slightly transform the initial proposition—that is, whether you can divide a set of integers into two subsets so that the sum of the numbers in the two subsets is equal—into something that was easier to prove with the system that we later built—that is, we added the satisfying assignment a and three constraints that it must satisfy to be valid. The transformation is necessary in order to be able to tackle the problem in a mathematical way. And it applies to SNARK and STARK frameworks.
In fact, even though it's true that you can zero-knowledge prove any arbitrary computation using a SNARK or STARK framework, you first need to transform the computation into a form that the framework is able to correctly digest and process, usually called a circuit. It turns out that's a very hard task. In particular, it's really error prone to transform a complex computation such as the EVM state transition function into a zero-knowledge circuit, and it's also difficult to debug if there are any errors or problems. If the circuit is not correct or there are bugs, then you cannot trust the zero-knowledge proof that is later generated because it doesn't reflect the actual computation that has been done, so it could even be possible to generate a valid zero-knowledge proof for a fake statement—that is, saying that the new EVM state is "state1" while the correct one should be "state2."
An EVM implementation that also includes a zero-knowledge proof-generation system is called a zk-EVM. You can find a concrete zk-EVM in the ZKsync repository.
Initially, every project that wanted to build a ZK rollup had to tackle the hard work of creating the correct zero-knowledge circuit for the EVM state transition function. This is why at the time of writing (June 2025), we have far more optimistic rollups than ZK rollups. But things are changing really fast, thanks to the arrival of zk-VMs. Zk-VMs drastically change the perspective of building a ZK rollup and, more generally, a zero-knowledge proof system for the EVM state transition function. The idea is quite straightforward: instead of having to create a custom circuit for every different computation in order to then apply a SNARK or STARK framework, what if we could create a universal circuit that can be used for all kinds of computations? It would be a sort of general-purpose zero-knowledge computer that could handle any arbitrary computation. This layer of abstraction is really powerful: "one circuit to rule them all."
This way, you only need to focus on the computation you want to prove, and the zk-VM handles all the hard work of generating a proof. The most famous zk-VMs right now are SP1 and RISC Zero.
Figure 17-5 offers a streamlined visualization that captures the core elements of both zk-EVM and zk-VM frameworks.
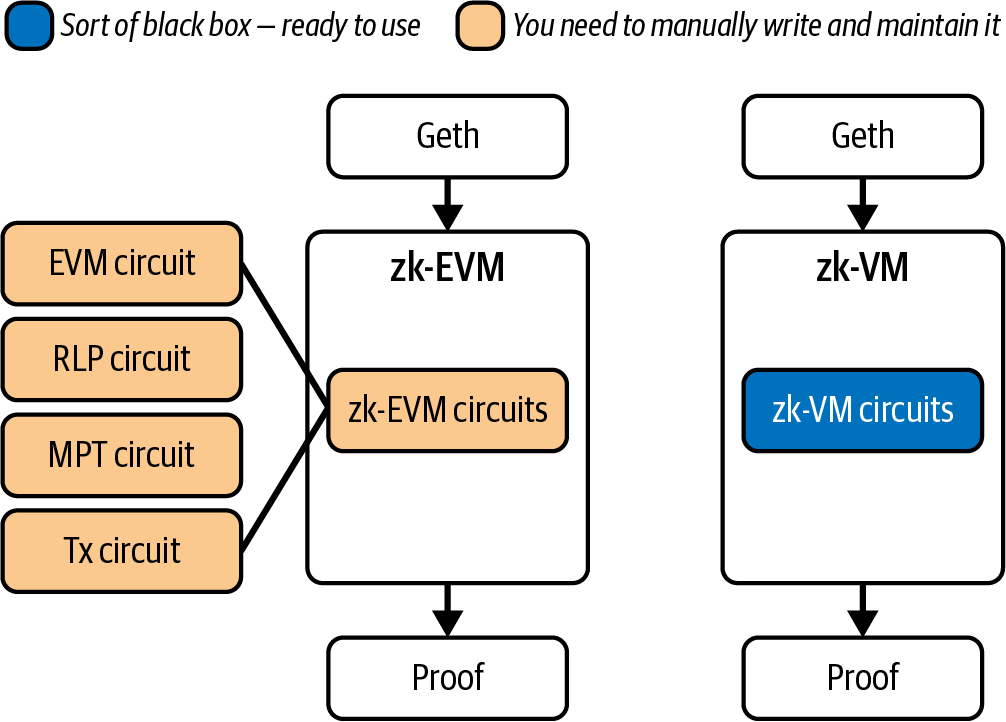
Figure 17-5. Comparison of zk-EVM and zk-VM frameworks
Conclusion
In this final chapter, we explored the basics of zero-knowledge technology: from its invention in 1985 to the groundbreaking innovations of the Bit+11 and Pinocchio papers that truly brought it to real-world applications, particularly in the blockchain world. We used the small partition problem as an example to gain intuition on how these complex systems work under the hood, and we later examined more generalized approaches, such as SNARK and STARK frameworks, that make it possible to apply a standard methodology to build a zero-knowledge proof system for any arbitrary computation. Finally, we introduced a very recent development: zk-VMs, which are quickly revolutionizing the sector thanks to their significant advantage of having a single circuit capable of handling arbitrary computations, which eliminates the need for developers to spend time creating custom circuits tied to specific computations they want to prove.
The future of Ethereum will undoubtedly intersect with zero-knowledge technology, both at the L2 level and directly on the L1 level. The concrete solution that will ultimately prevail remains unknown; perhaps it will be a combination of different approaches to ensure greater resilience against bugs or failures. Only time will tell...
For further reading on this subject, please see the following:
- A simple example
- "You Could Have Invented SNARKs" by Ethan Buchman
- "Why and How zk-SNARK Works: Definitive Explanation" by Maksym Petkus
- The RareSkills Book of Zero Knowledge